After a hard day at work, on weekends and holidays, or when the weather is bad outside, the best place to relax is the sofa in the living room. The TV becomes his constant partner, and the more channels it receives, the better, which is why many people install satellite dishes. For a small fee, you can watch hundreds of channels and get a high quality signal. Only for this you need to be able to choose the right satellite dish, install and configure it. Let's talk about this.
How does a satellite dish work?
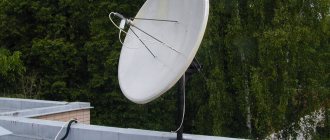
A satellite dish, as this kind of antenna is popularly called, receives signals from space satellites. The distance between them and our antennas is about 36,000 km, so you can imagine how enormous the signal loss will be. In order to ultimately get a high-quality picture on the TV screen, you need to concentrate the incoming signal as much as possible. This is why a curved antenna surface is needed. It reflects the waves arriving at it from the satellite and directs them all to one point - the focus.
Satellite dishes are called dishes due to their shape. The larger the diameter of the antenna, the more waves it can catch and reflect. The focus point can be in the center of the plate or shifted down.
Types of satellite dishes
The main difference between all plates is the location of the focus point. The following types of antennas are used to receive satellite television :
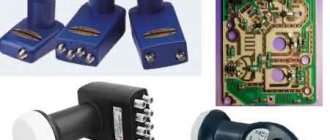
- direct focus . In this case, the focus, i.e. converter on metal rods, attached directly to the center of the plate. It allows you to amplify the signal well, but has a number of disadvantages. Firstly, it must be mounted at an obtuse angle, because in winter snow, leaves, and dirt can accumulate in the dish, reducing the area of the reflective surface and worsening the signal. Secondly, the rods and the converter itself cast a shadow on the plate, also taking away part of the usable area for signal reception. However, such dishes receive signals well from distant satellites, but it is better to take large diameter models - from 130 cm;
- offset. The focusing point is located at the bottom of the dish, and the antenna itself can even be placed vertically. Such products receive signals worse, but they are easier to install and do not accumulate debris and snow, and the converter does not cast a shadow on the surface, which is why they are used more and more often in everyday life;
- toroidal. A more modern type of antenna, which is equipped with two reflectors. The design feature is double wave reflection. First they hit the surface of a large plate, from which they are reflected and fall on a small bowl. The dish receives signals from several satellites (up to 16), providing the user with maximum comfort. These plates are more expensive than others.
Other types of dishes are very rarely used to receive satellite television signals.
General characteristics
A satellite dish for a TV is the first link in the entire home satellite installation. The choice of her model deserves your attention. A properly selected design will last over ten years. The exception may be rare atmospheric conditions such as tornadoes and storms.
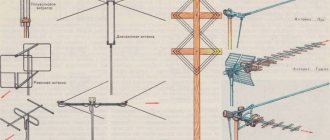
Despite their apparent external similarity, satellite antennas have a lot of design differences. Not all devices for receiving communications from a satellite are round and point straight towards the sky. There are complex array and multivibrator antennas that have different radiation patterns. For which a high noise level is allowed, because they perform no less important functions than receiving television programs.
Material of manufacture
The main task of the dish surface is to reflect waves received from the satellite, but the antenna will always be outdoors, so it must be resistant to all negative influences of the external environment. The following materials are used to make satellite dishes:
- aluminum - the most interesting option. The material is lightweight and resistant to corrosion. Due to their light weight, such dishes have poor resistance to winds and mechanical damage, therefore, to prevent the antenna from being blown away, reinforced mounts must be used;
- steel. Such a plate will cost less than an aluminum one, but it weighs more, which will complicate installation. Steel products are susceptible to corrosion, so pay attention to the quality of the protective layer;
- plastic plates with metal coating appeared not so long ago, but have not yet taken root. The main advantage is low weight, hence the ease of installation. The disadvantages include high price, low durability and poor performance. Moreover, in winter snow sticks well to plastic;
- worth highlighting separately mesh metal antennas. They are designed for installation at high altitudes, as well as in regions with frequent and strong winds. Numerous slots reduce windage, so the antenna will not be carried away. The feature of the dish does not affect the quality of the signal in any way. The downside is the higher cost compared to analogues.
Increasing signal level by turning the converter
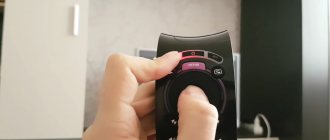
Enhancing the signal quality is also possible by rotating the converter. Initially, it is moved clockwise, and then in the opposite direction. In this case, you need to carefully monitor the position at which the signal level has increased. The converter can be placed against the satellite dish mirror if the mount is secure. As you can see, installing the antenna yourself is not difficult, but setting it up can be difficult.
Antenna Position Settings
This is interesting! Easily connect your phone to your TV: 4 visual tricks
Plate diameter
The larger the dish, the more waves it will receive and reflect, and the better the signal will be. The diameter of the dish is especially important when it comes to installing an antenna in areas with problematic signal. If you prioritize aesthetics and take a smaller plate, you may not achieve the desired result.
The diameter of the antenna varies widely - from 40 to 300 cm, but the most popular have become dishes with a diameter of 80-90 cm , with which high-rise buildings in any city in the country are literally plastered. Owners of private houses usually choose plates with a diameter of 120-130 cm.
An antenna with a small diameter is cheaper, weighs less, looks neater, is easier to install, does not require reinforced fasteners and does not block the rays of the sun. But such models will be appropriate if you are going to place the dish in an area with a good signal. The smaller the diameter, the more difficult it will be to catch the signal, and the more susceptible it will be to weather conditions. Large plates do not have these disadvantages, but they are more difficult to install, bulky and have a higher price.
When choosing the diameter of a satellite dish, be guided by the features of the area where the dish will be installed. If there are difficulties, it is better to consult with specialists who will advise you.
Connecting the system
Connecting the system involves performing a number of actions and following the rules:
- Connecting three converters and a disk using three cables;
- The disc must be protected from moisture. In this case, it is undesirable to use insulating tape, since it is not capable of providing reliable protection in this case. It is better to use heat-shrink tubing, as it will fit tightly to the cable as a result of compression.
- The disc is connected to the tuner by screwing it on.
This is interesting! How to connect speakers to a TV: tips and video instructions
Suspension type
Another technical point that is important to pay attention to is the type of suspension:
- The azimuth-angle suspension allows you to configure the antenna to receive a signal from a specific satellite. If you want to receive a signal from another satellite, you will have to completely reconfigure the dish;
- with the polar type of suspension, it has a special lever that allows you to quickly switch from one satellite to another. This lever operates on an electric drive.
Assembling the antenna, connecting the cable to the converter and switch.
THE CABLE MUST BE CONNECTED WITH THE RECEIVER TURNED OFF. A short circuit in the cable may damage the receiver.
We attach two heads using multifeeds in an approximate position (as in the picture).
We attach the head that will receive Amos to the left of the central head (when viewed from the back of the antenna) at about a distance of 7 cm and a little higher, then on the right the head that will receive Hot Bird, it will be about 3 centimeters from the central head and a little lower.
Antenna installation nuances
Most buyers prefer not to bother and entrust the installation and configuration of the satellite dish to specialists. This is a guarantee that everything will be done quickly and correctly. If you have time, certain skills and the desire to work with your hands, and even save a little, then you can install the satellite dish yourself. In general terms, the installation principle looks like this:
- understand which side the dish will be on and which satellite it will be tuned to. There are many satellites around the Earth, their positions are precisely known and do not change. There are services on the Internet that display which satellites are hovering over a specific area. At the end of the name, as a rule, there is something like 36E or 9W - this is the longitude above which the satellite is located. Choose a place where there is no shadow or other interference. There are special programs that will help calculate the antenna tilt angle depending on the coordinates of the area and the selected satellite. You can use the compass and azimuth information for a specific satellite. On the ground, all that remains is to determine the north, find the given azimuth and point the dish in the desired direction;
- Before fixing the antenna, it is better to check the presence of a signal;
- First, the bracket is mounted. To do this, holes are made for anchors on the load-bearing surface using a hammer drill. The size of the latter depends on the weight of the plate and the type of supporting material. If the walls are wooden, then it is important to attach the bracket to a beam or log, but not to the sheathing;
- The plate is mounted on a bracket. An offset antenna can be strictly vertical, but it is better to tilt it back by 1.5-2 cm; for a direct-focus dish, the tilt angle is 20-40 degrees.
Next, it remains to configure the antenna correctly.
Setting up MTS television equipment
The next step is setting up the television. The process differs depending on the equipment used.
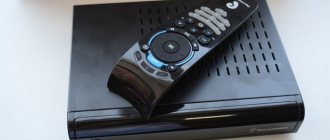
HD set-top box
To set up an HD set-top box, you need:
- Turn off the power, install a smart card in the special slot, and plug in the device.
- Turn on the receiver and TV.
- On the TV, select the desired connector (HDMI or AV) to see the image from the set-top box.
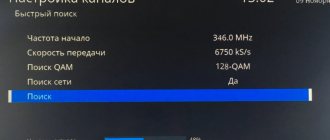
- Depending on the model of the set-top box, the user will immediately begin searching for channels or will see a setup wizard. In it he will select the menu language, picture size, set the parameters of the satellite, transponder and LNB. After making these changes, he will be able to tune the channels on the TV.
- After the search for TV channels is completed, the TV will begin broadcasting the first channel found.
Next, you will need to activate the equipment.
CAM module
To set up a TV with a CAM module, you need:
- Disconnect the TV from the network, connect the antenna cable.
- Install the TV module into the CL slot of the TV, place a smart card in the module.
- Connect the TV to the network and start it.
- Open settings, go to search for satellite DVB-S2 channels.
- Select the desired satellite or add a new one with the parameters indicated below.
- Search for channels.
When adding a new satellite, use the following parameters:
- Satellite – ABS-2;
- Modulation – DVB-S2, 8PSK;
- Home transponder frequency – 11920 MHz;
- Symbol rate – 45000 Msymbol/sec;
- LNB polarization – vertical;
- LNB local oscillator frequency – 10600 MHz;
- LNB power – on;
- Tone 22 KHz – active.
After completing the channel search, activate the equipment.
Interactive console
To set up an interactive set-top box, you need to insert a SIM card into a special slot, and then start the equipment. At the first start, the 3G signal is analyzed and initialized. This is a long process, you need to wait for it to finish.
Next, the subscriber will be asked to activate the equipment using one of the available methods. Regardless of the option chosen, the subscriber will have access to demo television viewing for 10 days.
Next, the user needs to create a profile. Here you can set an age limit and create a password to access channels.
The subscriber can set up and connect satellite TV from MTS independently if he does not want to pay additional money for installing the equipment. The guide above will help him with this. Once setup is complete, you will need to activate the equipment. After activation, the user will have 10 days of test viewing, during which the operator will have to receive the original contract.
Author of the site
Natalya Technical specialist, user support on mobile communications issues.
Write to the author
I will try to help every user in solving their problems, the most common ones you will find on the site. You can read about me here Natalya Timofeeva.
How to set up a satellite dish?
The sequence of actions here will be as follows:
- connect the receiver to the TV, turn it on and wait for the channel search stage;
- connect the antenna drive from the satellite dish to the receiver;
- on the other hand, this cable must be connected to the Sat Finder using F-connectors. This is an inexpensive device that will help you set up your plate correctly and quickly. It determines the signal strength at the output of the antenna converter, reporting this through an audio or arrow indication. To perform measurements, Sat Finder must be connected to the converter. If all is well, the sensitivity light should light up. Then all that remains is to rotate the sensitivity control until the device gives the appropriate signal. If it should be audible, then focus on crackling, but not squeaking;
- You need to carefully and slowly rotate the plate left and right. Several beeps will be heard, stop in the position where the signal is stronger. By reducing the sensitivity of the Sat Finder, you need to select a more accurate position of the dish in the horizontal plane. Then you can tilt the plate slightly and check whether the signal has increased. With such careful movements, the position with the strongest signal is selected;
- Follow the instructions for the receiver to complete the channel search. If everything is done correctly, a long list of available channels will be visible;
- If you are successful, all that remains is to finally fix the plate. If few channels are found, or the signal is very bad, then you will have to adjust the position of the dish. It is more convenient to work together;
- after fixing the dish, you need to disconnect the wire leading from the receiver to the Sat Finder and connect it to the converter on the antenna;
- register with the operator, if required;
- Do not throw away the Sat Finder device. In the future, it may be needed to reconfigure the antenna if it moves a little due to wind and precipitation.
If any of the points makes you doubt the ability to do everything yourself, it is better not to waste time, not to put the equipment at risk, but to immediately call specialists. offers residents of Yekaterinburg different diameters. It is possible to order professional installation and configuration.
Satellite television has many advantages over digital and cable. Digital, for example, will be completely free for you, but you will only be able to catch a small number of channels, and the further you are from the TV tower, the worse the picture quality will be. Cable television has high picture quality and a sufficient number of channels, but is expensive and limited to the area where the cable can be laid. Satellite television will require an initial investment for the purchase and installation of a dish, but it allows you to do without communication with a TV tower, because the signal comes directly from the satellites. In addition, a huge number of channels are available to the user, and the subscription fee is not as high as in the case of cable TV.
Selecting a channel list
First of all, you need to decide which channels you would like to watch on your TV. You can view lists of channels broadcasting in Russian and Ukrainian on our website on the “Lists of channels without a subscription fee” page. This page lists only channels broadcast in the public domain or that can be opened using Biss keys, which are supported by any modern receiver. If you are not satisfied with the above lists of channels without a monthly fee, you can familiarize yourself with the lists of paid channels from the Ukrainian providers XTRA TV or Viasat, where the conditions for viewing them are clearly described.