Modern television devices are not just “boxes” with which a person switches channels. This is a smart technique that can be customized to suit specific needs.
For these purposes, manufacturers constantly release software add-ons that are installed after purchase. This requires firmware. How to flash a TV correctly is further in the article.
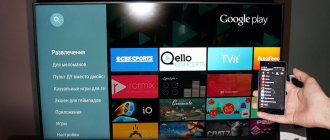
Methods for flashing TV firmware - via the Internet or from a USB flash drive
There are three ways to update the firmware on a TV with Smart TV or Android software installed on it:
- over the Internet automatically,
- or manually via a USB flash drive.
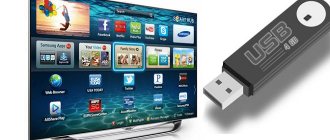
I don't recommend using online updates, as any unexpected action, like a power surge and turning off the TV, can cause it to turn into a big black brick. So prepare a USB flash drive to connect it to your smart TV. We will talk specifically about the method of flashing firmware via a USB connector, since it is more reliable and guarantees a successful software update in 99% of cases. It doesn’t have to be large - 1 GB is enough.
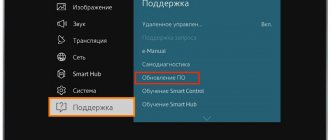
If automatic updating from USB does not start, use the remote control to go to Menu - Support;
KARONASTOP - herbal mixture for immunity
Today, the herbal mixture “KARONASTOP” is in great demand. The popularity is justified primarily by the fact that the collection contains 16 herbs, thanks to which the product is able to help maintain immunity, while widely affecting all internal organs. The fame of the healing effects of the drink spread quite quickly, its effectiveness was appreciated by many people, for whom it significantly improved their quality of life and provided significant assistance in supporting the immune system during viral and infectious diseases.
Now this is more important than ever!
- Supports immunity
- The collection contains 16 herbs
which will help restore immunity, provide a full charge of ALL necessary vitamins; will protect you from viruses!
- All plants are collected in the cleanest ecological places!
increases skin firmness and elasticity, eliminates and prevents stretch marks.
Go to the supplier's website
(function(w, d, n, s, t) { w = w || []; w.push(function() { Ya.Context.AdvManager.render({ blockId: 'RA-443800- 13', renderTo: 'yandex_rtb_R-A-443800-13', async: true }); }); t = d.getElementsByTagName('script'); s = d.createElement('script'); s.type = 'text/javascript'; s.src = '//an.yandex.ru/system/context.js'; s.async = true; t.parentNode.insertBefore(s, t); })(this, this. document, 'yandexContextAsyncCallbacks'); (adsbygoogle = window.adsbygoogle || []).push({});
(function(w, d, n, s, t) { w = w || []; w.push(function() { Ya.Context.AdvManager.render({ blockId: 'RA-443800-15', renderTo : 'yandex_rtb_R-A-443800-15', async: true }); }); t = d.getElementsByTagName('script'); s = d.createElement('script'); s.type = 'text/javascript '; s.src = '//an.yandex.ru/system/context.js'; s.async = true; t.parentNode.insertBefore(s, t); })(this, this.document, 'yandexContextAsyncCallbacks '); (function(w, d, n, s, t) { w = w || []; w.push(function() { Ya.Context.AdvManager.render({ blockId: 'RA-443800-11', renderTo : 'yandex_rtb_R-A-443800-11', async: true }); }); t = d.getElementsByTagName('script'); s = d.createElement('script'); s.type = 'text/javascript '; s.src = '//an.yandex.ru/system/context.js'; s.async = true; t.parentNode.insertBefore(s, t); })(this, this.document, 'yandexContextAsyncCallbacks '); (function(w, d, n, s, t) { w = w || []; w.push(function() { Ya.Context.AdvManager.render({ blockId: 'RA-443800-5', renderTo : 'yandex_rtb_R-A-443800-5', async: true }); }); t = d.getElementsByTagName('script'); s = d.createElement('script'); s.type = 'text/javascript '; s.src = '//an.yandex.ru/system/context.js'; s.async = true; t.parentNode.insertBefore(s, t); })(this, this.document, 'yandexContextAsyncCallbacks '); (adsbygoogle = window.adsbygoogle || []).push({}); (adsbygoogle = window.adsbygoogle || []).push({}); (function(w, d, n, s, t) { w = w || []; w.push(function() { Ya.Context.AdvManager.render({ blockId: 'RA-443800-7', renderTo : 'yandex_rtb_R-A-443800-7', async: true }); }); t = d.getElementsByTagName('script'); s = d.createElement('script'); s.type = 'text/javascript '; s.src = '//an.yandex.ru/system/context.js'; s.async = true; t.parentNode.insertBefore(s, t); })(this, this.document, 'yandexContextAsyncCallbacks '); (function (w) { function start() { w.removeEventListener('YaMarketAffiliateLoad', start); w.YaMarketAffiliate.createWidget({containerId:'Televizormarket',type:'offers',params:{clid:2372448,searchSelector: 'title',sovetnikPromo:false,searchInStock:true,themeId:2 },rotate:{marketToBeru:false } }); } w.YaMarketAffiliate ? start() : w.addEventListener('YaMarketAffiliateLoad', start); })( window);
In automatic mode
By following the sequence of simple steps, you can be sure that the performance of the TV will not be damaged. Haste and failure to follow step-by-step operations, on the contrary, will lead to small or large problems that can cause a complete technical breakdown. Therefore, if anything in the instructions below is not entirely clear, it is better to call a qualified technician.
There are only two ways to reflash the device yourself. The choice depends on whether there is access to the Internet through the TV, whether there are any traffic restrictions, and what the data transfer speed is. If access is available, speed and traffic allow, it is most convenient to use the automatic update method. The standard sequence of actions includes:
Connecting the Internet to the TV (whether it is Wi-Fi or a cable connection);
Entering the settings menu via the remote control (Menu – Settings);
Go to the support tab;
Selecting an item with a software update;
After launching, the user does not need to do anything, just wait for the process to complete. If everything went well, the TV firmware is completed, the TV itself will turn off and then turn on.
To be honest, I haven’t tried updating via a flash drive yet. But the firmware itself is on the Philips website. Just download it, copy it to a USB flash drive, and on the TV select USB as the source for the update. I always install new software via the Internet. The TV itself downloads the firmware and installs it. It is this method that I will write about below.
Updating Philips TV firmware (Android TV) via the Internet
Since we will be updating our Android TV via the Internet, the TV must be connected to the Internet via a network cable or via a Wi-Fi network.
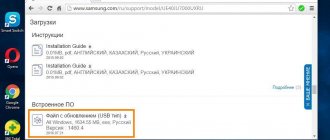
After making sure that the Internet on the TV is working (you can, for example, start a video on YouTube), open the Smart TV and scroll to the “Settings” section. There we select the item “Update software”
Next, select the “Search for updates” item.
And select “Internet” as the source.
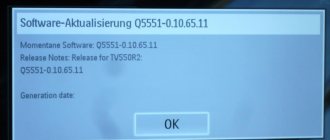
The TV will check and if it finds a new software update, it will offer to update. Click on the “Update” button.
Next, we accept the user agreement and wait for the TV to download the firmware. It weighs quite a bit, so it all depends on the speed of your Internet connection.
I haven't encountered such a problem before. I decided simply: I turned off the TV’s automatic shutdown in the settings. There is such an item “Auto shutdown timer”, set the value to 0.
Installing a system update on your Philips TV
Once the update is downloaded, the TV will prompt you to install it. Click on the “Start” button. The TV will reboot and the installation of the system update will begin. We wait.
Then, the TV will reboot again and the Android update (application optimization) will begin. We are waiting for this process to end.
After this, you can use the TV.
After update
It was very buggy for me right away, Android TV barely started. And then a blue screen appeared, I already thought it was a blue screen of death