MTS subscribers who prefer to periodically watch their favorite series, TV programs, news and talk shows have already appreciated the advantages of MTC TV for Smart TV. The option is provided on favorable terms and allows you to watch television content on 5 different devices with a paid subscription. We will tell you how to activate the service and what advantages it provides in the article below.
How to disable the service
Although the service has many advantages, it cannot be said with certainty that everyone will be satisfied with the cost and functionality. At some point you may need to disable the service. Fortunately, the operation does not take long. You only need to follow a few steps:
- Open the MTS TV application.
- Go to the "Services" section.
- Click the "Cancel Subscription" button next to your subscription.
- Confirm the action.
- Uninstall previously installed software.
After completing all instructions, access to the service will be limited, and money will no longer be debited from your card or personal account.
Source
Set for satellite TV
If you decide to connect satellite TV from mts, then you need to purchase an installation package, it should contain:
- satellite antenna;
- smart card (a plastic card with a chip containing the subscriber number);
- TV set-top box or CAM module (the choice in favor of one device or another depends on the model of your TV);
- TV cable;
- converter for receiving a signal;
Please note an important point: if your TV has a built-in receiver with a connector, then you do not need to additionally purchase and install a TV set-top box. In this case, it will be enough to purchase a CAM module to decode the signal and transmit it to the device.
Setting up digital television from MTS. LG 3D Cinema. Part 1.
In this manual, we will get acquainted with the process of setting up digital television from MTS using a TV module using the example of an LG TV.
Of course, it is possible to use the services of MTS adjusters. But, in order to save time, you can learn to do it yourself. In case of difficulties, all the necessary numbers can be found on the back of the box.
The cost of the module at prices as of September 2014 is 1,300 rubles.
In addition to the module itself, the box also contains a user manual.
Please note that if your TV is not equipped with a CI connector, you will have to use a set-top box.
Most new TV models are equipped with this connector. This module is convenient because it allows you to reduce the number of wires connected to the TV.
The model consists of a housing with a connector and a card inserted into it.
The image above shows which side the card should be inserted into the case. The card is inserted all the way.
Let's move on to the TV. We insert the module into the appropriate port.
You can see which side to insert the module in the instructions. The module fits into the port shallowly.
Now you can set up your TV.
Before you start setting up channels, you need to reset the factory settings. To do this, press the Home button on the remote control.
A menu will appear on the TV screen.
Here we select the SETTINGS section.
Next, go to the OPTIONS item.
Here we select Factory settings. Click OK. And in the window that appears, select the Yes button.
The TV will reboot. After the reboot you will have to perform the initial settings.
In the fourth step, when specifying the country, select Switzerland. If this country is not available, then choose Finland.
Television will definitely work in these countries. Perhaps it will work in other countries too.
Don't forget to set the exact time and date.
Continue reading on our website in the second part of the article.
Source
Setting up the remote control
By following the recommendations below, you can configure the remote control to control all the functionality of the TV:
- Place the TV and receiver control devices so that the infrared emitters are directed at one another.
- The universal remote control has special keys that can be “taught” various functions (increase, decrease, turn off the volume; switch TV channels; turn off and turn on the TV). To put it into training mode, click on the gear key and hold it pressed until the LED indicator lights up (constantly).
- While the training mode is activated (no more than 15 s in standby mode), press and immediately release one of the customizable keys. The LEDs should start flashing. After that, on the TV remote control, hold down the key whose functions you want to transfer to the universal remote control. If the command is successfully transmitted, the LEDs will blink 3 times and return to steady light. Other keys are “learned” in a similar way.
- After completing the procedure for setting up all the special keys on the universal remote control, click on any key to fix the result. The LEDs should go out.
- Make sure you can control your TV using the universal keys. If any of them do not work, repeat the above procedures again.
Tuning channels using the remote control
To configure TV channels using the remote control, follow this algorithm:
- Go to the receiver menu by pressing the “MENU” key.
- Go to the “Channel Editor” subsection.
- Go to the “Channel List” subsection.
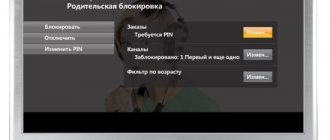
To block an MTS TV channel, do the following:
- Specify the TV channel, click on the yellow button.
- Enter your PIN code.
- A “lock” sign will appear next to the name of the TV channel. Now this channel can be viewed only after specifying the PIN code.
To add a TV channel to your favorites list:
- Specify the TV channel, click on the red button.
- A “heart” sign will appear next to the channel name.
- Now the channel is in the list of favorites.
You can also edit the list of MTS digital television channels:
- To view the editing list, click on the blue button.
- To remove a TV channel from the list, select it using the navigation keys, click on the red button, and confirm the action.
- To change the position of a channel in the list, select it. The green key moves the TV channel to the top, the yellow key to the bottom.
- To rename a channel, select it and click on the blue button. A virtual keyboard will appear. To type letters and numbers, use the navigation keys. You can delete characters with the yellow key, switch the language with the red key, and save changes with the green key.
Is it possible to replace the remote control?
It is possible to replace the remote control with another one if the existing one breaks down. You just need to choose the right new model. It is advisable to purchase a new device by comparing it with the existing remote control that came with the rest of the equipment.
Table of remote controls for the MTS digital set-top box:
| Model | Average cost, rub. | Compatible receiver models |
| 5304-MTS | 720 | Avit S2-3220, SkyWorth HSD11, EKT DCD 2204/2304/4404/3011 |
| DCD2304 | 350 | EKT DSD4614i, EKT DCD4404, EKT DCD2304 |
| DN300 | 330 | DC300A, DS701, DN300 |
| SML-482 | 390 | SML 482 Base, SML-292 HD Premium |
| WS-28A | 290 | EKT DCD3011 |
| ZTE-B700V7 | 490 | ZTE B700 V7 |
How to set up MTS television on an LG TV
Many new owners of MTS television prefer to use the services of the company’s technical specialists, but in order to save money, we would recommend learning how to configure the MTS satellite TV CAM module on an LG TV yourself. If any difficulties arise, you can always call support.
At the beginning of 2021, the equipment costs 2,990 rubles, and it includes a satellite dish and a CAM module (or TV set-top box). This is what the TV module looks like:
There is also a user manual in the box that will help you set everything up yourself. By the way, it is worth noting that if your TV does not have a CI input, such a module will not suit you and in this case you will need to use a set-top box. But, fortunately, most modern LG TVs have such a connector, and it is advisable to use the module in order to reduce the number of wires going to the TV.
The module itself is a flat rectangular box into which the card is inserted.
Most new TV models are equipped with this connector. This module is convenient because it allows you to reduce the number of wires connected to the TV.
The model consists of a housing with a connector and a card inserted into it.
After you have inserted the card into the module, it must be connected to the TV using the appropriate connector. The user manual says which side to do this on. Next, we move on to directly setting up MTS channels on the LG TV.
First, let's reset all settings to factory settings using the remote control. Press the Home button, a menu will appear on the screen in which you need to select the “Options” section.
Click on “Factory settings” and OK, then click Yes in the window to confirm, after which your TV will reboot.
After turning on the TV again, you should perform its initial setup, in which you need to select the Russian language, and then indicate Switzerland in the list of countries. If it is not there, select Finland. It is recommended to choose these particular devices, since digital television is guaranteed to work on them.
We also set up the clock, indicating the current time and date, and proceed to further actions.
In the first menu, select “Settings - Options - Auto search” and in the “Select TV connection” item, select Cable.
Then manually in the “Manual tuning” section enter the frequency 298,000 (298 MHz), speed 6875 and modulation 64. Close this window and click OK and “Run”.
A distinctive feature when setting up LG TVs for MTS satellite is the automatic channel update function, which must always be turned off, otherwise the channels you have configured will be constantly reset. To do this, go to “Digital cable settings - Auto update channels - OFF”.
Let's continue with the setup. Select “Customer service operator - Other operators.”
Nothing else needs to be changed for now. Click OK, then select “Run” in the window that appears.
As you can see, the search for analog and digital channels has begun. For now, you can leave the TV alone and go about your business for 10 minutes. In this case, do not press the “Next (Cable TV)” button under any circumstances, otherwise the search for channels will not reach the end.
This search may ultimately find a lot of channels, but you will only be able to watch the number that is specified in your contract with MTS TV.
The search can find a huge number of channels. As a result, on your TV you will be able to watch the number of channels that are specified in your contract with MTS. The remaining channels, unfortunately, will be encrypted.
If you want to watch encrypted channels, you will need to enter into an additional agreement with MTS or another company.
The remaining channels will be encrypted. To be able to watch them, you will need to enter into an additional agreement with MTS or another company.
When the channel search is completed, close this window using the appropriate button and go to the “Program Editor” section.
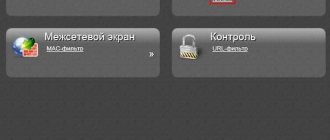
Here, using the blue button on your remote control, you need to mark the channels that you will not have access to.
To check the correct location of the CAM module in the TV port, you can go to the “CI Data” menu section.
If the module is inserted correctly, the text will be written in normal color. If you have positioned the module incorrectly, the line will be displayed in gray and will not be active, which can be noticed when switching menu lines with the remote control: the cursor cannot be stopped on this line.
This completes the setup of the MTS TV satellite on the LG TV. Enjoy watching!
Source
Step-by-step instructions for connecting an MTS set-top box
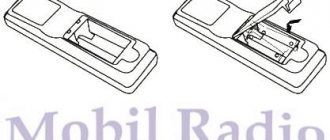
In the kit, along with the receiver and control device, the buyer receives “little finger” batteries, a power supply, and wires. Additional options worth noting include:
- pause and then watch a TV program from the place where it was paused;
- record television according to a schedule on a USB flash drive in order to watch the recorded content in the future;
- play audio, videos, photos from a flash drive (data on a flash drive can be recorded using a personal computer, laptop, or other similar device).
By following the algorithm below, you can connect the equipment to the TV yourself:
- Before connecting the receiver to the TV, make sure that the supplied wire is connected to the MTS operator. To do this, find MTS INFO among the TV channels. If you can’t find it, it means that the wire was connected to another provider; subsequent configuration does not make sense.
- Connect the receiver's output jacks to the TV's input ports. Make sure that the input jack to which you connect the device is marked “IN”.
- Connect the power adapter to the DC IN jack located on the rear of the receiver. Connect it to the mains.
- Turn on the TV, using the remote control, activate the mode for receiving a signal from the input connector to which the receiver is connected. Switch modes using the TV/VIDEO, TV IN, AV keys. The name of the port that you need to select using these keys is indicated next to the connector to which you connected the receiver. Usually it is labeled as AV1, Ext1, SCART.
If you connect equipment to a plasma, the output connectors may not be located on the TV itself, but on the receiver that controls the plasma panel. You can find where it is located by following the wires that come out of the TV.
Ports for connecting an MTS receiver can be located either on the back of the TV or on the front panel (under the cover that covers the keys). If other equipment is connected to all ports, use the SCART input.
In addition to the basic packages, you can access additional packages for an appropriate fee:
- "Match! Football" – live broadcasts, match replays, reviews, news content, interviews with football players.
- "Match! Premier” – broadcasts of all RPL games, Russian Cup, RPL friendly matches.
- “Amedia Premium” is a selection of the most interesting TV series filmed both in Russia and abroad.
- “Get in the movie mood!” – a selection of the best films, both classic and modern.
- “VIP” – premieres of foreign and domestic films, modern television series, educational programs about nature and sports.
- “Children’s” – cartoons and programs for children aged 1-12 years and their parents.
- “Kaleidoscope” is a selection of exciting TV shows for the whole family.
- Discovery is a channel for people interested in science, new inventions, and innovative technologies.
- “Adult” – erotica.
Also, MTS subscribers can connect certain channels to their liking:
- movies;
- music;
- High definition TV;
- entertainment content;
- scientific broadcasts;
- family channels;
- erotic content (it is recommended to block such channels so that your children cannot access them).
Setting up a TV to receive a MTS Digital TV signal: 4 comments
There are no timeframes for updating digital television software. there is no image and shows a connection error on many channels, requires changing the set-top box that supports the HD format
I would like to know everything about connecting MTS digital television and about Wi-Fi
I would like to know everything about connecting digital television, and everything about Wi-Fi
We bought an MTS TV, it’s impossible to install, they don’t pick up the phone. People buy the best tricolor, you won’t know any problems.
Source
Error codes for MTS set-top boxes
MTS receivers may display the following errors:
- E06-4. The SMART card is not installed correctly and the contacts are dirty. This error may also indicate that the card is faulty or belongs to another provider. Make sure the card is installed correctly, or carefully clean the contacts.
- E16-4. The error indicates that the funds in your subscriber account have been exhausted or that you have selected a TV channel to which you are not subscribed. Top up your balance or switch to a channel included in the package available to you.
- E33-4. The error indicates that the software installed on the device is out of date. Update the software version by going to the “System Settings” section and selecting “Software Update”.
- E120-4, E30-4, E19-4. The MTS receiver has been restarted and has not yet received the data used to decrypt TV channels. An error may also be displayed if the set-top box was turned off for an extended period of time (it was not used to watch MTS digital TV). Leave the device turned on for half an hour. It must be connected to a TV signal source (antenna).
Knowing how to connect and configure a digital set-top box from the MTS operator, you can easily use this modern device to watch television channels in high quality. There is no need to resort to the help of specialists; all the necessary procedures can be performed independently by any person, regardless of his knowledge in the field of technology. The main thing is to follow the step-by-step instructions given here.
Necessary equipment
To connect satellite TV you will need the following equipment:
- Antenna with a diameter of 0.6 or 0.9 m (this option is for weaker reception);
- MTS TV set-top box or CAM module (depending on the TV model);
- Smart card;
- Converter is a device that is mounted on the antenna feed and receives a signal from the transponder;
- TV or coaxial cable RG-6.
If your TV is equipped with a DVB-S2 receiver with a built-in CI/CI+ connector, then there is no need to install a set-top box. To do this, you need to use a CAM module, which will decode the signal and coordinate it with the television device.
A smart card is a plastic card with a built-in chip with an individual subscriber number. It is inserted into the set-top box (receiver) or CAM module.
Now you can call the contact center toll-free number 8 800 250 0890 (or 0877 - short number for mobile phones) and call a wizard who will perform the complete setup. Or start setting up the system on your own.
Main functions
Equipment capabilities:
- detailed image in high resolution (FHD, 4K). Cable operators do not work with this standard;
- You can watch TV simultaneously from 5 connected devices;
- more than 150 TV channels;
- the set-top box synchronizes not only with the TV, but also with a phone, computer, tablet;
- access to online content;
- You can connect to the Internet not only from the MTS provider.
These advantages, including minimal connection and maintenance costs, attract subscribers who switch to digital set-top boxes from satellite or cable television.
The MTS set-top box will provide a detailed image on the screen.
Services from MTS
There are several TV subscriptions, so a subscriber can choose TV channels for a family with different needs. It is also worth noting the ability to pause TV shows, rewind or watch archived recordings.
Basic MTS-TV packages:
- base. Includes more than 150 TV channels;
- entertaining. Comedy shows and series;
- cartoons. Option for children;
- Premier Match. Content about domestic football;
- cinema online. This package provides access to such services as “Megogo”, “iVi”, “START”, “Amediateka”. As a bonus, the subscriber receives 61 channels from the “Entertainment” and “Cartoons” package.
Tariffs can be combined. Moreover, each client, when connected, gets access to 20 free federal channels.
Owners' opinion
Connecting a Samsung TV to the Internet (or TV from any other manufacturer) allows you to fully unleash its potential. Thanks to this operation, it turns into a full-fledged home multimedia entertainment center. After implementing such a connection, the user is not strictly tied to TV shows, but can play entertainment content at his own discretion. This is the main advantage of such systems. Moreover, the source of content can be either a special application or various sites on the Internet.
The disadvantages include a slight complication of the setup procedure.
Sources
- https://TehnoPanorama.ru/smart-tv/mts-tv-smart-tv.html
- https://VyborTelevizora.ru/sovety/mts-tv-na-televizore
- https://ProSmartTV.ru/sputnikovoe-tv/kak-nastroit-mts.html
- https://zkd-smotret.ru/kabelnoe-iptv/prilozhenie-mts-tv-dlya-smart.html
- https://nastoysam.ru/televizory/kak-smotret-mts-tv-na-smart-televizorah
- https://RuTvStar.ru/o-tv/kak-smotret-mts-besplatno.html
- https://fintaxi.ru/kak-ustanovit-prilozhenie-mts-tv-na-televizore-lg/
- https://KakOperator.ru/lifehacks/kak-podklyuchit-mts-tv
- https://Otvet.tv/kabelnoe/prosmotr-mts-tv-na-smart-televizorah.html
- https://telecomer.ru/tehnologii/kody-dlya-kanalov-mts-tv.html
- https://TwNews.ru/kabel-tv/prilozhenie-mts-dlya-smart.html
- https://ProOperatorov.ru/options-mts/mts-tv/
- https://MySotoS.ru/operatory/mts/prilozhenie-mts-tv-2-0
- https://sputnikmts.ru/nastroyka/
- https://kslift.ru/nastroyka-mts-tv-na-samsung-smart-tv/
- https://MultZona.ru/kabelnoe/mts-tv-na-smart-lg.html
[collapse]
Where to write if there is a problem
In fact, calling a hotline is probably the fastest way to get answers and solve a problem. Of course, there is a way to contact the company through email and social networks, but this may take a while:
- Fill out the feedback form on the website at https://moskva.mts.ru/personal/feedback-fix.
After you ask a question, managers will answer you in a convenient way, which you noted in the feedback form: SMS, call, or email.
- Write to one of the official MTS social networks:
- VKontakte - https://vk.com/mts;
- Twitter - https://twitter.com/mts_news;
- Odnoklassniki - https://ok.ru/mts;
- Facebook - https://www.facebook.com.
Setup and Troubleshooting
- Installing and configuring Satellite TV is a technically complex task, so the best way to cope with this difficulty is to call a specialist who will do everything quickly and professionally. You can call a specialist at 8 800 250 0890 or 0877 from an MTS number. True, the exit will be paid and will cost about 2000 rubles;
- If you purchased a kit and need to register it, you must fill out a special form on the MTS website;
- If you still dare to do everything yourself, then a special video can help you, which contains a description and nuances, as well as instructions and a subscriber’s guide. You can watch the video and download the necessary information here. There is also a detailed guide on antenna installation and settings. You may need help from the Protractor and SatFinder applications; they can be downloaded from the AppStore or Play Market ;
- Instructions for manually setting up channels can be found here https://moskva.mts.ru/personal/podderzhka/sputnikovoe-tv/nastroyki/ruchnaya-nastroyka-kanalov;
- Subscribers can download the manual for returning to factory settings at https://moskva.mts.ru/personal/podderzhka/sputnikovoe-tv/nastroyki/vozvrat-k-zavodskim-nastroykam.
Principle of operation
The set-top box connects to the TV via an HDMI interface, and the Internet is connected to it (via cable or wireless Wi-Fi technology). The user on the TV selects a digital set-top box as a signal source and controls it with a separate remote control, with which he switches channels, downloads applications, starts movies and much more.
If the subscriber already has a gadget running on the Android OS, he can synchronize it with the set-top box, that is, existing images, movies, music and other content will be displayed on it.
Thanks to Bluetooth technology, the user can use wireless accessories, such as headphones or a keyboard. In the same way, a smartphone is connected, which will work as a control panel.
Coverage map
Before connecting to the service, you should familiarize yourself with the coverage map. This information is available on the company’s official website at the link: https://moskva.mts.ru/personal/podderzhka/sputnikovoe-tv/ya-uzhe-vash-klient/nastroyki/samostoyatelnaya-nastroyka-oborudovaniya/. Here you can also find detailed instructions on installing and configuring the antenna.
- How to set up an MTS TV dish to a satellite yourself without a video device
On the page you can see the map as a whole. Or you can enter a specific address. The better the reception, the darker the area is painted. In areas with less coverage, it is recommended to install a larger diameter plate. You can submit a connection request on the company’s online portal using the following links: https://moskva.mts.ru/personal/dlya-doma/checkconnect/moskva/sputnikovoe-tv or https://sputnik.mts.ru/ #.
Now you can go directly to how to install the equipment.
Choosing a place to install the antenna
When installing a satellite dish, first of all, you need to make sure that no obstacles interfere with signal reception, that is, do not block the device - these could be tall trees, various kinds of structures, power lines, tall buildings.
Also, when choosing a location, make sure that the antenna is pointed in the right direction. To receive the signal, the antenna is turned towards the satellite.
When choosing a location for installation, it is important to know that:
- You can go to the mts website and there you can automatically determine the direction in which you need to turn the satellite dish. Namely, select the “support” item, then “satellite TV”, then the “I am already your client” item, then in the “self-installation and configuration” settings. Here, in the search on the map, you need to enter your address and the direction for placing the antenna will automatically be indicated on the map with a green line.
- MTS makes it possible to determine the location and direction of the antenna by using the SatFinder application, which is available for both Android and iOS. The application is free. With its help, you can determine the direction to the satellite from different points of the house. You will need to select ABS 2 in the list of satellites, and then the red line on the map will indicate the optimal direction for your antenna.
Setting up the signal
To understand how to configure the MTS antenna yourself, read the following sequence of actions:
- How to set up MTS satellite TV
- in the TV settings, select HDMI video input;
- After this, after a while, a menu with MTS TV settings will launch, you may need to select the antenna settings item;
- after this, you need to loosen the bolts on the bracket in order to make it possible to rotate the antenna and change its angles;
- we change the position of the antenna and at the same time monitor the quality of the signal on the TV;
- After a good signal appears, we fix the antenna.
MTS TV channel menu
Appearance and equipment
The digital set-top box looks extremely simple. This is a rectangular box made of matte black plastic. It has a compact size, which allows you to hide it behind the TV or place it in any convenient place.
At the end of the TV box there are 2 USB inputs through which flash drives and external hard drives are connected. At the back there is an input for a network cable, an HDMI interface, an AV output and a slot for a microSD memory card.
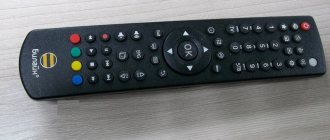
The remote control is classic, elongated. It has the usual controls in the form of buttons and a digital block through which the channel number is entered. There is a microphone and a key to call the voice assistant - thanks to this, the user can find a movie simply by saying its name.
The package includes: HDMI cable, power cord, remote control with batteries and instructions.
Set-top box set.
Antenna installation
Installation and configuration of satellite broadcasting begins with the installation and configuration of the antenna.
To begin, select the location for connecting the plate. The imaginary line from the antenna to the satellite should not be blocked by obstacles: buildings, trees, etc.
The antenna should not be installed in attics, balconies or other enclosed spaces.
The plate itself must be assembled according to the instructions supplied with the plate. The bracket is attached to the wall with elements that will be reliable for the specific wall material and also correspond to the strength of the wind.
- How to set up an MTS dish for a satellite yourself
When you entered the coverage area on the website, you would see a green line by placing a dot on the map. This line shows the direction to the satellite and the corresponding azimuth (the angle between the north direction and the satellite).
It is recommended to download the Protractor and SatFinder phone application, which can be used to set the antenna direction. You will need to select the ABS 2-75 E satellite.
You will also need a compass to determine north. You need to stand with your back to the place where the dish is connected, find the north and set aside the azimuth, which is shown in the application or on the website. Now you know where the antenna should be pointed.
A holder is attached to the antenna, and the converter is inserted into it, with the connector facing down (to prevent precipitation from getting inside). Now you can attach the antenna to the bracket on the wall. But it needs to be secured in such a way that it can be turned with effort. After final adjustment, complete immobilization will be required.
After this, you need to prepare the cable by connecting the F-connector to both ends.
The cable is inserted into the converter connector and attached to the holder using, for example, electrical tape. The second end of the cable will connect to the set-top box or TV if a CAM module is used.
Now, in order to receive satellite TV from MTS, you still need to configure the dish.
To configure the MTS satellite antenna, perform the following steps:
- The smart card must be inserted into the receiver or CAM module;
- Connect the set-top box with an HDMI cable to the TV;
- Turn on the TV and set the reception mode from the output to which the receiver is connected;
- Turn on the set-top box. Find the antenna setup menu (may have a different name depending on the model);
- A scale of the signal level coming from the dish will appear;
- Now you need to adjust the antenna position. To do this, it is moved left, right, down or up in steps of about 1 cm. After each movement, you need to wait a few seconds for the signal change to be displayed;
- Having reached the best scale value (it should be at least 70%), you can finally fix the antenna.
It is much more convenient to manipulate the antenna settings with two people. It is also best to perform installation in clear, windless weather.
FAQ
Is it possible to call a specialist for setup? How much do his services cost?
Yes, of course, you can call a specialist. To do this, fill out the application here. After filling out the application, the specialist will call you back, ask a few questions and tell you the cost. We do not have a fixed price list, since the price depends on the complexity of installing the antenna, the number of TVs, the remoteness of your locality and other factors.
How do I know if my TV is compatible with the MTS cam module?
The TV must have the following characteristics: CI+ connector, support for DVB-S2 and HEVC.
I had an antenna from another operator (Tricolor, NTV Plus, Telekarta), how can I reconfigure it to MTS?
If you had a circular polarization converter (Tricolor, NTV Plus), replace it with a linear one. After this, point the antenna at the ABS-2A satellite. Also remember that you will need to connect a set-top box or MTS cam module to the TV.
Will satellite TV work if there is no cellular signal in the area where it is installed?
Yes, it will. The satellite TV signal comes from space, while cellular communications come from terrestrial towers.
What equipment will I need if I want to connect several (two or more) TVs to MTS satellite TV?
You will need a linear converter with several outputs (the number of outputs must be no less than the number of connected TVs), as well as equipment (receiver or cam module) for each TV. One antenna is enough. You can read more about the conditions for connecting two TVs here.
What cable should I use to connect satellite TV?
Use coaxial cable. The advice is banal, but the more expensive it is, the better.
Some channels have no picture, only sound, what is the reason?
Your set-top box or, if you are using a cam module, your TV does not support the HEVC codec. You can purchase a new tuner. To purchase, please fill out this application.
On the MTS website in the “Self-tuning of the antenna” section and in the SatFinder application, different directions to the satellite are indicated. Tell me, what data can I trust?
In case of such discrepancies, please refer to the SatFinder application data.
I'm a text block. Click the edit button to change this text. Diverse and rich experience, constant quantitative growth and the scope of our activity require us to analyze positions.
Is it possible to place the antenna on a glass balcony?
There is no need to do this. Firstly, the glass itself creates an obstacle to the signal. Secondly, during rain, water on the glass creates an almost insurmountable obstacle to the signal. The only option when you can place a dish on a glazed balcony is if it is glazed with plexiglass, which does not create any obstacles to the signal. But in the rain, even in this case, TV will not be shown well.
How to properly install a smart card in the set-top box?
The smart card is installed with the contacts facing down.
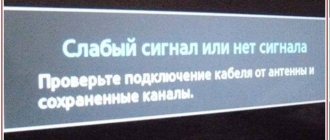
The message “No signal. Check that the signal cable is connected correctly to the set-top box.”
Check that the cable is connected and the correct input is selected in the TV settings. It is also necessary to check the cable for damage.
How to set the time on the set-top box?
You cannot set the time yourself; the set-top box receives this data from a satellite.
The signal power (strength) is 100%, but the quality is 0%, what is the reason for this?
When setting up the antenna, they forgot to turn the converter.