Samsung has long been one of the most popular brands sold and serviced in Russia. The choice of buyers is justified by the favorable price-quality ratio of the equipment, and its popularity among repairmen is due to many factors that determine the simplicity and convenience of repair and maintenance.
Samsung TVs for service center technicians and engineers have long been and still remain simple and predictable to repair, and timely technical support from the manufacturer with components, modules, documentation and software greatly facilitates and simplifies diagnostics and repairs.
Since the early nineties of the last century, craftsmen have accumulated experience in repairing Samsung TVs, which has been preserved on the Internet in conferences and blogs of repairmen. Typical defects of some models sometimes deserve special attention in considering the causes of malfunctions and methods for eliminating them.
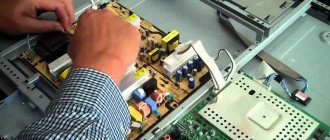
Measuring equipment and repair tools
To determine how to repair LCD TVs and other models, you first need to determine the cause of the breakdown. To do this you will need the following equipment:
- tester or multimeter - for determining voltages at special (control) points, measuring resistor and capacitor values, testing circuits and parts (coils, transformers, diodes, etc.);
- amplifier - to determine where the sound signal disappears;
- oscilloscope - for comparing signals at certain points with the TV circuit. It is used quite rarely at home, since not everyone knows how to work with it.
Regardless of the malfunction, you will need the following equipment to repair TVs:
- screwdrivers of different sizes (straight, Phillips, rarely asterisks);
- “hexagons” – quite rare, but necessary;
- pliers, wire cutters, etc.;
- soldering iron (25-60 watts) with rosin and tin;
- hair dryer or soldering station - for modern models with a flat screen.
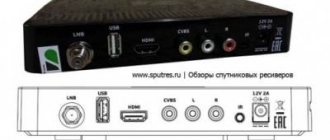
- schematic diagram of the TV unit (can be found on the Internet). For example, the diagram of LCD devices looks like this:
Incorrect source selected
Standby mode is the main reason the display stops working, but it does not turn off the device. That is, the plasma works, but this does not manifest itself in any way. Fixing this problem is extremely simple; just use the remote control and switch the mode by pressing the “Standby” key.
Let us immediately note that this option does not block the power adapter, so the screen always remains “ready”; of course, this negatively affects the performance of the device, since it becomes too vulnerable to voltage surges.
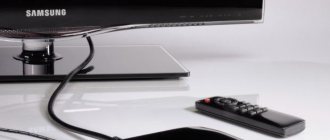
An incorrectly selected source is another reason why the TV does not turn on. It is possible that the user has previously activated AV or HDMI; therefore, to watch television broadcasts, you should switch to the original position. Sometimes this happens after the user has connected a laptop to the TV. You just need to switch the source using the remote control.
Getting started - troubleshooting
A special troubleshooting technique has been developed for beginners, which will help them navigate when carrying out repairs. The table provides a description of the main faults and instructions in which unit the TV should be inspected and repaired.
| What's happening | Possible reason |
| The device does not turn on | Power supply, power button, cord |
| The LCD screen does not light up, there is an image, but barely noticeable | Lamps or backlight diodes, their power supply |
| No sound, TV wheezes | Sound amplifier or harness (microcircuit and parts around it) |
| The screen is lit, but the TV does not show | Receiving unit (tuner and its circuits), video processor |
Please note that if, during a visual inspection, you find darkening on the board, carbon deposits, swelling or rupture of parts, then you cannot immediately replace the damaged elements. A burnt component may be a sign of a short circuit, but the cause will be in a completely different direction.
Important! When inspecting, be sure to unplug the TV.
How to identify the cause of the problem
First of all, you need to check the outlet into which the TV is connected, then you need to inspect the power adapter. These are the simplest steps that do not require special knowledge or skills.
Afterwards, examine the device boards, processor and synchronization modules. There are many reasons for the malfunction, some can be eliminated yourself (failure of the socket, control panel), others cannot be eliminated without a specialist (failure of the transistor, urgent scan module).
How to determine whether you need the help of a specialist or whether you can handle TV repairs on your own will be discussed in detail in the article.
How to repair a TV if it won't turn on
Repairing a TV with a kinescope
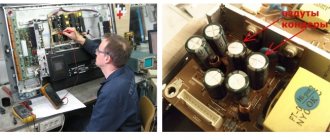
As indicated in the table, the cause of the breakdown may be in the power supply, the power button and the cord. The wire and the button can be easily checked by the tester, and the serviceability of the button must be determined in the off and on state. The situation is more complicated with the power supply. If the inspection reveals damaged parts, it is not a fact that everything will work after replacing them. For example, capacitors can swell due to time, overvoltage, or a short circuit in a completely different circuit (secondary).
In any case, you need to call all the details of the power supply. We do it in the following sequence:
- If the “conder” is swollen, the posistor is cracked, or another obvious defect is visible, it is necessary to unsolder this element and clean the carbon deposits or electrolyte.
- We start checking with fuse 2 and posistor 3. Then we call the diode bridge, resistors, transistors and the microcircuit (if a high-voltage stabilizer is installed).
- If everything is in order, install new elements instead of old ones.
When replacing parts, especially transistors and microcircuits, be sure to install gaskets (mica or rubber) if they were installed under the housings of these elements. They serve to isolate components from the housing.
Remember! In case of any problems with the power supply, it is better to replace its main element (high-voltage transistor or stabilizer chip).
Repair of LCD/LCD TVs
There are two options for the location of the power supply in such devices:
- Internal . It may be located in such a place that sometimes it is necessary to disassemble the entire television monitor. For example, many Chinese models do not have screws that secure the cover. To repair them, you need to pry off the plastic case with a flat tool (screwdriver) and remove the screen with the video driver, followed by the metal casing. By removing (unscrewing) it, you will get to the power supply.
- External . More convenient for repairs, since you don’t have to “get into” the monitor itself.
All these power supplies are similar in operating principle to the power supply of a conventional CRT device, and the method for troubleshooting is the same. The only difference is in the element base and output voltages. Consequently, the repair of plasma TVs and LCD power supply devices is no different from the above.
Typical malfunctions of kinescope equipment and ways to eliminate them
Below is a list of problems that owners of CRT TVs encounter.
Ruby:
- The Rubin TV buzzes loudly when connected - most likely the photodetector needs to be replaced.
- The ruby does not turn on, the indicator does not light up - voltage surges in the transistor.
Horizon:
- The Horizon TV has no blue tint, and the white balance is also disturbed - this is mainly due to a broken resistor.
- There is sound, but no picture - the cause of the problem is poor contact of the power connector on the screen board. It is recommended to use a soldering iron to solder the harness into the board of the Horizon TV.
Knight:
- The screen does not turn on - there is a problem with the power supply.
- A horizontal strip appears on the monitor - repairing a Vityaz TV consists of fixing a problem in the frame scanning chip.
The LCD/LCD or plasma screen does not light up – there is an image, but it’s barely noticeable
This indicates a problem in the backlight circuit. There are two reasons for this:
- Fixtures (lamps or LEDs) are damaged.
- There is no power supply to the backlight (backlight generator, transformer, transistors).
If the LCD has a lamp backlight, then the rest have LED backlight.
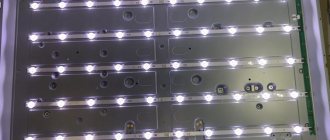
First option
LCD devices have from 1 to 10 lamps. Rarely do all the lamps burn out at once. In the first case, the lamp itself may be faulty. As a rule, TV sets with other technologies have LED strips installed. In many models they are located in series, and the combustion of one of the LEDs leads to the extinguishing of the entire screen.
Repair of LCD and other TVs is performed as follows:
Step 1 . Open the case.
Step 2 . Remove the driver and power supply boards (they can be located in a metal casing).
Step 3 . Disassemble the screen part. To do this, you need to remove one or two metal casings and (if any) the protective film.
Step 4 . Find backlights or LED strips.
Step 5 . Replace those that do not light up. It doesn’t hurt to check the contacts in the lamps or the diode strip for breaks first visually and with a tester.
Second option
If you have the second case, and all the lights do not light, most likely the problem is in the backlight power supply. LCD equipment uses a high-voltage converter made according to a transformer circuit. Faulty parts (microcircuit or transistors) in its trigger circuit are easily determined by the tester. To do this, measure the voltage on their legs, checking the diagram. If a discrepancy is found, the element is replaced.
But the transformer is difficult to check. Check all voltages (according to the diagram) on the elements of this converter. If everything is normal, the transformer is to blame.
It can be rewound, but this is a hassle, and the quality of such winding will again lead to failure. It’s better to buy a new one (get a working one from a TV workshop) and install it.
In the LED backlight transformer, the potential difference is only 50-100 V. If it is not on the connector, you need to check how many volts are supplied to the transformer. To do this, it is better to remove it. If everything is normal, change the transformer; if not, use a tester to check the remaining elements of the converter.
Software problems
It is also worth considering situations in which Smart TV on the WebOS platform does not work. Such models do not function correctly due to problems with the operating system. To avoid them, you need to install updates in a timely manner.
If the user updates the device incorrectly, then the TV will constantly reboot or will not turn on at all. The failure is resolved by loading the new firmware files onto a very ordinary flash drive, from which the TV OS is already being updated. Anyone can do this job, there is nothing complicated, just follow the instructions.
No sound or wheezing
In this case, there is a breakdown in the sound path. Check the supply and output voltages on the legs of the audio amplifier microcircuit (with a tester according to the diagram). If they are normal, the piping and input capacitors are to blame.
If nutrition is low or absent, there are two reasons:
- It doesn't come with the PSU . In this case, all elements going from the power supply to the charger are called and the ones that are faulty are replaced.
- The microcircuit is unusable . This can be easily checked by unsoldering the microcircuit. If after this the voltage appears and is normal, it needs to be changed.
Line scan defects on Samsung TVs
Samsung CS-21K3S Plano does not turn on. Short in line transistor D5703. When replacing, the liner fails again. Checking the stitcher's binding did not yield anything. The horizontal deflection system turned out to be faulty.
SAMSUNG CK 2185VR. The same capacitor caused the following malfunction. Image as with a small accelerating voltage. The voltage at the accelerating terminal of the kinescope did not rise above 240 volts. After replacing the 10nF-3kW capacitor in the accelerating circuit, the voltage increased and the image became normal. SAMSUNG 3385 When the power is turned on, the red LED blinks continuously - indicating a malfunction. Analysis of the signals showed the presence of horizontal scan trigger pulses and a non-working output stage. The reason is a break in the primary winding of the interstage line transformer. W1=400 vit., W2= 45 vit. Wind the windings in one direction. Wire with a diameter of 0.15mm and 0.6mm, respectively.
SAMSUNG CK-5385ZR. The malfunction was as follows: there is no startup when the TV is turned on, the indicator lights up yellow and immediately red, and then starts flashing red every half a second. Apparently some water got in through the back cover and rotted the wires of the primary winding of the TMS (T401). SAMSUNG CK5341ZR. The image is shifted horizontally. The H-SHIFT control has no effect. Defect: leakage of capacitor C404 2700pF.
The screen lights up, but there is no image
This happens for many reasons. Here are some of them:
There is no signal from the receiving unit (tuner and its circuits) to the input of the video amplifier . To check, you need to connect some video signal source (computer, VCR, set-top box) to the “Video” sockets on the TV body. For example, HDMI, VGA, tulips (yellow) and others.
If the image appears, the tuner, microcontroller and their circuits are to blame. The microcontroller can be checked quickly. It is responsible for the operation of buttons, input, sound and video signals. If when you press the buttons you can enter the menu and it is displayed on the screen, then the microcontroller is not at fault. Check the potentials on its legs with a tester. If they all match the diagram, change the tuner.
The video processor is to blame . If nothing happens after connecting to the tuners, then check the microcircuit (video processor). Check all supply and output circuits for compliance with the required potentials. If there is a discrepancy, the processor is 70% faulty.
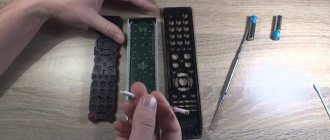
DIY repair
If the TV stops turning on, it is recommended to check the following parameters.
- TV mode. The first thing you need to do is check what mode the screen is in. For example, the device is operating in Standby mode. A red light on the TV panel will indicate that the standby mode is activated. Experts do not recommend leaving the TV in this mode for a long time, since power surges may cause the equipment to burn out. In order for the TV to work again, the user must disable Standby mode.
- The remote control is broken. If the device does not respond to remote control commands, try turning on the TV using the control buttons on its panel. If the screen works, then the cause of the problem is the remote control, most likely the batteries are dead.
Tips and secrets of the masters
- When checking the power supply, turn off the secondary circuits, and instead turn on ordinary light bulbs at the appropriate voltage.
- If you suspect that the “electrolyte” has lost capacity, warm it up with a soldering iron. The electrolyte inside will boil and the capacity will be restored for a short time. The method helps with frame scanning malfunctions, when you can visually see how the screen opens as a result of heating.
- If the high-voltage part is faulty, a slight hissing and crackling noise can be heard. Turn off the lights. In the dark you can tell where the sparks are coming from.
Do-it-yourself TV repair + overview of common faults
Home page » Do-it-yourself TV repair + review of common faults
Modern TVs - LED and plasma panels, despite the perfection of their designs, often disappoint end users. Television signal receivers, for example, suddenly stop playing video or sound. Other defects may also occur due to distortion of the image on the screen or the transmission of signals via the HDMI cable. In such cases, for users inexperienced in electronics, repairing TVs with their own hands seems like an unattainable task in principle. However, as repair practice shows, it is quite possible to restore an LCD TV, plasma or other, without contacting service providers. Let's consider some points of possible repair of modern TVs.
Simple DIY TV repair
Below we discuss defects in specific models of television receivers that require certain repairs.
However, given the technological similarity of the electronic circuits of quite a few modern TV models, the elimination of defects with similar symptoms is not excluded for a whole range of equipment.
In any case, the repair of televisions produced under the logo of one company, Panasonic, LG, etc., is actually the same.
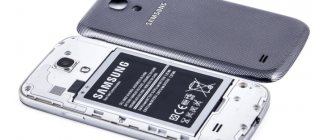
Device #1: “Samsung LN46A530P1FXZA” - does not turn on
The television receiver of this model (service PDF file) is made on the basis of a 46-inch (116 cm diagonal) LCD screen panel. In practice, it can be used not only as a television receiver, but also as a computer monitor.