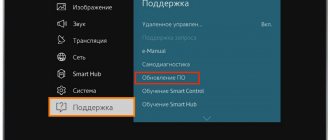
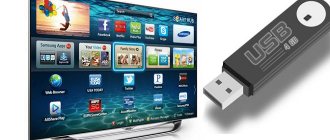
Show a PowerPoint presentation on TV
Good slides with an interesting soundtrack can add color to any public speech, be it a lecture at an institute or a presentation of a new product. But what if there is no computer or other device at the performance site that can read the file, but only a TV? There is a solution, and in this article we will find it. Let's figure out how to watch a presentation on TV through a flash drive.
Demonstrate a PowerPoint presentation on TV via a USB drive.
We look at the storage capacity
Perhaps the flash drive in the TV does not work not because of a malfunction or incorrectly specified layout, but simply because the storage capacity exceeds the allowable capacity for your TV. Many TVs are not able to initialize disks with a capacity of over 32 or 64 gigabytes; There are also more significant restrictions - up to 8 gigabytes. Look at the capacity of the flash drive you are using, look at the instructions for your TV - if it supports a smaller capacity, the easiest way out is to buy a new flash drive, the parameters of which match the specifications of the TV.
Need clarification? Call or write to the “Good Deeds Service” - our specialist will tell you how to properly set up any TV and deal with flash drive problems!
A little theory
As a rule, TVs are not able to read a file with the .pptx extension, with the exception of instances with a built-in browser, with the help of which plug-ins can be read. This is a real problem for many users, especially for those who have never heard of different object formats. A problem for many, but not for us. Most presentations are created in Microsoft PowerPoint software, which is included in the Microsoft Office suite, so that's what we'll be looking at. Starting with PowerPoint 2010, developers added the ability to create videos from the original program project right inside the product. It’s not difficult to do, let’s get started?
Adobe Flash Player on Smart TV:
The player for Samsung Smart TV is responsible for processing a large amount of flash content, but not all of it. The HTML5 standard has been released quite a long time ago, which is intended to replace the flash player. HTML5 support is built into the browser, so there is no need to install third-party applications.
Many sites have already transferred their players to a modern platform and abandoned third-party extensions. At the same time, not all websites have yet managed to redesign their players for HTML5, which is why the lion’s share of web resources still use Flash Player. It is not yet possible to completely abandon the outdated technology; you have to install the player on your LG or Samsung TV.
Program installation
Flash Player Smart TV is distributed completely free of charge. There are definitely no difficulties with downloading, but installing the application is a little more difficult. To perform this procedure, you need to have a computer with Internet access and a removable storage device (suitable for any amount of memory).
How to install Flash Player on Smart TV
- We connect a USB flash drive to the PC and create a folder on it with the name of the program.
- Unpack the plugin from the downloaded file.
- Turn off the TV and insert the USB flash drive with the player files into it.
- Turn on the TV and see a new application in the general list.
- We start installing the application and follow the instructions of the installation wizard.
Now not only iptv, but also video from the browser works on a smart TV.
Step-by-step setup
Flash Player does not require any special settings; the program works autonomously and is immediately supplied with basic settings. However, the player technology is relatively vulnerable, and through it the TV system can become infected. In order to improve security, it is worth making some adjustments.
Basic setup tips:
- Select the player application and click on the “Settings” button.
- Go to the "Flash Player Settings Manager".
- Go to the “Storage” page and set the flag next to “Ask...”.
- On the “Camera and Microphone” tab, select “Deny…” this will help avoid problems with sites that request access to external devices.
- Go to the “Reproduction” page and click on “Block all sites...”.
The player does not require additional settings.
Creation and configuration
We will need a project from which we will make a video. The finished version will retain all the transitions and effects, as well as the sound and even the pointer. Not bad, right?
Open the project and go to the “File” tab in the control panel. Next, “Save and send”, “Create video”. In the interface that opens, we can adjust the quality:
- computer monitors and high-resolution monitors - high;
- Internet and DVD - average;
- portable devices - low.
And you can also specify whether the sound and pointer will be turned on. Click “Create video” and wait for processing to complete. The output file will have a WMV extension; you can convert it to another format using the appropriate programs; there are plenty of them on the Internet.
After preparing the project, you can transfer it to a flash drive, which, in turn, can be inserted into a port on a special TV panel, and then start the video.
Alternative options
If USB is not on the TV, then you can use third-party devices: a digital tuner, media player or DVD player.
Important! In this case, the compatibility of the flash drive’s file system needs to be checked specifically with peripheral equipment, and not with the TV.
Digital tuner
Equipment of this type is always equipped with at least one USB interface, and only with rare exceptions is it missing. So before purchasing a tuner, it would be a good idea to check the presence of a USB output. Tuners are connected using an HDMI port, and older models are connected via RCA.
Drive connection procedure:
- Connect the flash drive to the USB output.
- Turn on the TV and go to the tuner menu.
- In the local file manager, select the desired movie and play it.
Media player
This is multifunctional equipment that allows you to work with a wide variety of content. Unlike other devices, any conflicts here are kept to a minimum. A good device reads formats in almost any encoding, from the most common - MP4, AVI, to exotic ones, like OGM.
Just like other similar equipment, media players are equipped with a USB interface, most often a whole set. Ports can be numbered or marked with prefixes – In / Out. You need to use the interface marked Out, while the number is completely unimportant.
How to play video from a flash drive through a media player:
- Connect the USB drive to the device.
- Go to the media player menu and open the “Video” section.
- The equipment should scan the flash drive and display a list of found files.
- Select the desired movie and launch it.
If we are talking about a proprietary tandem, for example, when an LG media player is connected to an LG TV, then the menu for managing multimedia content on the set-top box and TV is combined. But the principle of playing files remains the same.
DVD player
Not all DVD players are equipped with USB interfaces, so when purchasing a device it would be useful to pay attention to this point. Moreover, DVD players are picky not only about the file format, but also about the codec version
That is, it may happen that one MP4 video will be played, but another in a similar format will not.
How to connect USB to DVD player:
- We connect the flash drive to the corresponding connector on the DVD device.
- Open the DVD menu on the TV and go to the file manager.
- Select the desired movie to play.
Important! When connecting DVD devices to Samsung and LG TVs, they may not see USB interfaces on peripheral equipment if it is not branded. Manufacturer-specific operating systems (Tizen / WebOS) are extremely picky about third-party gadgets
In this case, updating the TV firmware sometimes helps.
How to properly save PowerPoint presentations?
A letter has arrived to the editor... I mean, my students who took my courses continue to ask questions. this time on how to save a PowerPoint presentation so that it doesn't get distorted when viewed on another computer .
This is especially true for those who use the 2007 version of Power Point - it uses a new collection of fonts, many new visual effects and animations that are not supported in previous versions. Unfortunately, if saved incorrectly, all this may become inaccessible. And at the same time, Power Point 2007 can protect so that none of the above is lost! How? Read below.
So, let's look at the most common mistakes and learn to avoid pitfalls.
How do we usually save a presentation?
Well, it's known as the file-save ... Oh, Microsoft Office 2007 doesn't have a file menu. To save, click the “Office” (the round button in the upper left corner) and select “Save” . It would not be worth writing about this if not for one “but”. In what format are you going to save the presentation? By default, Microsoft Office Power Point 2007 saves your presentation as a file with a .pptx extension. This is the internal format of Power Point 2007 .
It has two unpleasant features for us. Firstly, if you try to read this file on a computer that does not have Microsoft Office 2007 installed, you will not succeed. Office 2003 cannot read this format (however, it can be taught, but more on that elsewhere). The second reason is less obvious, but, in my opinion, it is no less important.
Try saving the presentation, and then open it by double-clicking on the file icon. What will happen? That's right - Microsoft Office Power Point 2007 will launch (if it is installed on your computer) and open... The Power Point editing window. Of course, you know that you can start the show by pressing the F5 key. But imagine the situation. You are speaking at a major event. You have prepared a presentation designed to show all the achievements of your work, the presentation should “kill” everyone present with its stunning design and finely tuned animations that reveal the features of your work just in time...
But instead, listeners see... the inside out, the working kitchen of your project! In my opinion, this is absolutely unacceptable. This is a clear example of unprofessionalism. Unfortunately, few of our lecturers feel that their work is akin to the work of an artist. There are no small details here. People are greeted by their clothes, and the way you start a presentation leaves a strong imprint on the content.
A small lyrical digression. Recently, exactly this example of unprofessionalism was shown by Microsoft employees at the “Microsoft Nonprofit Organizations Day” conference, when an employee of this company, in front of the amazed listeners, could not find a better way to return to the previous slide than to go into editing mode, select the desired slide, and show it to everyone . Moreover, he performed this operation ten times during his report. In my opinion, he admitted his own lack of professionalism. “What is it - people are gobbling it up.” He doesn't grab it.
How should you save a presentation? In this case, I recommend saving it as a “Demo”:
At the same time, it is saved in a special .ppsx format, which, when double-clicking on the file, automatically starts showing the presentation.
However, this method only works when Microsoft Office 2007 is installed on the computer on which the presentation will be shown.
Playing video
Nowadays, no one can be surprised by cheap LCD TVs, to which you can easily connect a flash drive. Moreover, many of them even have a browser that supports high-definition Flash video. Some models even work with “heavy” MKV files and Blue-Ray disc images.
Let's consider a very typical situation. You are about to go out for a walk or to a club with your friends, and at this time your favorite TV program starts on TV. What to do in this case? Fortunately, there is already a solution to this problem, and now you don’t have to be torn between your friends and your TV. You can simply press the record button on the TV remote, leave the TV on and calmly go for a walk with friends. And when you return, you can watch the recorded TV show, which will be saved to a flash drive (or external HDD) connected to the USB port of your TV. You can also change some settings, and the recorded shows will be immediately saved over the network to your computer's hard drive. The recording time in this case is limited only by the capacity of the hard drive or the capacity of an external USB drive. The average size of a 90-minute recording of a TV program in regular digital format (not HD) is about 2.5 gigabytes. Video recordings are saved in the MPEG TS format, which is supported both by the media player built into the TV and by most modern programs for viewing video on a computer (for example, completely free VLC).
The PVR module from the SamyGO Auto configurator, already known to us, will help you activate this function on your Samsung TV. In the section dedicated to setting up and installing the SamyGO Auto application and its modules, we have already looked at how to enable this option (just check the box next to PVR).
After the SamyGO Auto configurator is completed, the PVR folder will be created on the flash drive. We will need to make some changes to the pvr.ini
(full path to the file on the flash drive is
F:\PVR\pvr.ini
).
To edit it, you can use the universal notepad Notepad++.
the line with the
TARGET1
in pvr.ini , we will indicate where recorded TV shows will be saved first.
By default, the following settings are set there: TARGET1=/dtv/usb/sda1 TARGET2=/dtv/usb/sdb1 This means that by default, recorded TV programs will be saved to an external USB drive, which, when connected to the TV, is defined as the sda1 or sdb1 (for example, my USB flash drive is defined as sdb1). In the previous section, we looked at installing and configuring an NFS server, where we gave the TV access to the folder on the computer C:\films
and gave this folder the network name
video
.
If we want recorded TV shows to be primarily saved in this folder, and not on a flash drive, then we just need to enter the appropriate path in the TARGET1
: TARGET1=/dtv/usb/sdg1/192.168.0.100/video/ where
192.168. xxx.xxx
is the IP address of a computer connected to the TV via a local network (or via WiFi), with an NFS server previously installed on it.
Note: you can determine exactly what names are assigned to external devices connected to the TV in terminal mode via Telnet using the ls
(see an example of executing the
ls
in the special reference book on Telnet and some Linux commands).
pvr.ini pvr.ini F:\PVR\pvr.ini
Recording of television programs from digital channels is carried out by pressing the RECORD
(red round button on the TV remote control).
At the same time, a recording icon appears in the upper left corner of the screen. To stop recording, simply press STOP
.
Also, during recording, you can use the PAUSE
RECORD
button again .
The name of the video file of the recorded program will indicate the date and time of recording, and if the recorded channel is accompanied by a TV guide, then the name of the TV program.
In the next section, we'll talk about how to update your PVR so that you can switch audio tracks while watching movies on your TV's media player. In earlier versions, the SamyGO PVR digital channel recording application “conflicted” with the Audio Switch module, and you had to choose between the recording function and the audio track switching function. The updated version of the SamyGO PVR program solves this problem.
How to show a presentation on TV from a flash drive?
Most TVs do not recognize the presentation format. Some models have a built-in browser that allows you to download the necessary plugins and display the file. In other cases, to show the project you need to turn it into a video. All images, music and effects will remain. In the latest versions of PowerPoint, it became possible to change the format directly in the program and then transfer the file to a flash drive.
IMPORTANT. Also, using the Windows Movie Maker program, you can convert slides into avi format and watch them on the big screen.
Method 1: PowerPoint to TV from DVD Player
If there is a DVD on site, then you can show the presentation on it. To do this you need to do the following:
- Using a program that can reformat the presentation, open the project.
- Go to the “File” tab, then to the “Save and Send” section and there “Create video”.
- Then select the desired quality, adjust the duration of each slide, specify the sound and cursor.
When everything is set up, you need to click the “Create Video” button and wait a while. After creation, the file is transferred to a flash drive or disk, inserted into the player and shown on the TV.
IMPORTANT. The higher the quality of the video, the larger the file weighs. It is recommended to choose a high resolution for screens with a wide diagonal.
Method 2: View PowerPoint on TV via Apple TV
Apple TV also allows you to show presentations. This is very convenient - the image quality is often higher than that of most projectors. To set up Apple TV you will need the following:
- Apple TV.
- Air Parrot software or iPad or iPhone.
- HDTV with HDMI input.
- Internet access.
The procedure is as follows:
- install Apple TV;
- connect it via HDMI to your TV;
- connect equipment to the network (via a wired network or WI-FI);
- after turning on the TV, select the input for Apple TV;
- Connect the device where the presentation is saved to the screen.
IMPORTANT. If everything was done correctly, your presentation will appear on the TV and you can start showing the slides.
Method 3: Connect TV to PC
Perhaps the most accessible and fastest way is to connect a computer or laptop to the TV. You will need an HDMI cable for this. Modern models come with it.
To show your project on the screen in this way, you need to find the HDMI channel, connect both devices using a cord and select PC in the settings. In the laptop itself, to set the screen resolution, go to the Change display settings section.
IMPORTANT. If the kit did not include a wire, you can buy it at any hardware store - they are standard for almost all PC and TV models.
You can show slides without a projector in different ways - you need to choose the most suitable one based on the available technology. However, the simplest and fastest method is to display a presentation via a PC connected to the TV via cable. If it is not there, then other methods will help to display the slides on the TV.
Connection via USB connector
Most modern TV models have a USB connector. If this is exactly what you have, then you can breathe a sigh of relief - connecting a flash drive to such a TV is easier than changing the channel. To do this, follow the further step-by-step instructions.
Important! This manual is worth reading even if your TV does not have the appropriate connector, as it will cover the basics of the connection process. They will be mentioned in the rest of the article, but will not be described again in the same detail.
Step 1: Find the USB port on your TV. This is perhaps the most difficult step of the entire instruction. Its difficulty lies in the fact that there is no universal answer to the question: “Where is the USB connector?” It all depends on the model of your TV.
We find the USB connector on the TV, with the corresponding inscription or icon
Reference! In some models this connector is located on the back, in some – on the front (however, most often it is on the back). It looks the same as the USB port on your computer or laptop, into which you connect a mouse, printer and other USB-enabled devices. Almost always there is a corresponding “USB” inscription or logo near the connector.
Here are some photos of such connectors from different TVs to make it easier for you to navigate.
Panel with USB connectors on the TV
USB connector on TV
Step 2: Once you've found the right connector, you're three-quarters of the way done. Now all that remains is to connect the flash drive to it. There is no wisdom here - you simply insert the flash drive into the TV connector, like into the connector of your computer.
Insert the flash drive into the USB port of the TV
Step 3. So, the flash drive is connected, but for some reason, instead of the movie that you downloaded to the flash drive, on your TV screen you see what is usually shown on TV at this time. The thing is that your TV operates in antenna mode, that is, it broadcasts what the owners of the TV channels kindly provide you with. You can switch the mode using a special “TV/AV” , which is on the remote control or the TV itself. Look for a button on your remote control or TV that says “TV/AV” (on some models just “AV” ) and press it.
Find and press on the remote control or the TV itself the special “TV/AV” button, or simply “AV”
Step 4. If your flash drive is connected correctly, then after pressing the above button you should see on the screen an interface approximately like the one in the photo below. Navigation in this mode is carried out using the TV remote control buttons. Using the arrows that you use to switch channels in antenna mode, you can select a file, and use the “OK” to play it.
Using the arrows on the remote control to switch channels, go to the desired file, and use the “OK” button to play it
Step 5. You can switch back to antenna mode by pressing the “TV/AV” . Different TV models have different numbers of antenna and analog signal modes, so you can simply press this button until you get to the mode you need - this way you definitely won’t go wrong.
Find and press on the remote control or the TV itself the special “TV/AV” button, or simply “AV”
While playing a file, an error may appear stating that this format is not supported. There is nothing scary about it - it can be easily solved.
The “unsupported format” error appears when the TV does not support reading certain formats
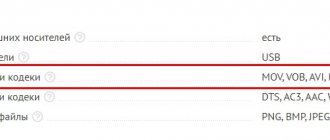
You just need to know what formats your TV supports. This is written in its instructions, but if you have lost it, you can quite easily find the relevant information on the Internet. In general, most TVs support the following formats:
- .wmv;
- .mp4;
- .avi;
- .MPEG;
- .vob;
- .mkv.
The easiest way would be to re-download the movie in a supported format, but if you are looking for easy ways, you can easily use one of the following video conversion programs:
- Format Factory;
- Hamster Free Video Converter;
- Freemake Video Converter;
- iWisoft Free Video Converter;
- Any Video Converter.
Recovering presentation files
(which stopped opening or were completely deleted from the drive)
Option #1: Using PowerPoint Features
Important! Conventionally, the article is divided into several parts (4). The first 3 are suitable if you have the presentation files themselves, but they do not open in the usual way (for example, they were damaged for one reason or another).
The last option (4) is useful if your documents have been deleted from your hard drive (flash drive), and you do not see them using regular Windows Explorer.
And so , to begin with, I would like to recommend using modern versions of PowerPoint (currently 2016, 2019). They have wider functionality, often when opening damaged files - they offer to try to restore them (as, for example, in my screenshot below).
Microsoft PowerPoint has encountered a content problem
You can also use this function through the program menu: to do this, open the “File/Open/Browse” tab (see example below).
Open - overview / Microsoft PowerPoint
Next, select the file and specify the required action: instead of “Open”, put “Open and restore”. An example in the screenshot below.
Open and restore
If the file does not open (or little of the original document is displayed), then move on.
Option #2: using Recovery Toolbox
Advantages of the method: high probability of recovery, simplicity and speed (no technical knowledge is required for work).
Cons: the program is paid (but the price is reasonable, plus you can view part of the restored file before paying).
In general, there are quite a lot of programs for file recovery. But there is very little specialized software for working with documents (in particular, with presentation files .PPT and .PPTX). And, in my opinion, Recovery Toolbox makes you pay attention.
Program for Windows
Recovery Toolbox for PowerPoint
A specialized program for recovering damaged PowerPoint files. Supports both files from older programs (.PPT format) and modern versions of PowerPoint (.PPTX).
- support for files from Microsoft Office 97-2003 to 2021;
- an attempt to reconstruct the presentation and calculations in it (if the file is severely damaged);
- in the most hopeless cases (when the file is severely damaged), the program will help you get out of it all the files that are possible: pictures, videos, music, etc.;
- simple and intuitive interface (with step-by-step actions);
- Russian language support;
- support for Windows XP, 7, 8, 10.
And so, let's move on to restoring the damaged file.
1) I omitted the installation of the program (it is standard, the Russian language is installed automatically). After starting the program, you must specify the broken file (see example below) and click on the “Next” button.
Step 1 - specify the presentation file
2) Further, depending on the size of the file (and its integrity), it may take some time to process it and evaluate the possibility of recovery. If the file is small, as a rule, the waiting time is no more than 30 seconds.
STEP 2 - waiting for processing
3) After the analysis is completed, click on the “Submit” button.
STEP 3 - Transfer Content to PowerPoint
4) Then wait for the program to transfer all the slides to the PowerPoint program (the program should open automatically).
STEP 4 - recovery process
5) By the way, I would like to draw your attention to the fact that Recovery Toolbox for PowerPoint retrieves all files (which is possible) from the “broken” presentation and saves them in a separate directory (it will also be opened automatically).
STEP 5 - Please note that all files from the damaged files will also be restored to a separate folder
6) In general, after you finish transferring the file to PowerPoint, you can start working with it as usual.
You can get some tips on creating and editing a presentation from these instructions: https://ocomp.info/kak-sdelat-prezentatsiu.html
STEP 6 - you can continue to work with the presentation as usual!
Cloud service
By the way, I can’t help but note that instead of the program you can use the cloud service of the same name.
It will be especially useful in cases where the classic program for Windows does not work for you, or you have discovered that the file is damaged not on your PC, and now you urgently need to restore it.
After switching to a cloud service, you can immediately begin recovery (no registration required!). See screenshot below.
Upload recovery file
In the next step, you will need to specify the file, your e-mail (how to create an email), enter the characters from the picture (spam protection) and click the “Send file” button. See example below.
Next, the service will “think” for a few minutes, analyzing the file.
If the file can be recovered, the service will notify you about this and show some slides. You can familiarize yourself with them and decide to pay (the cost of restoration is quite affordable - for example, they “asked” only 5 usd for my file!).
By the way, a notification about the results of the analysis of your file will be sent to the specified e-mail address. It is, however, in English, but if you have mail from Yandex, Google (and other large companies), it probably has a translator.
Reminder by e-mail
Option #3: use the converter from Libre Office
Pros: free method; the converter works quickly; everything will take 5-10 minutes.
Cons: not all files can be recovered.
Libre Office is a fairly powerful and free office suite. Allows you to solve many office tasks, even those that Microsoft Office cannot! More details about it here - https://ocomp.info/besplatnyiy-ofis-windows.html#LibreOffice.
The point is that it can convert presentation files to other formats (while extracting everything that is possible from them). In general, in some cases, after converting a broken file, you can (at least partially) restore it. Why not try?
Let's assume that you have Libre Office.
1) And so, first we launch “Libre Office” (after installing the package you will have a shortcut of the same name on your desktop) and go to the “File/Wizard/Document Converter” section.
Libre Office - document converter
Methods
If your TV has a built-in USB connector, to connect an external drive you just need to place it in the corresponding port. Unfortunately, only modern models have this interface. To connect a flash drive or other device to outdated television receivers, you can use alternative methods.
Via USB output
Current TV models all have a built-in USB port. In most cases it is located on the rear panel. It can also be located on the side. Connecting the gadget through this connector is as follows.
Insert the drive into the appropriate port.
Then you need to select a new signal source using the remote control.
Launch the file manager and in the desired folder, find the movie or any other video that you want to watch. To switch between folders, the rewind buttons are used by default.
Via set-top box
You can connect an external digital storage device to your TV via a set-top box. TV boxes are in great demand due to their wide range of functions, simple controls and affordable prices. All set-top boxes are equipped with a USB port.
Modern TV models are connected to the set-top box using an HDMI cable. The gadget is connected to the old TV using “tulips”. To turn on a flash drive or other USB device, you must follow these steps.
The set-top box must be paired with the TV and turned on.
Connect the external drive to the gadget using the appropriate port.
Turn on the TV and go to the set-top box menu.
In the file manager, select the video file.
Launch it by pressing the Play button on your remote control.
Via DVD player
Almost all new DVD players are equipped with a USB connector. In this regard, this technique is actively used to connect flash drives to a TV. Synchronization occurs according to the following scheme.
Insert the digital drive into the appropriate interface.
Turn on the player and TV.
Select to receive signal from the player.
Now, having selected the required file, you can view it through the TV screen.
The main advantage of using this technique is that most TVs will automatically recognize it. If this does not happen, you need to select a new signal reception source. This can be done using the remote control by pressing the TV/AV button.
If the file you need is not visible or does not play, most likely its format is not supported by the player you are using. This method is great for reading data from flash drives, the only disadvantage of which is the connection of additional equipment.
Using a media player
The next option, which is also often used, is synchronizing the TV with a flash drive via a media player. Their main difference from DVD players is that they read all current formats. This practical and multifunctional technique allows you to view not only videos, but also photos, without the need for conversion. The process of operating the media player is simple and understandable to all users, regardless of experience. The synchronization process is almost the same as the option described above.
First you need to connect the player to the TV receiver by inserting the cord into the desired connector. Then a digital storage device is connected to the USB port. The basic package includes all cables necessary for connection. If you have problems pairing, try again using the following procedure.
Connect the flash drive to the desired connector.
Using the remote control, open the “Video” section.
To select the desired file, use the rewind buttons.
To start, click the “Ok” button.
Now the gadgets are ready for use - you can enjoy music, movies, TV series and other media materials. Before using the equipment for the first time, it is recommended that you carefully read the technical documentation and make sure that you have read all the required formats. Most player models read flash drives with the FAT32 file system. Please take this into account when formatting digital media.
Users who have personally tested this option note its ease of use and practicality. The need to use additional gadgets is completely eliminated. You can buy such an adapter at any electronics store at an affordable price.
How to save a presentation
We'll tell you how to save a presentation locally on your computer and on the network. And also how to export to other formats. To share your presentation with someone who doesn't have access to PowerPoint, export to a different format. To view the pdf version of the slides, a web browser, which is installed even on your phone, is enough.
Also at the end of the article there is a description of fine-tuning the saving function in the program and a video explaining the nuances of saving and exporting.
Main video formats
A format or codec is a set of commands required to recognize the data in a file and convert it into video that is displayed on the screen. Their number is increasing every day, so manufacturers are constantly updating the firmware of TVs and teaching them to play an increasing number of codecs.
The main types of codecs that are highly popular include MKV, MPEG, H 264, XVID and DVX, as well as some others.
This is a type of video container similar to MOV, MPG and AVI codecs. May contain subtitles as well as multiple audio tracks placed in a single file format. Popular among high-quality video fans, it is used to broadcast content on the Internet. You can use the video in this extension to check the HDR capabilities of your TV set.
The oldest and most common format. Over the years, it has been constantly refined and changed, so several varieties of it have appeared.
Now common:
Another name for this codec is Advanced Video Coding or AVC. Allows you to compress the video stream as much as possible, but at the same time provides amazing picture quality. It is the most efficient part of the MPEG-4 Part 10 format.
Area of application: recording and playing video content from DVD and Blu-Ray discs. Compared to other codecs, it has a number of advantages.
XVID and DivX
Two competing technologies that are supported by players for video playback in modern television receivers.
- Samsung LED TVs
Other formats
In addition to those mentioned above, videos can be in other formats - 3GP, FLV, MOV, MVC, etc. They are less popular, so not all TVs are capable of playing video in this extension.
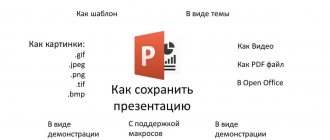
You can save your presentation in these formats
Native PowerPoint format since version 2007
Presentation with macro support. The built-in magic will be available on another computer where you open your slides.
The presentation can be viewed anywhere you have a browser. In this case, the animation is lost, all elements will be displayed.
Presentation storage format as a template. When you create your next presentation, if you start from a template, PowerPoint will load the template design, as well as all the slides with ready-made text and pictures.
Template for older versions - 97 -2003
Save the topic. This way you can reuse the built-in color scheme, as well as slide formatting settings in Slide Master
A PowerPoint presentation format that will open in slide show mode.
By saving the presentation in this format, you can make a video from a slide show
A set of different graphic formats in which you can record a finished presentation
One of the Open Office formats
Screenshot of the " save as " window:
CRC SHA encryption built into Windows 10
Anyone who wants to protect their data or simply doesn't want anyone to read it if they lose their laptop or tablet has thought about encryption. Today we will talk about CRC SHA encryption in Windows 10. If earlier you could use BitLocker, now there is no need for this. As you know, when using bitlocker you could not launch a flash drive and open data on another device without any problems. And if you remove it from another device, the media is simply formatted.
Let's figure out where to find and what CRC SHA encryption is.
CRC SHA is a utility built into Windows 10 that allows you to encrypt data on storage media in one click. The data is encrypted using a key that you choose; the following are available, as the name suggests:
- SHA-1
- SHA-256
CRC, in turn, is a cyclic redundancy code that is used to check the integrity of data.
Find this utility to use encryption in Windows 10 by right-clicking on the media.
Save as menu
The window for saving the presentation in the desired format is in the File of the ribbon > Save As . Can be called using hotkeys – ctrl+s.
Depending on the need, you can select the saving mode to your local computer, or to the network to Microsoft shared resources - Ondrive and Sharepoint. Next, select the desired format from the list in the previous section of the article.
Export menu
This option is also available on the File of the ribbon.
Groups saving options more clearly - adds text explanations. However, in the future the program uses the same save dialogs that were already seen in ctrl+s.
Export to pdf
Export to video formats
Export to CD
Export to word with creation of results
The change file type button opens the same window as ctrl + s