Share on social media networks:
It would be a shame for anyone to throw away a $1000 TV. Obviously, replacing the matrix is a very complex and expensive procedure, which may not even be used for budget models. The issue of repair is of particular importance in large organizations that have craftsmen on their staff. How to repair an LG TV yourself? This question increasingly puzzles users, since not everyone wants to seek the help of specialists. Let's save some money together and discuss the main points.
Operating principle of LED/OLED matrices
It is important to know the operating principle of modern TV matrices for one reason - failure of the backlight is not such a serious problem.
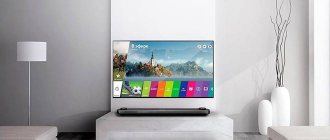
The TV screen itself is made of millions of low-brightness color LEDs. In order to see the picture on the TV screen, the matrix is equipped with a bright white LED backlight. It is its light, subsequently colored by the LED/OLED LEDs of the matrix, that we see on the TV. The design of the LED screen module of modern television receivers looks something like this: From the diagram it can be seen that the backlight is an auxiliary component of the TV screen module.
The failure of this device does not in any way affect the operation of the screen itself. This is easy to verify. Turn on the TV (preferably with no light in the room) and direct the light from the flashlight onto the screen. In the place where the light from the flashlight falls, the picture currently displayed on the screen will be visible.
Wrong mode selected
The standby mode stops the display, but does not turn off the device itself - in other words, the TV functions, but this does not appear outwardly. In this case, you just have to use the remote control and switch the mode by pressing the Standby button.
It should be noted that this function does not turn off the power supply and therefore keeps the screen always “ready”, which makes the TV vulnerable to power surges.
Activated AV, HDMI and others modes can also prevent you from watching cable, digital or regular TV channels. If you previously connected a laptop to the screen and forgot to change the signal source settings back, then you may have to activate the TV signal source from the settings menu manually.
Reasons for the backlight not working
Failure of the backlight may be due to one of two reasons:
- Problems with the backlight itself.
- Malfunction of the backlight control module (driver).
Sometimes the backlight does not work due to both reasons at the same time, but this is a fairly rare occurrence.
The very malfunction of one or another electronic component of the TV screen most often becomes a consequence of voltage drops in the electrical network. If the power supply of the television receiver receives a voltage that does not correspond to the values required for operation, it may malfunction. Bursts in output current, voltage, frequency, etc. may cause burnout of the backlight itself or the control module. Often the only way out of the situation is to replace burnt out components.
What to do if the “Attention” light on the Atlant refrigerator is on?
As you can see, in most of the cases listed above, the person is to blame for cycle disruption. It is quite easy to fix such problems on your own. Figure out where the problem lies and eliminate the cause. But in order not to repeat mistakes in the future, before turning on the unit for the first time, you should read the instructions and follow the operating rules.
Remember that elementary crumbs on the seal can lead to compressor failure. Because of the gap, warm air enters the freezer. The temperature rises, the motor runs constantly, trying to restore the temperature regime. He fails to do this, he breaks down. In other cases, you need to call a specialist. But you can at least identify the area where the fault lies. The thermostat maintains a certain temperature in the refrigerator and freezer compartment. If there is a snow build-up on the freezer door, or vice versa, water has accumulated in the tray - perhaps that is the problem.
Freon is a gas that cools the chambers. Perhaps the problem lies in the leak. Inspect all the tubes, the Schrader valve, the filter and the entire system through which the gas moves. A leak is possible if:
- cracks are visible on tubes and other components;
- due to mechanical influences, bent elements or other damage is observed;
- traces of rust are visible.
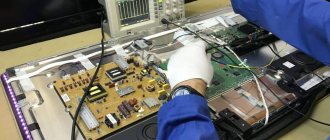
Can I replace the backlight myself?
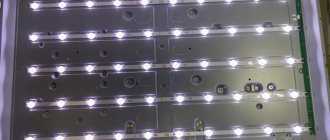
The backlight is a fairly simple electronic component. It consists of several tens or hundreds of white LEDs. Typically, these LEDs are combined into strips arranged horizontally or vertically with the same distance between each other. For example, the photo below shows the backlight module for LG TVs of the 42LA6230 model range:
Each of the 5 LED strips has 10 LEDs in its design, i.e. there are 50 of them in total. The strips can be unsoldered from the backlight module and then just as easily replaced with new ones.
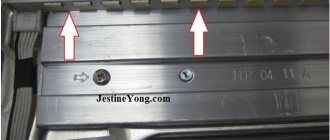
A special case of backlight failure—the burnout of one or more LEDs—is shown in the image below:
From here you can see that the LED strips are located behind the TV screen module. Those. they can be repaired or replaced at any time. But it is not recommended to do this without experience in repairing delicate electrical equipment.
What to do if the LG Smart TV remote control does not work?
If the remote control is broken:
- if water or dust gets in, disassemble it and wipe the mechanism with alcohol using a lint-free paper napkin;
- If you lose connection, turn off the TV and turn it on again after 2-3 minutes;
- if the buttons are worn out, you will have to buy another remote control (choose strictly according to the model of your TV).
A separate topic is the functioning of the infrared port. To check its performance, take a regular smartphone and the remote control itself. Open the camera on your phone, point the remote control gadget at the lens and press any button. If, when you press on the screen, you see a small glow (red, purple, blue or white) in the area of the infrared port, then the port is working. If there was no glow, then it was broken.
We diagnose the TV
Diagnostics refers to identifying the reasons why the backlight on an LG TV has disappeared. If you try to start the TV panel from the remote control, but the image does not appear, then you need to shine a flashlight on the screen. A faded image should appear there. This flashlight served as a backlight. Based on this, we can conclude that the problem is a broken driver or burnt-out LEDs. In order to more accurately determine the problem, you will need to remove the back panel and conduct a visual inspection of the hardware.
The case can only be disassembled if the warranty period has already passed. Otherwise, your TV will not be eligible for free repair.
If you do not have any knowledge of electronics or repair of TV panels, then it is better to leave all the work to masters and qualified specialists. Otherwise, you risk aggravating the situation and completely breaking the device.
To replace the LEDs on LED TVs, you will need to disassemble the panel. To do this, unscrew the holding bolts on the TV cover. After this, use a voltmeter to gently measure the backlight voltage. If it is 100 volts or lower, then it is the one that has failed. Clear lighting is achieved due to LEDs in the LED backlight, which are located around the perimeter of the screen. To get to them, you will have to dismantle the matrix. To disassemble the device, follow the instructions below:
- Disconnect the cables and unscrew the bolts to remove the T-con board.
- Remove the protection from the decoders by unscrewing the fasteners on the sides. Proceed with caution, because the decoders will then only be secured with rubber fasteners.
- Unscrew the bolts around the perimeter of the frame. Place the device on the back wall of the case and remove the frame.
- Carefully turn the panel over so that the matrix does not fall off.
- Carefully disconnect the rubber fasteners and remove the matrix.
Determining non-working LEDs
After you have put the matrix aside, you can begin to identify the burnt-out elements in the LED backlight. To replace you need:
- Unclip all connections and remove the plastic frame.
- Remove the scattering film.
- The number of LEDs depends on the LG TV model.
- A series connection is characterized by the fact that due to one diode the entire system may not function.
Typically there are about 18 diodes in the system. If the voltage measurement showed that 140 V is supplied, therefore, 7.8 V is supplied to each diode. Such calculations need to be carried out in order to calculate the power of the diodes used. To find a faulty diode, carefully inspect them for burning. This is the easiest way. But if no burns are detected, then you will have to check each diode separately.
We replace LEDs
Replacing LEDs in LED TVs is not easy, so if you are not confident in your knowledge, then it is better not to start. Another problem is that you will have to purchase a strip of light bulbs from the manufacturer, since service centers do not supply them. This affects the delivery time, so you will have to wait a while.
But you can also save money. You don’t need to buy the entire strip, but only a few LEDs to replace the burnt ones. They are purchased on the market. Usually they are sold already soldered, but it is important for us that they are working. The planks are fixed using double-sided tape. To disconnect the burnt-out diodes, you need to heat the tape with a hot hairdryer, after first fixing the bar on the prepared installation. The heated tin becomes soft, and you can remove faulty elements. Solder also using a hair dryer.
Lenses are attached at the factory using a compound, so be extremely careful when replacing them. In order not to disturb the focusing of the lenses, install everything in its place.
If you come across diodes with a negative area larger than the positive one, you will need to trim the contact point. If you damage the paint, don't worry, it's not that important. The lenses are glued using superglue.
Setting the current limit for LEDs
Manufacturers often overestimate the backlight level, setting it to almost maximum. This is done for advertising purposes to attract buyers with a bright picture. But over time, this can play a disservice and lead to LED burnout. Owners of LG TVs can independently reduce the current by increasing the value of the resistor - a special current sensor in a chain of series-connected diodes. The rule for calculating the resistor value is as follows: the resistor value will be equal to a value inversely proportional to the current in the diodes.
To reduce the current, you need to increase the resistance of the current sensor. They usually consist of paired low-resistance resistors. By removing one pair, we increase the sensor value and thereby increase the depth of the PWM NFE (Negative Feedback of the driver PWM controller) and reduce the current in the LEDs. If you remove two pairs of resistors, the current will almost halve, and this will significantly affect the brightness of the screen.
For TVs with dual 6-volt LEDs, there is a current reduction option. The current sensor consists of six resistors connected in parallel: 1 Ohm, 1 Ohm, 1 Ohm, 1 Ohm, 2 Ohm, 8.2 Ohm. The total resistance in this case is calculated inversely proportional to their conductivity. This will be 0.22 Ohm. If you remove one 1 Ohm resistor, the total resistance increases to 0.28 Ohm, the current proportionally decreases from 250 mA to approximately 190 mA.
KARONASTOP - herbal mixture for immunity
Today, the herbal mixture “KARONASTOP” is in great demand. The popularity is justified primarily by the fact that the collection contains 16 herbs, thanks to which the product is able to help maintain immunity, while widely affecting all internal organs. The fame of the healing effects of the drink spread quite quickly, its effectiveness was appreciated by many people, for whom it significantly improved their quality of life and provided significant assistance in supporting the immune system during viral and infectious diseases.
Now this is more important than ever!
- Supports immunity
- The collection contains 16 herbs
which will help restore immunity, provide a full charge of ALL necessary vitamins; will protect you from viruses!
- All plants are collected in the cleanest ecological places!
increases skin firmness and elasticity, eliminates and prevents stretch marks.
Go to the supplier's website
(function(w, d, n, s, t) { w = w || []; w.push(function() { Ya.Context.AdvManager.render({ blockId: 'RA-443800- 13', renderTo: 'yandex_rtb_R-A-443800-13', async: true }); }); t = d.getElementsByTagName('script'); s = d.createElement('script'); s.type = 'text/javascript'; s.src = '//an.yandex.ru/system/context.js'; s.async = true; t.parentNode.insertBefore(s, t); })(this, this. document, 'yandexContextAsyncCallbacks'); (adsbygoogle = window.adsbygoogle || []).push({});
(function(w, d, n, s, t) { w = w || []; w.push(function() { Ya.Context.AdvManager.render({ blockId: 'RA-443800-15', renderTo : 'yandex_rtb_R-A-443800-15', async: true }); }); t = d.getElementsByTagName('script'); s = d.createElement('script'); s.type = 'text/javascript '; s.src = '//an.yandex.ru/system/context.js'; s.async = true; t.parentNode.insertBefore(s, t); })(this, this.document, 'yandexContextAsyncCallbacks '); (function(w, d, n, s, t) { w = w || []; w.push(function() { Ya.Context.AdvManager.render({ blockId: 'RA-443800-11', renderTo : 'yandex_rtb_R-A-443800-11', async: true }); }); t = d.getElementsByTagName('script'); s = d.createElement('script'); s.type = 'text/javascript '; s.src = '//an.yandex.ru/system/context.js'; s.async = true; t.parentNode.insertBefore(s, t); })(this, this.document, 'yandexContextAsyncCallbacks '); (adsbygoogle = window.adsbygoogle || []).push({}); (function(w, d, n, s, t) { w = w || []; w.push(function() { Ya.Context.AdvManager.render({ blockId: 'RA-443800-1', renderTo : 'yandex_rtb_R-A-443800-1', async: true }); }); t = d.getElementsByTagName('script'); s = d.createElement('script'); s.type = 'text/javascript '; s.src = '//an.yandex.ru/system/context.js'; s.async = true; t.parentNode.insertBefore(s, t); })(this, this.document, 'yandexContextAsyncCallbacks '); (adsbygoogle = window.adsbygoogle || []).push({}); (function(w, d, n, s, t) { w = w || []; w.push(function() { Ya.Context.AdvManager.render({ blockId: 'RA-443800-7', renderTo : 'yandex_rtb_R-A-443800-7', async: true }); }); t = d.getElementsByTagName('script'); s = d.createElement('script'); s.type = 'text/javascript '; s.src = '//an.yandex.ru/system/context.js'; s.async = true; t.parentNode.insertBefore(s, t); })(this, this.document, 'yandexContextAsyncCallbacks '); (function (w) { function start() { w.removeEventListener('YaMarketAffiliateLoad', start); w.YaMarketAffiliate.createWidget({containerId:'Televizormarket',type:'offers',params:{clid:2372448,searchSelector: 'title',sovetnikPromo:false,searchInStock:true,themeId:2 },rotate:{marketToBeru:false } }); } w.YaMarketAffiliate ? start() : w.addEventListener('YaMarketAffiliateLoad', start); })( window);
More possible problems and ways to solve them
Usually, expensive equipment is repaired at a service center, but sometimes the problem may turn out to be minor, and you can solve it yourself. Let's look at a few common problems and how to fix them yourself.
TV won't turn on
This problem is the most common, and almost every third LG TV owner encounters it. You shouldn’t immediately assume that TV receivers are of poor quality, everything is much more banal. The batteries on the remote control may be dead or the electrical cable may be damaged. Check that the plug fits tightly into the socket and that the socket itself is in good condition. If basic measures did not help or correct the situation, then you need to look deeper, namely in the hardware.
No image on screen
If the sound works, but the image is not displayed, then most likely the problem is the backlight. How to check the LED backlight on a TV is described above in this article. There may be several reasons:
- no current is supplied to the light bulbs if gas-discharge lamps are used;
- the diodes have burned out if strips with LEDs are used;
- scanning electrodes are faulty.
There is no image, but the bar is lit
The type of stripe can be different: located vertically and horizontally. This indicates that there is a problem with the sweep electrode. To confirm this, you need to connect another TV device with a working matrix. This situation can only be corrected by completely replacing the damaged part. If a spot appears on the display rather than a stripe, then the reason is most likely the same.
If backlight repair is required
Backlight repairs should be carried out in the following order:
- Turn the TV device over and unscrew the fasteners on the back of the case.
- Disconnect the cable from the chip boards.
- Remove the latches on the matrix and unscrew the connecting elements.
- Remove the top of the screen to access the diodes.
- Use a tester to check the performance of each strip.
- Identify the faulty strip.
- Using hot air from a hair dryer, heat the tape under the strips and remove the faulty diodes.
- Replace broken diodes.
- Test the connection to the current and the flow of electricity.
- If there are no problems, then tighten everything in the reverse order.
We do repairs right
We should not forget about the general instructions. It is advisable to dismantle the main board in order to avoid the possibility of electric shock. First you need to discharge the electrode of the EL tube.
Important! During restoration work, try not to touch metal parts.
This component is located in the area of the rubber gasket:
- Use a screwdriver to pry off the rubber band.
- Rock the component and remove the EL tube electrode.
- Touch the rod to the body of the device, thereby discharging the part. If you can find land, it's best to take advantage of it. The most ideal option is a European-style socket that has the terminals connected correctly.
- When discharging, you should hear characteristic clicks. Discharge the component until you can no longer hear them.
- Each TV has a main board, which is responsible for “controlling” the equipment. Remove this part and inspect the radio components on the board.
- If necessary, replace swollen capacitors, resistors and burnt-out elements.
Important! If you haven't been able to repair your TV yourself, it's probably time to replace it with a new, improved model. In our separate review you will find out which TV brands are better.
Matrix disassembly procedure
First, remove the decorative plastic panel
To do this, simply press the clamps around the perimeter. Note: this TV model is convenient because the matrix itself has an additional metal fastening casing, so you can safely press out the clamps with a knife without fear of damaging the glass.
After we have removed the decorative panel, we proceed to disassemble the metal casing. Again, this device is very convenient - the casing has screw fastenings around the entire perimeter, you just need to unscrew them
The casing consists of four plates; first the upper and lower ones are removed, and then the side ones
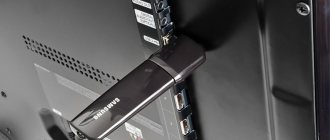
After the casing elements are removed, the matrix itself can be removed. Possible nuances: 1. During operation, dirt may accumulate around the perimeter of the matrix, and therefore the matrix can very easily stick. You should pay special attention to this - first you need to check whether the matrix can be easily removed by carefully prying its edges. It is highly not recommended to use metal objects for this; it is best to pry it with a fingernail, or, in extreme cases, with a plastic object such as a card). 2. The driver board cables are very thin and can be damaged very easily. You should definitely make sure that the driver board is free and does not touch the TV body when removing the matrix. You can secure it with a piece of electrical tape (as in the photo). 3. Take care in advance of where the removed matrix will lie while you carry out further repairs - it should be a flat and soft surface. For example, a table covered with a blanket.
After the matrix is removed, you can begin to disassemble the plastic casing that secures the light-scattering films. To do this, you just need to press out the fastenings around the perimeter. In principle, nothing is fragile at this stage, so special care is not required here.
After we removed the light-diffusing films, we finally got to the LEDs themselves.
Replace matrix
The matrix cannot be repaired, and if faults are detected, it simply needs to be changed. Signs of a matrix malfunction are the LG TV freezing, slow response to commands, lack of response to launching applications, and the TV panel turning on and off instantly. It is better to replace the matrix at a service center.
Replacing the power supply
Most often, along with the backlight, the power supply stops working. You can determine that it is the one that has failed by the following signs:
- The TV doesn't turn on.
- The device does not respond to the remote control even after replacing the batteries and checking that the plug fits tightly into the socket.
The problem can be solved very easily and quickly by replacing the old unit with a new one.
Additional information on MainBoard repairs
The appearance of MainBoard EAX64891306 is shown in the figure below:
EAX64891306 can be used in TVs:
LG 32LN540V (Panel LC320DUE (SF)(R1)), LG 42LN542V-ZD (Panel LC420DUE SFR3), LG 32LN541V (Panel LC320DUE (SF)(R1)), LG 42LA615V (Panel LC420DUE (SF)(U2)), LG 32LA615V (Panel LC320DUE (SF)(U2)), LG 42LN540V (Panel LC420DUE (SF)(R1)), LG 42LN541V (Panel LC420DUE (SF)(R1)), LG 47LN540V (Panel LC470DUE (SF)(R1)) , LG 32LB530U ZA (Panel LC320DXE (SG)(R1)), LG 39LN540V (Panel HC390DUN-VCFP1-11XX), LG 32LA643V (Panel LC320EUN (SF)(F1)), LG 32LN542V (Panel LC320DUE SF R1), LG 47LA615 V (Panel LC470DUE (SF)(U2)), LG 47LA643V ZB (Panel LC470EUN (SF)(F2)), LG 32LN541U ZB (Panel HC320DXN-VHFP1 - 21XX / HC320DXN-VHFPA - 21XX), LG 32LN536U (Panel NC320DXN (SA )(P1)), LG 37LN541U (Panel LC370DXE (SF)(R1)).