The position of the satellite Yamal 300 K (beginning of 2015) remains the same. Check the tracker https://n2yo.com/. To find a device, enter the search by country. Please note that Russia is indicated as “former USSR” (Former USSR). Avoid being embarrassed. Yamal 300 K hangs fractions of a degree east of Yamal 401, launched on December 14, 2014. It was said in the news: the latter came out to replace its tired brother, so that its predecessor would move east. The service life of the new device is 15 years, Yamal 300 K is 14 years (launched in 2012). Therefore, the next two five-year plans - as they used to say in the former USSR - plan to watch both, then it will be seen if anything happens... How to set up a satellite dish on Yamal if the 201 device is out of order, the news plus Wikipedia crashed, figuring out where the spacecraft are. Let's discuss a sensitive topic together.
Space satellite
New satellites Yamal
What people have to face when they are racking their brains about how to set up a satellite dish in Yamal. The government's plans are overdue. Those wishing to set up a dish for Yamal themselves must take into account the missed deadlines. Providers with service packages immediately sell instructions; most citizens are interested in free satellite broadcasting, which is available to the masses. It is clear that for each channel you will have to look into the presence of an encryption code separately.
According to some information, in the first ten days of January 2015, Yamal 401 began testing the unused 300 K range (3.7 GHz). The next 10 days are spent testing transponders. Replacing Yamal 401 will go unnoticed by end users. It is necessary to change the name in the receiver settings and update the software. The broadcast plan is being kept quiet, stop rushing things. Transparency of replacement is our assumption, we believe that satellite television providers will simply recommend updating the firmware or working files.
Judging by the network information, the Yamal 201, 300 K and 401 satellites will broadcast the same way (in parallel). NTV of different time zones, Ren TV, other Russian TV shows. The information is multiplexed, so you can catch several programs on one frequency. However, the subtleties are invisible to the user; the receiver decrypts the information and sends it to the TV. Please note: the DVT-S2 standard is being introduced in Russia; old equipment (not younger than 2012) may refuse to work if it encounters an unfamiliar encoding technique. You need to get an external receiver from your provider. Some provide equipment for free; as for the state, pensioners will receive less free access from the Kremlin.
The Yamal satellite channels remain unchanged, residents of the Far East need to patiently monitor the progress of events until the old spacecraft (launched in 2012) reaches the position of 134 degrees east longitude. Let's say right away that the new Yamal 401 covers the territory of the Russian Federation, including the far north. The range covers the nearby territories of neighboring states. Not everyone will have to set up a satellite dish for Yamal 300 K. But who exactly?
- We don’t always choose a free place to install the plate. The direction in azimuth and elevation to Yamal 401, based in the area of 90 degrees east longitude, is blocked by buildings, forest, mountains, and other obstacles. The line of sight to geostationary orbit at coordinate 163 degrees east longitude is open. Of course, there is no choice here; we are targeting the point where it is planned to bring Yamal 300 K. It will allow people previously cut off from civilization to partake of the benefits of technological progress. We remind you that an ordinary dish does not support an uplink channel (download to a satellite), requests must be sent to a cellular communication channel. To support two-way transmission, special stations are used, where a single transmitter costs more than 2 million rubles. The diameter of the plate is tens of meters. The methods are used, for example, by providers.
Yamal 300 K
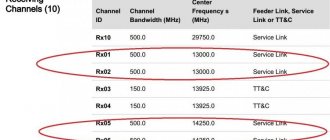
- Residents of the Far East and others living closer to the planned location of the 300 K satellite, if the connection is unstable, should evaluate the possibility of receiving the position of 163 degrees east longitude. Note an interesting feature: there may be no spacecraft at this point; it is impossible to determine distances and angles using standard calculators... We recommend specifying any satellite located as close as possible to the point of 163 degrees east longitude. Allows you to assess in advance the possibility of reception and the distance to the spacecraft. The end of the story is not near. It is known for certain: Yamal 401 carries more powerful transponders, it is more advantageous to catch its strong twin brother from “disputed” places equidistant from both spacecraft. In Russian: leave the plate in the same position. To find out the question, see the coverage maps of the Yamal 300 K and 401 beams. The figure gives the expressed dB power level at the receiving point on Earth.
The introductory part is over. Let's discuss setting up a satellite dish for Yamal with your own hands. Let's find out whether an emergency step is necessary.
Setting up a Smart TV
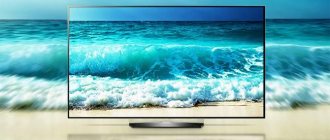
When purchasing new LG Smart TV household appliances, users can not only watch their favorite shows and movies, but also receive constant access to the Internet. How to set up an LG TV yourself if it supports the Smart function? Setting up the TV is done only after ensuring a stable connection to the worldwide network via a wired connection or Wi-Fi router. By connecting the product to the electrical network and providing a connection to the Internet, you can tune in analog channels or digital TV.
Installation is done as follows:
- go into the settings of the Lg TV receiver and select the “Network” item;
- select a network connection and click “select” on the screen;
- Select the desired type from the list - wired or wireless network, press the update button;
- Now the smart product sees the Internet connection, click ready;
- We register on a special portal: create a call sign, enter a password, then a letter is sent to your email - you need to open the specified link to confirm all actions;
- access has been obtained, go to the Internet using your nickname and password, move on to the main thing - how to set up channels on your LG TV for reception;
- install the “SS IPTV” application.
After this, you can directly tune the channels on your LG TV in the same way as the previously discussed method. Setting up Smart TV on Samsung TVs also has its own nuances. Now you know how to set up digital TV on various models.
Channels broadcast by Yamal satellites
A devoted reader of the portal, using Yandex search, will find a list of TV channels currently operating in Yamal 300 K.
Setting up channels
- How to set up a satellite dish in Yamal
Some sites indicate directly: there are no differences with the 201st device. Catch a copy of countless links https://sat.nov.ru/yamal300K.htm that provide the necessary values:
- frequency;
- type of polarization;
- flow rate (bitrate).
The tables will show: in addition to channels, radio stations are caught. Feel the full-fledged existence in the taiga - you can always stay up to date with events! Transferring is another matter. For cardsharing, stock up on a weak line, like an ADSL landline phone or cellular connection. It will be difficult to kill enemies in computer games; the efficiency of character control is determined by the bitrate of the uplink. It will be useful for advanced people to look at the frequency plan. The table indicated by the link above shows downlink channels; other parameter values are used for loading. Many radio amateurs use the chip for personal purposes.
To track the true position of the spacecraft, on the website https://n2yo.com/ information is provided by dead reckoning. Sometimes the American NORAD deliberately produces inaccurate numbers due to upcoming tests of military, classified equipment. It’s clear that you can’t fool the special services like that, but apparently there is still protection from them. Therefore, do not be surprised if you receive pokes and injections from advanced users at well-defined coordinates.
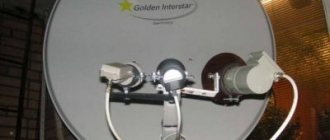
Typical Kamchatka satellite dish
C-band converters
The converter (or LNB - Low Noise Block) is designed to convert the C-band frequency (3.5 - 4.2 GHz) into an intermediate frequency of 900-2150 MHz for transmission with minimal losses via coaxial cable to the satellite receiver.
Specifications:
The local oscillator frequency for the C-band is set to 5150 MHz. For C-band, 22 kHz is not needed. Therefore, it makes absolutely no difference whether this signal comes or not.
Polarization of converters
In addition to the frequency spectrum (range), converters differ in the type of signal polarization. Moreover, two types of polarization can be present in one converter at once.
Here are the two main types of converters:
1. Linear universal satellite converter (Universal) - in this type of converter there are two types of polarization: Linear horizontal (H - Horisontal). Linear vertical (V - Vertical).
2. Circular satellite converter (Circular) - in this type of converter there are also two types of polarization: Circular right (R - Right). Circular left (L - Leftl).
Depolarizer
The depolarizer allows you to convert the circular polarization of the signal from the satellite into linear polarization, which the converter can receive with greater efficiency. It is installed in linear polarization converters. Most often, the depolarizer is a dielectric plate in the waveguide of the converter.
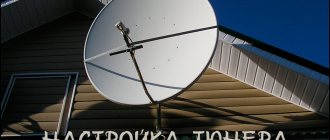
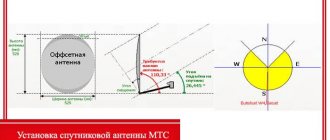
The process of pointing a satellite dish to Yamal
You will find the location of the Yamal satellite using information from online services, ask your provider. We consider the best option to be an online calculator written by programmers. The site https://www.satellite-calculations.com/ has collected (mostly foreign) calculators for calculating coordinates. Use Google! There is only one drawback: we ask for a new satellite every 8 seconds (long wait), today we are only interested in Yamal. The convenience is great: Google, due to its advanced capabilities, will allow you to specify the location of the reception by postal address, guaranteeing accuracy down to hundredths of a degree, which another method is powerless to provide.
The disadvantage of Google is obvious: it does not allow deleting to a satellite. But the maximum unevenness of the Earth at a distance of 7 km and the heights of local obstacles are given. Necessary when assessing the availability of reception. For coordinates of 65 degrees north latitude, 144 degrees east longitude, Yamal received an elevation of 300 K above the horizon of more than 5 degrees. You will have to pierce the atmosphere layer at an oblique angle. The terrain, judging by the Google map, is hilly and mountainous. Go catch NTV+. The 163 degree position is much more advantageous. Look at the obtained coordinates:
- Azimuth 160 degrees.
- Elevation angle (place) 15.4 degrees.
The recommended (by Google) minimum antenna installation height is 2 meters. Suitable for every mountain summer resident, there would be no forest. Moreover, the map shows the slightest unevenness in the ground, so the search engine has already approximately calculated the visibility for the authors; if there are no buildings nearby, the reception will be excellent. We carried out calculations for the Superbird B2 satellite, located at eastern longitude 162 degrees. We do not think that the expected position of Yamal 300 K will differ much from this figure.
We believe that not everyone has a device for tuning satellite dishes. Use a watch. Setting up using the compass is quite simple. Don’t forget, the frequency of Yamal satellite channels determines which converter to buy (you can buy the unit separately for the Tricolor TV package). We discussed how self-tuning is carried out, if it is not clear, write! Let's discuss.
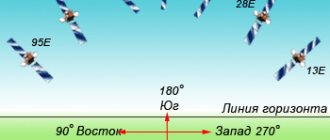
- How to determine the direction to a satellite
It’s a sin to stare at the screen when you can earn money and do something useful. But if there is nothing to do...
On this page you will learn how to independently assemble, install and configure a 1.8 m direct focus segment satellite antenna to receive a signal from the Yamal satellite - 201 (90°E)
- To receive a signal from the Yamal-201 satellite (90°E) a depolarizer plate must be inserted into the converter.
- Depolarizer position 18 volts = Horizontal = Left polarized.
- We choose the installation location in such a way that the direction to the satellite is absolutely open, in Novosibirsk and the region - south-southeast.
Let's consider in practice: Assembly, installation, mounting and tuning of a 180 cm direct-focus antenna on Yamal-201 (90°E) C-band.
- Since the longitude of Novosibirsk is 88° E, and the Yamal satellite is 90° E, the satellite will be located almost in the south, which greatly facilitates the installation of the antenna position in azimuth.
- Any objects interfere, such as trees, poles, houses, etc. The deterioration in reception quality is proportional to the shading area of the dish surface. In this case, the wires (even high-voltage ones) practically do not interfere. It must be borne in mind that during setup the antenna direction will need to be adjusted, so it must have a margin for rotation both vertically and horizontally. If it is difficult to determine where to install the antenna, then the direction to the satellite can be determined by trying to catch the satellite from another place where there is more open space. For example, from the ground or from any flat surface. Then decide on the direction to the satellite and the tilt of the dish and whether it will be possible to catch the satellite at the installation site.
NOTE: Some models of C-band converters allow you to increase the signal level with a non-standard depolarizer position, namely +90° relative to the slots. It is only possible to determine whether this is so in your case only practically. When installing the GOSPELL GCF-D11C converter, you need to insert the depolarization plate inside the converter pipe along the grooves on the inner wall of the pipe. If you look inside the converter tube, the plate should stand at approximately an angle of 45 degrees relative to the front pin standing vertically, having first turned the converter so that the front pin is vertical. When setting up the terminal, L-polarization will be turned on with a voltage of 18 volts (in the terminal settings this corresponds to horizontal polarization, H-polarization). Most channels from the YAMAL satellite are transmitted on horizontal polarization (GAZKOM package frequency 3645 MHz L-polarization flow rate 28000 FEC ¾). In the terminal settings, you must set the converter local oscillator frequency to 5150 MHz. In the PBI Turbo-1800 converter, the plate is already inserted into the converter feed (pipe). However, you should open the front plastic cover and remove the bolts that are sometimes placed there. In the converter, when setting up the terminal, the horizontal polarization will correspond to L-polarization (left - circular). Most channels from the YAMAL satellite are transmitted on horizontal polarization (GAZKOM package frequency 3645 MHz L-polarization flow rate 28000 FEC ¾). In the terminal settings, you must set the converter local oscillator frequency to 5150 MHz
That's all. Thank you for your attention.
Satellite television is very popular in our country. It is chosen by many consumers for its wide range of coverage and reasonable cost. Most of the streams received from this satellite are publicly available.
Broadcasting is carried out in C-band and Ku. Band C broadcasts a large number of TV channels, including 40 free ones. The user has the opportunity to receive them at different time intervals. This will also require a Ku-band connection.
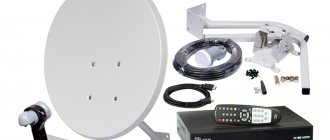
Yamal 201 is a satellite dish with a diameter of 0.9 m. This parameter depends on the region of location. Experts link the size of the system to the quality of the perceived signal. With a larger diameter, the intensity and quality become better.
- Setting up a satellite dish: instructions on setting up a dish for a satellite with your own hands
The products presented on the modern market differ in several respects: size, cost. Yamal satellite antenna channels make it possible for everyone to watch quality TV.
A TV with a built-in satellite receiver has some advantages.
History Corner!
Yes, that’s what I wrote in 2013! In a word, a few lyrical memories, or what we worked with not so long ago.
- No need for a separate receiver.
- No need for HDMI-HDMI connecting cord
- No need for a separate remote control.
But, you can forget about Aunt “sharu”, which is not a disadvantage for owners of official access cards.
But if the TV has a built-in digital tuner that supports the DVB-S2 standard, this means that the TV will receive (if the antenna is correctly tuned to the satellite) the signal of satellite channels.
TV with built-in satellite receiver, however, be careful:
This is where confusion can sometimes occur, because other tuners with similar names are built into the panels and have nothing to do with satellite TV.
So:
— The tuner for terrestrial digital broadcasting is called DVB-T2 or DVB-T (not suitable) — The tuner for cable digital broadcasting is called DVB-C (not suitable) — The tuner for satellite digital broadcasting is called DVB-S2 or DVB-S (Suitable)
The letter T stands for terrestrial TV, the letter C for cable, and the S for satellite. As you can see, the difference is only in one letter, and the tuners are completely different.
Installation of antenna equipment does not differ from standard installation using an external receiver.
TVs with a built-in satellite receiver can easily scan channels both manually and automatically, but will only show unencrypted channels.
Almost all modern TVs with a built-in satellite tuner support the DiSEqC 1.0 protocol, which means you can receive signals from at least four satellites using a 4x1 DiSEqC switch.
One... just a satellite receiver and antenna built into the TV will not be enough.
The fact is that almost all television channels broadcast from satellites are not broadcast in an open format, but in one encoding or another.
"AS PLUS" - in Crypt On, Tricolor TV - in DRE Crypt, "NTV +" and many erotic operators - in Viaccess, "Raduga TV" and "Continent TV" - in Irdeto, "Telekarta" - in Conax and etc.
And therefore, having installed an antenna and tuned in the channels of one or another operator on your TV, on the screen, instead of the long-awaited high-quality image and favorite program, you will only see an inscription something like “Coded channel”.
To solve this problem, you need to purchase and install a decoding device in your satellite TV - the so-called access module (CAM module and access card inserted into the CI+ slot)
Do you mean that 90% of satellite TV channels are encoded!
And so... TV with built-in satellite receiver
NTV+ conditional access module Viaccess CI+ for setting up NTV-Plus channels on DVB-S2 TVs of various brands.
Let's start with Samsung, for example:
First, it is advisable to reset the TV to factory settings:
Menu > support > self diagnostic > reset > ok.
After the reboot, go to menu > channel > antenna > select the “satellite” value.
Further in the same section: satellite. system - enter the password > 0000
We uncheck all satellites that are installed by default (if this fails, you need to remove the CAM module from the slot and reset the TV again).
We scroll through and select the EutelsatW4 36E satellite, in the LNB settings we select transponder 12130 R, lower gene. LNB - 0, top - 10750.
Advantages of Yamal TV
The use of Yamal TV provides the following advantages:
- Wide variety of broadcast streams . At the dawn of its appearance, the operator presented about 50 streams. Currently, the figure has reached more than 95 titles, radio stations - more than 25.
- Wide coverage of territory . The operator's coverage area covers 98% of the territory of the Russian Federation, part of the territory of neighboring countries, as well as some countries in Europe and Asia. Thanks to this, high-quality Internet and television will be available to everyone.
- The operator has provided favorable terms of cooperation . Up to 40 channel names are available to the subscriber, for viewing of which no additional payment is required. They include broadcasts of federal significance, sports, regional, children's, entertainment, and music.
- The price of the kit is available to every consumer.
Watch the video
Satellite television is now available in many homes.
It makes it possible to view many channels, the signal from which is received from different satellites. Before you start setting up the antenna using the receiver and TV, you need to assemble it and install it in the right place so that the signal is clean and passes unhindered to the receiver, and also so that the quality of the video display is high.
One satellite antenna can simultaneously receive several satellite signals, it all depends on the number of antenna heads. Let's look at how to set up a Yamal satellite dish.
Installation Features
The Yamal 201 satellite antenna, if installed and launched correctly, will allow you to enjoy watching high-quality video for a long period of time.
When deciding on a location, it is recommended to choose an open space oriented towards the broadcast source. During the work process, direction adjustments may be required. To do this, you need to provide a margin for rotation: both vertically and horizontally, because it is not always possible to determine the optimal location the first time.
The solution to the problem in such cases is to search for a satellite from any convenient point - the surface of the earth or an open plane. After this, having decided on the direction and inclination, you can quickly pick up a signal in the selected area. Nearby systems aimed at the same source will also serve as an excellent reference point.
During installation work, it is recommended to take into account that Yamal-201 operates at 90 degrees.
Before starting work, it is recommended to make sure that the installer’s actions are correct:
- The signal passage should not be interfered with by the walls of nearby buildings or tree branches. They can lead to poor connection quality.
- It is necessary to check the surface for contamination, which will also lead to loss of broadcast quality.
- It is necessary to check that all devices are connected correctly.
Setting up the Yamal 201 antenna requires the following elements:
- antenna;
- TV;
- transponder;
- cables that provide connection between structural elements.
When connecting, it is important to follow safety rules. When connecting devices with cables, be sure to turn them off. Timely measures taken will not only protect against unforeseen situations, but also help maintain the integrity and safety of products.
In order to configure the tuner to the satellite, you will need to perform the following sequence of actions:
- Using the remote control, go to the Setup Menu to the “Hardware Settings” item. Here you can control the connection level and reception quality. If an insufficient level is detected, you should change the position of the device, choosing the most optimal one.
- Next you need to specify - Yamal.
- In the “Frequency” section you will need to specify the value 10990 MHz.
- In the “LNB Power” line, check ON.
- In the “LNB Type” section, you should define the “Universal” parameter, frequency - 9750.
- The next stage is DiSEqC, indicate the one that is used, and opposite the unused one, indicate the OFF mark.
- Next, you need to go to the “Search” section.
- Specify the search type for satellite streams.
- Run the process and wait for the results.
- The displayed list of streams can be sorted as you wish.
- Save the received data.
- Turn off the receiver, first using the remote control, then turn off the power. If you immediately unplug the device from the outlet, the search results and the user-set order will not be saved, and the procedure will need to be repeated. This will take a lot of time.
Setting up the receiving device
To ensure a high-quality connection, you will need not only to select a suitable receiving device, but also to perform proper installation and configuration. First of all, it is recommended to determine the location of the structure. It is worth considering that during the installation process, adjustments to the equipment may be required, so the fixation should not be maximum.
A margin for rotation is left both vertically and horizontally, since it is rarely possible to select the optimal position the first time. It is easier to search for a satellite from an open plane. If there are already installed systems nearby, they can be used as a guide. The Yamal 201 model operates at an angle of 90 degrees.
Before you start setting up the Yamal 201 antenna, you need to make sure that nothing will interfere with high-quality signal reception:
- the walls of neighboring buildings may interfere with the signal, and tree branches may also be an obstacle;
- there should be no dirt or debris on the surface; they can also lead to a decrease in the quality of the broadcast;
- you need to make sure that each device in the system is connected correctly and is working properly.
To view satellite broadcast channels, the user needs the following components: TV receiver, dish, transponder, cables and connecting and fastening parts.
Before connecting the wires, they must first be disconnected from the power supply. To set up the tuner, follow these steps:
- Using the remote control, you go to the settings menu, where you need to select the “Hardware settings” item. Here the quality of reception and connection level are monitored.
- The next step is to select a satellite; it will be indicated by the name of the operator.
- In the “Frequency” section the value is set to 10990 MHz.
- Next, go to the “LNB Power” section to make sure that o is installed there.
- In the “LNB Type” line, set the “Universal” parameter and set the frequency to 9750 MHz.
- Now you have to choose DISEqC. Opposite the unused one, it is necessary to install o.
- Goes to the “Search” tab.
- After specifying the type of streams, start the search process and wait for the results.
- The list that appears on the screen can be sorted by the user at will.
- It is recommended to save the received data.
After performing the search, the receiver must be turned off both from the button on the case and from the outlet. If you immediately disconnect from the power supply, the settings will not be saved.
Some users prefer to manually configure their hardware. To do this, there is a special yellow button on the receiver's remote control. After clicking it, you will need to specify the frequency values manually. After a few minutes, the signal strength and type will be displayed on the screen and you can search for channels.
Source
Manual satellite tuning
First, you need to press the yellow button on the receiver's remote control. It is provided on all modern models. After this, you need to manually enter the frequency value. After a while, a connection signal will be displayed on the screen, and you can start searching for streams.
Correct adherence to the recommendations presented will allow you to obtain an efficient and functional system that guarantees high-quality viewing. When performing installation, follow the safety rules and instructions provided by the manufacturer.
Setting up a Smart TV
When purchasing new LG Smart TV household appliances, users can not only watch their favorite shows and movies, but also receive constant access to the Internet. How to set up an LG TV yourself if it supports the Smart function? Setting up the TV is done only after ensuring a stable connection to the worldwide network via a wired connection or Wi-Fi router. By connecting the product to the electrical network and providing a connection to the Internet, you can tune in analog channels or digital TV.
Installation is done as follows:
- go into the settings of the Lg TV receiver and select the “Network” item;
- select a network connection and click “select” on the screen;
- Select the desired type from the list - wired or wireless network, press the update button;
- Now the smart product sees the Internet connection, click ready;
- We register on a special portal: create a call sign, enter a password, then a letter is sent to your email - you need to open the specified link to confirm all actions;
- access has been obtained, go to the Internet using your nickname and password, move on to the main thing - how to set up channels on your LG TV for reception;
- install the “SS IPTV” application.
After this, you can directly tune the channels on your LG TV in the same way as the previously discussed method. Setting up Smart TV on Samsung TVs also has its own nuances. Now you know how to set up digital TV on various models.