Each person would prefer to watch, in addition to central television channels, another 20-30 thematic TV channels in high definition. What is needed for this? Choose one of the Russian satellite broadcasting operators, purchase a set of equipment and configure it.
In most cases, configuration and installation of equipment is included in the purchase package, so after purchasing the “plate”, installers come to perform the necessary work. However, you can completely cope with this task yourself, and we will tell you how to do it.
Antenna structure and equipment set
Considering that the instructions are designed for a beginner, let's start with the basics. All satellite antennas present on the domestic digital television market are divided into two groups:
- Offset.
- Direct focus.
The difference between the models lies in the operating principle.
In direct focus antennas, the signal reception converter is located exactly in the center at a short distance from the mirror. In offset ones, the signal is reflected at an angle, and accordingly the converter is shifted relative to the axis.
The method of installation depends on the type of antenna. Direct-focus ones are mounted at a right angle, which corresponds to the satellite’s trajectory above the horizon. With offset analogues the situation is different. Here you need to turn to the school physics course and remember that the angle of incidence of the beam is equal to the angle of reflection.
Therefore, such models are installed with a slight inclination relative to the satellite.
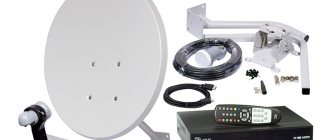
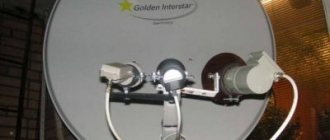
The satellite dish consists of the following elements:
- Mounting bracket.
- Reflector mirrors.
- Irradiator with a removable casing that protects from precipitation.
- Depolarizer – converts circular polarization into linear frequency.
- Converter with signal amplifier.
In addition, the basic package includes:
- tuner responsible for broadcasting channels;
- disek – switch between converters that receive a signal from a satellite;
- coaxial cable with connection connectors.
The package also includes connecting plugs, anchor bolts and dowels.
Choosing a suitable location for equipment
First of all, you should choose the optimal location for the satellite dish. What should be understood by the term “optimal”? Of course, a completely free area in the direction of the transmitting satellite.
That is, in a given direction the presence of any objects such as:
- buildings;
- trees;
- advertising posters, etc.
It is also recommended to ensure that the remaining equipment (receiver, TV) is placed as close as possible to the installation point of the satellite dish. These are not critical requirements, but fulfilling these requirements will help simplify the setup of the equipment.
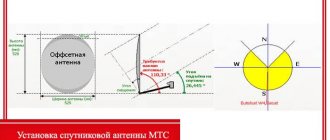
Tuning antenna diagram: 1 – direction “north”; 2 – direction “south”; 3 – azimuthal direction; 4, 7 – angle at the installation site relative to the satellite location; 5 – television satellite; 6 – satellite signal
Traditionally, “plates” are placed on the wall of a building next to a window opening, or installation is done on the side of the wall that is part of the balcony (loggia) structure.
The instructions prohibit installation directly inside the balcony area, especially a glazed one. The equipment should also be installed at points where there is no possible fall of precipitation in the form of snow and ice from the roof.
Antenna installation
Let us immediately note that installation must be carried out in strict accordance with the manufacturer’s instructions, which are included with the equipment. If you don’t follow the mandatory rules about high-quality images, you can forget. Correct installation of the antenna consists of the following steps:
Choosing a direction . The mirror of the “plate” always faces south, and no foreign objects should fall into the target. If the antenna is installed in a private house, it makes sense to mount it at a height of 7-10 m from the ground: this will reduce the level of dust in the air and help to significantly improve image quality.
Installation of fasteners . First, mounting brackets are installed, which are secured with anchor bolts or collet pins. The main rack is installed strictly vertically, otherwise setting up the equipment will be problematic.
Assembly and installation of the “plate” . An antenna is assembled to which the converters are screwed. These elements are always installed with the connectors down to avoid oxidation of the contacts. All connections are reliably insulated and covered with a layer of sealant for greater reliability. The assembled antenna is hung on a bracket and secured with fasteners.
After this, the finished “dish” must be oriented in the direction of the broadcast satellite. To do this, exact geographic coordinates are determined; a mobile device with a satellite navigation module will help here.
The azimuth of the broadcast satellite can be found on the provider’s website, where there is an inclination angle calculator.
Next, all that remains is to align the “plate” in accordance with the coordinate grid. To do this, it is recommended to use an engineering compass.
To configure the antenna to receive a signal, perform the following steps:
- The TV and tuner are connected to the converter via a coaxial cable. The equipment is connected to the network, and the following menu items are selected sequentially in the receiver menu: Installation -> Manual search.
- Then the antenna itself is adjusted by swaying relative to the installation axis. This is necessary for the equipment to “catch” the satellite.
- above 60% is good .
After this, the mirror is carefully tightened, trying not to disturb the azimuth.
During pre-tuning, you should not be in front of the antenna: any objects in the reception area will negatively affect the image quality.
Searching for a satellite and tuning channels
Once all the cables are connected, the TV and receiver are turned on, and the satellite dish is installed and pointed south, you can begin setting up the antenna.
With multiple converters
If several converters are connected, you need to start working with the middle one, tuning it to the Sirius satellite. The sequence of actions will look like this.
- The receiver needs to set the frequency to 11766, speed to 27500 and “H” polarization. 2 bars will appear on the screen: red, which indicates the connection of the dish and the receipt of a signal from the satellite, and yellow, indicating the level of this flow. When the antenna is aligned correctly, the first bar will be at the 40% mark.
- To adjust the signal level, which is initially at 0%, you need to point the antenna dish up and turn it to the left as much as possible. Next, smoothly turning the antenna to the right, you need to find the best signal.
- If there is no result, you should lower the antenna 2-3 mm and repeat the steps described above.
- The antenna must be lowered lower and lower until the yellow bar reaches 21%.
- Having remembered the position, you should lower the antenna slightly, turn to the right and check if the signal improves. If it gets worse, return the antenna to its original direction, turn left, lower and raise. Check the location of the strip. Actions must be performed until the signal improves to 40%.
- Next you need to move on to setting up the converter. Smoothly rotating it clockwise and then counterclockwise, you need to move the yellow strip to the 65-70% mark. At this signal level, the image quality will not be affected by precipitation, wind or other weather conditions.
In the same way, you need to configure the remaining two converters: the first is tuned to the Amos satellite, frequency 10722, speed 27500, “H” polarization, and the second is tuned to the Hotbird satellite, frequency 11034, speed 27500, “V” polarization.
Setting up channels
The process of setting up satellite antennas for any other satellites, at the user’s request, is similar. This will require data on their location and approximate frequency.
After completing the antenna setup and achieving a good signal level, you can begin searching for channels on the set-top box. To do this, you need to start a scan, after which a list of all available channels will appear.
Tuner settings
The next important step in installing a satellite dish is setting up the tuner. The equipment of some providers automatically detects the satellite, the user only has to catch the necessary TV channels.
If there is a need to fine-tune or change the parameters specified by the manufacturer, go to the “Menu” section and select the “Installation” sub-item. There will be several sections here, so we will consider in detail what each item is responsible for.
Satellite. The first line indicates the name of the broadcast satellite and its location in geopolar orbit. The name of the translator does not affect the equipment settings.
Sometimes the desired satellite is not on the list at all. In this case, select any translator and tune in to its frequency.
LNB type . The type of installed converter is determined here. There are two types of devices: C and Ku , depending on the reception range. In the first case, the menu is set to “Standard”, in the second – “Universal”.
TP number . This section displays a list of transponders. Using the buttons on the remote control, you can scan the frequency and save all broadcast channels. Information about the required parameters can be found in the provider's frequency table.
DISEQC . This is a switch between converters configured for a broadcast satellite. If the antenna works with one translator, you need to set the menu to DISABLE (disabled). When the antenna is configured for several satellites, the line indicates the connection port to the desired converter.
Positioner . This function is responsible for automatically adjusting the antenna to the azimuth of another satellite. For this purpose, the “plate” is driven by a built-in electric motor. If there is no corresponding key on the remote control, then the equipment does not support this function, so the menu is set to “disabled”.
Polarization . This item can be left in automatic search mode. If you select the vertical or horizontal settings, only TV channels located in the specified plane will be broadcast.
LNB power supply . The item must be in the on position so that power is supplied to the converters.
The interface of equipment from different providers may differ, so carefully read the manufacturer's instructions for setting up the equipment.
How to connect satellite TV without a receiver
Now let's return to the topic that was mentioned in passing - the operation of satellite TV without a receiver. This is possible, but only if your home TV already has a built-in receiver inside. Then connecting yourself will become even easier, because it will be enough to run the cable from the installation outside directly to the TV in the house.
Of course, this is much simpler, but such receivers also have their own problems, for example, in the limitation of received frequencies and limited customization options. And even though such televisions are not new today, not everyone has them yet.
TV with built-in satellite receiver
But if the consumer still wants to install satellite TV in this way, he will have to look for suitable TVs in hardware stores. The easiest way would be to just ask the seller and ask to show the line of such TVs.
I think that in absolutely any store there is just a whole line of TVs lined up in a row that would be suitable for the consumer’s purposes in our case. The choice itself between TVs with built-in satellite receivers depends more on the future user, and not on any requirements, because such receivers are almost always the same technically.
How to set up your TV
This is the easiest stage of setting up the equipment. After connecting the antenna and debugging the receiver, testing of available TV channels is carried out. Typically, programs are arranged in a random order depending on the broadcast frequency.
Using the remote control, you need to connect the channels in a convenient order.
Step-by-step instructions for installing the plate
You must first assemble the satellite antenna structure as described in the attached instructions. As a rule, antennas are supplied disassembled. Therefore, the structure should be assembled using the accessories supplied.
Next, we will consider the step-by-step installation of a satellite dish.
Step #1 – attaching the antenna holder bracket
Again, taking into account working with a branded product, where all installation elements and components are designed for the appropriate load, work is being done to install anchor bolts in the wall of the building.
One of the options for antenna brackets that are used for reliable, strong installation of a satellite dish. Initially, a support pipe is attached to the wall, and the antenna bracket is directly attached to the pipe.
This work is done in a standard way, using a tool for working with concrete. After introducing the anchors, a support rod is attached to the installed anchors, and a metal bracket is attached to the rod.
Step #2 – installation of the antenna converter
Installation of the pre-signal amplifier - converter is carried out strictly according to the instructions, where all the details of the placement of this component are noted.
The converter itself should be secured in the support ring so that the device is perfectly sealed. Even a small penetration of moisture inside threatens to disrupt the operation of the device.
Step #3 – connecting the cable to the converter
At the current stage, the cable, which is usually also included in the kit, is connected to the converter module. The connection is made using the special “F” connector included in the delivery package.
An example of a well-connected cable on the converter side. The successfully sealed connection area is clearly visible, which will ensure stable operation of the amplifier for a long period of time.
The connection area must be carefully sealed, for example, with silicone sealant. The cable from the switching point is pulled carefully and without unnecessary effort along the body of the converter holder rod. It is fixed at regular intervals with plastic ties or other means.
Step #4 – securing the satellite dish
The prepared “plate” is installed on the bracket, while the adjusting screws are not tightened all the way - they are left loose.
This approach is necessary for the simple reason that further (after installation) the procedure for fine tuning to the satellite will follow. Accordingly, the “plate” will have to be moved both vertically and horizontally.
An installed, fully customized household “dish”, ready to reward its master with a high-quality television picture received from a satellite
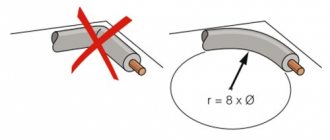
Separately, it is worthwhile to provide instructions on installing the F-connector on a coaxial cable. This operation has its own characteristics. The final area of the cable (approximately 15 mm long) must be freed from the first insulating layer.
But the insulation must be removed taking into account maintaining the integrity of the screen braid present under the insulation layer. Then the second layer of insulation is removed at a length of about 10 mm. This frees the central copper core. Next, screw the connector onto the stripped end switch until it stops, passing the copper conductor into the corresponding hole.
Common connection errors
If, after installing the equipment, the image leaves much to be desired, it means that errors were made during setup, which led to a deterioration in the quality of signal reception. In most cases, users make the following mistakes:
- insufficient diameter of the antenna mirror - leads to loss of signal in bad weather conditions;
- errors when choosing the polarization of the converter - do not allow the equipment to tune to the desired satellite;
- lack of a protective casing - at low temperatures the irradiator will become covered with ice;
- connection via an unsuitable cable - the core must be copper: a steel core noticeably worsens the reception quality;
- poor-quality cable crimping at the connection points.
In addition, most users make mistakes when connecting two or more TVs to a satellite dish.
If you are not confident in your abilities, you should not install the equipment yourself. In the best case, specialists called to fix the malfunction will require partial compensation for the cost of damage; in the worst case, the repair is completely carried out at the user’s expense.
Connecting to a TV via a receiver
The simplest and most common way to connect satellite equipment to a TV is to connect through a receiver . To connect the set-top box to the television panel, you can use the following connectors:
- antenna input;
- RCA, also known as “tulip” - for transmitting an analog signal;
- component connector;
- SCARD;
- HDMI.
Important! Connecting the set-top box to a TV receiver via a tulip or television cable with a standard antenna plug or F-connector provides a low-quality image. The best picture can be obtained when connected via HDMI. And from the converter to the receiver the signal is transmitted through a television cable with a connection through the F-connector.
In addition to its main purpose, an external receiver performs a number of additional functions, for example, playing photos, videos or audio from a flash drive or hard drive, connecting a TV to the Internet, etc.
Advantages of satellite television
DIY 4G antenna for modem
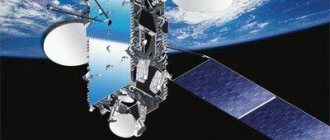
Satellite television is called so because the satellite acts as a repeater. While in its orbit, the device receives a signal from the provider and distributes it in different directions. The dish is a concave mirror that catches a powerful and clean signal directly from the spacecraft. The antennas are installed so that the dish is pointed at the satellite; due to the rotation of the earth, there is more than one satellite in orbit. The network of devices makes a circular motion in the equator belt towards the direction of the Earth's movement. Thus, the next satellite is constantly located at the point where the dish is pointed.
Location of satellites in Earth's orbit
In addition to the fact that the quality of the signal ceases to depend on many factors influencing it, a satellite antenna allows you to catch more than two dozen channels, unlike a conventional antenna. You can install it with your own hands anywhere and choose the operator yourself. The existence of open free channels allows you to use them for unpaid services. They are on almost all satellites, but there are few Russian-speaking ones among them.
Principle of operation
Satellite works just like terrestrial television. The dish is used as a receiving device, and the satellite serves as a repeater. Therefore, for successful operation it is necessary to receive a high-quality signal and display the image on the screen.
Television broadcasts in analog format and digital standard. In the latter case, a digital signal of the DVB-S/S2 standard is transmitted, which must be decrypted before viewing. Only two devices can be used for this:
- TV tuner. A built-in TV decoder of digital information into a familiar image.
- Receiver. A separate device for decoding the digital signal and displaying the image on the screen.
Television supply
There are two types of programs broadcast from the satellite - open and encrypted TV channels. The latter are paid content, to unlock which you use an operator payment card inserted into the CAM connector.
From what has been discussed, we can conclude that in order to connect a satellite dish, you need two devices - a decoder and a CAM connector.
Technically, television is available even if you connect a dish without the above-mentioned equipment. However, only open channels will become available, and the image quality will remain at a low level, comparable to ATV. Therefore, to watch high-quality television, you need to connect both devices.
Types of plates
Satellite TV receivers belong to the category of mirror devices. They are the most popular type of this line, used in the range from UHF to Ka-band. They are installed both for private use and when organizing space projects. The sizes of the devices range from a tenth to tens of meters. For individual use the following types are used:
- direct focal antenna;
- offset design - type with an offset head.
If the focus is located on the axis of symmetry with the reflector, then this is a direct focal antenna. Its irradiator is located in the center of focus directly in front of the reflector.
Straight focus antenna device
Offset designs are made using a cut from a parabolic mirror. They have a shift in the radiation pattern relative to the mirror axis by an offset angle. This is called the offset angle. Unlike the direct focal position of the feed, in this case there is no shading of the antenna mirror, and the surface utilization factor increases.
For your information. The holder and the irradiator itself do not block the direction of the device towards the satellite. The adjustment when aiming at the signal source is vertical. This reduces rain and snow from entering the antenna receiver.
Antennas with a diameter of up to 2.5 m, receiving signals coming from the satellite, are made according to this principle. With these dimensions, a plus in gain is added by the ability to use the entire reflector mirror due to the absence of shading areas. This type of antenna has its own drawback: a low class of polarization isolation, leading to increased interference from the adjacent polarization of its own source. With large dimensions, it is more difficult to manufacture and install offset reflectors than direct focal mirrors.
Attention! At a small vertical pointing angle, even if the antenna is aimed at the source, the bowl looks down. Monitoring a spacecraft near the horizon for devices of this type is a minimum interval of 0-10 degrees. In this case, the rotation adjustment device reduces the rotation angle for guidance.
General information about satellite broadcasting
Broadcasting satellites are located in geostationary orbit, at an altitude of 35,786 km above sea level in the plane of the Earth's equator. The orbital speed at this altitude is equal to the speed of rotation of the Earth, so the satellite hangs over the same point on its surface. The location of the satellite in geostationary orbit is called the station point.
In reference manuals, satellite locations are designated by their geographic longitude: angular distance from the prime (Greenwich) meridian. This must be taken into account when orienting the antenna and a correction must be given: from a given point, the Greenwich meridian is “visible” at an angle opposite to the longitude of the location. How some stationary satellites are visible from Greenwich is shown in the figure.
Example 1: the longitude of the center of Voronezh is 39 degrees 15 minutes east. The position of the Eutelsat II F4 satellite is 7 degrees to the east, i.e. from Greenwich this satellite is visible at 7 degrees to the east. If Eutelsat II F4 hovered exactly above the prime meridian, the antenna would have to be rotated 39 degrees 15 minutes towards Greenwich to receive it, i.e. west. And since Eutelsat II F4 is already “shifted” by 7 degrees towards Voronezh, the antenna needs to be turned west by 32 degrees 15 minutes.
From Earth, the stationary orbit is “visible” in the sky in the form of the so-called “Clark Belt”. It should not be confused with the celestial equator. The angular height of the celestial equator varies throughout the year, and the Clarke Belt is “visible” as an arc of a curve that degenerates from a circle at the poles to a straight line at the equator. The Clark Belt “rests” on the horizon exactly in the east and west, regardless of location.
At a particular geographic location, the highest point of the Clark Belt is located exactly in the south, and its angular altitude is equal to the inverse of the geographic latitude of the place: 0 at the poles and 90 degrees at the equator. Therefore, at high latitudes, reception of satellite television is difficult or completely impossible: the Clark Belt “lies” on the horizon, and the satellite signal, even if it “shines” here, “stalls” in the atmosphere.
Example 2: the geographic latitude of the center of Voronezh is 51 degrees 20 minutes north. The highest point of the Clark Belt is seen from here at 90 degrees minus 51 degrees 20 minutes = 48 degrees 40 minutes due south.
Satellites do not emit signals in all directions; that would be too wasteful. The transmitting antennas of satellites are directional and, as a rule, “illuminate” the territory of the owning country, or the region to which the broadcast is carried out. Therefore, it is impossible to “catch” all the satellites visible from a given place: it may be visible, but it “shines” in the other direction.
If the satellite “shines” directly downwards, then, in principle, it can broadcast to the entire hemisphere below it, having an antenna with a radiation pattern with an aperture of just over 10 degrees. However, at a distance of 36,000 km, this requires a transmitter power of more than 10 kW, solar panels of the appropriate area, and the entire satellite must be launched into orbit by a heavy carrier. Therefore, there are not so many broadcast satellites.
Video: Basic Points of Satellite Dish Direction
Satellite TV set
When purchasing a set for watching television channels, you need to know what should be included in it. The main components of a satellite TV set are:
- satellite dish;
- signal converter;
- controlled DiSEqC switch;
- bracket with fastening elements;
- DVB receiver;
- F-connectors for cable connection.
All components are indicated in the operating instructions or in a separate list included in the package.
The dish (reflector) receives a signal from a space device. Mirrors with a diameter of 60 cm - 1.2 m, depending on the obstacles located along the signal.
The head (converter) converts the signal taken from the plate before being fed to the receiver. Conversion devices can be designed for multiple inputs to connect more than one receiver at the same time.
The Disek Managed Switch (DiSEqC) is designed to connect multiple converters.
The fastening device (bracket) serves as an element for fastening the antenna. Requires a careful approach when choosing the geometry of the structure.
The DVB receiver is the most expensive element of the kit. It all depends on the number of encodings supported by the receiver. To view more paid channels, you need a receiver that has a slot for installing an additional module, which increases the number of encodings. The price range depends on the parameters that the devices support.
World Vision Premium Combo Receiver
The connector connecting the cable to the equipment is an F-connector. Minimum quantity – 8 pcs. With its help, cable ends are terminated without the use of a soldering iron. For mechanical strength and insulation, heat shrink tubing can be used on top after connection.
The length of the cable required to connect the dish to the receiver is determined in advance; the choice of brand depends on the characteristics of the equipment. The cable and mounting anchors are purchased separately and are not included in the kit.
Converters
Reducing the frequency of electromagnetic radiation of the signal in the “Ku” (10-13 GHz) and “C” (3.5-4.5 GHz) bands to intermediate values with a frequency of 0.95-2.5 GHz occurs thanks to the converter. This is necessary in order to reduce losses between it and the receiver. As a result, it is also possible to increase the cable length up to 100 m without loss of the carrier signal.
High-quality converters have low intrinsic noise. This is one of the characteristics to consider. Manufacturers indicate a noise range of 0.3-0.6 dB. There are practically no devices on sale with a noise value of less than 0.3 dB, and if the label indicates a parameter of 0.2 or 0.1 dB, it is worth carefully studying the quality certificate and accompanying documents.
Of the models presented on the consumer market, the most commonly used ones can be identified:
- "C" band device;
- “Ku” band converter having circular polarization;
- universal “Ku” band converter, working with horizontal and vertical polarization.
For your information. When choosing a converter, you need to pay attention not only to the noise level, but also to how many outputs this device has. There are converters that have independent sockets for 2, 4 and even 8 outputs, allowing you to connect several receivers with a TV. This allows you to view channels that have different polarizations.
To connect two receiver-TV pairs, you need to buy a converter that has two separate outputs.
Multiswitch connection diagrams
Multi means a lot. To connect several receivers to several antennas so that the receivers work independently, use a multiswitch. While DISEqC allows you to connect only one receiver, the mutiswitch is limited only by the number of its outputs. Do-it-yourself connection is made taking into account the fact that the multiswitch has input and output connectors. Converters are connected to input jacks, receivers are connected to output jacks.
The scheme is assembled according to the following rules:
- the number of receivers corresponds to the number of multiswitch outputs;
- the number of inputs required for one converter is four.
The signal flow is divided into two subranges: upper and lower, as well as horizontal and vertical. Therefore, connecting it will take 4 inputs.
Conclusions and useful video on the topic
Below is a video where a home master explains from personal experience all the intricacies of installing the “plate”.
Accordingly, the entire process is filmed on a video camera, so the reader is clearly shown how to install a satellite dish with his own hands:
Despite the visible and invisible difficulties that appear during the installation of a satellite dish, it is quite possible to cope with such work with your own hands. The main point is the scrupulous collection, processing of relevant information and, of course, careful study of the accompanying instructions.
Would you like to talk about how you installed and configured a satellite dish with your own hands? Do you have information on the topic of the article that is worth sharing with site visitors? Please write comments in the block below, ask questions, post photographs.