Until recently, TP-Link routers with IPTV support had problems with standard firmware. At best, on some models it was possible to simply enable IGMP support, and only on a few models it was possible to allocate a port for a set-top box. Now the list of TP-Link models supporting IPTV has increased significantly. Updated firmware has been released for such popular models as TL-WR740N, TL-WR741ND, TL-WR743ND, TL-WR841ND, TL-WR941ND, TL-WR1042ND and TL-WR1043ND, although not for all hardware revisions. Also released firmware for TP-Link routers with added support for 802.1q traffic tagging (VLAN).
A complete list of TP-Link router models that support IPTV digital interactive television is here - link. If your TP-Link router model can work with IPTV, follow the instructions for connecting digital television:
The first thing you need to do is get into the web interface of your TP-Link router. Most TP-Link models use an IP address on the local network - 192.168.1.1 (https://192.168.1.1) and only a few models - 192.168.0.1 (https://192.168.0.1). The login to access the TP-Link web interface is admin. The default password is also admin. If you have difficulties accessing the router’s web interface, see these instructions. To connect digital television, there is a section “Network” => “IPTV” in the router’s web interface.
Which TP-Link wifi routers support IPTV?
In order to understand whether your router supports TP-Link IPTV, I recommend that you familiarize yourself with the list of models on the official website of the developer. On my own behalf, I can add that all new TP-Link firmwares have added the ability to assign a separate LAN port for working with IPTV and configure IGMP Proxy.
But if you don’t have this function in the admin panel, then first of all I recommend reading our instructions for flashing TP-Link routers, and only then taking some steps to set up IPTV.
Online viewing
Available in 2 versions - on Smart TV or with a “regular” TV receiver via a set-top box. The m3u playlist must be downloaded: it can be found in the TV settings (some manufacturers create such an option) or on the Internet. Without a ready list of TV channels, viewing is impossible.
As a rule, with properly configured equipment, no difficulties arise with broadcasting. Except for situations where the channel link is inactive. In the additional settings of the TV and set-top box, playback quality, resolution and frame rate are indicated.
Sometimes malfunctions occur due to poor Internet speed. You should contact your provider to select the required tariff plan and clarify data transfer rates.
Setting up IPTV on TP-Link via VLAN ID on TP-Link for Rostelecom
Setting up IPTV for Rostelecom on TP-Link is done by specifying an individual user identifier - VLAN ID. The provider issues it to its subscribers, so you will need to check your number with technical support or look it up in the service agreement.
On the old router, you also need to activate “IGMP Proxy” and then select “802.1Q Tag VLAN” in the mode menu
The page will be updated and many new IPTV settings will appear. We need to leave everything as default, and only fix a few points:
- Disable "VLAN TAG for Internet"
- In the “VLAN ID for IPTV service” field, enter the value provided by the provider Rostelecom (VLAN ID)
- We put “LAN port operating mode” on “IPTV” opposite the connector where the set-top box was connected.
In the new control panel:
- Check the box next to “Enable IPTV” and “IGMP Proxy”
- In the mode, select “Specify manually”
- Registering the VLAN ID for IPTV
- Assigning a LAN port to work with an IPTV set-top box
That's all. If something doesn't work out, ask in the comments. We’ll talk about setting up IPTV on routers of other brands separately.
Basic setup
The setup procedure begins by logging into the basic interface of the router, the so-called “admin panel”. The standard IP address used by the TP-Link developer is 192.168.1.1 (less commonly 192.168.0.1). It must be entered in the address bar. The default login and password are admin/admin.
In the web interface we will need the “Network” section, where there is a corresponding tab – “IPTV”.
Next we will work directly with it. It doesn’t hurt to make sure in advance that your router is designed for interactive TV broadcasting. This can be done on the manufacturer’s website by following the link https://www.tp-linkru.com/article/?faqid=518.
IPTV is guaranteed to support: 720N, 740N, 741ND, 743ND, 841ND, 941ND, 1042ND, 1043ND, MR3220. The device model and software version are indicated on the nameplate attached to the bottom panel.
More about UDP proxy
A UDP proxy server is designed to convert a UDP IPTV multicast data stream into a TCP unicast stream. This allows you to solve 2 problems:
- Stream IPTV over Windows local network.
- Ensure stable transmission of IPTV as Http traffic via a router.
A UDP proxy has been added to the software shell of modern multimedia devices that do not support multicast. The main advantage of using UDP proxy for IPTV is that the application provides the most reliable transmission of IPTV traffic, allowing you to view high-quality broadcasts on literally any multimedia equipment.
Setting up IP-TV for D-Link
Setting up IP-TV on D-Link DIR-615 ver. E
Go to Advanced -> Advanced Network . Check the boxes for Enable UPnP and Enable Multicast Streams . Save the settings. Now you can connect stb or watch ip-tv on your computer from any port.
Setting up IP-TV on D-Link DIR-615 ver. 1.3.x
Option 1. Configuration without traffic tagging
In this case, the meaning of the setup comes down to separating one of the four LAN ports and combining it with a WAN port . With this setup, the set-top box looks directly into the provider’s network, as if through a router , i.e. as if the provider's cable was connected directly to the set-top box.
Go to Setting up IP-TV.
Next, select a port or several ports for IPTV, click on it, and the port color should change to green. After the port is selected, click change; . Next, click Save .
In this case, we connect stb or watch IP-TV on a computer from the 4th port of your wi-fi router.
Option 2. Setting up with traffic tagging.
Go to Advanced -> Vlan. Next we enter the following values:
name be IPTV - it is local and is only needed for convenience. Type - Transparent , VlanID set to the one used on your home switch (you need to find it out from your provider's technical support). In our example, this is 16. Then we select the port on which we will watch IP-TV and set its type to Untagged . Click the Save changes button.
Now we add Port 5, but select the Tagget type for it. In fact, we combine port 5 (Wan port) and port 1 (from which we will watch IP-TV).
If you did everything correctly, it should look like the picture below (see the IP-TV line)
Setting up IP-TV on D-Link DIR-615 ver. 1.4.x
Option 1. Configuration without traffic tagging
In this case, the meaning of the setup comes down to separating one of the four LAN ports and combining it with a WAN port . With this setup, the set-top box looks directly into the provider’s network, as if through a router , i.e. as if the provider's cable was connected directly to the set-top box.
Click the IP television .
Next, select a port or several ports for IPTV, click on it, and the port color should change to green (in our example it is Lan 4). After the port is selected, click Change . Next, click Save .
In this case, we connect stb or watch IP-TV on a computer from the 4th port of your wi-fi router.
Option 2. Setting up with traffic tagging.
Go to Advanced -> Vlan. Next we enter the following values:
Here we see that the ports are configured by default - everyone is in one group and looks at the Internet. We need to separate one of them. Click on the Lan and the group settings menu will open:
Here we select any LAN port, for example port 4, click on it with the mouse and press the button Delete port and then Save changes . It should look like this:
Next we need to add a new Vlan - click the Add . Vlan settings menu will open
name be IPTV - it is local and is needed only for convenience. Type - Transparent , VlanID we set the one that is used on your home switch (you need to find it out from the technical support of your provider). In our version, VlanID is 1601. Then we select the port that was released from the Lan and set its type to Untagged . Click the Save changes button. As a result, if you did everything correctly, it should look like this:
That's it, setting up IPTV on DIR-615 K1 (DIR-300 NRU B5) is completed. Don't forget to save your router settings.
Setting up IP-TV on D-Link DIR-320 NRU B5
When creating an Internet connection, be sure to check the boxes Enable IGMP and NAT Miscellaneous .
1. Delete the WAN Go to the Network menu ; — submenu Connections;. Select WAN Connection;
We get into the WAN , at the very bottom there are 2 buttons (Save, Delete). Click the Delete button;
As a result, we get that there is no WAN in the list of connections;
Save changes (button in the upper right corner) - Save.
2. Select one of the physical LAN to combine it with the WAN. Go to the Advanced menu ; — VLAN submenu; . Select VLAN lan
Select one of the lan ports, in our case port 4, and click Remove port;
As a result, we get the following (only ports 1, 2 and 3 corresponding to the LAN on the rear panel of the device are declared in the VLAN):
Click Save changes; In the VLAN we see the following picture:
Save the changes ( Save button; in the upper right corner) and wait for the device to reboot.
3. Add to VLAN wan , a dedicated LAN port - port 4 Go to the Advanced menu ; — VLAN submenu; . Select VLAN wan
In the window that appears in the Ports section; , select port4 , adding it to VLAN wan :
Click Save changes;
Attention: You can add port 5 again. We save the device settings by rebooting the device. Below you can see that port4 and port5 belong to VLAN wan
4. Create a WAN connection; Next, go to the Network menu; submenu Connections; , to create a WAN connection, click Add;
Router settings for smart TV
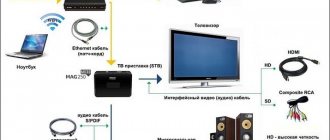
The router for smart TV must support this function. It is recommended to connect smart TV to the router using a UTP-5e patch cord. You can connect a router, router, TV set-top box, as in the picture below.
If your TV has a WiFi function, you can set up connections between your smart TV and your router using a (WiFi) connection. In this case, there may be interruptions and freezes in the picture when playing video. First, using a computer, you need to configure your router for TV so that you have access to the Internet. When the router is configured and everything is working on the computer, you can set up the Internet on Smart TV. Press the “Menu” key on the TV remote control and select “Network” from the menu.
Then select “Network Settings” and if the TV is connected to the router by cable, then setting up the connection via the cable will immediately begin, and if WiFi is used, then setting up the wireless connection will begin.
Click on the “Start” button and the search for a WiFI router will begin. (The router must be turned on and online). When Smart TV detects a WiFI router, the following window will appear.
Here you need to select your router and click “Next”. After this, the router will ask for a security key. You need to enter the key that you entered when setting up the WiFi router.
If the key is entered correctly, a wireless connection will be established.
Once the Internet connection is established, you will be able to work with SMART HUB services.
Zyxel routers
To configure the P-330W EE router model, you need to reflash it with the latest firmware, which you need to download from the manufacturer’s website. Then, in the WAN menu, find the Choose Bridge Port(s) field and indicate in it the LAN port to which the TV set-top box will be connected. To configure the Keenetic and Keenetic Lite models, you need to select in the Home network - IP-TV menu and set the TV port mode (connecting an STB set-top box to the LAN port) or select - Automatic (watching IPTV on a computer).
For models NBG334W EE and NBG460N EE, you need to select Network – WAN – Advanced in the menu and check the box next to Enable IGMP Snooping Multicast. In addition, to connect an IPTV set-top box to the router, you must select the Choose IPTV STB PORT option and install one/several LAN ports there.
General information
Like other types of routers, TP Link is designed to exchange the received network traffic packet between all devices connected to it. That is, all home equipment can access the Internet via Wi-Fi wireless connection technology, provided that the specific equipment supports it. But the user must understand that the speed will decrease in proportion to the number of connected units of other devices. Any router has ports for receiving and distributing the received signal. On the case there is always a connector called WANN, through which the equipment connects to the Rostelecom Internet network, and several LAN connectors for connecting other home equipment. And if the router is equipped with a wireless network adapter, then the connection can be established immediately via Wi-Fi technology. The manufacturer has equipped most of its models with security software, that is, traffic is filtered and unwanted attacks from intruders are blocked.
Setting up IP-TV for Upvel
Setting up IP-TV for Upvel UR-315BN
IP-TV settings for this router are made when creating an Internet connection and are the same for all connection types. You need to tick the boxes as in the picture:
Setting up IP-TV for Upvel UR-326N4G
To connect an IPTV receiver: Go to menu Administration - Summary information . the TV/STB box . Make sure the LAN4 in the diagram above is labeled “ TV ”. To save the settings, click the “ Apply ” button.
Wireless Security Settings
As mentioned above, after resetting the settings to the factory state, access to the newly created Wi-Fi network is possible without entering a password. If the goal is not to distribute the Internet to everyone for free, you need to change the wireless connection security settings. This can be done through the admin panel, both via wire and Wi-Fi.
You can configure the security of your Wi-Fi connection in the “Wireless Security” section. The image below shows the optimal parameters, with the exception of the password value in the “PSK Password” field. The password must be at least 8 characters and include numbers (mandatory), letters of different case, and signs (such as @&$).
To change the name and other network options, you need to go to the “Wireless Mode” section, where in the appropriate field you need to enter any name in Latin (you can also use numbers).
Connecting the router to the computer.
The very first thing we do is connect the router to the network card of our computer/laptop. If your device has a wi-fi module, you can configure the router without connecting it with a wire, but for novice users, I strongly recommend connecting your router with a cable.
So, we connect one of the LAN connectors of the router (in this case it is yellow) with the computer’s network card using the cable included in the kit; We insert the Rostelecom cable that enters the apartment into the WAN connector (blue) TP-Link TL-WR841N/ND . Turn on the router.
Connecting equipment
First, let's reset the router configuration to its factory state. This is necessary to eliminate unexpected situations during the setup process. This procedure may vary slightly depending on the model. In most cases, the reset is done by pressing a hidden button with a thin object. This method is suitable, for example, for the 8961n.
On other models (wr841n), you need to press and hold the WPS/RESET button on the rear panel.
After performing one of the above actions, the device parameters will be restored to the factory state. This will allow you to use standard login credentials for the management interface.
Configuration installation can be carried out either wirelessly or via a cable connection. The patch cord supplied by the manufacturer with the device is suitable for this. Using a cable is more reliable. In addition, some manipulations, such as flashing, cannot be done wirelessly at all.
We insert one connector of the Ethernet cable into the LAN port on the router (yellow), and the other into the same port of the network card of the PC or laptop. On Windows devices, network adapter drivers must be installed. In addition, in the IPv4 properties you need to configure automatic detection of addresses and DNS servers.
If there is no cable or there is no device with a network connector, you can log in to the modem control panel via Wi-Fi. This method is suitable for setting any parameters except updating the firmware. After resetting the settings, access to the wireless network is possible without entering a password, which simplifies the process of logging into the management interface.
To continue the setup, the PC and the access point must be connected by a network cable and running. If pairing via Wi-Fi, you won't need a wire, but you need to make sure that wireless mode is active on both devices. You also need to delete all connections on your computer that were started manually. If they are not present or the network was logged on via ADSL technology, no additional configuration steps need to be taken.
System update
Many network equipment manufacturers install older versions of firmware on their devices. In most cases, the factory firmware works quite stable and does not require reinstallation. But there are situations when reinstallation is necessary, for example, if the firmware is damaged by a virus or by the user.
To reflash a TP-Link router, you must first download the firmware file from the official website and save it, for example, on your desktop. Then go to system tools -> firmware update. On the page that opens, select the binary file downloaded earlier and click “Update”.
Important. This procedure is carried out exclusively through a wire. Otherwise, the access point may fail and the warranty will be void. You should also avoid disconnecting the equipment from the power supply.
Changing your account to access settings
After you have fully configured the router, you must change the password for logging into the WEB interface.
In the menu on the left, select System Tools, then Password. Enter the old admin/admin, then the new login and the new password twice. I left the login as the old admin, but changed the password. I recommend setting a fairly complex password, and not 123456789 consisting of at least 10 characters (capital letters + small letters + numbers + special characters) for example [email protected]