Frequently asked questions when connecting
Installing MTS satellite TV is a labor-intensive process that can cause a number of difficulties and questions among subscribers. Let's look at the most common calls to technical support.
No signal
No signal may be caused by incorrect connection of cables or other components. This factor may also be influenced by bad weather conditions, due to which the antenna cannot transmit a signal to the satellite
Also pay attention to the newsletter from MTS, which may contain information about the work being carried out
No channels
The lack of channels may be due to:
- incorrect installation of a SMART or SIM card, due to which the system cannot identify the subscriber;
- the end of a subscription to a certain package of services or the occurrence of debt on the personal account balance;
- the device is unable to communicate with the satellite. The reasons are described in the previous paragraph.
Quality problems
Poor picture quality depends solely on the signal level, and the most common cause of interference is incorrect installation of the dish or external physical obstacles (trees, leaves, houses).
Errors
Since satellite equipment uses complex software in its operation, a unique error system has been developed that allows you to independently diagnose the malfunction. The operator's standard database contains detailed information for each error.
By contacting support, you can find out how to install, how to configure and why satellite TV does not work. MTS is distinguished by the most qualified and responsive service.
What is better and which plate to choose?
Which is better: MTS or Tricolor? There is no exact answer to this question. When comparing satellite companies, subscribers must decide what is most important to them:
- Availability of channels, i.e. their number.
- Price for equipment and installation.
- Various additional services from the operator.
- Stable technical support.
- Not too high tariff fee.
- Easy channel setup.
Comparison:
- Tricolor TV is intended for people who have average incomes and want to get a large number of channels at an affordable price.
- Television from the MTS provider has one good property - fairly developed functionality and interactivity. But for this company, television development is not in the first place.
When choosing an operator, you must be guided by what is required from this type of television technology.
Tariff comparison - table
Before purchasing one of the televisions, you need to familiarize yourself with the packages and compare their prices.
| MTS | Tricolor |
| Basic package (189 channels) for 175 monthly. Per year – 1600 rubles. | United (220 TV channels) for 1500 per year. |
| Basic package of services + (198), cost 250 and 2000. | Single UltraHD (226) for 2500. |
| Expanded first tariff (198 channels) for 250 per month and 2000 per year. | Extra (221). Annual maintenance – 2000, six months – 1200. |
| Extended Plus package (207) for 390 per month or 3000 per year. | UltraHD (6) – 1500. |
| Option Cinema Setting (5) – 319 rubles. | The Children's tariff offers 21 TV channels for 1200 per year or 200 every month. |
| Amedia (2) – 200 rubles. | Night tariff plan (7 TV channels) – 1800 or 200. |
| Children's Channel (5) - for 50 rubles. | Match! Premier (2) – for 219 rubles. |
| Sports channels from Match! Football (3) – cost 300 rubles. | Match! Football (6) – 380 per month. |
| Match! Premier (1) – 219. | Basic tariff (20) – free. |
| Package of channels for adults (5) – 150 rubles. | |
| Ultra hit (2) – 200. |
Each operator has its own positive and negative aspects. MTS offers a large number of tariffs to choose from, and Tricolor impresses with a large number of channels and an affordable price.
Installation and configuration of MTS satellite antenna
How to install and configure a satellite dish yourself?
To install and configure satellite television in the MTS system yourself, you need attention and certain knowledge, otherwise the equipment can be damaged. First you need to check the connectivity, that is, determine whether your region is within the coverage area, and also whether there are any obstacles to installing the antenna, for example, a tall tree or a house. In addition, before installing and configuring the antenna, you need to make sure that you have purchased a kit with all the necessary elements
In addition, before installing and configuring the antenna, you need to make sure that you have purchased a kit with all the necessary elements.
So, setting up MTS satellite TV includes the following steps:
- Select a location to mount the satellite dish where it will have direct visibility of the satellite.
- Assemble the antenna according to the instructions that came with it.
- Install the bracket for fastening the equipment as firmly and reliably as possible in the selected location.
- Attach the plate to the bracket according to three parameters: rotation, rotation and tilt.
- Connect the MTS set-top box and set up satellite TV using the installed mobile application online.
- Check the signal strength in the “Antenna Settings” section on your TV.
At this point, setting up MTS satellite TV yourself is considered complete. If any problems arise, admin will answer all questions. Read on for more detailed connection information.
Antenna installation process
The quality of satellite signal reception depends directly on the correct configuration of the MTS antenna. Just buying a set of devices and materials and putting a plate on is not enough. You need to choose the right direction to the satellite, connect the receiver, and make certain settings.
First you need to decide on a place. The satellite dish must face south. It's good when the windows face south. The main thing is that there is no tall building or tree nearby that will block access to the satellite. Otherwise, you will need to remove and install the plate on the roof of the house. Next, bolt the bracket and the plate itself to it. In this case, it is necessary to use not all the bolts at once in order to be able to adjust the desired degree of tilt angle of satellite TV from MTS. The next step is to attach the converter, which must also be rotated to the desired degree.
An important task is to configure the receiver head yourself. The equipment will not work correctly if it is turned even slightly away from the satellite. In this case, you can set up a satellite dish from MTS yourself in three ways. Using a smartphone will help you complete the task using the installed SatFinder application, indicating the name of the satellite in which you can calculate the required tilt and rotation angles
The second way is to use the MTS website in the “Satellite TV” section, then “Settings”, and then “coverage map”, “Setup Wizard”. The last method will help after installing the set-top box in the “Settings” menu. To set up the MTS antenna as quickly as possible, watch the video with instructions
Using a smartphone will help you complete the task using the installed SatFinder application, indicating the name of the satellite in which you can calculate the required tilt and rotation angles. The second way is to use the MTS website in the “Satellite TV” section, then “Settings”, and then “coverage map”, “Setup Wizard”. The last method will help after installing the set-top box in the “Settings” menu. To set up the MTS antenna as quickly as possible, watch the video with instructions.
Where to send the MTS plate
The antenna for television must be installed exactly on the satellite that produces the broadcast. It revolves around the earth above the equator, so in Russia satellite dishes are pointed in a southerly direction.
It is important that there are no obstacles in the direction of signal reception at the reception location. If they are present, the signal will be much weaker. You need to find a place where tall buildings or trees will not interfere with receiving the signal.
The author of the video shares with viewers how he sets up the MTS satellite dish
How to install a plate
How to set up tricolor TV channels yourself in 5 minutes
After assembling the structure, you can begin installing it on the wall. Fastening is carried out at a pre-selected location (how to do this is discussed above). Now find a flat surface to fix the bracket and follow these steps:
Using a drill or hammer drill, make holes in the wall where the device will be mounted. Fix the bracket support where the antenna will be placed
If there are strong winds in the region, pay attention to the fastening. This is necessary to securely fix the antenna and protect it from falling.
In addition, with high-quality fixation, you will be able to configure the MTS TV dish once and return to this issue less often. Assemble the bracket, rod and mirror following the instructions (the assembly process is discussed above).
Attach the assembled mechanism to the support, rotate and tilt the mirror at the angle shown on the MTS website or the SatFinder application.
- Install the converter. It must be adjusted so that its front part “looks” into the mirror of the plate. At the same time, rotate it at the angle defined above.
- Strip the antenna cable and attach the F connector to it so that it is held tightly on the braid.
- Place the cable on the antenna into the connector of the converter and insulate the entry point with electrical tape or sealant. To prevent the cable from dangling, it can be secured with several pieces of electrical tape to the converter rod.
- Pull the cable indoors and connect it to the set-top box (must be disconnected from the power supply).
- Install the MTS smart card into the set-top box. For Interactive TV, install the SIM card into the slot.
At the final stage, all that remains is to connect the set-top box to the TV, activate satellite TV and configure the channels. The process of choosing the right position will be discussed below.
Equipment selection
How to set up a redirect yourself
Before installing the MTS dish yourself, you need to choose the right equipment. First, decide on the diameter of the plate. For most regions of Russia, a 60 cm antenna is suitable. For a number of regions (Leningrad, Amur, Kaliningrad, Arkhangelsk, Vologda, Khabarovsk and Primorsky Territories, Yamal-Nenets Autonomous Okrug, Karelia, Komi, Yakutia and Sakha) you will need a dish with a diameter of 90 cm. When purchasing a full a set of equipment in your region, errors are excluded, because the equipment is sold taking into account local characteristics. When choosing this solution, the equipment is easier to configure.
If the TV has a DVB-S2 tuner, a CI+ connector, and HEVC encoding, the use of a CAM module is allowed. In other situations, you need a TV set-top box. When connecting two or more TVs, a module or set-top box must be provided for each device. There can be only one MTS plate. The main thing is to buy a converter with the required number of outputs and configure it correctly.
How to assemble a plate?
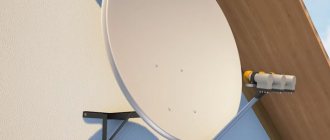
Equipment buyers often ask how to assemble an MTS satellite dish. First, check the equipment you have on hand. Before installing and configuring the system, you will need the following elements:
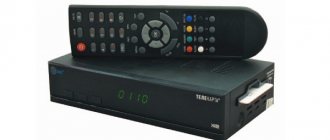
- KAM module with smart card or set-top box.
- Antenna and mounting device.
- A converter with the required number of pins that correspond to the required number of connected TVs.
- Coaxial cable.
- 2 F connectors.
- Screwdrivers and wrenches for installation work.
- The plug required to connect the cable to the TV.
For convenience, it is recommended to buy a complete set of equipment at once, so as not to assemble it in parts later. To save money, you can assemble the devices into separate elements - buy a converter, antenna, connectors and cable in different places. But keep in mind that in this case it is more difficult to configure the equipment and errors are possible, which we will discuss below.
Along with the antenna there are instructions for assembling the MTS dish. It describes the configuration of the equipment and the algorithm of user actions. The product is fixed using a special bracket. There is no need to tighten the adjusting nuts. They help to adjust the azimuth of the MTS dish after installation and achieve maximum signal quality. The bracket consists of two elements and is fixed directly to the antenna. The converter can be connected immediately, and cable fixation can be left for later.
The general algorithm for assembling the MTS plate is as follows:
- Fix the envelope holder arc on the support using M6*30 screws.
- Place the support cheeks between the cheeks of the bracket and secure them with a clamp. At the same stage, insert the spacer bushings between the cheeks of the support and place the washers and nuts on the “eight” (M8) on the outside.
- Screw the support together with the bracket and the arc to the reflector. To do this, use four M6*16 screws. After this, tighten the M6 mounting nuts.
- Place the LNB clamp with the converter on the special arch of the holder of this mechanism. To do this, install the protrusion on the left side of the envelope holder into the recess on the right side, grasp the converter and fix the assembled structure on the holder arc using M6*30 screws. Next, install an additional M6*35 bolt, but do not pull it all the way through.
- Hang the reflector with the support on the mount. To do this, it is necessary to attract an assistant, because it is difficult to cope alone. One should hold the reflector, and the second should fix it to the mounting pipe on the wall using two clamps and clamps. Secure the M8 nuts, but do not overtighten them. Turn the reflector towards the satellite and tighten the nuts to "eight" on the clamps.
- To mount the MTS dish at an angle, loosen the M8 nuts on the clamp and manually turn the product so that the required angle is formed between the vertical and the reflector. If the angle is correctly determined, it is easier to align the device with the satellite. To calculate, you need to subtract 26.5 degrees from the satellite angle of your area. The position at which the reflector position relative to the vertical is 0 degrees corresponds to the tilt of the other (focal) axis of the dish by 26.5 degrees relative to the horizon. If you managed to set this moment correctly, tighten the bolts.
- Adjust the product for focus by moving the converter along the axis with the LNB clamp screws slightly unscrewed. In the process of changing polarization, the converter smoothly rotates around its axis. Pull the M6*30 and M6*35 bolts.
A more precise algorithm of actions is given in the instructions for the MTS plate. If the process seems difficult, you can call a specialist. It will help you install and configure an MTS TV dish, but the price depends on the region and a number of other factors. This point needs to be discussed individually.
How to switch from Tricolor to MTS and back?
People who decide to change their service company this year will have to:
- renew the contract with a new provider;
- purchase a new receiver and antenna converter;
- rotate the antenna;
- catch channels.
There is no need to change all the equipment and install the dish, since the antennas are compatible. Considering everything said above, changing a provider will not take time and will not cost too much - about 4-5 thousand rubles, taking into account the payment of a subscription fee and the purchase of a set-top box.
About setting up TV equipment from MTS
To connect the set-top box, we connect the antenna cable to it; to connect the device to the TV, we use an HDMI cable. We place the CAM module in the TV connector. It should fit tightly. Afterwards we insert the access card into the module.
Details about setting up an interactive MTS TV set-top box:
- Before turning on the set-top box, insert the SIM card into the slot.
- The initial launch of the set-top box is accompanied by loading of the 3G signal.
- Let's authorize the device. During authorization, several methods will be offered. A demo version will be used first. As soon as the operator receives your signed documents, the working version will be activated.
- Create a user profile and save it. To set a password to prevent unwanted use of the set-top box by third parties, you need to go to the access settings.
- Let's move on to searching for channels. As soon as scanning is completed, a list of available channels will appear on the screen. This is the final stage of setting up the console.
Antenna Installation Instructions
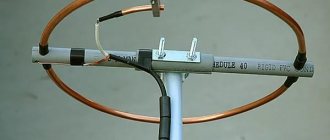
The signal from the satellite is picked up by an antenna, which acts as a “captor” of waves sent to the converter located in the center of the concave plane.
It is important to direct the device so that the signal is of maximum strength. MTS for satellite TV has created a setting on the official website using a coverage map. On it you will see the direction, and the MTS satellite TV setup wizard will independently calculate all the indicators
If you are not sure of the accuracy, we recommend downloading the SatFinder application to your smartphone.
Turn on the Internet and GPS so that the program can determine your coordinates and satellite position.
To set up MTS TV (satellite) yourself, go to the “showAR” menu. Rotate the smartphone until the red circle is aligned with the point where the lines intersect.
Or use the coordinates on the main screen:
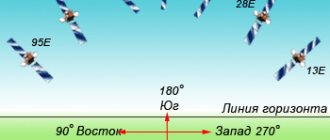
- Athimuth is the angle between north and satellite.
- LNB skew – angle of rotation of the converter inside the antenna.
- Elevation – the tilt of the plate relative to the horizon.
- Assemble the antenna and attach it to the satellite direction line. First measure the azimuth. Use a compass.
- Then tilt it relative to the horizon. Next, configure the converter using the value of its rotation angle.
- Prepare the cable as shown in the figure.
- Make sure that the set-top box is turned off from the network and connect it to the antenna with a cable yourself.
- If you are using a CAM module, insert it into the CI/CI+ connector on the TV, otherwise insert a smart card into the set-top box.
Connect the TV and set-top box with cables. Now you need to know how to set up an MTS satellite dish on your TV. Turn on both devices and use the menu to set the video input reception mode where the set-top box is connected. The main menu will appear on the screen.
Select "Antenna Settings".
- One should turn the antenna, the second should monitor the image. After a slight turn within 1-2 cm, you need to wait a few seconds until the signal is reconfigured.
- Look for the position where the signal level will be maximum.
- Also try changing the antenna angle within a couple of degrees. When everything is done, secure all the plate clamps.
Checking the signal using a set-top box
Fine-tuning the position of the deflector without a device is done by a couple of people. To control the reception parameters, you should launch the “Antenna setup” item from the set-top box menu. In this case, two indicators are displayed at the bottom of the screen, describing the strength and quality of the signal.
One person monitors the reception indicators. The second, having loosened the antenna mounting bolts, gradually turns it from side to side and tilts it vertically. After each minor shift, you need to pause for up to 5 seconds so that the set-top box has time to track the changes and display them on the reception indicators. The person monitoring the readings commands the adjustment process.
After it has been possible to achieve maximum levels of signal quality and strength, the antenna unit is rigidly fixed by clamping the mounting bolts on the bracket.
Antenna installation
Installation and configuration of satellite broadcasting begins with the installation and configuration of the antenna.
To begin, select the location for connecting the plate. The imaginary line from the antenna to the satellite should not be blocked by obstacles: buildings, trees, etc.
The plate itself must be assembled according to the instructions supplied with the plate. The bracket is attached to the wall with elements that will be reliable for the specific wall material and also correspond to the strength of the wind.
When you entered the coverage area on the website, you would see a green line by placing a dot on the map. This line shows the direction to the satellite and the corresponding azimuth (the angle between the north direction and the satellite).
It is recommended to download the Protractor and SatFinder phone application, which can be used to set the antenna direction. You will need to select the ABS 2-75 E satellite.
You will also need a compass to determine north. You need to stand with your back to the place where the dish is connected, find the north and set aside the azimuth, which is shown in the application or on the website. Now you know where the antenna should be pointed.
A holder is attached to the antenna, and the converter is inserted into it, with the connector facing down (to prevent precipitation from getting inside). Now you can attach the antenna to the bracket on the wall. But it needs to be secured in such a way that it can be turned with effort. After final adjustment, complete immobilization will be required.
After this, you need to prepare the cable by connecting the F-connector to both ends.
The cable is inserted into the converter connector and attached to the holder using, for example, electrical tape. The second end of the cable will connect to the set-top box or TV if a CAM module is used.
Now, in order to receive satellite TV from MTS, you still need to configure the dish.
To configure the MTS satellite antenna, perform the following steps:
- The smart card must be inserted into the receiver or CAM module;
- Connect the set-top box with an HDMI cable to the TV;
- Turn on the TV and set the reception mode from the output to which the receiver is connected;
- Turn on the set-top box. Find the antenna setup menu (may have a different name depending on the model);
- A scale of the signal level coming from the dish will appear;
- Now you need to adjust the antenna position. To do this, it is moved left, right, down or up in steps of about 1 cm. After each movement, you need to wait a few seconds for the signal change to be displayed;
- Having reached the best scale value (it should be at least 70%), you can finally fix the antenna.
Equipment options
There are 3 types of configurations with different prices:
- Full (provides access to interactive television).
- Standard (allows you to connect linear satellite TV without applications).
- Basic (will also allow you to connect linear TV, but differs in components from the standard one).
Necessary equipment
The set of equipment from MTS for installing satellite TV is as follows:
- antenna;
- Cam module or set-top box;
- converter;
- bracket;
- 2 °F connector;
- coaxial cable;
- set of screwdrivers and keys.
In addition, you may need a plug, and also, if connecting two TVs, a divider.
Receiver setup
In order for the setup of MTS satellite televisions to be successful, you need to configure the receiver. Connecting a TV set-top box requires connecting the antenna cable using an HDMI cable to the TV connector. To completely complete the satellite TV setup and connect the receiver, you need to follow these steps:
- Insert the SIM card into the slot provided for this purpose.
- Turn on the set-top box and wait for the equipment analysis to complete and the 3G signal to initialize.
- Authorize the device using methods that will appear on the TV screen, usually this is a call to the call center or sending an SMS, in some cases the service will be carried out automatically.
- Create and save a user profile. At this stage, in the “Access Level” section, you can set the age threshold and change the password.
- Scan available channels.
TV module
To configure the module, you will need the following steps:
- Unplug the TV.
- Connect the antenna cable to it through the connector marked SATELLITE.
- Install the TV module into the CI port.
- Install a smart card in the TV module so that the chip on it points towards the TV image on the sticker.
- Turn on the TV.
- Go to the mode of viewing satellite TV from MTS, set the necessary parameters.
Settings for satellite TV from MTS
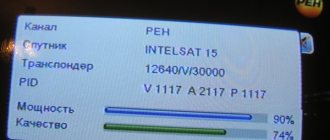
The MTS TV set using the STB Dune HD TV 251-S2 set-top box for watching satellite television does not require additional channel settings, everything will be done automatically. Manual settings will be required when using the Verimatrix CAM module. In this case, the satellite must have the parameters 75.0E ABS 2 MTS TV, the polarization is vertical linear, the position is 75° E., the module type is DVB-S, DVB-S2, QPSK, 8PSK, the speed is equal to 43 or 45 Msymb/ sec, and FEC – 5/6, 2/3.
Manual channel tuning
What settings are needed to watch channels? Manual settings are only needed for the CAM module. To do this, use a list of frequency ranges and transponders.
Features of connecting to MTS satellite TV
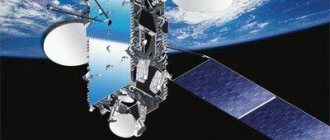
The satellite, thanks to which channels from MTS are broadcast, has a wide coverage area. This operator covers 90% of the Russian territory. The main feature of the provider is its focus on the quality of the received signal and image quality, the number of channels fades into the background. For some channels there are several versions of standard time. For example, if you did not have time to watch a movie or program at one time, then on this channel you will be able to see it on this channel, only in a different time zone.
Registration in your personal account for MTS satellite TV
Your personal account on the MTS website allows you to get many privileges. To register, you need to select the “My MTS” button, which is located in the upper right corner of the site, and then decide on the required satellite TV section. To register, you will need to enter your contract number and passport details. Such actions will later make it possible to manage services, view payment history, make settings, view the current tariff plan and change it, pay for the service, find out the remaining traffic, and more.
Mobile TeleSystems have loudly declared themselves in the satellite television market, offering high-quality services and modern technologies for everyday use. Setting up an MTS satellite dish is an important aspect for a potential client to study, since this process must be completed independently. The company's service does not provide home-visit services for a specialist, and calling a specialist will be accompanied by additional financial costs.
By following the established instructions, installing the antenna, mounts, wiring cables and setting up technical equipment will not cause difficulties even for an inexperienced user. In this material we will look at:
- pre-preparation process;
- step by step guide;
- satellite coverage map and direction;
- subsequent equipment setup;
- recommendations, possible difficulties and mistakes.
List of MTS transponders, broadcast frequencies
| 11740 V 43000 FEC 5/6 |
| 11800 V 45000 FEC 2/3 |
| 11860 V 45000 FEC 2/3 |
| 11913 V 45000 FEC 2/3 |
| 11980 V 45000 FEC 2/3 |
| 12040 V 45000 FEC 2/3 |
| 12100 V 45000 FEC 2/3 |
| 12160 V 45000 FEC 2/3 |
You have already voted
This might be interesting:
- Changing Tricolor TV provider, possible options
- Articles
- Wifi CCTV Camera
- Digital television connection diagrams
- Realme 7 5G – Budget 5G Smartphone
- Poor cellular reception
Frequently asked questions when connecting
Considering the complexity of installing television equipment with your own hands, almost no one will be able to avoid difficulties. Most often they are associated with:
- searching for the correct azimuth and inclination angle;
- authorization;
- preparing the receiver for work;
- searching for information about the satellite and frequencies.
In addition, sometimes subscribers encounter unexpected errors that prevent them from enjoying their favorite programs and cause connection problems. Usually their solution does not take much time; the main thing is to understand the reasons for the difficulties that have arisen.
No signal
If the user completely lacks a signal from space, it is worth checking:
- are there any obstacles in front of the satellite dish that are interfering with reception;
- correctness of the chosen direction;
- connection quality and cable integrity;
- no interference in front of the converter.
No channels
The absence of channels indicates problems with authorization and initialization. To be able to watch digital TV, you should:
- make sure that the SIM card is inserted into the slot;
- make sure the connection to the receiver or cam module is secure;
- check the correct position of the SIM card (sometimes it turns out to be upside down);
- check the integrity of the SIM card.
Quality problems
Difficulties with signal quality usually arise among those people who make connections without a device and without an application. The optimal solution to such troubles is re-tuning. To make it easier, you should focus on the position of the antennas on neighboring houses. But it is worth considering that third-party customers may use other satellites, so it is worth finding out in advance whether they are suitable as a reference. It is worth adding that sometimes poor reception quality is associated with sharply deteriorating weather.
Errors
If you encounter other errors or connection difficulties, you should call the MTS contact center. Consultants will explain how to set up MTS TV on a satellite yourself or accept a request for a technician to visit you
It is important to note that consultations with support operators are free, but a visit from a specialist requires payment. The cost depends on the region of residence of the client and the distance of the locality from the nearest dealership center
It is interesting to add that the company’s specialists are ready to configure third-party equipment, regardless of which provider it belongs to.
Preliminary preparation
If you are interested in the basic terms of service from a telecommunications operator, you need to make sure that services are available in your region. The use of modern technologies has made it possible to achieve more than 80% coverage of the Russian territory, but there are exceptions. This information is presented on the official website or can be obtained from a qualified technical support specialist.
You can contact him:
- by calling the operator's toll-free number;
- by contacting the nearest service office;
- leaving a written request in your personal account.
On the official website you can find detailed instructions for setting up MTS satellite TV, as well as information about possible errors. We will cover this issue in the appropriate section.
Also, preview the contents of the TV packages. At any time, you can activate additional services that will add thematic channels to your account.