When choosing a television operator, it is very important to know what satellite the company uses. This is necessary to ensure a more accurate channel search as well as a high-quality connection.
- Which satellite does MTS use?
- How to determine the direction of the antenna to the satellite using special applications
- Setting up on the MTS website
- Wizard for setting up a satellite dish using a map
- How to determine the direction of the antenna with a special device
- How to install an antenna
Before installation
Before purchasing an antenna, you need to make sure that there is a good satellite signal in your area. We look at the map: if the satellite coverage area in your place of residence is light red, you will need a larger antenna. There are cases with a weak signal if the antenna is located outside the Russian Federation.
For those lucky ones who live within the satellite's visibility range, there is a special application “SatFinder”. With its help, the desired direction of the antenna is determined. Information about the exact direction of the antenna towards the satellite allows you to detect obstacles to the signal in the form of high-rise buildings or trees. The application can be downloaded from the AppStore or Google Play.
Good advice: it is best to install the antenna on the roof of the house. This arrangement allows the antenna to be rotated in any direction, which cannot be said for installation on a wall.
Antenna installation
The antenna comes with instructions that describe the entire installation process. Initially, we tighten the nuts (moderately) so as not to damage the body, but also to prevent the fasteners from dangling from the bracket. There is no need to fasten the wall bracket, and you also do not need to tighten the nuts responsible for turning the antenna angle.
The two-piece bracket must be assembled separately and does not need to be attached to the antenna. At the initial stage, a converter is connected to the dish; cable connections are made later.
- We install the MTS TV dish ourselves and tune the antenna to the satellite without a device
To securely fasten the bracket, a perfectly flat surface is required. Place the bracket on the surface and mark the points at the mounting location with chalk or a marker. We drill holes in the surface and attach the bracket using dowels. Then we put the antenna on the installed bracket, select the required angle and carefully tighten the nuts. By “required angle” we mean the vertical limit angle of the mirror.
We install F-connectors on the converter, strip the cable and also connect it to the convector.
Setting up an MTS TV satellite television antenna
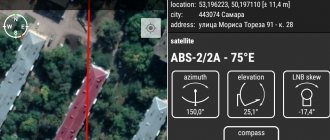
To set up an antenna, you need to pay attention to two main factors: the position of the convector and the antenna. You should activate GPS on your phone and enable the SatFinder program discussed above. We give preference to satellite ABS-2A, 75°E. The program points a straight line in the direction of the satellite. The required angle of rotation and tilt of the satellite dish is calculated.
Using the set-top box, we test the signal quality
As soon as the antenna is configured, we connect the cable (its other end) to the MTS set-top box. You need to go to Settings and select “Antenna Settings”. The signal level of the installed antenna will be displayed on the TV.
In case of a bad signal, you need to turn the antenna up or down, as well as to the sides, while simultaneously monitoring the signal level on the TV. Often, such manipulations are not worth carrying out using the SatFinder program. A good signal has been achieved - secure the antenna.
Dishpointer Pro
The application has similar functionality as SatFinder, with some exceptions.
Advantages of Dishpointer Pro:
- High accuracy of satellite identification;
- It is possible to determine location using data from mobile operators, which makes it possible for the application to work in places with a poor GPS signal (when using data from a mobile network, the accuracy of the determination may be greatly affected);
- Availability of the ability to take a screenshot of the application;
- Satellites are clearly visible at any time of the day on any phone.
Flaws:
- The application is paid and has a fairly high price.
How to install an MTS satellite dish
You can watch television from Mobile Tele Systems almost anywhere in Russia. But before you make a hardware purchase, check to see if your region is within the satellite's coverage area. You can view the interactive map on the provider’s official website.
It is better to purchase ready-made kits in your region of residence. The fact is that MTS sells equipment for the conditions of a specific territory, and uses a certain antenna diameter. Next follow the instructions:
- Determine the installation location. There should be no obstacles in front of the antenna - walls, trees.
- Determine the installation direction. This can be done through the “SatFinder” application after installing it on your smartphone.
- Assemble the antenna. Instructions for its assembly are included with each kit.
- Attach the antenna to a wall outside. The surface should be flat, first secure the bracket, then put the antenna on it, and adjust the vertical angle of the mirror.
- The convector in the holder should be directed with its head towards the plate.
- Connect the cable to the antenna.
- Adjust the rotation angles. Use the previously downloaded SatFinder application. To do this, click on the ABS 2 -75 E satellite.
- Check the antenna signal through the set-top box. In the settings section, find the line “Antenna Settings”. The reception quality level is shown on the scale; it should be maximum.
How to set up an MTS satellite dish
All equipment included comes with clear instructions. Therefore, in order to make settings, use them. The set-top box should be connected to the TV. After that, start searching for channels.
Important! One of the main stages is equipment registration. When purchasing from a dealer, you have nothing to worry about; in all other cases, you should activate the TV yourself.
In addition, the equipment must be registered, this is done through an activation key. For test activation, use one of the following methods:
- Call support. Operator number 8-800-250-08-90. Tell the operator that you have connected an MTS satellite dish and you need to activate it. Provide the call center employee with the necessary information.
- SMS service. Send a text message to the special number +7-985-000-0890. It should contain the following information, separated by a space: the smart card number and set-top box ID.
- Contact your dealer. If you purchase an MTS kit from a dealer, he will activate it at the time of execution of the contract.
- If the kit was not purchased from a dealer, activate it on the MTS website. To do this, go through a series of steps:
- Visit the link https://lk.ug.mts.ru/#/satellite.
- Fill out the form provided and be sure to include your phone number.
- Receive an SMS from your provider containing a digital code.
- Enter it in the field on the monitor.
- Wait for a message from MTS in which they will send you a personal account. This is considered the end of the registration procedure.
After installation is complete, please register yourself. Use the link to the self-registration page https://lk.ug.mts.ru/#/satellite_testview. Enter your data in the form provided and send it to the provider.
These registration options are provided for a trial period of using satellite TV services for up to 10 days. During this time, you will only be able to use a basic set of television channels. As soon as your contract is confirmed by the provider, you will have access to full use of the capabilities of MTS TV.
Every modern subscriber wants to enjoy good quality television, watch TV channels and not be tied to cable communications. Then it’s worth considering the option of satellite TV, which has good characteristics. You can install the antenna anywhere. Satellite TV from the cellular operator MTS is popular among Russian users. In addition to voice communications and the Internet, the company offers customers to connect satellite TV. The service is available to residents of Russia in almost all regions. You can find out exactly whether this service is provided in your area on the operator’s official website. Thanks to satellite technologies, connecting to the Internet and television has become much easier.
- MTS launched interactive home television in the Irkutsk region
Content
Frequently asked questions when connecting
Installing MTS satellite TV is a labor-intensive process that can cause a number of difficulties and questions among subscribers. Let's look at the most common calls to technical support.
No signal
No signal may be caused by incorrect connection of cables or other components. This factor may also be influenced by bad weather conditions, due to which the antenna cannot transmit a signal to the satellite. Also pay attention to the newsletter from MTS, which may contain information about the work being carried out.
No channels
The lack of channels may be due to:
- incorrect installation of a SMART or SIM card, due to which the system cannot identify the subscriber;
- the end of a subscription to a certain package of services or the occurrence of debt on the personal account balance;
- the device is unable to communicate with the satellite. The reasons are described in the previous paragraph.
Quality problems
Poor picture quality depends solely on the signal level, and the most common cause of interference is incorrect installation of the dish or external physical obstacles (trees, leaves, houses).
Errors
Since satellite equipment uses complex software in its operation, a unique error system has been developed that allows you to independently diagnose the malfunction. The operator's standard database contains detailed information for each error.
What are the features of MTS satellite TV
Subscribers planning to connect to this service can count on the following features:
- Availability throughout the Russian Federation (with the exception of some regions). You will be able to watch TV freely, both in the apartment and far outside the city.
- Fast and easy connection. If you use the services of specialists, the subscriber will not have to spend personal time and effort to assemble and configure the equipment.
- You will get TV channels divided into categories. Finding the right channel is simplified as much as possible. Sports, children's, educational and many other groups of channels will be available for viewing at any time. It's very easy to search and find the TV shows you need.
- No advertising, which is a definite advantage.
- Multifunctional attachment. It is a compact small device that supports HD quality channels. The set-top box is equipped with a built-in 3G modem, which allows you to remotely control the functionality.
- A Wi-Fi access point makes it possible not to use additional devices, because all the necessary telecommunication functions are provided in one case.
- The service package already includes one GB of high-speed mobile Internet so that the subscriber can use and manage the Smart TV option.
- There is an option that allows you to record the broadcast. Returning the broadcast allows you to watch your favorite TV show at any time.
- A large number of additional interactive services: TV programs, news and more.
- TV Guide option. You will always be aware of broadcast movies and TV shows.
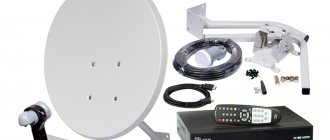
Installation of an MTS satellite dish: what equipment will be needed
Setting up MTS satellite TV causes difficulties for many users. Before setting up the MTS TV satellite antenna yourself, you should decide on the devices
which we will need:
- Directly TV.
- Set-top box with cables and control panel.
- Plate of the required diameter.
- A bracket with which the antenna will be mounted on the facade or roof.
- Converter.
- The wire through which the plate will be connected.
Satellite Director
An application for setting up satellite dishes, similar to SatFinder and Dishpointer Pro, but slightly inferior to them. In terms of popularity and number of installations, Satellite Director can compete with SatFinder.
Advantages:
- The application is absolutely free;
- The widest list of devices is supported;
- Satellite Director is very easy to use;
- Fast work even on the oldest and slowest phones;
- Decent satellite identification accuracy.
Flaws:
- There is no function for more precise settings (turning off the display of unnecessary satellites);
- You cannot take screenshots from the application (with the exception of devices with built-in screenshot capabilities).
How to set up an MTS TV dish to a satellite yourself
To install the antenna yourself, you need to understand that the reception level depends on the installation. The plate must be correctly directed and rotated so that the reception is as effective as possible. Installation errors often lead to the dish not being able to pick up a signal in the future. If you find it difficult to cope with the task yourself, it is better to invite professional craftsmen. If everything is in order, proceed to the step-by-step instructions on how to install the MTS satellite dish yourself:
- In the first step, you must choose a location. The dish must be turned to the south to improve signal reception. It must be within the visibility range of satellites. If you own a country house, it is better to place the device on the roof.
- Assembly must be carried out strictly according to the diagram given in the instructions. Different models come with different instructions. The antenna must be assembled carefully and securely
- Direct installation. You need to check whether the antenna will be blocked by tree branches or walls of nearby buildings. When performing installation, be careful, as you will have to work at heights.
- Using special bolts, the bracket is attached to the area of the facade or roof where the plate is planned to be installed.
- The antenna is then attached to the bracket. Why can't all the bolts be tightened? Because the antenna still needs to be tuned. It will have to be twisted and turned to give it the most correct position.
- Then you need to secure the converter and run a wire to it, which will later be pulled into the house. Be sure to think in advance where exactly the wire will enter.
Installation and configuration of MTS satellite antenna
To install and configure satellite television in the MTS system yourself, you need attention and certain knowledge, otherwise the equipment can be damaged. First you need to check the connectivity, that is, determine whether your region is within the coverage area, and also whether there are any obstacles to installing the antenna, for example, a tall tree or a house. In addition, before installing and configuring the antenna, you need to make sure that you have purchased a kit with all the necessary elements.
So, setting up MTS satellite TV includes the following steps:
- Select a location to mount the satellite dish where it will have direct visibility of the satellite.
- Assemble the antenna according to the instructions that came with it.
- Install the bracket for fastening the equipment as firmly and reliably as possible in the selected location.
- Attach the plate to the bracket according to three parameters: rotation, rotation and tilt.
- Connect the MTS set-top box and set up satellite TV using the installed mobile application online.
- Check the signal strength in the “Antenna Settings” section on your TV.
At this point, setting up MTS satellite TV yourself is considered complete. If any problems arise, admin will answer all questions. Read on for more detailed connection information.
Antenna installation process
The quality of satellite signal reception depends directly on the correct configuration of the MTS antenna. Just buying a set of devices and materials and putting a plate on is not enough. You need to choose the right direction to the satellite, connect the receiver, and make certain settings.
First you need to decide on a place. The satellite dish must face south. It's good when the windows face south. The main thing is that there is no tall building or tree nearby that will block access to the satellite. Otherwise, you will need to remove and install the plate on the roof of the house. Next, bolt the bracket and the plate itself to it. In this case, it is necessary to use not all the bolts at once in order to be able to adjust the desired degree of tilt angle of satellite TV from MTS. The next step is to attach the converter, which must also be rotated to the desired degree.
An important task is to configure the receiver head yourself. The equipment will not work correctly if it is turned even slightly away from the satellite. In this case, you can set up a satellite dish from MTS yourself in three ways. Using a smartphone will help you complete the task using the installed SatFinder application, indicating the name of the satellite in which you can calculate the required tilt and rotation angles. The second way is to use the MTS website in the “Satellite TV” section, then “Settings”, and then “coverage map”, “Setup Wizard”. The last method will help after installing the set-top box in the “Settings” menu. To set up the MTS antenna as quickly as possible, watch the video with instructions.
Why do you need to know this?
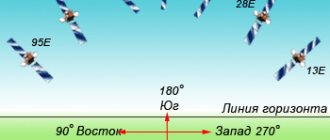
Several parameters are taken into account when determining the location. In particular, azimuth shows the angle between the direction of interest and north. It is calculated in the direction the clock hand moves. When setting, the rotation of the converter is taken into account, as well as the angle of inclination of the MTS dish itself. Another parameter is the elevation angle, which determines the angle between the direction to the satellite and the horizon. If this indicator is close to zero, the signal is not received.
Knowing the name of the MTS TV satellite and having its parameters at hand, it is easier to catch and configure the equipment for watching TV or using the Internet. The stability of the signal and its quality depend on the correctness of the available data and the clarity of the settings. In other words, knowing the location of the MTS TV satellite, you will quickly configure the necessary channels and achieve a high-quality picture. Even a slight shift left-right, up-down can lead to deterioration in signal quality or its complete loss.
Necessary equipment
The set of equipment from MTS for installing satellite TV is as follows:
- antenna;
- Cam module or set-top box;
- converter;
- bracket;
- 2 °F connector;
- coaxial cable;
- set of screwdrivers and keys.
In addition, you may need a plug, and also, if connecting two TVs, a divider.
Receiver setup
In order for the setup of MTS satellite televisions to be successful, you need to configure the receiver. Connecting a TV set-top box requires connecting the antenna cable using an HDMI cable to the TV connector. To completely complete the satellite TV setup and connect the receiver, you need to follow these steps:
- Insert the SIM card into the slot provided for this purpose.
- Turn on the set-top box and wait for the equipment analysis to complete and the 3G signal to initialize.
- Authorize the device using methods that will appear on the TV screen, usually this is a call to the call center or sending an SMS, in some cases the service will be carried out automatically.
- Create and save a user profile. At this stage, in the “Access Level” section, you can set the age threshold and change the password.
- Scan available channels.
TV module
To configure the module, you will need the following steps:
- Unplug the TV.
- Connect the antenna cable to it through the connector marked SATELLITE.
- Install the TV module into the CI port.
- Install a smart card in the TV module so that the chip on it points towards the TV image on the sticker.
- Turn on the TV.
- Go to the mode of viewing satellite TV from MTS, set the necessary parameters.
Settings for satellite TV from MTS
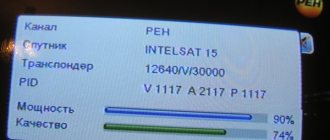
The MTS TV set using the STB Dune HD TV 251-S2 set-top box for watching satellite television does not require additional channel settings, everything will be done automatically. Manual settings will be required when using the Verimatrix CAM module. In this case, the satellite must have the parameters 75.0E ABS 2 MTS TV, the polarization is vertical linear, the position is 75° E., the module type is DVB-S, DVB-S2, QPSK, 8PSK, the speed is equal to 43 or 45 Msymb/ sec, and FEC – 5/6, 2/3.
Manual channel tuning
What settings are needed to watch channels? Manual settings are only needed for the CAM module. To do this, use a list of frequency ranges and transponders.
Features of connecting to MTS satellite TV
The satellite, thanks to which channels from MTS are broadcast, has a wide coverage area. This operator covers 90% of the Russian territory. The main feature of the provider is its focus on the quality of the received signal and image quality, the number of channels fades into the background. For some channels there are several versions of standard time. For example, if you did not have time to watch a movie or program at one time, then on this channel you will be able to see it on this channel, only in a different time zone.
Registration in your personal account for MTS satellite TV
Your personal account on the MTS website allows you to get many privileges. To register, you need to select the “My MTS” button, which is located in the upper right corner of the site, and then decide on the required satellite TV section. To register, you will need to enter your contract number and passport details. Such actions will later make it possible to manage services, view payment history, make settings, view the current tariff plan and change it, pay for the service, find out the remaining traffic, and more.
Cable communications are not available to all residents of Russia, but many have a desire to watch the best television channels in good quality. A way out of this situation may be to connect satellite television, which is available even in the most remote corners of the planet. In Russia, satellite television services are provided by many providers, including MTS. MTS satellite TV appeared relatively recently, but many have already appreciated its advantages, while the number of new subscribers is increasing daily. If you just purchased the kit, then very soon you will have to figure out how to set up MTS satellite TV. Of course, unless you decide to hire a specialist to do this work.
Of course, if possible, it is better to seek help from an appropriate specialist who will install and configure the equipment. MTS does not provide such a person, so clients are forced to deal with this issue on their own. Of course, there is a fee for such services, and not a small one. If you do not want to pay or there is no suitable technician in your locality, you can set up satellite TV from MTS yourself. This is quite possible, and you do not need special equipment . No one guarantees that you will definitely cope with the task, but it’s worth a try.
Preliminary preparation
If you are interested in the basic terms of service from a telecommunications operator, you need to make sure that services are available in your region. The use of modern technologies has made it possible to achieve more than 80% coverage of the Russian territory, but there are exceptions. This information is presented on the official website or can be obtained from a qualified technical support specialist.
You can contact him:
- by calling the operator's toll-free number;
- by contacting the nearest service office;
- leaving a written request in your personal account.
On the official website you can find detailed instructions for setting up MTS satellite TV, as well as information about possible errors. We will cover this issue in the appropriate section.
Also, preview the contents of the TV packages. At any time, you can activate additional services that will add thematic channels to your account.
What is required to set up MTS satellite TV
Many are convinced that setting up satellite television is an incredibly complex procedure that requires special equipment, so you can’t do it without a specialist. In fact, everything is much simpler. Of course, no one will claim that everything is extremely simple, but nothing is impossible here. Many people are most concerned about the issue regarding the special equipment needed to search for a satellite. Don’t worry, you don’t need to buy any special devices, any smartphone is enough. Of course, before you set up MTS satellite TV, you need to find out what exactly you need and prepare everything in advance. Don't worry, the list won't be long.
To set up MTS satellite television you will need:
- The MTS satellite TV set itself;
- Working tool for mounting the antenna;
- An application installed on your smartphone to find a satellite (for example, SatFinder);
- TV or projector.
You don't need any additional devices. Basically, even if you don't have a smartphone, you can still locate the satellite. This can be done through the setup wizard on the MTS website or in the menu of the set-top box.
- Important
If you are not confident in your own abilities, do not risk the equipment and contact a specialist.
Multifeed
An application for setting up satellite dishes, which is very different from analogues in its operating principle. For configuration, only a GPS receiver is used, so the configuration acquires many intricacies and features.
Advantages of Multifeed:
- Satellite antennas of non-standard sizes and shapes (which are extremely rare) are supported;
- Possibility of tuning one antenna to several satellites simultaneously using a multi-feed;
- The application does not require a camera to operate (you only need a GPS receiver), so the application will work on some older tablets;