After opening the LCD TV panel, it turns out that one or two LEDs in the backlight are faulty. When it becomes clear that the cause of the malfunction is the LEDs, then the question arises: What LEDs are in the backlight of the TV or just what LEDs are in the TV?
The latest models of liquid crystal TVs have an LED backlight type, meaning the backlight is made using LEDs for surface mounting. These LEDs very often fail due to overheating. In cases where the image on the TV disappears, there is a high probability that the cause of the malfunction is burnt-out LEDs. Depending on the type of TV, the LEDs burn out so quickly that even the warranty period for using the TV does not expire.
In this article we will look at two options for LED backlighting on a TV. LED modules illuminating the cells of the LCD matrix, an LED “full array” and a second illumination option when the LEDs are installed around the perimeter of the LCD panel.
Let's determine the malfunction in an ultra-thin TV.
It is not always the burnout of the LEDs that leads to the failure of the TV. It often happens that the power supply or other TV modules fail. Therefore, the first step should be a general diagnosis of the TV.
Our first example will be LG's ultra-thin TV. Let's determine which LEDs are in the TV backlight.
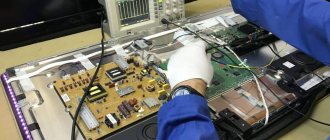
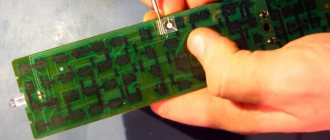
This is an LG model. Very difficult and too expensive. I turned on the TV and turned on the LEDs, but the display was dark. As always, some of the screws on the back and inside of the TV were exposed. As you can see, the power board, logic board, T-con board and finally the LED driver board. My focus was on the LED driver board and LED backlight. It's the one with the metal shield on it.
The first thing to do is make sure that voltage is getting to all the LED modules. Since the standby indicator is on, the logic board is currently healthy. I checked the voltage on the power board and everything seems to be ok.
If you look at the two arrows at the top, you will see the black and red wires. These are the two main power lines to LEDs. There they received a voltage that should be 12 DC on each side. If the board is receiving the correct voltage, but the LED backlight is not lit, this means two things. Either one of the LEDs has burned out, or the board is receiving voltage, but cannot cope with the voltage load, again caused by a malfunction of the LEDs. The only way to find out is to take out the LED strips, check them and determine which LEDs are in the TV backlight.
How to solve a problem?
Many craftsmen modify the power supply, reducing the supplied voltage. To do this, one or more resistors are soldered from the power circuit. However, this method is only suitable if the TV breaks down regularly within a short period of time after purchase - otherwise, the problem is not in the supplied voltage, but in the malfunction of a specific LED.
In this case, there are two options: replace the entire LED strip or fix the problem locally. The second option will be cheaper, but it will require some skill and accuracy.
It is best to use both methods at once: first replace the non-working LEDs, and then reduce the voltage by soldering resistors, or - much simpler - by adjusting the image, by about 20%. This will increase the service life of the LEDs significantly.
Let's determine which LEDs are in the TV backlight.
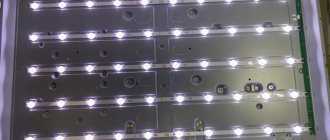
All LED backlighting is located around the perimeter of the TV at its end, 50 LEDs on each side. Testing with a tester revealed a malfunction of one of the LEDs. Now we need to determine what kind of LEDs are in the TV in order to buy either the entire LED module or identify burnt diodes and solder them ourselves.
Let's determine which LEDs are in the TV backlight.
- So, to determine what kind of LEDs are in the TV , you need to use a voltmeter and determine the voltage of the LED. Our article How to check an LED can help you with this.
How to check the LED?
The most important thing in the process of identifying an LED is to find out the operating voltage and current on the LED.
- After we determine which LEDs are in the TV. Next, we must determine whether the entire LED module has failed or whether a single LED has failed. You need to determine the type of LED, namely its housing dimensions. They are measured in millimeters. Our article Dimensions of LEDs can help you with this. But the article may not be useful since manufacturers often write the type of LED on the board itself. See photo. It will indicate 2835, 5050 or 5630, this is the type of LED.
LED sizes
- Further, knowing the diode body and its voltage, it will not be difficult for you to purchase the LEDs or LED modules you need on Aliexpress.
ATTENTION!
If in front of you is an LED module with failed LEDs and in front of you is a voltage-stabilized module (i.e. for 12/24 V voltage). Check the resistance elements with a tester, since LEDs often fail due to burnt-out resistance in the circuit.
Which backlight to choose, on what factors it depends
To make a decision, you need to take into account the conditions of use, the location of the TV or monitor, as well as several additional recommendations:
- Options with a thin body are suitable for limited space, as well as for direct wall mounting. This type is used where thickness matters and it is advisable to choose a thinner model.
- If the TV will be placed on a bracket at an angle, it is better to choose products with direct backlighting. The fact is that over time the case may become slightly deformed, which, with side illumination, will lead to disruption of the normal illumination of the matrix.
- When choosing an option with side-mounted diodes, it is worth checking the screen for glare before purchasing. It is best to turn on the blue color, as any problems are most visible on it.
It is better to give preference only to well-known companies with a good reputation.
At the end of the video, it will help you choose the right lighting.
Choosing the type of LED backlight in a TV or monitor is not difficult if you understand the features of each option and take into account the nature of use of the equipment. The main thing is to purchase equipment from well-known manufacturers; this is the only way to guarantee that the declared characteristics will not differ from the actual ones.
Let's determine the problem with a front-lit TV.
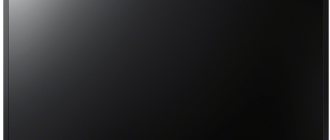
So now we have Philips LED Smart TV - 55.
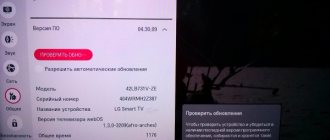
Before disassembling the TV to confirm the fault, I turned on the TV to see the fault itself. Indeed, there is an image and sound, but the image was not visible due to the lack of backlight. You must look closely or use a flashlight to see the image on the display panel. This confirmed that the signal was going to the motherboard, T-con and LED panel. I then confirmed whether the motherboard was sending a black light signal to the power supply (PSU). To do this I needed to disassemble the cover to find out.
Power supply (PSU) for connection to the motherboard. Checking the signal from the motherboard to the power supply on CN203 after turning on the TV on BL_ON. Signal or 4.3 VDC was present.
This test confirmed that the motherboard is working and the next step is to confirm if there is output to the LED strips from the power supply.
There are 2 pairs (CN301) of LED strips – LED1 + and LED2 +. The first (LED1+) was tested at 130VDC, and the second (LED2+) received 113VDC from the power supply. These results showed that one set of LED lights had a higher voltage than the other, implying that there might be a fault in the LED strips. The final test was to determine which LED strip did not cause the TV to backlight.
The LEDs connected to LED1+ had 2 LEDs that do not light up when using an LED backlight tester testing one strip at a time.
So we found out that the cause of the malfunction is in the LEDs. Now you need to decide for yourself whether to buy a new LED module or solder new LEDs yourself. To do this, you need to determine which LEDs are on the TV.
We use a tester to determine the operating voltage and type of this LED. Next, we will need these characteristics to select and purchase a new LED. It is very easy to make a mistake, perhaps in this case buying a new LED module will be much easier and more reliable.
Let's summarize. We identified a malfunction of the LED backlight and determined which LEDs on the TV are their type and characteristics. Now we have two options: buy LEDs and solder them in ourselves, or purchase a new LED module completely. Fortunately, Aliexpress has a very large selection of both.
In a few minutes, I found ready-made LED modules for replacement in the Philips LED Smart TV - 55, and I also found individual LEDs with lenses. I repeat, the main thing is to correctly determine which LEDs are in the TV backlight.
Advantages and disadvantages of each option
To compare two solutions and understand the pros and cons of each of them, you need to compare the features of each and highlight the positive and negative aspects.
Comparative table of pros and cons.
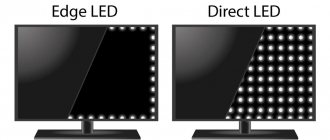
| Direct LED backlight | Edge LED backlight | |
| Advantages | Uniform illumination of the entire matrix due to the location of light sources and the presence of a diffuser | High brightness and good image contrast. This applies to quality options with bright LEDs and well-tuned reflectors. Screens of this type are bright and well perceived by people's eyes, causing minimal discomfort |
| Good contrast ratio, you can set the perfect image even on a large screen | The thickness of the screen is much smaller due to the lateral location of the backlight, which allows you to make compact models without losing the quality of the equipment and its performance. For example, Slim Direct backlight means that the TV has an ultra-thin screen; many manufacturers name models in a special way, indicating their minimum thickness | |
| Simple system repair due to the convenient location of the backlight unit. Such models are much easier to repair if the LEDs fail | Due to the simplicity of the system, such models are often an order of magnitude cheaper, although it all depends on the manufacturer and the quality of the components | |
| In a dark image, there are no highlights at the edges and corners of the screen. This is a very important factor for those who need the perfect picture. | ||
| When the matrix or housing is deformed, the quality of lighting does not decrease, since the diodes are located at the back and such problems do not greatly affect them | ||
| Flaws | Greater screen thickness due to the additional lighting module and lower brightness levels. | Uneven backlighting in some models; this problem especially often occurs over time when the matrix becomes slightly deformed. Another common problem is glare at the edges of the screen where the diodes are installed. |
Highlights around the edges are usually a problem with side lighting.
Repair practice
Like
Social buttons
A small educational program on the types of backlighting for Samsung TVs of the 4000 and 5000 series. Types of LED bars and their markings.
After another repair of the Samsung UE32F4000AK TV, I decided to write this article and share my repair experience. The Samsung company suffers from one unpleasant feature: it puts completely different LED strips in absolutely identical TV models, with the same module composition, while the matrices are installed accordingly differently (with different glass and tikon), but having absolutely the same dimensions of the trough inside and outside....
In order to share my experience and so that others do not fall into an ambush (including myself), I provide a small table on the correspondence of LED strip markings to models of some Samsung 4000 and 5000 series TVs, indicating the matrix model, size and number of strips, indicating the number of LEDs on the strips, with links where you can buy a TV repair kit:
| TV model | Matrix type | Ruler markings | Size | Purchase link |
| UE32F4000AW | HF320GEV4H | D2GE-320SC0-R3 | 5×9-650mm | Backlight kit 5x9LED D2GE-320SC0-R3 |
| UE32F4000AW | CY-HF320 AGS V1V | D2GE-320SC0-R0 | 5×9-655mm | Backlight kit 5x9LED D2GE-320SC0-R0 |
| UE32F4000AK | HF320GEV4H | D2GE-320SC0-R3 | 5×9-650mm | Backlight kit 5x9LED D2GE-320SC0-R3 |
| UE32F4000AK | CY-HF320 AGS V1V | D2GE-320SC0-R0 | 5×9-650mm | Backlight kit 5x9LED D2GE-320SC0-R3 |
| UE32H4000AK | didn't save | D4GE-320DC0-R2 | 3×7-650mm | Backlight kit 3x7LED D4GE-320DC0-R2 |
| UE32F5000AK | CY-HF320BGSV1V | D2GE-320SC1-R3 | 5×9-655mm | Backlight kit 5x9LED D2GE-320SC1-R3 |
| UE32F5000AK | HF320BGA-B1 | D2GE-320SC0-R3 | 5×9-650mm | Backlight kit 5x9LED D2GE-320SC0-R3 |
| UE32F5003AK | CY-HF320BGSV1V | D2GE-320SC1-R3 | 5×9-655mm | Backlight kit 5x9LED D2GE-320SC1-R3 |
| UE32F5003AK | HF320BGA-B1 | D2GE-320SC0-R3 | 5×9-650mm | Backlight kit 5x9LED D2GE-320SC0-R3 |
| UE32F5003AK | CY-HF320BGSV1V | D2GE-320SC1-R3 | 5×9-655mm | Backlight kit 5x9LED D2GE-320SC1-R3 |
| UE32F5003AK | HF320BGA-B1 | D2GE-320SC0-R3 | 5×9-650mm | Backlight kit 5x9LED D2GE-320SC0-R3 |
| UE32EH4000W | LTJ320AP03-L | D1GE-320SC0-R3 | 4×8-580mm | Backlight kit 4x8LED D1GE-320SC0-R3 |
| UE32EH5000W | DE320BGM-C1 | D1GE-320SC1-R2 | 4×8-580mm | Backlight kit 4x8LED D1GE-320SC1-R2 |
| UE32EH5000W | LTJ320HN07-L | D1GE-320SC1-R2 | 4×8-580mm | Backlight kit 4x8LED D1GE-320SC1-R2 |
| UE32EH5007K | DE320BGM-C1 | D1GE-320SC1-R2 | 4×8-580mm | Backlight kit 4x8LED D1GE-320SC1-R2 |
| UE32EH5007K | LTJ320HN07-L | D1GE-320SC1-R2 | 4×8-580mm | Backlight kit 4x8LED D1GE-320SC1-R2 |
| UE32EH5047K | DE320BGM-C1 | D1GE-320SC1-R2 | 4×8-580mm | Backlight kit 4x8LED D1GE-320SC1-R2 |
| UE32EH5047K | LTJ320HN07-L | D1GE-320SC1-R2 | 4×8-580mm | Backlight kit 4x8LED D1GE-320SC1-R2 |
| UE32EH5057K | DE320BGM-C1 | D1GE-320SC1-R2 | 4×8-580mm | Backlight kit 4x8LED D1GE-320SC1-R2 |
| UE32EH5057K | LTJ320HN07-L | D1GE-320SC1-R2 | 4×8-580mm | Backlight kit 4x8LED D1GE-320SC1-R2 |
* Explanation: 5×9-655mm - read as 5 lines of 9 LEDs, the length of one line is 655 mm.
* The marking of CY-HF320 matrices may differ in the last digits, for example CY-HF320BGSV1H, CY-HF320AGLV1V, etc.
* Marking of HF320 matrices may also differ in the last digits in the marking depending on the revision and manufacturer
* As a rule, 655 mm rulers are installed in the CY-HF320 series matrices, and 650 mm rulers in the HF320 series.
* If you see markings on SHARP HD tapes, then, as a rule, tapes with a length of 655 mm are installed.
AFTERWORD:
Well, for those who were ambushed, for example, by ordering the wrong set of rulers for their TV, I will give an example of how you can get out of such a situation if you have rulers shorter or longer than those installed by the manufacturer and the placement of the LEDs does not match the white matrix substrate (purely collective farm):
Using the example of a Samsung UE32F4000AW TV with a CY-HF320 AGS V1V matrix. I ordered the D2GE-320SC0-R3 (650mm) rulers without looking, without looking at the matrix markings, since previously I had come across all UE32F4000AW with exactly these rulers. From the table above we see that the original tapes are marked D2GE-320SC0-R0 and are 5 mm longer (650mm) and, accordingly, have a different arrangement of LEDs and lenses.
I solved the problem using this method: we take a pen with blue paste and a ruler, draw out the cutouts as in the photo and carefully cut out the horizontal stripes of the matrix so that the lenses of our incorrect rulers align with the cutouts:
It turned out unsightly, but in terms of parameters and the number of LEDs, everything coincides with the original. To be honest, on a white background these horizontal cutouts give off slightly dark highlights, but when watching TV they are not visible at all. Unfortunately, I was in a hurry and forgot to take a photo of the result. At least while the client was picking up the TV, three different people who were not involved in TV repairs looked at it and none of them noticed any “jambs.” The TV broadcast videos from YouTube via an HDMI cable from the computer.
Write a comment:
- Use VKontakte
- Comment without registration
Social Comments