Sony TVs have LED indicators at the bottom of the front panel. They are used to indicate the status of the TV or to indicate that certain functions are enabled.
NOTE: If you need information specific to your specific TV model, please refer to the instruction manual that came with your TV.
- Light sensor
- Remote control sensor
- Picture Off/Timer Lights up green when Picture Off . Lights up orange when setting the timer. Lights up and/or flashes orange during a software update.
- Standby Lights up red when your TV is in standby mode, computer power saving mode, or during a software update.
- Power Lights up green when the TV is turned on.
System error:
- On some models, the red LED indicator remains lit to indicate that the TV is powered off. This is a normal display for your TV.
- If the red LED indicator blinks in a continuous series of flashes and the TV does not work correctly, the TV has detected an error or problem. Continue to the next solution in the online DIY TV troubleshooting tool
- NOTE: 8 flash indicator - On some models, you will need to perform a special reset procedure if the red LED indicator on the front of the TV flashes in a series of 8 flashes. This issue only affects certain models and can be resolved by using the following procedure (please refer to this answer to check if your model is included in this list).
No image
A fairly common problem with all smart TVs is the absence of an image on the TV screen. At the same time, we are not talking about the case when it does not turn on at all, but about the situation when there is sound but no image.
There are two possible reasons for such a breakdown:
- problems with the power supply;
- problems with the backlight inventory.
In the first case, the only solution is to replace the broken block. Secondly, there are two possible solutions. In the first case, the faulty LED is excluded from the circuit without replacement. In the second case, they change the LED strip.
Important! In some cases, more serious matrix malfunctions are possible. To identify them, you will need professional diagnostics, which on average costs about a thousand rubles.
Software update:
- A flashing orange/amber light means the TV is accepting a software update. This only happens if your TV has an active high-speed Internet connection. Do not turn off the TV or disconnect it from the power source while updating the software.
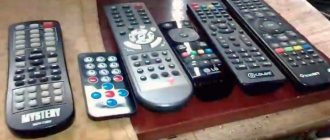
- The remote control will not operate while the software update is downloading and installing.
- It may take several minutes to download and install the software update. Please be patient. The TV will return to normal operation once the software update is completed. NOTE: During a software update, the TV will not respond to the remote control. The software update may take several minutes.
Troubleshooting on Sony Bravia TVs
Smart TVs from the Sony Bravia line, like any other household appliance, break down. This does not happen very often, but since we are talking about a high-tech product, breakdowns of these devices have their own characteristics. In particular, many of the problems are similar to computer ones. This means that the technician who will have to repair the Sony KLV 32s550a TV must have a good understanding of the software.
This TV may have some problems
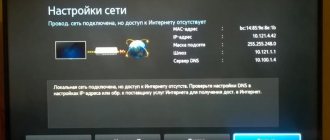
One of the main reasons for problems with smart TV is its integration with Internet networks, both wireless Wi-Fi and wired Internet. This integration creates a risk of virus infection. The latter can cause:
- lack of response to the remote control;
- lack of image;
- lack of sound;
- inability to find the antenna;
- unexpected shutdown.
But the impact of viruses on the operation of software is not the only problem that owners of such TVs have to face. Mechanical damage is an equally common cause. The most common breakdowns due to impacts, falls and exposure to water:
- TV not turning on with blinking indicator;
- not working buttons;
- the picture becomes monochromatic;
- strong snow-like noise;
- the screen turns black or white;
- TV turns on or stops working after turning on for no reason;
- no decimeter channels;
- violation of synchronization between picture and sound;
- problems with image scaling relative to screen size;
- linearity violations;
- clear signs of physical damage on the case.
In this video you will learn more about repairing such a TV:
Each time, to find out the cause of a breakdown, correct, professional diagnostics is necessary. For it, a number of methods and special equipment are used, available only to masters who deal with such equipment. We're talking about:
- microscopes of binocular models;
- vacuum grippers;
- oscilloscopes;
- multimeters.
In addition to these tools, software specialists conduct software testing.
There are breakdowns that cannot be corrected by other methods other than replacing the broken part. This is the case, in particular, with matrix failure. Any damage cannot be repaired. Be it chips on the glass, cracks or internal damage to the display unit.
In addition to the matrix, the X1 Extreme processor, which is responsible for exactly how the image is displayed, also breaks down. It is on this that the increase in resolution to 4K HDR (that is, 3840 by 2160 pixels) depends. Without 14-bit signal processing, colors would be segmented and gradients would not be smooth enough. Thanks to the processor, even with an 8-bit source, you can watch videos with maximum quality. Replacing a processor can be quite expensive.
In addition to the processor, the following are subject to replacement:
- power circuits;
- backlight lamps;
- kinescope modulators.
Attention! All these and some other parts cannot be repaired if damaged. Which requires contacting a licensed service center.
Flashes when the TV is turned on:
- The green LED indicator lights up continuously to indicate that the TV is powered on. The TV screen may be blank if the TV is switched to an input that does not receive any signal. Try switching to another input by pressing the INPUT or TV/VIDEO button on the remote control.
- On some models, a flashing green LED indicates that the TV is accepting commands from the remote control.
How to identify the cause of the problem
The search for inoperability problems should start from the outside and end inside the device itself:
- First, check the outlets and power cord. We are looking for kinks and abrasions.
- Inspect the case for mechanical damage resulting from a fall or other force majeure.
- We examine the LCD matrix to see if there is a characteristic “cobweb” of broken glass.
- We sniff to see if it smells burnt.
- For those who boldly hold a screwdriver in their hands, open the back cover of the Samsung TV and visually inspect the boards to see if there is any mechanical or thermal damage to the chips.
- If channels turn on poorly and for a long time (or not the first time), most likely the operating system is to blame. Modern devices are equipped with the simpler and more functional Tizen OS, but it is not without its drawbacks.
It is best to entrust detailed diagnostics to specialists who, from their own experience, know what a motherboard, voltage regulator, scan module and TV processor are.
A new device from a store is unlikely to be faulty. Therefore, before using it, it will be useful to read the contents of the quick start guide and make connections in accordance with these instructions.
Technical problems
What to do if your LG TV screen is flickering? Start with hardware diagnostics. Check the functionality of the basic modules of the TV device. It is extremely common for high-voltage capacitors to burn out in the power system, namely in the inverter. In CRT models, cracks appear in the soldering. Mechanical defects visually resemble a ring. They appear in those places on the board where all elements are heated. Such a breakdown also occurs due to high voltage.
If the inverter does not produce the required voltage level, then the LED backlight begins to blink. It may flicker when you turn on your LG TV. In some situations, the LEDs go out completely. Therefore, some parts of the screen remain completely dark. To solve the problem, you need to check the functionality of the capacitors and LEDs. In some situations, it is necessary to resolder boards in places where there is increased voltage.
Separately, we note that screen flickering due to board failure is more often typical for Smart TVs from Samsung. This is due to a manufacturing defect. Sometimes it is possible to slightly reduce the negative effect by adjusting the brightness.
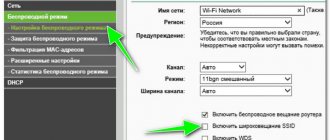
Setting up Tricolor TV channels on Sony Bravia TVs with a CAM module
Preparing to set up your Sony Bravia TV: Set up the dish and point it at the EUTELSAT W4 (36B) satellite. Details about the Tricolor satellite coverage area and the direction of the satellite dish in your locality are indicated on the Tricolor website. Write down the local oscillator frequency parameters indicated on the satellite dish converter.
In our case, the upper frequency is 10.75 GHz
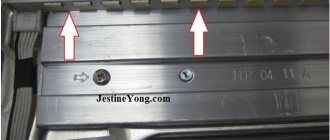
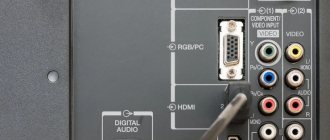
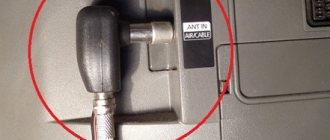
Make sure the TV is turned off. Connect the cable from the satellite dish to the TV's satellite dish input, marked with the icon:
Install the smart card with your subscription into the CAM module (DRE-Crypt CI+ module) provided by the satellite TV operator:
Install the CAM module (CI module) into the appropriate slot on your Sony Bravia TV, marked with the icon:
Note: it may be necessary to first remove the safety plug from the CAM connector of the DRE-Crypt CI+ module of the TV
Setting up your Sony Bravia TV
1. Turn on the TV and go to Settings -> Digital configuration -> Auto satellite tuning
2. Confirm that Auto Satellite Tuning will begin.
3. Select your satellite dish configuration. With regular individual satellite antennas, you should select the Fixed Antenna or DiSEqC option (default). Click Next
On the scan page selection page, leave the default settings and confirm - “Next”
4. Select the first satellite (Satellite 1) and press the center button on the remote control to enter the settings menu:
5. Select “LNB Configuration” and enter it:
6. In the “Lower LNB range” and “Upper LNB range” items, enter the corresponding values of the converter local oscillator (see paragraph 2 of the “Preparation” section). In our case, “LNB Low Range” by default coincides with the corresponding local oscillator parameter. But “Upper range LNB” is not. Enter the appropriate values for this parameter in megahertz (10.75 GHz = 10750 MHz) and confirm:
7
Return to the previous Sony menu and pay attention to the “Transponder” item. This item directly configures the parameters for receiving software packages
The default transponder settings in the TV menu coincide with the settings of the Tricolor TV transponder in the western region.
| Transponder frequency | 12226 MHz |
| Polarization | Horizontal or Left |
| Symbol Rate (SR) | 27500 ksym/sec |
For this reason, no settings changes are required at this point. It may be required if the signal parameters are changed by the satellite TV operator or if TV is configured in other regions. If the antenna is connected and the initial parameters are entered correctly, the screen will display an indication of the signal quality and strength.
Return to the list of satellites and click "Start".
8. Scanning of radio and TV channels begins, during which the progress and number of found TV channels (programs) are displayed.
9. The Sony Bravia TV setup is complete. Depending on the current set of programs transmitted by the satellite TV operator, the number of channels found may vary. Now you can either exit the setup menu or immediately sort the channels by pressing the corresponding button according to the prompt.
Attention! Some of the detected TV channels may not be available for display if they are paid and are not included in your subscription plan with the satellite TV operator. Previous
Previous
Setting up Setting up the Tricolor antenna
Next
CI+ module Setting up Tricolor TV channels on Samsung H-series TVs with a CAM module
Problem due to TV signal
If the LCD TV screen starts flickering after connecting a certain power source, then the problem is due to the connection. For example, a defect may appear due to a malfunction of the antenna, cable or receiver. In order to eliminate the causes of problems associated with television signal sources, the latter should be thoroughly tested.
Satellite TV
To set up satellite TV broadcasting, you need to use a receiver, a signal source and a TV. The source of the television signal is a satellite dish or cable provided by providers. The receiver is used to decrypt the satellite signal. The signal is transmitted to the TV via HDMI or RCA interface. Much depends on the model of the TV device.
A malfunction in one of the above items will cause the Samsung TV screen to flicker and the image to be distorted. It is possible that other defects may appear.
If you use the services of a satellite TV provider and have problems, just call the hotline. When a satellite dish acts as a signal source, checking the connection begins with this element.
Do not rush to dismantle or move the antenna, since then it will be extremely difficult to point it in the desired direction. This requires additional equipment. First, simply disconnect the antenna cable from the decoder. A notification will appear on the TV screen indicating that there is no signal.
If the flickering stops, then the problem is in the cable or satellite converter. It is much easier to re-install the cable. It will take a minimum of time. Connect the new cable to the receiver and check the broadcast quality. Has the screen started flickering again? This indicates a malfunction of the satellite converter - a special device that receives a signal from the dish. You will not be able to repair the converter yourself. Seek help from specialists.
In a satellite connection, the receiver is responsible for the image quality. Therefore, the performance of the decoder determines the comfort during viewing. How to test the operation of the receiver? First, disconnect it from the external receiving cable. It cannot be ruled out that failures occurred in the signal receiving module.
An alternative solution is to replace (if possible) or disconnect the cable that is connected from the decoder to the TV. Switch it to another signal source. For example, if you selected analog broadcast and the blinking stops, then the problem has been identified correctly.
What should I do if the display continues to flicker after replacing and unplugging the cable? This indicates that there is a hardware problem with the TV. Contact the service center.
Cable TV
What should I do if the picture on my TV flickers? The user doesn't have many options. Inspect the television cable that was laid by the provider in your apartment. If mechanical damage is detected, change the cable.
Practice shows that problems with color and other interference appear due to a broken plug. It is very difficult to identify a breakdown. Disassemble the plug and check the integrity of the element.
g
If changing the signal source makes the screen flicker disappear, then the problem has been detected correctly. Contact your cable provider's call center and report the problem. First try to repair or change the plug yourself. It is possible that it broke as a result of a short circuit.
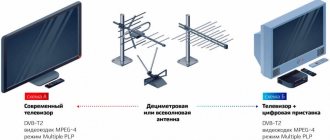
Analog and digital TV
If the image on the TV flickers during an analog or digital connection, then solving the problem will not be difficult. First, check the antenna, especially if it is equipped with electronic devices that provide signal amplification. Move the antenna. Has the flickering gone away? Disconnect the cable from the TV antenna. Have the defects disappeared? You will have to change the cable or antenna.
Flickering is far from the only glitch that users encounter. Very often the image is distorted and the TV beeps. All this may be a consequence of a malfunction of an ordinary antenna.