When a laptop or computer is in use for a long time, you may encounter such a nuisance as stains of various kinds. Moreover, these irreducible marks can be of a variety of colors. It is important to determine the nature of the stain and its features in order to choose the right method for removal. Let's take a closer look at how to remove black spots, as well as light, yellow, and red ones.
We repair laptop brands: Toshiba, ACER, SONY, SAMSUNG, DELL, Lenovo, MSI, ASUS
We provide laptop repair and maintenance services: Replacing the north and south bridge of a laptop, Cleaning laptops, Upgrading a computer, Replacing a hard drive, Replacing a matrix.
You can order from us: Urgent computer repair.
Raise the mirror. Press the shutter-release button all the way...
Page 344
- Image
- Text
316
n
5
Raise the mirror.
Press the shutter-release button all the way down. The mirror will be raised and the shutter curtain will open, revealing the sensor. The viewfinder display will turn off and a series of dashes on the control panel will blink.
6
Matrix check.
Hold the camera so that light falls on the sensor, and check for dust or lint on the sensor. If there are no foreign objects on it, proceed to Step 8.
7
Matrix cleaning.
Carefully remove dust and lint from the matrix with a blower. Do not use a blower with a brush, as the bristles may damage the matrix. Contamination that cannot be removed with a blower can only be removed by Nikon service personnel. Do not touch or wipe the matrix under any circumstances.
8
Turn off the camera.
The mirror will return to the down position and the shutter curtain will close. Replace the lens or protective cap.
Troubleshooting
If you can’t contact a professional, you can fix the display by replacing the matrix yourself.
For this we need:
- New matrix;
- Several screwdrivers.
So, here is the algorithm to follow when replacing a part:
- First you need to allocate a place to work and prepare a work surface.
- Next, de-energize the device by disconnecting it from the electrical network.
- Using a suitable screwdriver, unscrew the elements holding the device together. Many of them are located under a plug, which is easy to get rid of - pry it off with the same screwdriver.
- We remove the body.
- Next, you need to remove the metal fasteners, while carefully holding the PC.
- We disconnect the connection cables, fasteners and very carefully remove the matrix.
- Install the new matrix into the screen frame.
- Reconnect the cables.
- Perform the same careful assembly of the device.
What are the alternatives?
The fear of receiving a copy with highlights forces many buyers to consider alternative options and models that are completely devoid of this drawback. Luckily they are! These are TVs equipped with OLED matrices.
In screens built on organic diodes, there is no backlight module in principle, since the matrix itself consists of many multi-color LEDs (one for each pixel of the image), each of which is an independent light source.
The disadvantages of this solution include the high cost of the screen, and, consequently, the product itself, and the relatively short life cycle of organic LEDs. They degrade and fade (elements that form blue color are especially susceptible to this scourge), which over time leads to fading of the image and permanent loss of a pixel.
Cleaning the surface of the protective glass of the screen
One of the reasons for the appearance of stains is the external adhesion of dirt and dust. In such a situation, there is no need to disassemble the equipment or reboot it. It is enough to wash the surface of the screen. For this:
TV repairs are 30% cheaper
than in service centers near your home
Order repairs
- Turn off the equipment. It is advisable to turn it off from the network.
- Purchase a special cleaner for cleaning LCD monitors.
- Take a soft microfiber cloth.
- Apply a small amount of product to it.
- Wash the screen without pressing hard.
It is advisable to do this treatment 2 times a week. This will prevent dust from penetrating under the body and sticking to the matrix.
CRT TVs
In this technique, the image is transmitted through cathode ray tubes and a special system for deflecting light beams. This allows you to create a high-quality, color-rich picture. When spots form, the causes of malfunction are:
- demagnetization of the kinescope system;
- instant switching on/off of the unit;
- network outages;
- the presence of strong third-party electromagnetic radiation (for example, a turned on microwave oven).
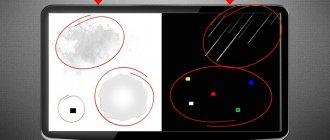
Black specks are formed when the internal coating of the kinescope sheds. Restoration is not possible, replacement is required. Often it is more profitable to change the entire device.
How to get rid of stains on your monitor
It is theoretically possible to remove dark areas that distort the image by adjusting the monitor, but the likelihood of a successful outcome is minimal. But the rest requires repair. But often it all comes down to the fact that replacing the matrix is completely unproductive, and in this case it is better to buy a new monitor. Let's look at the most effective ways to fix the problem:
- Hardware and software. Pixel Fixer creates color switching. If you “insert” this window into your dead pixel, turn on the program and let it sit for one hour, then this may solve the problem. If nothing changes after an hour, try leaving the car overnight. This is a completely harmless procedure, which, one might say, “trains” the pixels when contact is restored. The only caveat is that it takes time.
- Help from professionals. Perhaps manipulations with the Pixel Fixer program will not work. The Internet offers you many ways to remove black spots on your laptop using some pretty shady tricks. But in general, such games of chance end in tragedy both for the equipment and for its owner. At this point, this is not a better option than contacting support. Whatever the cause, any stains or spots will need to be addressed. Your gadget repair costs will not be higher than planned if you were smart and immediately took the laptop to a specialist. If used for a long time, various symbols may appear on it. If a blackened, permanent mark appears on the LCD screen, the sensor has failed.
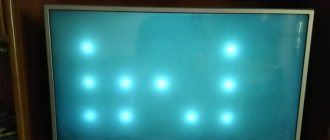
Debris between the layers of the LCD matrix
It happens that at the factory or during transportation, dust particles or other debris end up inside the matrix between the layers.
Somewhere in my archive there was a photograph of a fly stuck almost in the middle of the screen - it was a factory defect. In such cases, the monitor is successfully returned under warranty.
This happened with a new TV and this is what Samsung technical support responded, according to a participant:
This is what SAMSUNG responded to me:
Hello.
The Technical Department reviewed your request and reported the following:
The display housing has ventilation holes to allow heat to escape from the display backlight elements. Through these holes, insects could get inside the display. This is a TV production technology, like that of any other equipment manufacturer, to ensure the outflow of heat from the display backlight elements. The manufacturer is not responsible for insects getting into the equipment.
Here is a method I found from one of the IXBT forum participants:
You need to take a soft cloth, such as a scarf or sweater sleeve, and lightly hit it on the screen, next to the speck of dust. Dust particles are knocked out, and the risk of damage to the monitor is low. I hit the particularly stubborn ones a little harder - this left faint temporary traces on the matrix, which disappeared after a couple of minutes. The result is that the screen is clean, the monitor is intact and serves its owner well.
And in the same forum thread, people also advised tapping on the sides of the monitor - it also helps to push a speck of dust down, when the layers seem to separate for a moment.
Removing greasy stains from the display
In addition to stains caused by the operation of the device, there are those that do not affect it at all. They are also caused due to the carelessness of the consumer. In this section, we will learn how to remove monitor stains that form on the outside of the display.
It’s very easy to get rid of ordinary dirt, but how to get rid of stubborn greasy stains that greatly distort your view? In order to eliminate them, you only need a cellulose cloth, any dishwashing detergent and warm water.
Important! If you find scratches on the screen, use the useful tips on our portal from the special review “How to remove scratches from a computer monitor?”
So, here's what you need to do to remove greasy dirt from your display:
- At the very beginning, you need to slightly moisten the cellulose cloth with warm water and wipe the screen with it.
- Apply detergent to the napkin you are using and distribute it evenly over the contaminated area. During this procedure, a small soap scum will appear on the monitor, which helps remove fat from the surface.
- Next, you need to remove the soap scum from the napkin by rinsing it in warm water and squeezing it out as hard as possible.
- For prevention, repeat the above steps.
- Allow the surface to dry on its own.
- Wipe the screen with a special damp cloth.
Attention! There are special wipes on sale that can be used to remove stains from your monitor. They just need to be moistened and also wipe the surface. You should not purchase such wipes if they contain alcohol.
More tips for cleaning your PC screen
We have prepared for the reader a number of useful and effective tips for cleaning the screen of your favorite computer yourself:
- Water can be replaced with three percent acetic acid. Don't be afraid, such a solution will not harm the matrix, but will clean the screen very well. After the procedure, it is advisable not to wait for the screen to dry on its own, but to wipe it with a dry cloth.
- Cellophane or cling film helps to get rid of dust efficiently and for a long time.
- Do not remove stains with iron brushes, knives or other scratching objects. Here, harm to the device will be inevitable.
- Dissolved baby soap works well to remove old greasy stains.
- Do not use glass cleaners as this can damage all layers of the monitor.
Important! It is advisable not to use the following products to clean the monitor of any device:
- Foam sponges;
- Regular paper napkins;
- Various terry materials;
- Rough fabric.