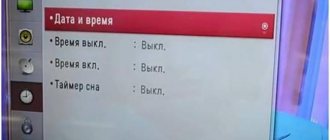
Interference on the TV not only interferes with your ability to watch your favorite movies and TV shows, but can also cause vision impairment. The TVs currently being produced produce high-quality, color-saturated pictures, but no matter how technologically advanced they are, they are not immune to mechanical breakdowns and hardware failures.
Most often, interference takes the form of vertical or horizontal stripes, or is expressed in the form of noise or flickering. Why does the TV screen ripple, can you fix it yourself and in what cases can you not do without the help of a specialist - this is discussed in the article.
Causes of screen noise
If, upon startup, the TV exhibits various types of radio interference, then the cause of this phenomenon may lie in a hardware malfunction. The breakdown may be directly related to the unsatisfactory condition in which the cables, resistors or microcircuits are located.
At the same time, it is not recommended to try to make the necessary repairs yourself, disassembling electronics without the necessary knowledge and experience. Inept intervention is likely to aggravate the current situation.
To prevent problems such as TV interference, you need to remember that it appears when:
- Moisture or dust gets into the inside of the case.
- Using low-quality cleaning products when servicing equipment.
- Careless transportation or accidental dropping of the device.
Internal monitor malfunctions can contribute to the appearance of ripples. The cause may be damage to peripheral devices or problems coming from the provider.
Creating Effects
Step 1
Turn off the visibility of all layers except the first two. Green and Blue boxes .
Translator's note: having created 4 duplicate layers, then the author turned off the visibility of the top three layers.
Step 2
Press the 'V' key while holding down the 'Shift' key and move the second layer 30 px to the right.
Step 3
Turn on the visibility of the third layer, in the same way as in the previous step, turn off the Red and Green . Next, hold down the 'Shift' key and move this layer 20 px to the left.
Step 4
Turn on the visibility of the fourth layer, and then go to Layer – New Adjustment Layer – Hue/Saturation (Layer > New Adjustments Layer > Hue/Saturation).
Step 5
Double-click on the adjustment layer to change the Saturation to +100.
As you can see, the saturation effect has been applied to the entire image, but we only need to apply saturation to some areas of the image.
Step 6
Right-click on the Hue /Saturation adjustment layer and in the window that appears, select the Create Clipping Mask , so the adjustment layer adjustment will only apply to the bottom layer.
Step 7
Now add a layer mask to the fourth layer.
Step 8
Hold down the 'Alt' key and click on the layer mask thumbnail to open it. Fill the mask with black.
Step 9
Press the 'M' key and then create rectangular selections where you would like the effect to be applied. Fill the created rectangles with white.
Thus, we applied the saturation effect only to certain areas of the image:
Step 10
Add a layer mask to the fifth layer, fill the mask with black. Next, create a large white rectangle just above the center of the image.
Step 11
Hold down the 'Shift' key and move this layer 600 px down.
Translator's note: first cancel the active selection (Ctrl+D), and then do not forget to switch from the mask to the layer, to do this, click on the layer thumbnail. Move the image strip all the way down, as shown in the screenshot below.
Step 12
Let's go Filter – Blur – Motion Blur (Filter > Blur > Motion Blur). Set the following settings: Angle : 15°; Offset (Distance): 15.
Step 13
Let's add a little distortion to the image. Let's go Filter – Distortion – Twirl (Filter > Distortion > Twirl). Set the following settings: Angle : 50°.
Step 14
Right-click on the Hue/Saturation adjustment layer and in the window that appears, select the option Create a duplicate layer (Duplicate). Next, move the duplicate adjustment layer to the top, placing it on top of the fifth layer, and then convert the duplicate adjustment layer into a clipping mask.
The result after all the manipulations should be as in the screenshot below:
External and internal interference
To prevent any type of audio distortion from occurring, you need to pay attention not to the TV itself, but to the type of TV. The fact is that its digital and cable varieties are much better protected from interference than analogue ones.
Another cause of unpleasant phenomena can be a large number of modern televisions installed within one home. The reason for picture distortion may be electrical equipment and household appliances installed in the apartment.
The most common cause of noise on the screen is external interference, the sources of which include:
- Household appliances located in the house.
- Radio stations and industrial enterprises located in close proximity.
- High voltage power lines nearby.
When it comes to internal interference, it is most often caused by faults that occur in the equipment itself. If ripples, stripes, shaking, grids, buzzing and hissing occur on the screen, you should urgently call a specialist. Only he will be able to make the most effective diagnosis and establish not only the type of problem, but also the cause of its occurrence and the optimal method of elimination.
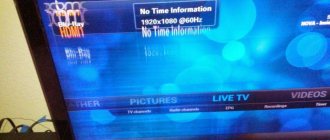
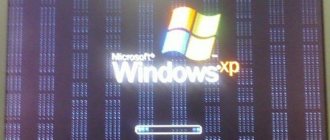
Video distortion options
Image deformations can appear not only on an old CRT television receiver, but also on a modern plasma or LCD device. All video playback violations can be divided into types:
- Gray ripples accompanied by a characteristic noise.
- Vertical or horizontal stripes.
- Vibration of the video image.
- Net.
- A specific hum that clogs the sound.
- Difficult to describe distortions.
Ka may be a sign of certain hardware problems.
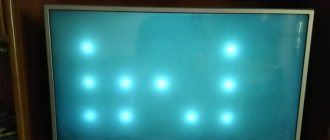
There are ripples and noise on the screen
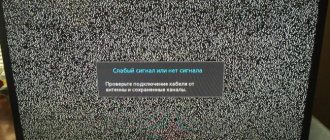
If a phenomenon such as gray ripples or hissing is observed when starting up television equipment, then the reason for it may be:
- There is a malfunction in the antenna. Such a breakdown can be eliminated by careful adjustment or replacement. Even in such a situation, it is necessary to diagnose the antenna cable, which could be frayed, bent or broken. It is worthwhile to carefully inspect the plug and, if necessary, replace it. An antenna malfunction can be easily checked by connecting it to another device that is working properly and does not show any problems. During such a check, the quality of the resulting image is compared.
- Lack of grounding or poor shielding of wiring wires. Replacing old cables and shielding will help solve the problem in such a situation.
- Violation of channel settings. In such a situation, the problem is resolved by reconfiguring. In this case, the breakdown can be repaired by the user or a specialist.
Each problem has its own specific solution, without knowing which you should not carry out independent repairs. Otherwise, there is a high probability of causing even greater damage to the television equipment and image.
Create a VHS Texture
Step 1
Create a new layer (Shift+Control+N) and fill it with white.
Step 2
Next, go Filter – Filter Gallery – Sketch (Filter > Filter Gallery > Sketch). Select the sketch type Halftone Pattern . Set the following settings: Size : 2; Contrast : 2.
Step 3
Double-click on the layer to apply the following settings in the Blending Mode window : blending mode Overlay (Overlay); Opacity : 25%. Disable the Red and Blue .
Translator's note: the author created a texture from small thin lines.
Step 4
Duplicate the texture. Using Free Transform (Ctrl+T), hold down the 'Shift' key, rotate the duplicate texture layer by 90°, and also apply scaling to the size of the working document.
Translator's note: thus, the author created a texture from small cells.
Step 5
Double-click the layer to apply the following settings in the Blending Mode window : blending mode Normal ; Opacity : 15%. Disable the Green and Blue .
Translator's note: perform actions with a duplicate of the texture layer.
Step 6
Press the 'U' key and select the Rectangle Tool. Create a shape with the following dimensions: Width : 1800 px; Height : 120 px.
Step 7
Click on the rectangle layer and select the Rasterize Layer .
Step 8
Next, go Filter – Noise – Add Noise (Filter > Noise > Add Noise). Set the following settings: Effect (Amount): 400%; Distribution : Uniform ; Monochromatic box .
Step 9
Next, go Filter – Blur – Motion Blur (Filter > Blur > Motion Blur). Set the following settings: Angle : 0°; Distance : 20 px.
Step 10
Go Image – Correction – Brightness / Contrast (Image > Adjustments > Brightness/Contrast). Set the following settings: Brightness : 150; Contrast : 100.
Step 11
While on the rectangle layer, press Ctrl+I to invert the colors of the noise texture, and then change the blending mode to Dodge .
Step 12
Duplicate the noise stripe layer several times. Hold down the 'Shift' key and move the duplicate layers, placing them in different places in the image.
Step 13
Create a new layer (Shift+Ctrl+N), fill this layer with black.
Step 14
Let's go Filter – Noise – Add Noise (Filter > Noise > Add Noise). Set the following settings: Effect (Amount): 400%; Distribution : Uniform ; Monochromatic box .
Step 15
Now we will add the Color Tile effect, for this we go Filter – Filter Gallery – Color Tile (Filter > Filter Gallery > Patchwork). Set the following settings for this filter: Square Size: 0; Relief : 0.
Translator's note: to apply a filter, go Filter – Filter Gallery – Texture – Color Tile (Filter > Filter Gallery > Texture > Patchwork).
Step 16
Go Image – Correction – Threshold (Image > Adjustments > Threshold). Set the Threshold Level to 240.
Step 17
Double-click on the layer to apply the following settings in the Blending Mode window : blending mode Lightening (Screen); Opacity : 100%. Disable the Red and Blue .
Step 18
Now we need to duplicate the layer. To duplicate the layer, turn on the Red and Blue , and turn off the Green .
Step 19
Hold down the 'Shift' key and move this new layer 60 px to the right.
Translator's note: move the duplicate layer to the right.
Step 20
Create a new layer (Shift+Ctrl+N), fill this layer with black. Reduce the Fill value for this layer to 0%.
Step 21
Blending Options window that appears, select the layer style Stroke. Set the following settings: Size : 25 px; Position : Inside ; Stroke color (Color): black.
Step 22
Now we need to rasterize the layer style, to do this, right-click on the layer and select the Rasterize Layer Style .
Step 23
Next, go Filter – Blur – Gaussian Blur (Filter > Blur > Gaussian Blur). Set the Radius of the blur to 4 px.
Step 24
While holding down the 'Shift' key, apply scaling to the created frame (Ctrl+T) to the borders of the working document.
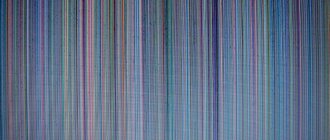
Lines and stripes
The stripes that appear on a television screen can be inclined, horizontal, continuous, dotted, wide and narrow. In this case, a similar phenomenon can occur on the screens of liquid crystal, plasma and CRT televisions.
This phenomenon is a sign that one of the household appliances installed in the apartment is jamming the TV signal. Remote sources can also play the role of a jammer.
Finding the source and taking the necessary measures to eliminate the negative impact will help solve such a problem. Often, such a breakdown is eliminated by installing a directional antenna.
However, if stripes are observed when viewing some channels, then the problem can be solved by retuning them. If interference is present when using one of them, the problem is most likely not with the equipment or the source of interference nearby. It’s a good idea to ask how your neighbors show specific channels.
There are situations when you experience interference when watching TV that is difficult to describe in words. In such a situation, a breakdown of one of the internal units, some part of the TV or a microcircuit is often diagnosed. At the same time, ordinary dust or high humidity in the apartment can provoke such a breakdown.
Color Correction
Step 1
Now we need to do a little color correction to make our image look more like "VHS". Go to Layer – New Adjustment Layer – Curves (Layer > New Adjustment Layer > Curves).
Step 2
Duplicate the curves adjustment layer and place the curves on top of the first layer.
Translator's note: move both adjustment layers with curves down, placing them on top of the very first layer in the layers palette.
Step 3
Double-click on the icon of the first adjustment layer Curves (curves). Set the curves as shown in the screenshot below:
Step 4
Now double-click on the Curves in the Layers palette to reduce the Opacity of the curves to 35%.
Who to contact
If interference is observed on the TV screen while watching, then in the absence of the necessary knowledge, experience and skills, you should not try to eliminate it yourself. You shouldn’t turn to friends who supposedly understand such issues for help.
As mentioned above, inept intervention will most likely lead to even more serious problems, the elimination of which will require a large amount of money, time and your own nerves.
To avoid additional costs, it is best to immediately contact specialists from a reliable organization specializing in TV repair. To choose the right company, first of all, you should pay attention to its reviews, as well as the time during which the company has been operating.
Create a New Document
Step 1
Create a new working document (Ctrl+N) with the following dimensions: 1500 x 1000 px; resolution 300 dpi.
Step 2
Next, go to File - Place (File> Place) and in the window that appears, select the source image to add to the working document.
Note: You can download the image from the link at the beginning of the lesson or use any source image of your choice.
Step 3
Apply scaling to the image to the size of the working document, and then press the 'Enter' key.
Step 4
Press the 'T' key to add text to the top right corner of the image.
Step 5
Press the 'U' key, select the Polygon Tool, in the control panel of this tool, set the number of sides: 3 to draw a triangle shape. Place the triangle shape as shown in the screenshot below:
Step 6
While holding down the 'Shift' key, select all the layers in the layers palette, and then right-click on the selected layers and select the Merge Layers option from the menu that appears .
Step 7
Now, right-click on the merged layer and select the Convert to Smart Object .
Step 8
Create four duplicate layers by right-clicking on the layer with the smart object and selecting the Duplicate .
Repair
Keep in mind that only the antenna can be repaired at home. For more serious problems, call a professional, as fixing it yourself may make things worse.
To replace the plug on the antenna cable:
- Remove the old plug.
- Strip the wire from 1-1.5 cm of insulation.
- Attach the new connector to the end so that its body does not come into contact with the central channel of the cable.
- Screw a new F-plug with the same thread size to the connector.
The result should be a reliable connection to the screen and the TV receiver will stop rippling. Also, place the electrical cable and antenna cable away from each other.
If interference appears on the TV, you must first determine the cause of its occurrence, and only then fix the problem. It is important to correctly calculate your capabilities and for serious repair work it is better to involve a professional. Otherwise, you can only aggravate the problem and significantly increase repair costs.
The situation when the TV ripples negatively affects the condition of the eyes and is a symptom of serious damage.
Employees of the A-Iceberg SC repair TVs of all types (LG, Philips, Sony, Panasonic, etc.), regardless of the level of complexity of the work. All actions are carried out at the client’s home (the device is not transported to the workshop). To call an engineer at a convenient time, call 8 (495) 213-11-90
from 7:00 to 23:00 (daily) or leave an online application on the website.