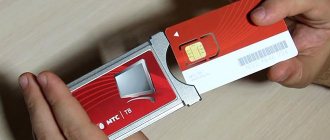
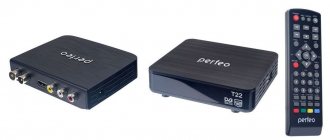
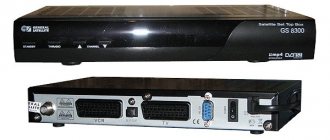
Self-firmware via USB connector
1. format the flash drive into the FAT or FAT32 file system;
2. unpack the file from the downloaded archive into the root folder of the flash drive (just to the flash drive, but not to any folder on it!)
3. connect the flash drive to the receiver and wait for a message on the TV screen stating that the external drive is connected and recognized;
4. Next, press the MENU button to enter the “Main Menu” of the receiver, go to the “Tools” menu and press “OK”;
5. in the menu that appears, select “Update via USB” and click “OK”;
- How to connect an old TV to a digital TV set-top box
6. the set-top box will switch to bootloader mode, which will perform a number of operations with the update file (the process will be displayed on the screen as a color indicator and as a percentage);
7. After completing the update, the receiver will automatically reboot and turn on the first channel in the list for viewing.
Similar stories / 6
In Russia they will launch a program for the transition of state-owned companies to domestic softwareInternet / Angelina GorDIGITAL video blog - a new section of DIGITAL TVCompany news / TV set-top boxes of the provider “Dom.ru” began to be sold on OZONCompany news / Angelina GorDigital TV will be properly “promoted”Television / Stas KuzminV "Intersvyaz TV" has a free digital packageCompany news / Angelina GorRostelecom in the Urals began to transfer its set-top boxes to the Wink platformTelevision / Angelina Gor
More recently, digital television was perceived as something new and incomprehensible, but now every TV shows images in high quality, without interference, with excellent sound.
In order for the TV to show digital channels, you need a set-top box. In addition to broadcasting channels, it has wide functionality and capabilities.
With its help, you can stop TV broadcasting, rewind to the desired moment, record your favorite program and much more. In order for all functions to become available, you will need to update the device or, as they say, update the firmware.
How to flash a TV set-top box and improve its performance will be discussed in this article.
Official firmware from USB flash drive
This option is the most popular among those who are planning to reflash the console. To complete it you will need:
- Stable Internet.
- Computer or laptop.
- USB drive.
- Operability of interfaces on the computer and set-top box.
If all conditions are met, you can safely proceed to the actual firmware update. It is worth noting that this will take 20-30 minutes. Advanced users can carry out the procedure faster, but it is better to have a certain amount of free time.
To flash the set-top box via USB, you need:
- Download the official software from the section support.ab.ru/settings/actual_firmware/.
- Create a folder on the flash drive with the name of the set-top box model.
- Place the downloaded firmware files into the folder.
- Insert the USB drive into the console.
- Turn on the equipment.
- Go to settings.
- Go to the “Software Update” section and select “Update via USB”.
- Click the “OK” button.
If all steps are completed correctly, the device will begin flashing. A complete update usually does not take more than 10 minutes. In this case, it all depends on the model of the console and its power.
If an error occurs during the installation of updates, you should rewrite the firmware data or use another method of reinstalling the software.
This update method is not the only one. It is also possible to reflash using the equipment’s engineering menu. There are no more difficulties in the procedure.
To flash the firmware via the engineering menu:
- Complete the first 5 points from the previous algorithm.
- Press and hold the “Menu” button on the remote control.
- In the window that opens, select “Upgrade Tools”.
- Click on “USB Bootstrap”.
The second method does not look more complicated, but still requires some skill. If you are not confident in your own abilities, it is better to contact Rostelecom so that a technician can be sent to your home who can reflash the set-top box.
Why do you need firmware?
In the domestic market, the most popular devices are from Rostelecom and Cadena. They pick up all free Russian television channels.
Negative factors include the lack of some services. The device itself is a modified foreign set-top box, and unnecessary functionality has been removed.
For domestic consumers, the interface is made in Russian. The Cadena console regularly receives updates, which are published on the official website. They mainly affect the interface and menu design. The receiver provides a TV program for the week ahead, support for subtitles and teletext, parental controls and many other useful functions.
- How to install and where to point the antenna for digital television
For those who like to record certain broadcasts, this function is provided. To do this, you need the appropriate firmware version and a memory card with enough capacity to record video.
In the future, the recorded material can be played back using the media player built into the console.
Preparation
If the image on your TV has deteriorated or doubts creep in that digital TV is not working as it should, you should think about updating the software.
It is necessary to prepare for this process. To do this, you will need to download the necessary files and have a computer or laptop.
Firmware for a TV set-top box from Rostelecom is done using a computer with a free Ethernet input.
The set-top box will be connected to it. In addition, you will need a network cable that will connect the set-top box and the computer.
The software you will need is mcast.exe and dualserver (or its equivalent). You need to download the latest firmware files from the company's website. They will be called " bootstrap " and " imageupdate ".
It is not recommended to flash the device using third-party tools if at least one official update has not been installed.
Cadena devices will require a USB flash drive with a capacity of up to 8GB formatted in FAT32. The firmware downloaded from the site will be recorded on it.
The concept of firmware
The term “firmware” appeared quite a long time ago, back in the days of the first computers. It is interesting that both the original name and the process itself have survived to this day, which has not changed at all.
To flash means to add other values to the device's memory in order to introduce new functionality.
Of course, today this is much easier to do. You need to download the firmware file in the required format, write it to the device using a special program and wait for installation. The installer will do all the most important steps itself.
All devices with Android OS are flashed in a similar way.
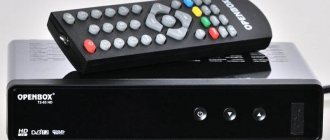
How to flash a TV set-top box (Step-by-step instructions)
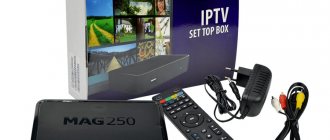
Let us analyze in detail the process of flashing the firmware of the Rostelecom set-top box model MAG-250.
- Create a folder on your computer and place the previously downloaded server and program in it: mcast.exe and dhcp. In addition, you need to place two files bootstrap and imageupdate.
- Call the command line by pressing the Win+R keys. You need to enter the ncpa.cpl command in it. A network connections window will open, select the one we will use and right-click on it. By clicking on “Properties”, select the component (TCP/IPv4). In the window that opens, you will need to manually enter the IP address 192.168.1.1 and the mask 255.255.255.0.
- Connect one end of the network cable to the computer and the other to the set-top box.
- Turn on the set-top box and quickly press the “Menu” button, after which the device’s BIOS should open.
- Enable the dhcp server installed in a folder on the computer. To do this, in the command line, specify the path to the folder with the file, for example: C: Rostelecomdualserver.exe, and press the Enter key
- Run the mcast.exe program and specify IP 192.168.1.1, then click on the “Select” button. In the menu that appears, you will need to specify the broadcast addresses Steam1: 224.50.0.70:9000 and Steam2: 224.50.0.51:9001. Then, next to each stream you will need to press the “Start” key.
In the BIOS you should follow this path: Upgrade Tools – MC Upgrade .
During the loading process the following messages will appear sequentially:
Bootstrap message: Reception of an image is started!Bootstrap message: Writing image to flash.Writing image to flash successfull!
Then the device will reboot and start with the new firmware version.
An alternative way to flash the MAG-250 console
The best option for an alternative device update is DNA firmware.
Thanks to it, functions such as:
- TV program from Yandex;
- recording broadcasts to disk;
- autostart of iptv broadcasts from Rostelecom;
- Recovery after the update occurs automatically.
It is important to install the original version before installing alternative firmware. Otherwise, problems often arise with updating the device.
The DNA firmware process itself occurs without the use of a network cable. To work, you will need a flash drive with a capacity of up to 8 GB, formatted in FAT32.
Then, on the USB drive you should create a folder with the name of the device and install the firmware files there: “ Bootstrap ” and “ imageupdate ”. In the future, there are two options for updating the device:
- from the internal portal;
- from BIOS.
In the first case, you need to go into the settings and go to the service menu by pressing the “ SETUP ” button. Selecting “ Update software ”, select the option “ via USB ” and click “ Start update ”. Before starting the process, you will need to click the “ Check ” button.
The program will check for the presence of the necessary files on the flash drive. If all requirements are met, the “ Start ” button will light up.
A common error: “Invalid file header.” In this case, it is recommended to reformat the USB drive to FAT32. In addition, you should check the name of the folder on the flash drive. It must be without spaces, for example, MAG250. If this does not help, then you should use the firmware option from the BIOS.
After connecting a USB drive with files, you need to reboot the device. In this case, you should hold down the “ Menu ” button. After the menu appears, select “ Upgrade Tools ”, then go to “ USB Bootstrap ”.
If everything is in order with the information on the flash drive, the process of updating the software version will begin. The successful completion of the installation will be indicated by the message: “ Writing image to flash successfull ”.
Then, the device will reboot and will start with the new firmware.
PROS and CONS of flashing the Rostelecom set-top box
Reflashing hardware is a process that anyone can do. But at the same time, the operation is labor-intensive and requires certain knowledge. Therefore, before updating, you need to understand why the flashing procedure is performed at all.
Reflashing the set-top box can provide access to new channels, as well as increase the stability of the equipment. However, the reverse consequences of the update cannot be ruled out.
Self-flashing is a controversial process. On the one hand, performing the procedure entails several advantages. On the other hand, reflashing can lead to dire consequences. In this regard, it is recommended that you familiarize yourself with all the advantages and disadvantages of flashing before engaging in this procedure.
Pros:
- Possibility to increase the number of available channels.
- Additional opportunities may become available.
- Installing good firmware will speed up the interface.
Minuses:
- Some pre-installed services, such as weather or exchange rates, will probably disappear.
- Deterioration in operational stability cannot be ruled out.
- After flashing, the set-top box may stop working.
The client performs reinstallation of the software at his own peril and risk. If problems arise during the process, Rostelecom employees will, of course, help solve them, but an attempt to illegally open additional channels may lead to sanctions from the provider.
Updating DVB T2 set-top box
The process of flashing such set-top boxes is similar to the devices from Rostelecom described above. After downloading all the necessary files and installation manual from the official website, you need to place a file with the extension .ssu .
Having gone to the set-top box menu, select the “ System ” tab and select the “ Update and save ” item. Then, you should reboot the device and disconnect the power from the network.
After turning on, the set-top box will have a new firmware version. All that remains is to configure dvb t2 to automatically or manually search for channels.
In 2021, all residents of Russia are slowly switching to a new TV format - digital. Its advantage is that the picture quality is higher than that of the usual analogue. 20 federal channels are provided to everyone free of charge. For digital TV to work for you, you need a TV with a digital receiver - most modern models have them. If you already have an outdated model, you need to buy an additional digital TV set-top box. How to connect and configure it after purchase?
Nintendo Switch firmware and the consequences of hacking a game console
Firmware and hacking of Nintendo Switch. What is it and why do you need to hack a game console?
It's no secret that Nintendo Switch is one of the main gaming consoles of our time.
A unique hybrid device combines the functions of a home console when connected to a TV and the ability to play in portable mode in one case. The new model, Switch Lite, released this year, appealed to all portable users and surprised everyone with its unexpectedly low price. But no matter what configuration of Nintendo Switch you choose, they always offer the user the most important thing: the widest selection of games for the most demanding tastes. These are unique exclusives like Super Mario Odyssey, The Legend of Zelda: Breath of the Wild, or Splatoon 2, as well as a huge library of cross-platform games - from the brutal shooter DOOM to the sophisticated old-school RPG Pillars of Eternity.
Of course, all this wealth is not given to gamers for free. In addition to the console itself, users must purchase new games on cartridges or through the Nintendo eShop. As on other platforms, the cost of licensed products for Switch is not the lowest - around two to four thousand rubles.
For most users, this price is easily justified by the high replay value or long duration of Nintendo games (for example, a complete completion of Breath of the Wild can take from 50 to 200 (!) hours).
Despite this, there are always many people who try to save money on their favorite hobby by playing pirated games for free. To do this, they resort to Nintendo Switch firmware.
What is “firmware”? In the context of game consoles and other devices (such as phones), this word refers to software for changing the functionality of the device. Simply put, this is hacking the console so that it does not work according to factory parameters.
This illegal measure is usually used to bypass the console's built-in security. The fact is that simply inserting an unlicensed cartridge into the Switch or downloading a pirated version of the game from the Internet is not enough. The console will immediately recognize the illegal program and will not allow it to start. But if you know the vulnerabilities of the system, then the console can be deceived and forced to turn on the coveted “pirate”. After hacking the Nintendo Switch, its entire huge game library becomes available completely free of charge. The firmware has other advantages. This is the ability to install additional third-party programs (like an Internet browser) or amateur translations for games that have not received official localization. Another interesting feature of the hacked console is the use of emulators that allow you to use the Switch to play projects created for older console models (for example, PSP or Playstation 1). However, emulators are unstable and often give poor performance even in ancient games.
Hacking the Nintendo Switch has many disadvantages and pitfalls that need to be warned about.
Firstly, it’s not a fact that the Switch will be able to be flashed at all. For example, at the moment it is physically impossible to hack Switch Light. But not all hybrid versions of the console are amenable to third-party intervention. The unlucky pirate will have to go to extra trouble, searching by serial number for devices that have the vulnerability necessary for hacking.
But this is just the beginning of his problems. One of the main difficulties associated with firmware is the firmware itself. The fact is that this process can hardly be called simple and intuitive. All guides to hacking the Nintendo Switch warn: flashing the console firmware will require skill and technical knowledge. The future pirate will have to understand the intricacies of setting up the console and learn a bunch of new terms.
And that’s only half the problem. To hack, you will not only need to follow complex instructions exactly, but also interfere with the operation of the console: the currently most popular method of hacking the Nintendo Switch involves shorting several contacts on one of the joycons. One careless move and the controller is damaged. And this is not to mention the possible damage that a failed hack could cause to the console software.
However, you don't have to do it yourself. On the Internet you can easily find many advertisements from craftsmen who are ready to flash the Switch for a fee. But they are not at all a guarantee of success. No official service center provides services of this kind. “Firmware masters” are just amateurs. And this means not only that among them there are unscrupulous individuals who charge exorbitantly high prices for their services. More importantly, “masters” are in no way immune from mistakes. And if they damage the console, the owner will have to repair it himself.
Hacking the Nintendo Switch is an illegal act, an act of piracy. This means that it is not a warranty case. Official service centers easily recognize an attempt to update the firmware and do not provide free repair services for a console damaged in this way.
But let's assume that our pirate carefully read the instructions and did everything correctly. What troubles will come his way?
The most important thing is the complete lack of online access. That is, in general. Each Nintendo Switch console has a unique identifier that is checked when accessing the Internet. If the security system finds signs of hacking in the information sent by Switch to the official server, the console is blocked. Access to Nintendo online services will be terminated once and for all.
What does it mean? First of all, no updates. By default, patches with new content and bug fixes are downloaded to the console automatically. But if a player is banned by the system or disconnected from the Internet, then he will have to install “patches” for video games himself. As you might guess, this is also a long and difficult process.
Secondly, the pirate loses access to Nintendo eShop, and in the future, to cloud streaming services. Of course, you won’t be able to make any purchases online using a hacked version of the Switch. When it comes to cloud gaming, a caveat needs to be made. Playing projects not included in the console library through Cloud services (for example, Assassin's Creed: Oddysey) is currently only available in Japan. However, in the near future we can expect the service to enter the international market. However, pirates have nothing to hope for: since the service only works over the network, a firmware Switch is not suitable for its operation.
But the most annoying limitation of the hacked Nintendo Switch is the inability to play online. Want to beat your friend's score in Super Mario Odyssey? Nothing will work on a flashed console. Have you decided to download a couple of new levels for Super Mario Maker 2? And again the pirated version is powerless. Tired of beating bots in Mario Kart 8 Deluxe or Super Smash Bros Ultimate? Come online, where you can compete with thousands of live players around the clock! Just don’t forget that owners of hacked consoles are not allowed to go there.
Such an extensive list of firmware shortcomings makes one wonder: is the game worth the candle? Is free access to games worth the risk of ruining your console and completely cutting out Nintendo's ever-improving online services? Everyone answers this question independently. But the Igroray online store advises against pirated products. And it's not just the risks associated with hacking.
Today, even for the most skeptical gamers, the Nintendo logo is a guarantee of absolute quality. Yes, the games that the company produces are not the cheapest. But they are worth the money. Each project is a new, unique experience, which, thanks to the design of the console, you can take with you and enjoy it even on the bus, or in bed before going to bed. The best way to thank the people who gave us these games is to simply pay for their work, and not download a stolen version from the Internet.
We should also not forget that the fact of purchasing a license is an investment in the future. Nintendo took a long time to officially launch in Russia. Sales of their games are an excellent indicator of the market's prospects. The more consoles and licensed games are purchased, the more support Russian players will receive. This means more localizations and more additional services. Purchasing a license is a mutually beneficial cooperation with one of the most prestigious companies in the gaming industry.
One more important detail: you don't have to pay full price for Nintendo games! eShop really rarely has discounts. But in other official stores selling licensed products, promotions are constantly held. And the online market “IgroRai” is no exception! Right now, the absolute hit and one of the main games of the current console generation, The Legend of Zelda: Breath of the Wild, can be purchased from us for only 3,768 rubles. And this is just one of the many great deals that can be found on our website.
Although it offers immediate benefits, in the long term the firmware harms not only the gaming experience of the individual user, but also the entire Russian Nintendo community. Hacking will save the pirate several thousand rubles, but will deprive him of a lot of priceless moments - the feeling you get when you win a race in Mario Kart against the living rivals or outpacing a hundred opponents in the mind-bending match of Tetris 99 is impossible to describe and experience in other games.
Therefore, listen to our advice: do not suffer with pirated firmware, play licensed games and save on official devices and first-class licensed game cards - together with the IgroRai online store.
You can get acquainted with the entire range of licensed video games in the “Video Games for Nintendo Switch” section, and also don’t be lazy to visit the “Accessories for Nintendo Switch” section, where you can find a huge selection of items at the lowest prices!
A little about digital set-top boxes
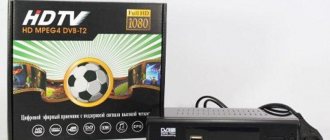
A digital TV set-top box is a rectangular or square device to which an antenna is connected. The set-top box, in turn, is connected to the TV using a cable. Thus, the set-top box (tuner, decoder) acts as an intermediary on the signal path from the antenna to the TV. It converts the digital signal into a regular one, which the TV can already recognize.
A set-top box is a small device that converts a digital signal from an antenna so that the TV can recognize it
The price of the device is low - you can buy a high-quality model for 1000 rubles. When purchasing, pay attention to the characteristics of the device - it should be marked DVB-T2.
How to connect a digital set-top box to your TV
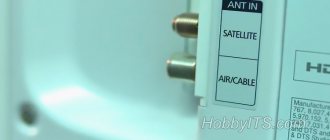
Before connecting any devices via wires, unplug all equipment. After this, connect the cable that comes from the antenna to the RF IN connector on the set-top box.
Insert the cable from the antenna into the RF IN connector
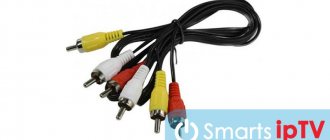
Now connect the set-top box to the TV. For communication you can use one of three cables:
- HDMI. Suitable for more modern TVs with the same output. This wire will provide the maximum picture quality that digital TV is capable of.
- Cable “tulip” with three plugs.
Used most often in the case of outdated TVs. The quality here is not the same as with HDMI, but if you have a small display on your TV, the difference will not be too noticeable. Connecting the cable is easy: the color of the plug matches the color of the round slot. Yellow is used for video signal, white is for audio input signal, and red is for audio output signal. The set-top box can be connected to the TV using a “tulip” (RCA) or HDMI - Coaxial wire. This method should only be used if the previous two exits are missing. The set-top box is connected to the TV using an antenna cable. To do this, you need to connect the cable to the RF Out slot on the set-top box. The image quality will be very poor in this case, unfortunately.
After connecting the devices, connect the TV and set-top box to the mains and turn them on. Now you can proceed to the channel search itself.
How to set up a digital set-top box to receive 20 digital television channels
Let's consider the entire process of debugging and checking the quality of the signal from the set-top box and antenna.
Instructions for setting up TV channels on a DVB-T2 set-top box
You can find free channels automatically or manually. The first one is simpler and faster. Manual is used when automatic does not cope with the task.
Let's look at an easier way first:
- On your TV, switch to video mode.
The menu of the connected set-top box should load. In the setup wizard (should appear if you turned on the set-top box for the first time and have not configured it before). Select country and language - Select the Russian language and the country Russia from the menu.
If necessary, select the DTV-T2 signal format. We go down to the third item and start searching for channels automatically using the OK button. Start channel search - We are waiting for the search to complete.
As a result, you should have 20 free channels in your menu. Save the changes using the same OK key. Wait a while until the set-top box finds all channels
If this method of searching for channels does not work, use manual mode:
- Go to the search section in the console menu. Select "Manual Search".
- Click on OK to start the process.
Start a manual search - The system will ask for the exact frequency and range of the digital channels you want to find. Digital channels are searched in whole packages, not individually. Each package has its own range and frequency. You need to find out the values for your city. You can find information on your local news portal or local forum.
- When you find all the channels based on the data you have, do not forget to save the changes.
How to set up local channels on a digital set-top box
Many people complain that with the transition to digital TV they have lost local channels. In order for them to appear in the list again, when setting up (before starting the automatic search), you need to select to search for both analogue and digital channels at once, that is, set the value to DTV-T/DTV-T2.
Federal channels, which are already available in digital, may later be excluded from analogue TV, but local regional ones will not be removed from analogue.
Checking signal quality and solving setup problems
If you see obvious noise in the picture, check the quality of the signal coming from the antenna. To do this, press the Info key on the remote control several times. Look at the strength and intensity indicators: if their value is below 60 - 70%, then there is a problem with the signal. You need to change the position of the antenna and its direction. To do this, you will need help: someone must move the antenna slowly, and someone must monitor the picture quality (is it improving or deteriorating). When the interference disappears, fix the antenna position.
For a stable signal, the antenna must be pointed clearly at the tower
If you cannot find the desired antenna position, most likely the tower is located far from you - hence the weak signal. Usually this situation occurs outside the city. In the homes of urban residents, the signal is usually received well. In this case, you need to purchase an additional amplifier for the antenna or buy a new, more powerful antenna. It is also worth placing the antenna as high as possible - if possible, on the roof itself.
If possible, look up information on the Internet regarding the location of towers in your area so you know where to point the antenna.
If everything is in order with the indicators in the Info section (70% and above), but interference is still present, then the problem is with the set-top box. It may not be configured correctly. If you changed any of its parameters, return the factory settings back or reset the settings to factory settings, and then start the automatic or manual channel search again.
Reset the set-top box settings and search for channels again
There could be a different situation: the set-top box initially found less than 20 channels or began to show fewer of them some time after successful setup. The solutions in this case are the same as for interference: look at the signal level, restart the channel search, change the position of the antenna. If the problem persists, you need to buy a new antenna or amplifier for the old one and place it as high as possible.
It is also possible that the problem is a hardware malfunction, if everything was fine before, but now some of the channels have suddenly disappeared. Only a specialist can say for sure that the set-top box or antenna is faulty, so it would be advisable to call a specialist to your home to determine and eliminate the causes of the malfunction.
The antenna cable is connected to the TV tuner, and from the set-top box there is a cable to the TV (HDMI, “tulip” or coaxial cable). Next, the setup is carried out - first automatic, and then manual, if the first does not produce results. If you do not receive all channels or they show poorly, change the position of the antenna. If necessary, purchase an amplifier for it.
Content
For more than 5 years now, free digital terrestrial television has been broadcast in our country. The territory in which its signals can be received is increasing every day. In the next year or two, it is planned to completely stop broadcasting analogue television and switch only to digital.
Therefore, you should now configure your TV to receive digital broadcasts. True, there are several nuances here: if you have a model that is a couple of years old, then most likely it already has a built-in DVB-T2 TV tuner and then there will be no difficulties when connecting. Otherwise, you will need to purchase a special receiver, and here a logical question arises: how to configure this set-top box to receive available digital channels?
We will give the answer to this within the framework of this article. In addition to this, we will consider difficulties that may arise during the process of both setting up and connecting equipment and offer options for solving them.
Equipment for receiving digital channels
So, before setting up digital channels, we first have to purchase the necessary equipment. The list of equipment for receiving digital television includes an antenna, the digital set-top box itself and connecting wires.
Of these components, the biggest role for reliable reception of digital TV is played by the tuner itself, how well it is made and what format it is designed for. The antenna and connecting cables contribute a noticeable but less significant influence.
FAQ
Anyone can reflash the Rostelecom set-top box at home, the main thing is to know the principle of the sequence of work.
If you have any questions, you can always seek help from specialists.
How to activate after flashing
Many subscribers of a digital television provider have a question about how to activate the receiver after flashing it. Often, this is not necessary. If the work is done correctly and step by step, the device will be ready to work. The consumer will only need to restart the equipment and configure the channels.
Which consoles can be reflashed
Not every console can be reflashed. The program can be downloaded for the following models of Rostelecom receivers: IPTV RT-STB-HD Standart, MAG-200, MAG-250. Each case requires an individual approach.
Connection
To connect a set-top box for a digital signal to a TV, you must first connect the antenna to the set-top box, and then the set-top box itself to the television receiver.
Depending on the TV model, the receiver can connect to it either using an RCA cable (tulip) or using HDMI. Moreover, the latter allows you to observe a much higher quality picture.
The requirements for the antenna are quite simple: the reception frequency must be decimeter. This makes it possible to use a regular indoor antenna for digital TV to connect.
To reliably receive the signal, you may need to raise the antenna we need higher and point it towards the repeater. When connecting the antenna and set-top box via cable, you should use high-quality products that will not negatively affect the signal. After all these manipulations, you can begin to search and configure digital channels.
Connecting the receiver to Soviet TVs
It's no secret that our grandparents often still use televisions that were released back in Soviet times or a little later.
The absence of “tulip” type connectors in them makes it impossible to connect a digital set-top box directly. But don’t rush to save money to buy a new TV. If the old TV has a SCART connector, then the problem is solved by purchasing an RCA-SCART adapter.
However, very old models do not have this either, but only an antenna input. Here a special device will come to the rescue - a modulator, which converts the digital signal into a high-frequency signal that is understandable to the old TV.
Therefore, it is possible to install digital television even on very ancient television receivers; another question is, does this make sense?
Why flash a TV receiver?
Each receiver has software installed that allows it to operate. This applies to both the simplest devices and Smart TV systems. It is responsible for literally everything: for receiving channels, for the operation of the remote control and menu, for settings. Therefore, firmware for a digital set-top box may be needed under the following circumstances:
- Failures and errors, problems with operation and settings. The remote control may not work, the volume or channels may not switch correctly, or there may be problems with sound or picture.
- Lack of functionality: some menu items and features declared by the manufacturer for this model do not work. Or some of the channels do not work, and the problem cannot be solved by any other methods.
- Stuttering and freezing, general incorrect operation.
- The appearance of new functions of the set-top box means that the developer recommends updating its firmware. For example, this is how the IPTV function appeared or improved on receivers. New applications may appear, a clearer signal, bug fixes and other pleasant features.
Before you reflash your TV set-top box due to its poor performance, make sure that this is the problem. After all, if the problem lies in the antenna, TV, remote control, hardware, or is generally on the side of the broadcasting station, then a software update will not be able to solve these issues.
Also remember the disadvantages of this operation:
- The update will completely delete the data and settings you had on the TV receiver. Therefore, back up your data and write down important settings in advance.
- In some cases, the menu or interface of Smart TV may change.
- If you use non-native firmware for the set-top box, it may void the warranty or cause problems with its operation.
- During the operation, you cannot turn off the TV device, otherwise it may fail.
Receiver setup
The steps to find digital channels will be as follows:
- Using the remote control, go to the main menu of the tuner.
- We find the item that is responsible for the settings.
- In the country field, select our country.
- Next, select the signal type, in our case DVB-T2.
- Select automatic setting.
- We wait a few minutes until the digital receiver finds available channels.
After successful completion of this procedure, we save the found channels and can view them at any time.
There are cases. When the automatic search cannot find any channel. This means that you will have to manually enter the settings. Then we do the same, but select manual search.
A window will open in front of us in which we must indicate the frequency at which digital channels are broadcast. Its meaning can be found on the Internet for your city.
What is needed for firmware
To flash Android TV BOX, you will need:
- computer with Internet access;
- RockChip Batch Tools (RCB Tools) – a program with which the firmware will be installed;
- drivers for TV set-top box;
- firmware file;
- USB cable.
It is important that Windows is installed on the computer, since the program with which the device is flashed is written specifically for it. You also need to carefully inspect the cable to ensure its integrity. On the set-top box itself, you need to enable USB debugging.
Checking the signal quality
After finding digital terrestrial television channels, you should evaluate the quality of the received signal. To carry out this procedure on the TV set-top box, find the INFO button (the name may differ for different manufacturers) and click on it.
We will see a message about the signal level on the screen:
- If the indicator is more than 60%, then the digital signal reception is quite stable.
- The receiver picks up a low quality signal.
The following actions can correct the situation:
- Place the antenna in a different location or, for example, raise it higher on the mast.
- It is more accurate to orient the antenna in the direction of the repeater tower.
- You can find out the location of transmitters in your area on the Internet.
- Use an amplifier to increase signal strength.
Setting up TV channels
In order to configure your TV set-top box to receive as many channels as possible, you will most likely have to use manual channel tuning. In this case, you need to know that channels are broadcast in packages, multiplexes, at different frequencies. The first package contains the following channels:
Channel One, Russia 1, Match TV, TVC, Karusel, OTR, Russia 2, Channel 45, NTV, Russia Culture.
Receiving broadcasts from the second multiplex gives access to:
MuzTV, RenTV, STS, Spas, TV3, Friday, Domashny, Mir, Zvezda, TNT.
Also, do not forget that, unlike analog channels, the search for digital channels on the set-top box occurs by packets, and not by channels. This means that nothing will happen on the TV screen for several minutes, and then 10 channels will immediately become available.
It is also worth periodically monitoring information about available free channels etc. if necessary, update the found packages.
You have learned how to set up digital television through a set-top box, all that remains is to deal with possible problems with this.
When to update the firmware
Firmware is a new version of the software that controls the set-top box. It is available on both smart devices and regular digital television devices with a minimum of functions. The firmware is responsible for displaying the menu and working with its functions, decoding channels and converting them for display on the TV screen.
Before you upgrade your 20-channel digital set-top box, you need to figure out whether you need it. Check these points:
- Constant errors and malfunctions in functionality: channels do not switch, the volume level drops, channels are shuffled, the remote control does not respond (while its batteries are charged), the menu does not open or does not work correctly, errors when recording the broadcast and playing it back, and so on.
- Errors in television display are also possible: the image is of poor clarity, problems with sound (disappeared when playing through a set-top box) and with television stability, fewer channels than it should be (for example, it shows 10 instead of 20).
- However, other methods to solve the problem do not work: reboot, reset to factory settings, check on another TV, and others.
- Problems do not disappear over time - that is, they did not arise on the television side, they are definitely related to your device.
Even in the case described, there is a possibility that you have a hardware problem, for example the power supply is malfunctioning. But you can check this either by giving the device to a service center, or by being well versed in electrical engineering. If the problems are not hardware related, then upgrading your digital TV set-top box may fix your situation.
Separate from the problems described above, there is another reason to update the software of a digital set-top box - a more positive one. These are new features added by the manufacturer: support for clearer television, built-in programs, faster performance, getting rid of old errors and bugs and other features. In this case, the result of flashing will bring only positive aspects.
Typically, updating a digital set-top box is a safe and simple process. But there are nuances here too. I have done this operation many times, but if this is your first time, you should strictly follow the instructions.
Setup problems and solutions
There are situations when you correctly set up the reception of digital TV channels, watched them for a long time, and then suddenly stopped showing one or several of them at once. Or do you know that 20 channels are broadcast, but only 10 channels are found, what to do in such cases?
Let's look at the main problems that may arise during the process of setting up or operating digital television and methods for solving them.
- The antenna does not receive or does not receive a digital signal well, but previously received an analog signal well. There may be several options: the antenna is not suitable for receiving a DVB-T2 signal, for example, it is designed for MV, not UHF; The distance to the repeater is too large and the gain of this antenna is not enough for reliable reception. In this case, only buying a new antenna or amplifier will help.
- The antenna was tuned for quite a long time, after a while it stopped receiving a certain channel. Alternatively, the connection on one of the contacts may have broken or the wire has broken. All contacts should be checked for oxidation and the cable should be ringed.
- The tuner does not receive a digital signal. Check if your set-top box does not support DVB-T2 format. Then only replacing it will help.
- The amplifier used to work, but now it doesn't. Most likely, either the amplifier itself or its power supply has failed. It should be taken to a service center for diagnostics.
- Shows only part of the 20 possible channels. Most likely, the antenna has insufficient gain, or is not aimed precisely at the repeater. To show more channels, you should buy a more powerful antenna or orient it more accurately in the direction of the tower.
- Previously it showed 20 channels, but now only 10. The equipment was checked, everything is in order. – The set-top box settings may have gone wrong. In this case, you need to reconfigure the tuner or configure channels manually. If everything worked fine before, but over time problems began to appear, this may indicate the need to replace the equipment or its breakdown.
In general, if problems arise with signal reception, the action algorithm should be as follows:
- Checking the correct connections between all types of equipment: antenna, set-top box, TV, amplifier.
- Checking all receiver settings, adding data manually if necessary: channel number, channel width, etc.
- Determining the location of the transmitter and orienting the antenna towards it as accurately as possible.
Depending on the terrain, it may be necessary to raise the antenna to a greater height.
- Using a tuner, we determine the maximum signal level for various antenna orientations.
- We perform automatic channel search.
If after all these manipulations our TV does not receive all channels, then it means we have a low-power antenna. As a rule, residents of large cities feel more confident when tuning in and watching digital television than residents of rural areas. This is due to the short distance to the transmitting tower, and, consequently, more reliable reception.
What will you get by flashing your console?
If you install the firmware on the PlayStation 3, you will be able to:
Burn games from licensed discs or downloaded from the Internet to the internal disk of the console (these games can be copied to the console via ftp or from a flash drive). In the future, you will not need discs to run these games.
Run games not only from disks and internal memory, but also from an external USB drive or flash drive. These can also be games downloaded from the Internet or copied from licensed discs.
Use homebrew - unofficial programs for PS3 - more convenient file managers and shells for launching games, video players, etc.
In other words:
You save money on games (you don't have to buy them anymore)
You save drive life (you don’t have to use it at all)
You expand the capabilities of your console
Agree, these are good reasons to flash the PlayStation 3. However, the firmware also has some disadvantages.
PlayStation 3 firmware is produced in our workshops . You can confidently trust the many years of experience of our specialists. Call and make an appointment!