Electrician in the house
Encyclopedia about electricity from A to Z
Masters catalog
Find the best master or company in your city
Hidden cable wiring for TV
It's hard to imagine a city apartment without a TV. In today's dynamic pace of life, it is an integral attribute of any home. In this case, the image must be of high quality, with surround sound, and clear color reproduction.
Even good antennas and the latest equipment will be powerless if the television cable wiring in the apartment is of poor quality. The article will tell you the rules for its installation.
- Selecting a TV cable
- Accessories and distribution equipment
- Cable laying procedure Rules for installing antenna cable
- Cable wiring in the apartment
- How to disguise a TV cable
Choosing a TV cable: what to pay attention to first?
Many providers, for example, such as Tricolor, lay out the cable for cable or satellite television themselves. However, in this case, the quality of the cable may be lower than desired. And in connection with this, there is an option to search for this product yourself, focusing on a number of parameters. We will choose the RK 75 model (analogous to SAT 602).
Quality is something you cannot skimp on when laying cables. Ideally, we do this once and for many years, since sometimes such communication elements are located under the baseboard or even under the trim. And if we want to re-stretch them, it may involve a lot of extra work. At the same time, a high-quality cable has minimal signal attenuation, which means that the picture and sound will be of the highest quality.
The wire must be flexible enough so that we can lay it with our own hands at different angles if necessary. At the same time, it must have high-quality external insulation that is resistant to water and other factors. This is especially true if some of the wiring is located on the street.
Depending on what kind of television we conduct, we are looking for the following types of cable:
- Digital television: RK 75-4.8-312, or RK 75-4.8-318;
- Cable television: RK 50-7-11, or RK 75-4-11;
- A simple cable from TV sockets to a TV: RK 75-2-1.
The best option for connecting a satellite dish to several TVs
If we talk about two, three or four TVs connected to one satellite dish. A variant of twin and quad converters - “satellite heads” with several outputs.
Perhaps the most optimal.
2 or 4 cables come out of each converter and are connected to separate drives, each of which is connected to separate satellite receivers and TVs.
In this case, we get independent reception of different satellites and channels on all TVs.
Another very good option for independently connecting one or more satellite dishes to two or more TVs is to use for this purpose. But in many cases, one antenna is rarely sufficient.
I hope the information was useful and you will be happy to watch your favorite TV shows regardless of your wife, children or parents in another room or kitchen.
In one of the previous articles we talked about how to install and configure a digital terrestrial television antenna. But it should be taken into account that many homes today already have several televisions, for example, in the living room and in the bedroom or in the kitchen. If you use cable television or paid satellite, providers will require an additional fee for a second TV. When using a T2 digital antenna, this feature is available completely free of charge. You just need to properly split the signal into multiple devices.
What is the best way to do this? What additional items will you need to purchase? We will provide answers to these questions and even a little more in today’s material.
First of all, let's look at what additional things you will need to prepare for signal separation and cable routing throughout the apartment.
Cable laying rules and sequence of actions
Important! When laying the TV cable, try to place it at a distance from the electrical wiring. In this case, electromagnetic radiation will not affect the quality of the television signal. This effect is called stray currents.
The fewer branches and interruptions, the better. Ideally, the cable should be laid directly from the point to the outlet or TV. But sometimes this is difficult to do, and you need to connect splitters in series. The signal in this case may be worse.
A few other rules for laying a TV cable:
Television cable is low-current. If it is laid in a cable channel with other types of wiring, it is best to also choose a “low current”, such as a telephone or the Internet;
When laying the cable, you must not create loops or twists (coils). All this can lead to significant signal degradation.
Now let's talk about the procedure itself:
- We find the shield, and in it the cable we need;
- We pull it along the panel tunnel in the case of a vertical installation in an apartment building. If the signal source, an antenna, is connected directly, then you often have to pull the cable along the outside of the house and through a window or wall;
- We drill a hole in the wall or plastic window and run the cable into it;
- We run the cable through the room directly to the receiving device.
Installation of TV wiring is carried out using special plastic holders, nailed to short nails included in the kit.
Accessories and distribution equipment
Connecting TV cables to each other and connecting them to receivers is done using various devices, which are presented in the table:
| Device | Purpose |
| Such a device is used to amplify the signal coming from a general television antenna to a specific television. The amplifier is connected to the TV cable using threaded plug connectors. |
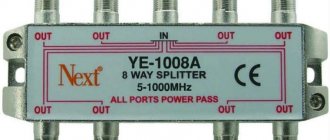
| The TV signal arriving at the “weak point”, from the common antenna to the interfloor switchboard installed in the entrance through a TV cable splitter, goes to different rooms of the apartment to the televisions. Their main purpose is to divide the input signal into the required number of possible TV connection points. In this case, there can be quite a lot of points, but in proportion to their number, the quality of the signal will decrease. |
| In appearance, the device resembles a splitter. The adder is designed to sum television signals from antennas of different frequencies into one common television signal, which is supplied via a single cable to the desired television receiver. |
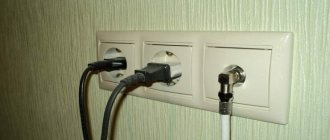
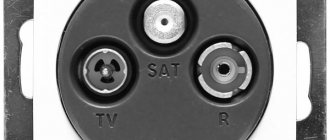
| TV socket for F-connector when connecting an antenna plug | This is the ultimate device for supplying a TV signal to a TV. The socket is mounted in a special box located in the wall, and the TV cable that fits to it is connected with a screw clamp. |
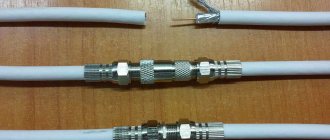
| Antenna plug | These devices are used for the final connection of the cable, equipped with antenna plugs on both sides, to the TV and TV socket. The plugs are connected to the cable by soldering, or by screwing the plug onto the cable, thereby creating a fairly reliable, well-shielded connection of the elements. |
After getting acquainted with all the devices and choosing the right cable, you can wire it yourself.
How to install a television cable around an apartment
Often we need to use not one, but several TVs. And in this case, it may be necessary to route one cable to a number corresponding to the number of receivers planned for use.
For those who thought that this process could be carried out by simply cutting and twisting the cable and then fixing it with “blue electrical tape”, let’s say that this method is unacceptable. In this case, the quality loss can be catastrophic. It is necessary to use only factory splitters that will ensure reliable wiring. Splitters should be placed in places that can be easily accessed.
Connecting to an antenna without an amplifier
The easiest way to use two TVs with one television antenna, causing a minimum of headaches during setup, is to use an antenna without an amplifier. We recommend using it if you live in an area with good reception, as it will protect you from possible over-amplification of the signal.
One of the main conditions when using an antenna with a built-in amplifier is that power must be supplied to the amplifier continuously. If you use the circuit described above, problems will certainly arise, since the power supply will be constantly interrupted. Fortunately, the problem is very easy to solve; you just need to slightly change the connection diagram. How will it change?
- Buy a splitter and install it in a convenient place.
- Cut and crimp the cables as described above. There is absolutely no difference.
- At one end of the cable, directly next to the TV input, you will need to connect an antenna power supply. Taking into account the use of a separator with a power pass (denoted as Power Pass), the voltage will flow to the amplifier on the antenna, ensuring its uninterrupted operation.
- If you cannot purchase a splitter with a power supply pass anywhere, you can use a regular one, but the power supply must be carried out before entering the splitter. To do this, you need to use a special adapter, one end of which will be inserted into the input of the divider, and the other, which has an antenna type connector, into the power supply.
IMPORTANT. When using this type of connection in conjunction with a set-top box, you do not need to turn on the antenna power in its settings!
Hiding television communications in a house or apartment
Nobody likes to have wires lying on the floor. They are easy to trip over and can be played with by children or animals. Therefore, we will hide the cable. There are several ways to do this:
- A plastic box, also called a cable duct. This is a long, hollow structure into which one or more cables can be routed. The channel itself is attached to the wall, and sometimes to the ceiling. The method is simple, but for some it is not suitable due to the fact that, having hidden the cables, we continue to see a box for them, which may not be combined with the interior, especially if it is necessary to maintain the integrity of the latter;
- Skirting board. Some modern models of skirting boards are equipped with cable channels. However, the necessary space can also be found under the old baseboard;
- Hiding the cable with trim. If the installation of television communications is carried out simultaneously with repairs, then there is an option to hide it all in the walls. Some people gouge the wall to create a channel there, and then cover the whole thing with plaster. In other cases, the cable is hidden under drywall.
Set of terrestrial DVB-T2 television equipment
To watch digital terrestrial TV, your TV must have a built-in DVB-T2 tuner. New models have this tuner as standard. But for outdated models, the purchase of a special set-top box is required.
- All-wave terrestrial antenna Locus L021.62 or Funke DC4595;
- Coaxial cable RG6 (10 m);
- F-type connectors (2 pcs.);
- Signal divider;
- HF amplifier Alcad AI-200 or Terra HA126;
- Telescopic mast 4 m;
- Supports for the mast;
- Wall bracket (2 pcs.);
- Installation and configuration of equipment
from 12500.- With installation
Message
Professional services guarantee quality
How to route the antenna into the apartment from the panel? At first glance, it’s enough just to buy a cable, a few plugs, a separator, if necessary, and mount it all. In practice, everything is a little more complicated. offer several advantages that become a key advantage for the modern busy person.
- You save time. The most complex scheme will take a professional worker no more than two hours, but you will spend the whole day on it. Agree, the difference is more than significant.
- The diagram on how to connect the antenna to the TV is very important. The technician will select the correct equipment. A clear and bright picture on the TV screen depends on the thickness of the cable you choose, what type of plugs you use, and whether you use splitters, amplifiers and similar devices. You choose the right option by trial and error (read: spending money and time), the master will succeed the first time.
- Cooperation with specialized companies allows you to install a TV antenna throughout your apartment with the highest quality possible. Workers will hide the cable and connecting elements in the plinth, boxes or walls, and no one will guess. Where does your TV signal come from?
- Qualified craftsmen use modern equipment and materials in their work that allow them to broadcast the perfect image. New receivers, amplifiers and splitters of the latest model even make it possible to combine several types of signal.
Calculate in rubles how much time you will spend on independent work. Add in the costs of equipment, which you will probably have to buy several times, because you are unlikely to find what you need the first time. Look, the amount turned out to be even greater than what needs to be paid to the master.
Do you need an antenna amplifier?
The question of purchasing an antenna amplifier arises when signal loss becomes systemic.
Due to insufficient transmission, the receiver or digital tuner cannot cope with the processing of the organization. You may see a “no signal” or “weak signal” message on the TV screen.
If communication is carried out without an electronic intermediary, then signal loss can be expressed by the absence of sound, a “freezing” image, an unclear or “pixelated” picture
If the signal is too weak, an antenna amplifier is installed, the main purpose of which is to make the signal more powerful. It is integrated into the TV system on the section of the route between the television receiver and the antenna.
Most often, external devices are used that cut into the antenna cable using two connectors. More “serious” amplifiers look like a set-top box, and some have an additional power supply
Active type antennas already have built-in amplifiers; installing a second one will not help. Also, it will not cope with its function if the antenna is broken or, due to its parameters, is simply not able to receive a signal at a long distance.
In the area of stable reception, the amplifier can even cause harm, since too powerful a signal is also one of the reasons for the failure of the digital tuner.
Typical connection errors
- Not everyone knows that some manufacturers coat the inside of the cable with polyethylene, which cannot be cleaned even with a scalpel. Plastic, even with the best cable stripping, will prevent the creation of high-quality contact with the plug. To avoid signal distortion, it is recommended to turn part of the turned-off foil in the opposite direction so that the conductive side is on the outside.
- A typical mistake is getting the thinnest braided wires onto the main core of the cable when crimping it. This may result in poor quality or intermittent signal dropouts. A common mistake when installing and laying cables is placing them in the same baseboard as the electrical wiring. This cannot be done, otherwise the interference created can significantly spoil the mood when watching TV shows.
- Connecting a telephone socket: options, diagrams, features
Necessary equipment for connection
The connection of the television cable to the antenna and the receiver itself is not so difficult to perform that you need to seek help from a TV technician. Initially, you will need to choose the right coaxial cable and antenna plug.
Cable
There are many cable manufacturers. Their products, in turn, also have differences both between models of the same brand and, naturally, between models of different ones.
The main two categories of cables can be distinguished by the type of material of the central core:
- Pure copper.
Used for satellite TVs. The signal coming from space outside the earth's atmosphere has minimal power, so even minimal losses are unacceptable here. Copper has low resistance, which is why it is used for these purposes. - With copper plating.
In such cables, the core itself is made of steel, and the top is covered with a thin copper layer. This option is used to receive over-the-air broadcasts. There is a loss of some part of the signal, but it is quite insignificant, but the cost of copper-plated steel is definitely lower.
When choosing a cable, consider the following points:
- Depends on the type of signal.
If you have a satellite dish, it is better to use cable brands from well-known manufacturers. Models from Russian manufacturers are also suitable for broadcast or cable television. - Length of the route.
The greater the distance the signal has to travel to the target (receiver), the greater the losses it gets there. Keep this in mind, because even the most expensive cables have internal resistance. If the distance is more than 5 m, it will affect the transmission quality. - Girth of the main cable core.
Typically, cable cores are 1 mm thick. There are also those whose core is only 0.5 mm. Although thin wires are convenient for installation, they are more difficult to connect to devices, and losses due to resistance are often greater. - Problems with the proposed route.
Find out in advance about the presence of sources of interference such as clutter of wires and electrical appliances. In this case, it is better to give preference to a cable with the highest possible shielding. - What does the shell consist of?
Also take its material into account when choosing. Outside, the cable is insulated with materials such as PVC (black) or polyethylene (white). For outdoor antennas, it is better to choose a cable insulated with more durable and high-quality PVC.
Plug
Connecting your TV to an external signal source is impossible without using a plug.
The cable is connected to the socket on the panel using this small device.
They are manufactured for television equipment in accordance with international F-standards. The modern F-plug is suitable for both digital TV transmission antennas and those that transmit analogue.
In fact, this is a washer screwed onto the tip of the cable, stripped of the internal insulating material, with a bent braid and screen. The shielding elements are crimped with a plug, while the central core is connected to the receiver slot.
There are three main and most common types of plugs.
Screwed up.
The model has an amplifier (special pressed nut)
Users especially appreciate this type of plug for the ease of connection.
But such a plug also has its drawbacks:
- a crimp ring that is too narrow will cause the plug to break during installation;
- the short thread on the inside does not allow for tight fixation of the plug in the connector;
- During screwing, the braided conductors often break and the protective layer becomes twisted.
Crimping.
Such F-plugs are also characterized by a fairly high degree of ease of installation:
- Insert the cable prepared in the basic way (described below) into the hole of the convector.
- Cut through the foil with the winding.
- Distribute the bent layer over the entire diameter of the wire.
- Fix it to the wall from the outside with a crimping movable sleeve.
Crimp plug
Compression.
Such plugs are considered the most reliable
To install and fasten such a model, you need not only to have a set of tools designed for such work, but also to understand all the specifics of the process of connecting the cable to this plug.
The pre-prepared cable is inserted into the connector with special pliers, and the sleeve itself is pulled to the end.
Step by step antenna cable assembly
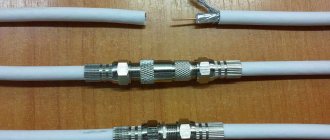
The coaxial cable is connected to the F-plug in the following sequence:
1. Carefully remove insulation from the end of the cable intended for connection. There should be about 1 cm from the edge.
2. Bend the braid and foil to the side of the cable where the outer sheath is still intact.
3. The central core must be freed from the inner insulating layer. To do this, cut it and remove it from the core; its length as a result of this step should be approximately 7 mm.
4. Screw the plug onto the wrapped layer of braid.
5. Trim the core so that about 2-3 mm of wire remains.
6. Screw the second half (adapter) over the inserted part of the plug. In principle, its presence is not necessary, but by using a “double” plug, you will improve the direct contact between parts of the equipment, which will ultimately have a positive effect on the quality of TV signal reception.
Connecting a cable to an old Soviet-style plug, or a new, compression one, most often goes like this:
- Disassemble the plug by unscrewing the contact from the body itself.
- Place the housing on the cable.
- Cut 1 cm of the outer part of the wire, remove the insulating material.
- Cut the braid by 5 mm.
- Where there is free space after trimming the braid, strip the insulation to expose the main core.
- Insert the wire into the socket located in the metal half of the plug.
- Use pliers to pinch the stripping material around the sheath so that nothing touches the center core.
- Tighten the fastening screw.
- Screw a plastic tip onto the metal part.
