The television program is becoming more and more boring. The same type of TV shows, no new movies, and 10 minutes of advertising every 8 minutes of broadcast. On the Internet everything is different. Look if you want, don't look if you don't. You can skip advertising. Fairy tale. Moreover, you practically don’t need any special equipment to connect. There is a router, and this is quite enough. And you seem to have already decided to connect your TV to the Internet via cable, but you don’t know how to do it, you don’t quite understand. To begin with, you should still decide on the equipment - whether what you have is suitable for connection.
What do you need to connect your TV to the Internet via cable?
To establish a wired connection, you need:
- the provider cable that comes from the entrance or from the modem in your apartment, or a LAN cable (if we connect through a router);
- TV with Smart TV and LAN connector;
- router (if a direct connection is not suitable for you);
- availability of Internet access (paid tariff);
- network type - find out from your provider what protocol it works with: call technical support or look at your contract with the company. Protocol options: PPPoE, L2TP, PPTP, dynamic IP, static IP.
What is required to connect
Before you find out how to connect your TV to the Internet, you need to find out what you will need:
- Good Internet performance.
- Instructions for TV.
- Router.
- Network cable or Wi-Fi router.
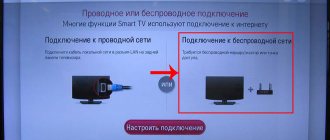
Important! You can connect your device using a wired or wireless connection.
Pros and cons of this connection method
What good can be in a cable Internet connection in principle? Why this bunch of wires if you can use Wi-Fi? Yes, you can, but firstly, not all TVs have built-in Wi-Fi modules. If you are a fan of wireless connection, but the TV module does not have a TV module, you will have to buy it separately.
If you need to use the Internet not only on TV, but also on your PC and phone, connect your TV to the Internet using a cable through a router
Secondly, data is transferred over a wire much faster than over Wi-Fi. Almost all routers reduce speed. Plus, they have to distribute the signal to several devices at once - the signal and speed are divided between participants in the local network.
Thirdly, a cable connection is more stable than a wired one. Data transmission failures will occur less frequently.
Network cable can be connected directly to PC
The downside of this method, of course, is the number of wires. They do not always fit into the interior. Besides, it's inconvenient. If the router and TV are far from each other, even more so. You will either have to buy a long cord or move the router closer to the TV.
If you don't have a router and don't want to use it, but have a cable from your provider, you can plug the cord directly into the TV. You don't have to buy a router. If the TV is not equipped with a Wi-Fi module, a direct cable connection will be the only budget option.
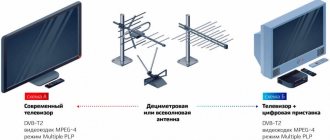
Connecting and setting up cable digital television
In addition to the TV itself, you will need:
- Antenna with amplifier . Of course, you can take it without an amplifier if the signal quality is good. However, if you plan to connect two or more TVs in the future, then it is better to take it with an amplifier. If the distance from the transmitting station is no more than 50 km, then take an inexpensive antenna with an amplifier Locus Meridian 07AF Turbo.
- Tuner (set-top box) . The tuner or receiver improves the quality of the image displayed on the screen. Most modern TVs have a built-in tuner, but older CRT models may not work with digital TV. On average, a normal tuner (set-top box) can be purchased for 1000-1500 rubles.
- Cable . You will need a coaxial cable from the antenna to the tuner and a cable with an HDMI connector to connect the tuner to the TV.
Step 1: Connecting Antenna and Tuner:
- We point the antenna at the television tower . There is a map of digital television in Russia online, where you can find out the nearest location of the TV tower.
- Connecting the antenna to the tuner. Simply insert the plug into the appropriate connector, as shown in the picture.
- We connect the tuner to the TV . Connect the cable to the HDMI connector on the TV.
If you need to connect two or more TVs to one antenna at once, then find out how to do this in the previous article.
Step 2: Automatic Channel Tuning:
- After turning on the TV, the message “channels not tuned” will appear on the screen. To configure, press the “Menu” button on the remote control.
- In the “technical configuration” section, go to the “channel setup” item.
- In the “channel setup” section, select “auto tuning”.
Automatic channel tuning will last 2-3 minutes. However, there is a high probability of duplicate channels appearing, and even with poor quality of picture transmission. Such channels must be manually deleted immediately.
Manual tuning allows you to find channels with a good signal, but it takes much longer. If you still decide to configure it manually, then step 3 is for you.
Step 3: Manual setup:
- In the same “technical configuration” section, select the “channel setup” item.
- In the “channel setup” item, select “manual tuning” or “manual search” (depending on the TV model).
- Start the search using the volume keys; each channel found will have to be saved separately.
TV cable connection diagrams
We will show and tell you how to connect a TV to a router or simply to an Internet provider cable.
Via router
If you decide that you need an intermediary in the form of a router, do the following:
- Connect the provider's cable to the WAN or Internet port (depending on the router model).
- Configure the connection on the router depending on the protocol. We have already described above what protocols there may be. The setup takes place on the local page in the browser at 192.168.1.1 or 192.168.0.1. The debugging process will depend on the router manufacturer (interfaces differ). Take a look at the instructions for your router - everything should be described in detail there.
- If the router has been connected and configured for a long time, skip the first two steps. Take the Ethernet cord that comes with the router. If it doesn't exist, or if it's too short, buy a new one at a computer store (labeled RJ-45).
- Connect the cable to the LAN port on the back of the router (choose any) - these outputs are usually yellow.
- Insert the second free end of the cord with the same plug into the LAN connector on the back of the TV. It is advisable to turn on the TV.
Using a special cord you need to connect the router to the TV
Directly
Everything is simpler here: we immediately connect the provider’s cable to the LAN port on the TV. The cable can come directly from the entrance or from the street, from a splitter (if it is a telephone ADSL connection, the splitter separates the signals for the telephone and the Internet) or from a modem (it is configured by the provider’s specialists upon connection).
HDMI
HDMI is by far the most preferred option for connecting a TV to a computer. Through it, in addition to high-definition images, sound is also transmitted. The TV and computer (laptop) must be equipped with an appropriate connector (see in the image), the physical dimensions of which are: width - 14 mm, height 4.5 mm. To connect, you will need an HDMI to HDMI cable (with an HDMI plug on both sides). The video cards of some computers may be equipped with a mini-HDMI connector instead of regular HDMI. In this case, in addition to the cord, you will also need a “mini-HDMI to HDMI” adapter, which most often comes with such a video card (or can be purchased separately).
When purchasing an HDMI to HDMI cord, keep in mind that the materials from which it is made, and therefore its price, do not have as strong an impact on the image as consultants in stores say. Buying a cord that costs several hundred dollars does not make much sense. An ordinary “Chinese” copy for 10 – 20 dollars will most likely turn out to be no worse. Digital data is transmitted via HDMI, and it is almost unaffected by various magnetic fields and other interference.
Connection order:
1. Disconnect the TV and computer from the power supply; 2. Connect the HDMI connectors of the computer and TV with a cord; 3. Turn on the computer and TV; 4. Specify the HDMI connector as the source in the TV settings. Most often, this is done using the “input” or “source” button on the remote control; 5. Make changes to the computer settings: - open the control panel (see the Start menu) and go to the sound control section, in which specify the HDMI interface as the playback device; — extend the desktop onto a second monitor. To do this, you need to: in Windows XP – right-click on the desktop, select “properties” in the context menu that opens, then go to the “parameters” tab, where you can make the appropriate changes; in Windows 7, to make the necessary settings, you need to right-click on the desktop and select “screen resolution”. More information about setting screen resolution can be found here.
How to find out the MAC address of a TV
A direct connection may not work for you if your ISP uses MAC address binding. The provider has a MAC device (its physical number) to which the Internet was previously connected (your router, PC). Now you have decided to change the device, so the provider needs to inform the new MAC of your TV, so that the company now supplies the Internet to this device too.
How to find out the MAC address of the TV? This unique code is, of course, found in the TV documentation. Or you can view the address on the screen of the device itself. If you have a Samsung, go to the “Support” section, under “Product Information” there will be “Model Code”. This is the MAC of your TV.
You can find out the model code through the “Support” block
DVI, VGA
See the pictures for what the DVI and VGA connectors look like. The computer and TV must be equipped with one of them. When choosing an option between DVI and VGA, preference should be given to the first, and only if it is not available, use the VGA interface. If you decide to connect via VGA, but the computer has only one such connector and it is occupied by the main monitor, you can use a “DVI to VGA” adapter and turn the free DVI connector on the video card into another VGA (see figure). Only video is transmitted through the DVI and VGA interfaces. Therefore, to transfer sound from a computer to a TV, in addition to a DVI-DVI or VGA-VGA cord, you will also need an additional audio cord with 3.5 plugs on both sides. The 3.5 plug is a standard plug used in common computer audio systems, headphones, etc. (see picture). Such cords are available for purchase in all specialized stores.
Connection order:
1. Disconnect the TV and computer from the power source;
2. Connect the connectors of the computer and TV with a DVI-DVI or VGA-VGA cable (depending on the selected connection option); 3. Connect the audio output of the computer to the audio-in connector of the TV using a purchased audio cord; 4. Turn on the computer and TV; 5. Specify the DVI or VGA connector (as appropriate) in the TV settings as the source. Most often, this is done using the “input” or “source” button on the remote control; 6. Extend your computer desktop onto a second monitor. To do this, you need to: - in Windows XP - right-click on the desktop, select “properties” in the context menu that opens, then go to the “parameters” tab, where you can make the appropriate changes; - in Windows 7, to make the necessary settings, you need to right-click on the desktop and select “screen resolution”.
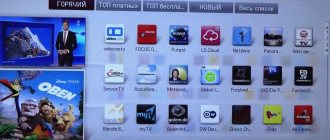
What channels are available for viewing?
As already mentioned, the T2 broadcast includes 20 free channels. Cable providers that provide digital may offer you more as part of the package you choose. But these will be paid digital television channels.
20 digital channels
The question of a third multiplex is up in the air, because... The existing digital broadcasting infrastructure in the Russian Federation is designed for only two multiplexes: there are not enough frequencies, the volume of analogue broadcasting is still large. It is expected that the current year 2021 will be decisive in the situation with the reduction of analogue broadcasting and the integration of the third package of digital channels.
Antenna selection and installation
Having decided to connect to digital television yourself, you will come close to choosing an antenna. Already at the very beginning, you should understand that there is no single universal model capable of catching a signal in any, even the most difficult conditions. It all depends on your location.
Using an indoor antenna is attractive, but, unfortunately, in many cases its power is not enough. This is due to interference that will inevitably appear in a situation when you walk around your apartment or when cars often pass near your house. Even with a very strong built-in amplifier, “clean” reception of channels will be problematic, because any obstacle dampens the waves. A room wave receiver is only “shown” at a short distance from the transmitter or in an ideal location (for example, windows pointing directly at the repeater).
An external signal receiver is a better option than an indoor one, because UHF waves do not penetrate walls without loss of quality. An external antenna provides sufficient signal strength. But is it active or passive?
The answer to this question is the distance between the TV and the DVB-T2 wave receiver. In most cases, a passive model that does not have additional amplification is sufficient, since the cable length is often short. In this case, the amplifier is an extra expense. The amplifier is already built into the active antenna at the factory.
You may be interested in: How to install an antenna
How to locate a TV tower
You can find the TV tower closest to your locality using the digital TV coverage map in Russia. By placing the name of your locality in the search bar, you can estimate the distance and direction to the nearest transmitter, and the main parameters of its broadcasting.
Reliable reception area
Reliable reception from a transmitter is when the quality of its broadcast remains at a high level, regardless of:
- depending on weather conditions
- from sun activity
- time of year and day
- air temperature and humidity, etc.
The reliable reception area is the coverage within the line of sight distance from the broadcasting antenna to the place where the receiving antenna is installed. The interactive digital TV connection map reflects the broadcast area of each television tower, under construction or in operation, for each of the two multiplexes.
Area remote from the TV tower
The problem with long-range reception of a digital television signal is its low level due to the significant distance between the transmitter and receiver due to the fact that outside the zone of reliable reception, radio waves fall into the shadow of the earth's surface, the so-called penumbra zone. Officially, permissible distances between towers have been adopted to solve this problem. However, digital reception at the edge of the transmitter's coverage area will be subject to interference due to weather conditions, which may appear as image fading on the screen.
Long-distance reception of digital channels is characterized by antennas that are large in size and have a complicated design. The task of remote subscribers (which is often solved only experimentally): to select an antenna design with a high gain and, at the same time, with the minimum possible dimensions. Directional models are usually the solution.
Choosing a router
After this, some people will still have a question: how to connect the TV to the router via a LAN cable, and which router to choose for this. Fortunately, there are very few problems that may arise when choosing a router. All modern routers cope with this with a bang. Therefore, if there is already a router at home, then it is easily suitable for connection. The main rule: the router must contain more than one LAN port for connecting external consuming devices in order to connect the TV and a personal computer or laptop.
Implementation of connecting a computer to a TV via LAN
As mentioned above, it is advisable to purchase a full-fledged network card and insert it into a special PCI slot on the motherboard of the personal computer. Moreover, it is inexpensive. Sometimes, during the process of installing new PC hardware, problems may arise with missing drivers. They can be solved either by the system itself after turning on the computer, or by independently installing additional programs from the disk included in the kit, or downloaded from the manufacturer’s official website. You can also buy a LAN cable of the required length in the store, which will be crimped on both sides with special connectors.
If all the parts are assembled, then you can start connecting. To do this, you need to plug one end of the cable into the RJ45 slot of the computer, and the other into the same LAN port of the TV. Most often it is located on the back panel of the TV, where power, speakers and other paraphernalia are connected.
After connection, it is configured. To do this, you can use specialized programs for broadcasting video and audio from your computer to your TV. Often they are specific in nature and are suitable for setting up TV from only one manufacturer. One of the software that works well on many devices is Home Media Server. It contains many flexible settings, as well as a function that allows you to broadcast IPTV directly to your TV.
Working with the software is very easy: to load a movie into it, you just need to drag it from the desktop or any other folder into the program window. After this, everything is ready for broadcast and all you have to do is click the “Start” button. A window will appear on the TV with a source selection, in which you should select “AllShare HMS”. This completes the setup. An interface for selecting the desired clip appears on the TV.
Important! The software allows you not only to view videos and broadcast them on the TV screen. You can also view photos from your hard drive or flash drive, as well as listen to music.
Watching IPTV on TV from a computer
Watching IPTV is a little more difficult to implement, but it is also quite possible even for a beginner. First, you need to download and install the VLC Media Player program from the developer’s official website (taking into account that HMS is pre-installed and configured).
It is worth noting that another player will do, but the best solution would be VLC and it is really necessary, since the Server will take the video stream from it. After installing the player, you need to link it to the Home Media Server. For this:
- HMS starts;
- Go to Settings - Media resources - Internet resources;
- A special column contains the path to the folder in which the player was previously installed;
- In the folder where IPTV from the provider is installed there is a file with the extension .m3u;
- The file is transferred to the program window, namely to the “Internet television” folder located to the left of the main interface;
- Follow the path “Settings” - “Transcoder” - “Transcoding profile”;
- In it, the incoming stream “Internet television” is selected;
- HMS reboots, and a list of available channels appears in the “Internet TV” folder on the TV.
Important! If there was no .m3u file in the folder with installed IPTV, then you can find and download it from the Internet on the website of your or someone else’s Internet provider
What to do if there is no Wi-Fi module
TVs in the mid-range and expensive segments already have modules for wireless connections “on board”. But budget or older versions of TVs may be deprived of such privileges. Some models are equipped only with LAN output and USB connectors. For some reason, manufacturers did not provide the ability to establish a Wi-Fi connection. Others do not even have such opportunities. However, almost any TV model can be connected to the network. High-tech gadgets - adapters and TV set-top boxes - will come to the rescue.
External Wi-Fi adapters
Through such devices, TVs are connected to the Internet via Wi-Fi access points. USB or HDMI connectors are helpful. They are suitable for TVs with the Smart function that are not equipped with built-in wireless modules.
Samsung, Sony, LG, Toshiba produce fully compatible adapters with their devices. The importance of this fact is that when choosing a receiver, it is worth taking into account power, range, data transmission standards, and network frequency. These indicators affect the quality of signal reception and stability.
But branded products always exceed the price tags of generic options. You can find suitable receivers for any TV model on the Internet or on the official websites of manufacturers. The technical documentation of the TV and the installed router will help you select the necessary parameters. To set up access, see the operating instructions.
Smart TV set-top box based on Android OS
If your TV does not support SmartTV, you can access the World Wide Web using set-top boxes. These devices are equipped with RAM and built-in storage. Control is performed through the interface of the Android operating system.
- You can install utilities, gaming applications, watch videos and other content.
- They are connected to the TV using a cable or inserted into USB, HDMI connectors. They have a remote control.
- They support many formats of video and audio content, IP television, reading files from flash media, and various applications.
Media players connect to the network via Wi-Fi or wire. The screen display function of a tablet or phone allows you to surf pages on a large screen diagonal.
Note: 6 applications for controlling your TV from your smartphone - how to control it from your phone
The price range of set-top boxes depends on the manufacturer, processor, size of RAM, built-in memory and set of functions. They allow you to significantly expand the capabilities of any TV.
Apple TV: what is special about the console
An excellent device for fans of branded products from the famous Apple. This gadget is designed for watching movies and videos in good quality. Provides access to the iTunes library, Apple Music and other content from the virtual App Store. When you activate sharing with a MAC or iPhone, you can view graphic content on a large screen on the same Wi-Fi network.
Useful article: How to connect Apple TV to a TV - setting up the set-top box in 4 points
Apple TV allows you to use popular instant messengers and networks, install toys, use paid and free cinemas, and third-party applications for streaming video. The AirPlay feature allows you to stream the contents of your computer or iOS phone screen. For Windows users, the AirParrot utility is provided.
The console is controlled by a touchscreen remote control equipped with an accelerometer and a gyroscope. Very convenient while playing or browsing. The gadget is easy to connect, configure and operate.
The Apple TV is connected to the TV via an HDMI cable, which must be purchased separately. Network access is provided via LAN or wireless connection. The cost of such a gadget is not so affordable. But Apple tech connoisseurs appreciate its benefits.