Who doesn't like to sing? And not under the shower in the bathroom, so that no one hears, but feeling like a full-fledged star? But, unfortunately, most of us are far from singers, having neither a voice nor hearing, so we have to be satisfied with karaoke. In addition, using modern televisions, you can experience for yourself what it’s like to hold a microphone in your hands, without even leaving your home. All you need for this:
- Install a special karaoke application for your TV;
- Connect the microphone;
- Choose your favorite song.
Typically, a suitable TV should have a Smart TV feature and be able to connect a speaker system. Connecting a microphone is a must for karaoke. It's not so interesting without him. That is why we will now try to figure out what to do so that this device is connected to the TV correctly.
Connecting karaoke on TV
You can connect a microphone to the TV to perform songs via a DVD player, laptop/PC, or via the Smart TV function, if your television equipment provides such a feature.
Connection via DVD
This method is considered the simplest, but such players are losing their relevance due to the widespread use of other storage media, including audio and video content (flash drive, smartphone, etc.). And for those people who still have such devices and have karaoke discs for them, this method is the most convenient.
To set up a microphone for singing songs, you need to:
- connect the device to the TV using a connecting cable (tulips, SCARD, HDMI - depending on the connectors available on the equipment, or using appropriate adapters);
- connect a microphone to the player;
- turn on the television panel, use the remote control to select the input through which the signal from the DVD is sent to the screen;
- turn on the player, insert a disc with karaoke music.
The connection is complete, now you can play your favorite song and have fun.
Advice! Instead of DVD, you can use a Blu-Ray player or home theater with karaoke support.
Connection via PC
You can also sing karaoke songs through a laptop or computer. In this case, the microphone is connected to the PC connectors, and the TV is used as a second monitor. The karaoke application runs on the laptop and is displayed on the TV screen. To do this, you need to go to “Screen Resolution” by right-clicking on the desktop, and select the preferred method of displaying the image from the options presented:
- first screen;
- expand;
- repetitive;
- second screen.
With this connection method, sound is output through the laptop speakers (or through the TV panel if it is connected via an HDMI cable). If the sound seems quiet, you can purchase a microphone amplifier or make one yourself if you have the appropriate skills and a soldering iron. There are a large number of diagrams and assembly instructions on the Internet.
Connection via Smart TV
Setting up karaoke on a Smart TV is more difficult. First you need to select a jack (connector) for the microphone. To do this, you should inspect the television panel to understand what outputs are available for connection. A special 3.5 mm or 6.3 mm connector is required, but if there are none, you can connect the device via a USB port .
Next, you need to install special karaoke software on your TV. This can be done via a laptop or by connecting to the Internet.
Important! You need to download karaoke applications from trusted sources so as not to introduce a virus or damage your equipment.
Installation of auxiliary software
Not all smart components of modern TVs have a karaoke application. Some of them will need to be supplemented with such a function independently. Popular apps for home singing:
- Karaoke in Russian brand Yokee. Here you will find many songs, the program takes them from YouTube. Enter the name of the desired song in the search and start performing. Record your voice, apply effects and send it to your friends via Facebook.
- Smule: A social singing app. This program has its own database of songs, which is updated daily. You can create a video clip with yourself as a soloist and post it on a social network. The disadvantage is that the songs are in English.
- Red karaoke is the choice of 3 million users. The program database contains more than 40 thousand songs. If your favorite is not among them, the program will find it through a connection to YouTube.
Connecting a microphone
Today, karaoke microphones with and without wires are available for sale. Both types can be connected to the TV.
Wired microphone
Wired microphones usually come with a 3.5mm or 6.3mm plug. As a rule, the first type of connector is most often found on TVs. It can be identified by its pink color and the inscription Audio In or the corresponding image.
Advice! If such connectors are not available, you can purchase a microphone that connects via USB. A similar input can be found in any modern television panel.
If the connection is made to a Smart TV that supports the karaoke function, there will be no problems recognizing the connected device, because all the necessary drivers are pre-installed.
Wireless microphone
Wireless microphones are more expensive than their wired counterparts, but they offer a number of benefits.
- Firstly, there are no wires dangling behind the person performing the songs.
- Secondly, range. Using a wireless microphone, the user can be in the far corner of the room, which the cable length of a device connected via a wire would not allow.
- Thirdly, the microphone connected through the transmitter is much more durable. Constantly connecting the cable to the TV will sooner or later loosen the connector, as a result the sound will disappear with every awkward movement. A wireless product does not have such disadvantages, as a result it works much longer.
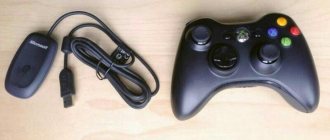
Wireless microphones involve two methods of signal transmission - through radio waves and Bluetooth technologies. In the first case, to use such equipment (for example, Defender Mic-140), you need to connect the receiver to the TV, insert batteries into the microphone and connect the antenna module, and then turn on both devices.
Wireless dynamic microphone Defender Mic-140
In the second case, the TV must also support Bluetooth technology, otherwise you will have to additionally buy an external module that is plugged into the USB connector or Audio In input. The TV receiver is synchronized with the microphone automatically. If the smart TV does not recognize the device on its own, you will need to go into its settings and use the manual to fix the problem.
On a note! Wireless microphones can also be connected via a cable, which is usually sold with the devices. In this case, the receiver and batteries are not required.
Is it possible without programs?
Not all applications should be used. The advantage of connected equipment, as noted above, is the high-quality overlay of voice and music in the same range. But, if you cannot use the equipment or install the application, then use online services. To do this, go to the browser on your TV and enter “Karaoke online” in the search bar. There are many different entertainment services of this kind on the Internet. You will find any song and music you need.
The only negative is the inconvenient controls. After all, you will have to move the cursor and select the desired items, and doing this from the remote control is inconvenient.
If you have any questions or complaints, please let us know
Ask a Question
Possible difficulties and ways to solve them
One of the main problems that arise when connecting a microphone to a television panel is related to the difference in the input impedance of the devices. This prevents the technology from producing sounds. To solve this problem, you need to connect the microphone through an amplifier.
If the TV does not have the necessary inputs, you can connect a DVD player to it and use its connectors to connect devices. Home theater can be used in a similar way. With this solution, the user will receive amazing sound thanks to the use of good acoustics.
If the microphone is connected to the TV, but is not detected by the device when you launch the karaoke program, you need to update the application. In some cases, an older version may create this problem.
Third Party Applications
Your TV doesn't have the input you need? Use the diagram for connecting the computer to the cable. If you have wired equipment, then download additional applications from the online store. The main difference in installation:
- the program is downloaded to the device;
- or to a TV set.
Use one of the methods. Download via Wi-Fi or buy a separate external media. Please review the file carefully when downloading. Pirated data can have a negative impact on your work. Refer to verified versions. Ask friends or family.
An error occurred in the OHDPluginLibrary application on the TV: reasons, what to do?
Features of connecting TVs of different brands
LG TVs do not have a microphone input, so you need to immediately purchase a device with a USB connection or use additional equipment, for example, a DVD player . On TVs with LG Smart TV function, to install the karaoke application, you need to open the LG Smart World store and download Karaoke.ru.
Advice! The Karaoke.ru service is also available for television panels from other manufacturers, for example, Samsung or Panasonic. You can find it through the official Samsung App and VIERA Connect Market app stores, respectively.
On Sony Bravia or Philips TVs based on the Android operating system, you can download the karaoke application on Google Play - a large amount of content is available in the store, both adapted for TVs and intended for mobile devices.
In addition to the largest brands, Android-based TV panels are produced by such manufacturers as Supra, Telefunken, Shivaki and others. You can also connect a microphone and install a karaoke app to have fun singing your favorite songs.
So, karaoke is an exciting pastime that is now available at home. To do this, you just need a TV (preferably with a Smart TV function) with a connected microphone.
How to connect a microphone to a TV to sing: what you need to know before buying
Before you go to the store, you need to get the following information:
- Is the selected model suitable for your TV? To do this, you need to read the technical support from him. If you didn’t find an answer to the question about compatibility there, then I advise you to write down the TV model and ask a consultant in the store. And if the purchase is made in an online store, read reviews on the Internet.
- What type of connection does the selected model have? If we consider wired models, their price will be much lower. However, cordless ones are easier to handle. In addition, they contain additional functionality. One of the best wired options is the RITMIX RDM-126 microphone. It combines high quality playback at a relatively low cost.
- It would be a good idea to find out how many audio reading devices you can connect.
I also want to emphasize that on modern TVs the connection is automatic. For everything to work, you need to insert the plug into the socket. Further setup will occur without your intervention.
Choosing the right equipment
Before you look for how a microphone is connected specifically to your TV, you need to decide on the connection method and, of course, the choice of microphone. Standardly they have the following varieties:
Wired with 3.5 and 6.3 mm connectors;
Wired with connection via USB port;
Wireless ones that connect via bluetooth.
Of course, if the TV does not have 3.5 or 6.6 mm connectors, there is no point in purchasing such equipment. If there is a USB connector, this does not mean that a microphone with a similar connector can be used in karaoke - you need to look at the technical specifications. It is best if you use a connection, for example, to a laptop, to which the microphone is also connected. The most convenient equipment can be called a wireless microphone, which is the easiest to connect and is very independent in use.
Since Smart TVs provide karaoke and microphone connection in general, the user does not need any knowledge about the settings of this function, all of them were already built in before your purchase.
Helpful tips for setting up
Connecting a karaoke system and microphone does not require professional skills, especially if you follow these useful tips:
- Before buying a karaoke, pay attention to the sound quality, recordings, number of inputs and outputs, and the availability of free songs in the music library. The most affordable option is a DVD player, recommended for beginner karaoke fans.
- To get high-quality sound, it is best to purchase a TV with Smart TV from Samsung or LG. Connecting karaoke is simple and understandable to everyone.
- If the audio stream is too quiet, connect additional speakers to the TV.
Karaoke has been and remains a popular entertainment for families or large groups of friends. You can connect karaoke to your TV in different ways, from a standard DVD player to Smart-TV technology. After setup, you need to check the functionality of a wired or wireless microphone connected through the TV connectors.