Is it possible to connect a router to a TV? This is a popular request among owners of Smart TVs and regular devices with an adapter. Almost every apartment has a TV, it can be an old CRT or a new and modern one. For the first, you need a set-top box or tuner; this is the only way to watch digital television. The second requires practically nothing except a correct connection to the Network. This can be connected via cable or wireless network. The second scheme is preferable, since it will help avoid the presence of unnecessary wires in the house.
What is Smart TV and how to use it
Smart TV is a set of software and hardware that allows the TV to perform many tasks. In terms of functionality, a device with Smart TV can be compared to a personal computer. This will allow you to access the Internet, play online games, communicate in instant messengers or social networks directly using the TV device.
In addition, the function allows you to connect the TV with a phone, tablet or laptop, display the image on a large screen and control it.
For the normal functioning of the television service via a Wi-Fi router you will need:
- router with connection to Internet services;
- TV with a built-in wireless module, cable connection or set-top box.
Note! If the device does not work on Wi-Fi, then you will need a special adapter that will replace the standard wireless module.
Instructions for LG
The process is no different for any model. The only difference is in the TV operating system, that is, in the interface. Depending on the year of manufacture and OS version, connection settings items may have different names.
Below are step-by-step instructions for both updated webOS TVs and older versions of LG Smart TV.
WiFi
For the main method, you need to know the name of the Wi-Fi network and the access password.
- Turn on the router.
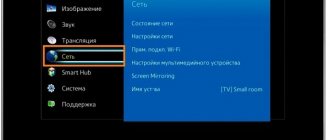
- Open the settings menu. On the remote control, press the “Settings” button (may be indicated by a gear icon).
- Click on “All Settings” at the very bottom.
- Depending on the system version, switch to the “Network” or “Connection” section.
- Next, select “Connect to a Wi-Fi network.”
- The TV will scan for available networks and display the full list. Find your network by name, click on it with the central button on the remote control.
- The system will prompt you to enter a password. Enter the password on the remote control or through the keyboard on the screen. Click on "Connection".
- The TV will connect quickly. A check mark will appear next to the network name, indicating that the connection is successful.
- If you return to the original menu, instead of the “No connection” message, another one will appear.
You can check the connection in any convenient way. For example, open the Youtube application, launch the browser and go to any website.
This connection is very convenient because you do not need to re-select the network and enter the access key each time you use the TV. Login to the network will be performed automatically.
When the network is hidden and does not appear in the list, you can also connect to it. In addition to the password, you also need to know the network name (SSID).
- Select "Set up a hidden Wi-Fi network" or "Add a hidden wireless network."
- Enter the network name, select the security type and click “Connect”.
- Enter your password.
WPS
Additionally, in the Wi-Fi settings there are several more options for connection - WPS-PBS and WPS-PIN. It can only be used if the router supports WPS mode. The case must have a corresponding button and indicator.
- WPS-PBS (mode via button press). Activate the item on the TV.
A notification will appear on the screen that you need to press a button on the router.
Without closing the notification, press the WPS button (sometimes you need to press it for 2-3 seconds). Release, the indicator on the router should start blinking with the word WPS. Over time, the devices will automatically synchronize with each other. A check mark will appear opposite the name of your network indicating a successful connection.
In the same way, you can install a printer on a laptop, if, of course, the printing device has a built-in Wi-Fi module.
The disadvantage of this method is that it requires connection every time after turning off/on the television equipment.
There is no password required when connecting.
- WPS-PIN. A more complex method will require logging into the router settings via a computer. Click on the item, a notification with a “pin” will appear.
PIN is a number that must be entered in the WPS settings inside the router interface. Open a browser on your computer, enter the address to access the router menu.Typically the address is 192.168.0.1 or 192.168.1.1. You can find out the exact data on the Internet by entering the router manufacturer.
A login menu will appear where you need to enter your username and password. For most models, the data is the same, login and password are admin and admin, respectively. When you get to the device interface, find the “WPS” section in the menu (located inside the Wi-Fi section). Inside, you can add a new device, where the PIN of the TV is entered. Afterwards, the connection should work. Sometimes you have to wait a little. Here is an example of the settings for the D-Link DIR-615 router.
1
2
Cable
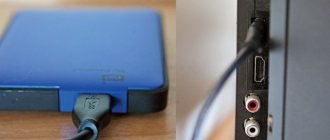
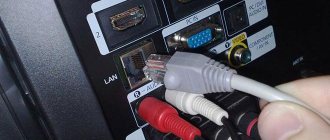
If you need to organize direct contact, then connect the wire entering the room to the LAN connector of the TV for a click. The connector is located on the rear panel of the equipment.
- Next, go to the same “Connection/Network” item. If the data is received automatically, then the Internet will immediately become active, you won’t have to configure anything else. You don’t even have to go into the settings, unless it’s just to make sure you’re connected. It will say “Connected”. Check the Internet in your browser.
- If the IP address is static, then you need to go inside the “Wired connection (Ethernet)” item and enter all the necessary data. The provider's support can provide accurate information.
When authentication by login and password is required (PPPOE connection), you can connect the TV to the Internet only through a Wi-Fi router.
The connection will still be physical (cable), the router will just take over the network configuration. First, the network is configured on the PC. When there is access to the Internet, another crimped cable (patch cord) is taken. One end is inserted into the LAN connector on the router, and the other is plugged into the same input on the TV.
Next, the Internet should appear on its own, since all the settings have already been made on the router.
Old models
The connection procedure is essentially the same. Only the interface and item names will be different. Let's look at the example of TVs that were released before 2013.
- Open the settings (“Settings” button).
- Go to the "Network" section.
- Select "Network Connection".
- Next, “Set up connection.”
- Find and select the one you need in the list of networks.
- Enter the security key (password) on the keyboard.
- Confirm the connection with the “OK” button.
- If the password is correct and there are no connection problems, a page with the message “Network connected” will appear. Complete the setup by clicking on “Finish”.
- Go to your browser and open any web page.
The cable connection is made in the same way. Only in step 5 you need to select not wireless, but “wired network”.
The TV itself will detect the data and connect.
If necessary, check the “Obtain IP automatically” setting. On older versions, this step must be done. Self-connection does not occur on older models.
If the IP address is static, then to the right of the list of connections, click on “Manual configuration”.
Check with your provider for the necessary information for setup and enter all the data.
How to connect a router to a TV
Review and configuration of the D-Link Dir-320 modem
Today, there are several ways to connect a router to a TV to watch digital channels and surf the Internet:
- using a wireless network;
- using a cable from TV to router;
- by connecting the TV to the set-top box and further connecting to the router.
Important! A wireless network is the favorite connection option for most users, as it allows you to free your apartment from unnecessary wires.
Results
A router is necessary equipment for Smart TV. It is this device that opens access to the Internet. There are no special requirements for the router, but it is best to avoid the simplest models, since they cannot withstand the increased loads created by the simultaneous connection of several devices.
Here, by the way, one can argue. The simplest, but no less beloved by users (the same D-Link DIR-615 or TP-Link TL-WR840N), routers are inexpensive (about 1000 rubles) and will work properly with a TV with the Smart function. The main thing is to consider what type of connection will be used. Because if the devices are connected by cable, you need a free LAN port on the router. Therefore, it is better to choose a router with 4 such connectors.
In general, if you have an old router, don’t run out and buy a new one just for Smart TV. If there is a question of choice, then you need to rely on your needs. If there are a lot of network devices at home that connect over the air, it is better to choose not the cheapest one, preferably with support for 2 bands and the 802.11ac protocol.
On our portal you will find instructions for connecting to the Internet of different TV models. If you have any questions, please contact us – comments are always open and there is an online chat.
How to set up a router for Smart TV
What are the differences between 3G and 4G networks: features, advantages and disadvantages
For most TVs on the market, all settings are carried out approximately the same. The names of the items may differ slightly, but the general meaning will be identical. In this regard, it will be quite easy to understand. The setup is carried out as follows:
- In the device settings, you need to find the “Network” item.
- Click on “Network Settings”.
- Confirm your selection, after which the “Automatic Network Configuration Wizard” will open.
- In the menu you need to indicate the correct connection method. You should choose wired.
- Wait a while for the TV to receive an IP address.
If after completing all operations an error window appears, you will need to manually enter all parameters. To do this, go to the “Network Status” menu, in which click on “IP Settings”. The data to be entered in this window can be found on the provider’s website or clarified by calling the support service.
Router models that support IPTV
Not all router models support IPTV and here's why.
IPTV has its own significant feature: unlike traditional cable television, which transmits a large amount of media content through a network of cables, the IPTV system stores all available content in the host network until the user requests it. This frees up bandwidth and at the same time removes the dependence on channel capacity to determine what can be accessed by subscribers. The time spent on video buffering is significantly saved by installing IPTV.
In addition, IPTV differs from standard downloadable video in that multimedia content is streamed rather than downloaded. This means that content is moved through the channel in batches (multicasts), so the user can watch movies before the entire download is complete.
Multicast is one network packet that can be used simultaneously by an unlimited number of subscribers, otherwise it is a multicast packet transmission via the IGMP protocol. This type of transmission is used in video streaming, and therefore in all IPTV networks.
Streaming media content can be viewed on standard thin clients and smart TVs, widescreen displays, as well as desktop computers. Recent technological innovations now make it possible to distribute IP video beyond the wired LAN, including the WAN, Internet and mobile devices.
However, to receive IPTV at home, you will need:
- Or a special set-top box-router for IP-TV with support for the multicast function;
- Or IP-TV Player.
If your provider provides you with a list of TV channels using the UDP transport protocol (video and audio streaming), you will need an IPTV router. By default, in many routers that support IPTV, the “Multicast” option is disabled and IGMP traffic is blocked. Therefore, users have questions regarding setting up a connection via an IPTV router.
Quite often, routers do not require any additional settings; in many IPTV devices, the “Multicast” function is activated automatically after a software update.
List of major manufacturers of routers supporting IP-TV:
- D-Link;
- Zyxel;
- Asus;
- NetGear;
- TRENDnet;
- TP-Link.
A complete list of set-top boxes with IPTV support can be found from your TV service provider or on their official Internet resource.
Choosing a router
Antenna for a computer to strengthen the Wi-Fi signal
TV brand or other indicators have absolutely no meaning when choosing a router. It should be chosen based on personal preferences. The fact is that for normal operation of the Smart TV function, no special equipment is required. The TV itself is no different from the same laptop or tablet in terms of connecting to the Internet. And you can connect Smart TV to a wireless network through any router via Wi-Fi or using a network cable.
Sony setup
The situation with Sony Bravia is the same as with other manufacturers. The principle of all companies is almost the same in order to simplify any user actions as much as possible.
- On the remote control, press the blue “Home” button.
- Go to the “Settings” menu by clicking on the suitcase icon in the upper right corner.
- Next, follow the chain “Network” - “Network settings” - “Setting up a network connection” - “Simple”.
- If the patch cord is connected, the TV will not offer configuration options. This will begin checking the current cable connection and completing the configuration.
- If there is no cable connection, you will be offered two options to choose from - “Wi-Fi” and “Wired LAN”. Continue setting up with the “Wi-Fi” item.
- Then decide on the type of connection to the router. You can search for a network and connect, then enter the key (password). Then select "Connect" through the scanner list." Enter the password by pressing the required characters on the keyboard. After entering, press "Enter".
- To avoid entering a password, use the second option “Connect.” using the WPS button." You need to select it only after activating WPS on the router.
The last step is that in “Settings”, submenu “Network”, select “Update Internet Content”.
This action will allow you to configure available services on the TV.
Connection options
There are two ways to set up Network on TV.
By wire
This is the simplest connection method, in which one end of the LAN cable is connected to the TV, and the other to the router.
The setup is carried out according to the algorithm described above, only in the connection selection item you need to specify “Wired”. Then the system will also ask you to enter your network name and password, if this is set in the settings.
Via Wi-Fi
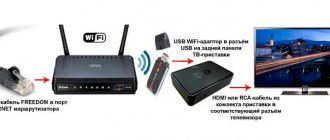
We are talking about a wireless connection method. If the TV is old and does not have a built-in module, then the connection is made through a special set-top box. It connects to your TV and connects wirelessly to your router. A USB input is used for this. Modern consoles have the appearance of a standard “flash drive”.
If the user has a modern TV, then most of them have built-in wireless modules. The connection is made directly.
Note! To view online channels normally, you need a connection speed exceeding 20 Mbit/sec.
The nuances of connecting via cable
The advantage is the stability of the Internet. Unlike Wi-Fi, data transfer will occur at maximum speed.
The only drawback of connecting to the network via a cable is the need to hide the wires so that they do not lie all over the apartment. It is ideal if the cable laying scheme and its camouflage to match the interior are thought out in advance.
An important point is the connection technology. The easiest way to connect to a network is when the Internet uses DCHP (dynamic IP) technology. In this case, any connected device via cable will automatically receive network data and the Internet will work immediately without additional intervention. If the IP address is static, then you will need to find out the IP data, mask, MAC address from the provider, and enter them in the network settings.
When the Internet uses PPOE technology, you will not be able to connect without using a router. You must first make the settings together with the router on your computer. Then run another cord from the router to the TV.
Most existing providers work on dynamic and static IP. Therefore, there should be no problems connecting.
Next, we will describe in detail how to enable Wi-Fi on TVs from LG, Samsung, Sony and equipment from other well-known manufacturers. Let's not forget about the wired connection.
Connecting an MTS router
Many operators offer connections and special equipment that they rent. These include one of the largest mobile operators - MTS.
The router or receiver that is provided is suitable for watching digital channels in high quality. If the TV has a CI+ connector and a built-in DVB-C receiver (as a rule, the vast majority of TVs starting in 2012 have this), then instead of an HD set-top box, the user can use a special cam module.
Reliable home network from a power outlet
If ethernet scare you with their tangles of wires, and you find wireless LAN too susceptible to interference, you can transfer data over the network. electric current in your apartment. True, there are not so many solutions of this type - PowerLine or HomePlug , and they are less resistant to interference, however, in the case of short distances this should not have an impact on data transmission.
The big advantage of the PowerLine is its simple installation. Convenient network modules, which in their shape and size are very similar to a mobile phone charger, must be placed in the power sockets. After this PowerLine are usually ready for use.
One of the PowerLine is connected by an ethernet to the Internet router, and then placed in the nearest outlet. The second modem is connected in the same way to the TV and outlet. This is enough to establish a connection to the TV through the home's power system.
The data transfer speed in PowerLine exceeds the data transfer speed in WLAN . Using the HomePlug AV standard, you can theoretically get transfers of up to 500 Mbps. Maximum performance when using the new HomePlug AV2 standard reaches 1 Gbps. However, in both cases, the actual data transfer speed depends on the quality and properties of the systems wires.
PowerLine networks are perceived as more secure than wireless WLANs , they do not achieve the same level of security as cable Ethernet . According to the manufacturers, the data flow is interrupted at the energy consumption meter.
Despite this, it is recommended to protect your PowerLine by setting a password. This turns out to be especially justified in apartment buildings. If the current is distributed correctly within the house, a neighbor will not be able to capture your data, because the electricity meter, placed at the end of the household electrical circuit, poses an insurmountable barrier to the flow of transmitted information. However, the average user cannot independently check the electricity distributions in his home.
Home Plug modems cope with several phases - provided that all three phases are carried out in parallel with all objects. In older buildings this is not so obvious. So, if the control LEDs indicating the readiness of the ethernet network do not light up, this should not mean a failure of the PowerLine .
In this situation, a solution to the problem may be an interphase connector, which is sold in electrical stores. Remember, however, that this type of device must be installed by a qualified mechanic.
Let's look at how to create a DLNA server based on the Windows 7, Windows 8, Windows 8.1 operating system without the intervention of any additional software.
First, let's briefly look at what DLNA is. This is a set of standards that allow DLNA-compatible devices (computers, laptops, tablets, smartphones, some media servers, even some models of photo and video cameras, TVs, game consoles, audio systems) to transmit and receive various media content. The connection can be either wired or wireless.
To connect devices, you will need to create a local network.
Let's go to the computer. We enter the “Start” menu. Select the “Control Panel” item.
Next, go to the “Network and Internet” section. In the next window, select the subsection “Homegroup”, “Select home group settings and data sharing”
Click on this line.
If anyone gets a warning window saying “This computer cannot join your HomeGroup,” you can click on the link marked in the red box in the image below. The link is called "What is Network Location?"
Click on this link. Let's go to the next window. Select the “Home Network” section.
If you did not receive the specified warning, then immediately click “Create a home group”. And click the “Next” button.
In both cases the following window will appear.
Here we need to select what we want to share. After making your selection, click the “Next” button.
A window will appear in which we will be asked to write down the password. Write it down or copy it somewhere.
Click the “Finish” button.
Let's go to another window. Here you can change your password to one that is convenient for us. This can be done using the “Change password...” link.
Click on the link. A window will appear. In it, pay attention to the warning: “When changing the password, make sure that there are no computers in the home group that are in sleep or hibernation mode. After changing your password, enter the new password on each computer in your homegroup."
Now click on the line “Change password”. In the window that appears, enter a new password instead of the old one. Click the “Next” button. A window will appear again asking us to write down the changed password. Click the “Finish” button.
This completes the first setup of the DLNA server. Devices can access information stored in Windows libraries.
Continue reading in our next publication.
Sometimes you want to watch a movie or play games on a large TV screen, since the monitor is relatively small and your eyes get tired of it quickly. Besides, you don’t want to wait until the film you’re interested in is shown on one of the leading channels. In this case, they resort to a procedure such as connecting the TV to the computer using a LAN cable. This allows you to even watch IPTV on your TV and not pay for cable or satellite TV. To do this, first of all, you need a TV that supports DLNA or Ethernet technologies. This material will discuss which cable to connect the router and TV with and how to connect the TV to a computer via a router via a lan cable.
Connecting a router to an old TV
If a user at home has a router with an Internet connection and an old TV with a “tulip” input, then he has the opportunity to watch digital television and use the Global Network using a special Smart TV set-top box. It connects directly to the TV, and then via a wire or via Wi-Fi to a router.
Important! Using a set-top box, the signal is converted and output to TV. These are provided by various operators on a rental basis or purchased by the user personally.
The need for Wi-Fi and what a TV can do
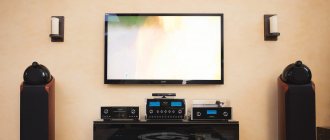
Television now provides a huge selection of channels, but simply switching them in search of something interesting quickly gets boring. Connecting to your TV via Wi-Fi will provide many benefits.
Currently, there are many options for using a Wi-Fi connection to a TV:
- Watch TV series and movies on streaming platforms such as Netflix, HBO, Filmin, Amazon Prime Video or Disney Plus. There are many services that have their own application, and you can watch them in full screen mode without depending on your tablet, mobile phone or computer.
- To watch YouTube videos directly in large format.
- Listen to music on Spotify or any other compatible service. You can take advantage of your existing soundbar or TV speakers without having to buy new devices.
- Read the news and check out social networks. You can open Facebook, Twitter.
- Duplicate the screen of your mobile phone to show something you need to a large number of people.
- Play games. There's nothing better than playing your favorite apps on a 40 or 50 inch screen.
If a user is looking to buy a new TV for their home, it is important to check whether Wi-Fi is included in the device's specifications.
First you need to know everything about the model. There is no point in buying outdated equipment.