We constantly receive questions regarding the settings of digital set-top boxes. This is how it turns out, but most of the errors come from Denn DDT model devices. Of course, these set-top boxes can show digital channels. However, their setup is somewhat different from the others, and because of this, users have a lot of questions.
Today we will try to give detailed instructions for installing and configuring these set-top boxes. We will also provide information on solving the most popular equipment errors.
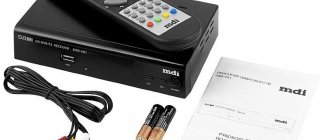
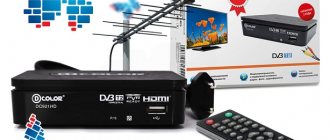
Currently, the price for denn ddt 111, 121, 131 set-top boxes varies around 1000 rubles. According to reviews, the device is quite reliable and performs its functions. Playback of digital channels on it occurs without delays or interference. For other points, the console contains:
It is worth noting that viewing and connecting to digital channels here is done via the available HDMI input. Therefore, it is advisable to make sure in advance that your TV is equipped with this connector.
Note that in practice, the operation of such an adapter is not always adequate for one or another TV. On most models the picture will be perfect, but some TVs do not convert the format correctly and display everything in black and white.
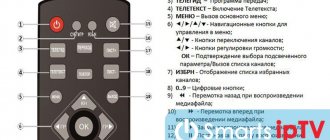
We figured out the correct connection. All that remains is to understand the principle by which the search for digital channels occurs. The menu of the Denn set-top box is somewhat different, so here we will show you everything in screenshots.
After you have turned on the set-top box, you will need to press the AV button on the TV. If it is not there, then you should switch to audio-video mode. If everything was done correctly earlier, the console menu should open. It will have several sections:
Then the “flash drive” itself will open, in which you should specify the update file.
This is how the Denn prefix is configured. According to reviews, it is quite reliable, however, as you probably noticed, it has a number of features, which we talked about today. If you have any other problems with the device, please contact us in the comments.
Modern television receivers are capable of broadcasting digital channels without connecting additional devices, but not all users have advanced TV models, so they are forced to use external equipment, the main element of which is a digital tuner.
The procedure for connecting it is not particularly complicated, but there are some nuances, about which information is given below.
What is the difference between digital television and analogue?
Almost the entire world already uses digital broadcasting (DV). Unfortunately, our country is still an outsider and the gradual transition from analogue to digital television began quite recently.
These two broadcast standards are fundamentally different from each other. A digital signal is a set of digital codes.
Thanks to this, the data reaches the user equipment without distortion, while the analog signal is subject to interference and is affected by the distance of stations. As a result, it can be stated that digital data transmission is ideal.
The set of codes is received by a special receiver, which decrypts them and broadcasts them to the TV. Such a unit is already built into modern TVs by the manufacturer, but in the case of outdated television receivers, it is necessary to connect additional equipment - a “receiver” or, as it is popularly called, a “set-top box”.
There is a large selection of devices on the market today, but the essence of the process of connecting them is the same for all models.
After connecting the set-top box, even to an outdated TV, the user will be able to enjoy the quality of digital television and watch their favorite shows and movies in high definition.
Content
Digital television is widely distributed in Russia. It is natural that people willingly take advantage of the opportunity to obtain a higher quality video image and audio signal. Digital TV allows you to watch many more channels than analogue. There is also an option to select the broadcast language or subtitles, this is useful when learning foreign languages.
All TVs released in 2013 already support the DVB-T2 standard. If your TV is an earlier year of manufacture, then you can solve the issue by purchasing a DVB-T2 digital set-top box. It is also called a receiver or TV tuner.
The DVB-T format is outdated and not suitable for digital broadcasting. This information must be taken into account.
Setting up the antenna via the receiver connection is easy. To do this you need:
- choose a suitable antenna;
- select a TV tuner with the desired set of options;
- make connections according to the connection diagram.
Required Equipment
To view DV you definitely need a receiver. First, it is recommended to study the instructions for the TV, since many TVs, for example, from and Philips, are already equipped with the necessary equipment.
This is indicated in the user manual and in this case there will be no need to incur additional financial expenses for the purchase of the set-top box.
If the TV is not equipped with such a unit, then based on the user’s personal needs, you need to buy a receiver with a suitable set of functions.
For example, if a TV owner prefers to use flash drives to watch movies recorded on them, then it is better to ensure that the set-top box has a USB connector.
The components included with the device include everything necessary to quickly put it into operation.
Typically this list includes the following:
- Instructions;
- “RCA” wire or as people used to call it: “Tulip” or “HDMI” cable;
- The tuner itself, that is, the set-top box;
- Cardboard box with a picture of the device and its brief characteristics;
- DU;
- Batteries for remote control;
- Power unit;
- Warranty documents.
Sometimes the list of components of individual budget models may lack a cable or other important element, without which it becomes impossible to connect the equipment.
In this case, you need to separately purchase the missing components and only then proceed to connect the device to the TV.
What antenna is needed for digital TV
It was easy to pick up analogue channels; any metal stick would do. Some craftsmen made them with their own hands. With digital broadcasting, things are not so simple. You will have to buy an antenna, but choosing one is easy. We need one that perceives signals in the decimeter range (UHF) 300-850 MHz.
Antennas can be indoor or outdoor. For residents of large residential complexes, it makes sense to chip in with their neighbors and install one antenna per house. In private houses within the city, you can use an indoor antenna, but only with direct visibility of the TV tower.
When the landscape interferes with signal reception, even in the city, it is better to choose an external antenna. For residents of houses located in the suburbs, areas remote from towers, an outdoor antenna is also suitable.
An important parameter is gain, which is measured in decibels (dB). The higher it is, the better the image quality. The main thing is not to overdo it, because everything is good in moderation. The measure in this case is a parameter of no more than 30 dB. This is quite enough to get a high-quality picture.
The antenna requires an antenna coaxial cable with a characteristic impedance of 75 Ohms, with plugs at the ends. One plug is inserted into the antenna, the other into the receiver. This cable comes in different lengths, so measure in advance the distance from the TV with the set-top box to the antenna installation site, taking into account all bends. The higher the antenna, the better the signal, but then more cable will be required.
Connecting and setting up the set-top box
In order to protect yourself and not damage expensive digital equipment, connecting all devices with wires must be done in a state disconnected from electricity.
For connection, it is recommended to use more modern interfaces, if available.
For example, if “HDMI” is present, then give preference to the connection through this particular connector. This will have a positive effect on the quality of signal reproduction.
If there is no digital input, you will have to use an analog interface, but it is better to give preference to RCA (tulip).
Connecting an antenna to a digital receiver
- Turn off the TV from the network (pull out the plug from the socket).
- We connect the cable: coming from the antenna (connect to the ANT IN or RF IN jack on the receiver), an RCA cable, or an HDMI cable, depending on what you chose and which cable is available (one end to the set-top box, the other to the TV) .
- We turn on the TV to the network (plug into socket). Press the ON button on the TV or its remote control. Select the signal source AV, HDMI, others depending on what you connected. The receiver menu window should appear. On the remote control this button may be called SOURCE, TV/VIDEO, INPUT.
photo RTRS
- We take the remote control from the console. Press the button.
- Select the menu items “SEARCH” - “Manual search”. Don't forget to set the UHF band. Next you will see scales of signal strength and quality.
- We ask someone to help and watch the scales change while you turn the antenna in different directions. All actions should be performed slowly, the reaction to the signal occurs with a delay. Having chosen the best position, we attach the antenna seriously and for a long time.
- Let's go to the menu again. Select “SEARCH” - “Auto search”. The channels will be installed automatically.
- To connect analogue and digital television at the same time, you simply need another antenna cable. They need to connect the ANT OUT or RF OUT jacks on the receiver to the ANT IN or RF IN jacks on the TV. Using the TV remote control, select the TV signal source and you can scroll through analog channels.
Source
AV/TV mode
To set up in this mode, you need to enter “AV/TV” using the TV remote control.
After this, the settings will be displayed on the screen, where the following columns are present:
You need to specify the column corresponding to the physical connection of the devices, for example, if the set-top box is connected to the TV via a tulip, then click “AV”.
Specify “HDMI when connecting with an HDMI cable.” When using a “comb” - SCARD.
Some TVs, after entering the “AV” menu, automatically switch to “AV1”, ..., “AV5”, etc.
In this case, you need to experimentally find the menu by simply searching through them and make the settings.
Setting up the antenna and DVB-T2 digital set-top box
The first step is to determine the location of the nearest tower. To do this, use online services. The nearest broadcast point for TSETV (digital terrestrial television) can be found on the RTRS website.
Using the DTV coverage map, you can also see the TVC (transmission frequency of your channel package), the status will be indicated next to it (broadcasting, waiting).
After this, decide on the location and method of mounting the antenna. Outdoor antennas must be pointed clearly at the signal source to improve transmission quality. When you have found the best location, secure the antenna with the ability to move it slightly for more precise tuning in the future. In apartments, you can attach the antenna to a balcony, window frame, the nearest wall or on the roof (if it is the top floor). In a country house you will need a mast (a pipe with a diameter of 4-5 cm) and a bracket for fastening. Next, we run the cable through the house to a digital set-top box; it looks aesthetically pleasing if you hide it in a cable channel.
Types of connections
Depending on what connectors the TV and set-top box are equipped with, the connection methods also differ.
The receiver can be connected to the TV via:
- “Tulip” - RCA wires;
- "HDMI";
- Coaxial cord (antenna).
RCA cable
This is the most common and widely used method of connecting a set-top box to a TV.
Although the video broadcast resolution is not as high as with the “HDMI” option, the difference is practically not noticeable to the naked human eye on a TV with small screens.
Due to the fact that each connector and plug of the Tulip connection is painted in a bright individual color, it is very difficult to make a mistake during the connection procedure.
The meanings of the color designations are as follows:
- Yellow for video signal;
- Red for audio output;
- White for audio input.
The user is only required to insert a plug of a certain color into a connector of exactly the same color. Then install the cable coming from the antenna into the “RF IN” connector.
If the TV does not have color “RCA” connectors, then the use of “Combs” is allowed.
It is labeled “SCART” on the back of the TV. You will need to use a cable with the appropriate plugs, as shown in the figure below.
HDMI connector
If the equipment has this type of connectors, then the quality of the image and sound will be significantly higher. In this case, you will need to make a connection via an HDMI cable.
It allows you to provide video resolutions reaching 1080p, and audio quality - 192 kHz.
Antenna cable
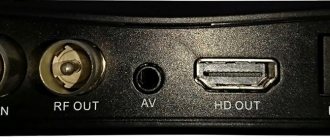
When the TV does not have more modern interfaces other than the antenna input, the set-top box can be connected to the TV via the “RF-OUT” connector.
For this purpose, it is necessary to use a special cord, as shown in the photo below. Unfortunately, this connection method will lag far behind in broadcast quality, but consumer requirements for an outdated or old TV are initially low.
Connecting the Denn DDT set-top box
Currently, the price for denn ddt 111, 121, 131 set-top boxes varies around 1000 rubles. According to reviews, the device is quite reliable and performs its functions. Playback of digital channels on it occurs without delays or interference. For other points, the console contains:
- Possibility to work with 2 multiplexes DVB-T and DVB-T2.
- Play additional audio and video formats via USB.
- Additional “Mini Jack” connector for connecting speakers.
It is worth noting that viewing and connecting to digital channels here is done via the available HDMI input. Therefore, it is advisable to make sure in advance that your TV is equipped with this connector.
Otherwise, you can purchase an adapter for RSA cables (tulips). It costs around 200 rubles.
Note that in practice, the operation of such an adapter is not always adequate for one or another TV. On most models the picture will be perfect, but some TVs do not convert the format correctly and display everything in black and white.
The general connection diagram will be standard and no different from any other
Setting up channels
Having completed the equipment connection procedure, you can turn it on and begin configuration.
If the user has a package of paid services from the provider, the number of channels will depend on contractual obligations, but even the number of free programs reaches two dozen.
A provider, for example, Rostelecom, provides a special card that is inserted into a module that decrypts encrypted signals.
To configure channels, you need to press the key on the remote control labeled “Input”, “AV/TV”, “Source”, etc. Next, specify the connection method. In the menu that appears, click “Autosearch”. Wait for the process to complete and save the detected list of channels.
If desired, programs can be grouped and arranged in a user-friendly sequence. They are now available to view.
Setting up the AV receiver
The setup process is simple. It can be presented step by step in the form of the following stages of action:
- Turn on TV and receiver;
- Activate AV mode on the TV;
- Enter the receiver menu;
- Launch “Autosearch”;
- Wait for the process to complete;
- Save the list of detected channels;
- Ready. You can start watching.
To Soviet TVs
You need to do the following:
- Carefully remove the insulating layer from a wire one and a half centimeters long, as shown in the picture below (position 1);
- Next, bend the shielding braid (position 2);
- Cut off the protective layer of the central wire one centimeter long (position 4);
- Install the connector by rotating to the right (position 5);
- As a result, a bare wire two millimeters long should appear (position 6).
Use a prepared coaxial cable to connect the TV and set-top box.
This method will make any vintage TV smarter, for example, the Ruby CRT or even the Horizon tube.
How to connect two or more TVs to a set-top box?
Using the antenna jack, you can connect several “blue screens” to one receiver at once. For these purposes, special splitters are commercially available.
The only drawback of the method is that all connected TVs will function synchronously, that is, they simultaneously broadcast the same channel (after all, there is only one set-top box).
There is an option to connect, for example, two TVs to one receiver, using unused interfaces, for example, connect one TV via RCA, and the second using HDMI.
If there are no free connectors left, then you can buy an “RF modulator”.
This compact device is capable of providing each connected TV with a separate decoded signal. The main disadvantage of the device is its high price, which is sometimes higher than the cost of the set-top box.
How to set up the denn stb 101 set-top box
We constantly receive questions regarding the settings of digital set-top boxes.
This is how it turns out, but most of the errors come from Denn DDT model devices. Of course, these set-top boxes can show digital channels. However, their setup is somewhat different from the others, and because of this, users have a lot of questions. Today we will try to give detailed instructions for installing and configuring these set-top boxes. We will also provide information on solving the most popular equipment errors.
Currently, the price for denn ddt 111, 121, 131 set-top boxes varies around 1000 rubles. According to reviews, the device is quite reliable and performs its functions. Playback of digital channels on it occurs without delays or interference. For other points, the console contains:
It is worth noting that viewing and connecting to digital channels here is done via the available HDMI input. Therefore, it is advisable to make sure in advance that your TV is equipped with this connector.
Note that in practice, the operation of such an adapter is not always adequate for one or another TV. On most models the picture will be perfect, but some TVs do not convert the format correctly and display everything in black and white.
We figured out the correct connection. All that remains is to understand the principle by which the search for digital channels occurs. The menu of the Denn set-top box is somewhat different, so here we will show you everything in screenshots.
After you have turned on the set-top box, you will need to press the AV button on the TV. If it is not there, then you should switch to audio-video mode. If everything was done correctly earlier, the console menu should open. It will have several sections:
Then the “flash drive” itself will open, in which you should specify the update file.
This is how the Denn prefix is configured. According to reviews, it is quite reliable, however, as you probably noticed, it has a number of features, which we talked about today. If you have any other problems with the device, please contact us in the comments.
Modern television receivers are capable of broadcasting digital channels without connecting additional devices, but not all users have advanced TV models, so they are forced to use external equipment, the main element of which is a digital tuner.
The procedure for connecting it is not particularly complicated, but there are some nuances, about which information is given below.
Solving the main difficulties
The most common problem that users encounter at home is when the TV cannot recognize the set-top box.
It is recommended to check the following:
- The performance of the receiver by testing its serviceability and functionality on another TV or by contacting a specialist;
- The correctness of all cable connections, as well as the absence of cable defects (they should not have abrasions, cuts, kinks or compressed areas);
- In the TV menu, correctly indicate the signal source.
Sometimes, after a certain period of operation, access to some channels disappears, and interference may also occur during broadcasting.
Such problems are caused by lost settings. It is recommended to update the equipment software and then use the “Auto Search” function or search and configure channels manually.
If this does not help, then it is likely that repair work is being carried out by your telecom service provider, which can be clarified by calling your provider's support line.
Source
Review of DVB-T2 receiver DENN DDT101
In the previous review, we looked at two older DENN models DDT103 and DDT105 with a learning remote control.
Well, in this review we’ll look at the youngest model – DENN DDT101.
As with previous models, the design of the box is made in light colors:
and also with a stylized round stamp - 2 year warranty.
On the reverse side are the technical specifications:
And as you can see, they are completely identical to those of the DDT103.
On the side, icons show the main functionality, for example, the presence of Parental Control - control parental:
The QR code also contains a link to the website www.denn-rus.ru:
On the other hand, detailed information about the Importer and Manufacturer is provided with contact information:
The kit consists of the set-top box itself in a small plastic case, a power supply, a remote control, AAA batteries, audio-video cords and an instruction manual:
On the front glossy panel there is a USB connector, in the middle there is a photodetector and a red-green operation indicator: The lid has slots on the sides for ventilation: The sides are also perforated:
And the bottom also consists almost entirely of cracks. As you can see, there are holes for mounting on the wall, and the holes allow mounting in any vertical position (the distance between adjacent holes is 40 mm):
The two legs have rubber spots that prevent them from sliding on a smooth surface, and underneath them there are also screws that fasten both halves of the case.
Measured dimensions - 114 x 92 x 28 mm.
At the back there is a minimum set of connectors required to connect to an old CRT TV or to modern flat-panel LCDs:
ANT-IN - antenna input and outputs for ordinary “tulips”: white AUDIO L - left audio channel, red AUDIO R - right channel, yellow VIDEO OUT - video and, of course, HDMI OUT.
DC IN 5V 2A - input for the power supply.
The power supply is the same as that of older models: +5V at 2A, wire length 1.2 m, standard plug 5.5 x 2.1:
Let me remind you that the self-tapping screw is located under the double square icon.
Unlike older models, this one uses a regular remote control, and a very small one:
Size 119 x 39 mm.
For a visual comparison of how it looks in the palm of your hand:
The buttons themselves are made of fairly dense, non-soft rubber, so everything feels good tactilely.
The colored buttons here are also not labeled, but like the older models, it turned out that they have the same purpose by default:
red - quick transition to the menu for viewing PVR recordings (video recorder)
green - Permission (usually signed V-FORMAT)
yellow - Image format (ASPECT)
blue - Scheduler schedule
Given the size of the remote control, it would be quite natural if it could ever accidentally get lost. But in this case, you can use a universal remote control, for example, Huayu DVB-T2+2: enter the combination POWER + SUB-T, thus obtaining a replacement for the lost one.
Looking inside, we will see a board with the technological inscription ABL7T01T2_R836_DC1108LX.A1, one-quarter smaller in size than the older models:
and on the reverse side:
Technical details: UHF on BFG540W/XR, Rafael Micro R836 tuner, MStar MSD7T01 combined processor, 25Q32CSIG flash memory (4MB), 24 MHz quartz, two S10BLE DC-DC converters, AMS1117 T18 linear stabilizer. Radiator 14 x 14 x 10 mm.
Those. As you can see, the composition is completely identical to the older models, and in fact the DDT101 is a copy of the DDT103, only with a regular remote control.
Electrolytic capacitors: one 470x10 and two 220x10, which, like the older comrades, favors possible simple repairs after the end of the 2-year warranty.
Having connected the set-top box to the TV, we find ourselves in a completely similar menu. More details can be found in the previous review.
I note that with any set-top boxes it is better to configure the antenna in the Manual search mode by selecting the frequency channel of your tower:
and looking at the % of the Quality scale, slowly rotate the antenna, achieving the maximum.
Subsequently, if necessary, you can control the Quality scale by pressing the button twice:
Like previous models, the latest version of the software is already installed here:
If new firmware versions appear, detailed step-by-step instructions are posted on the manufacturer's website: Updating the firmware of DENN TV tuners
And I repeat that you should not flash the set-top box using firmware from DDT105 or any other manufacturers in general, trying to get support for the licensed AC-3 (Dolby Digital) codec.
Support is determined by the modification of a specific processor batch - for a specific model.
The same processor (in this case MStar MSD7T01) may or may not have an AC-3 license, depending on the order of a batch of processors for a specific set-top box model.
Therefore, if you plan to often use the set-top box as a media player, then it is better to immediately consider purchasing the older model - DDT105.
Because the set-top boxes are identical, the speed of switching TV channels can also be estimated from the previous video.
As already mentioned, any set-top box can be connected to an old VGA monitor using an HDMI > VGA converter, thus turning it into a DVB-T2 TV:
The details and nuances of such a connection are described at the end of the previous review.
And in conclusion, I would like to remind you once again that the signal is received not by the set-top box, but by the antenna.
The stability of reception depends on the correct choice of antenna and its location.
Positive: thanks to a modern combined processor, there are a minimum of parts on the board, the case has holes for wall mounting, two support legs are rubber-coated, external power supply, 2 years warranty.
Negative: Small print in the Owner's Manual, small remote control.
Overall, a good modern set-top box for receiving digital television, for example, in the country.
Source
Searching for channels on the Denn set-top box
We figured out the correct connection. All that remains is to understand the principle by which the search for digital channels occurs. The menu of the Denn set-top box is somewhat different, so here we will show you everything in screenshots.
After you have turned on the set-top box, you will need to press the AV button on the TV. If it is not there, then you should switch to audio-video mode. If everything was done correctly earlier, the console menu should open. It will have several sections:
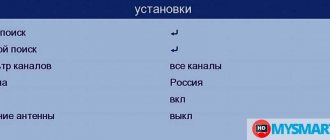
- Settings
- Auto search.
- Manual mode.
- Filter.
- A country.
- LCN.
- Antenna power on/off.
We need a settings menu. To configure the channels of both multiplexes, you must do the following:
- If you do not care about the order of channels or do not have the proper experience in searching for them, then you can entrust this process to the set-top box itself and click “Auto search”. The device will independently go through all frequency zones and find those TV channels that have a strong signal strength. The channel list will be saved automatically.
- If the order is important, you can use a manual search. To do this, you need to go through a number of steps yourself.
- Find out the best reception frequency in your region using the CETV map.
- Specify the channel number when setting up manual search.
- Wait a few seconds and make sure that this channel gives the strongest signal.
- Click OK and wait until the set-top box finds the packages you are interested in.
Important! When entering the installation menu, turn on the antenna power switch. This way you use a signal amplifier when searching
Possible problems
No one is immune from them, and depending on a number of factors, such as the TV model, some problems may arise, which we will try to solve below.
- The picture of digital channels is very distorted / They do not show.
- You need to check the digital reception in your region.
- Reset the set-top box to factory settings. To do this, go to the “General Settings” section and select “Factory Settings”. Enter the password “0000”. After this, perform an auto-search for channels.
- If you have an indoor antenna, you should replace it with an outdoor one with a good signal amplifier.
First, check all connectors and the power cord for wear. If everything is fine, then try updating the device. This is done using a USB flash drive. The set-top box supports flash drives no larger than 8GB.
This is how the Denn prefix is configured. According to reviews, it is quite reliable, however, as you probably noticed, it has a number of features, which we talked about today. If you have any other problems with the device, please contact us in the comments.
Modern television receivers are capable of broadcasting digital channels without connecting additional devices, but not all users have advanced TV models, so they are forced to use external equipment, the main element of which is a digital tuner.
The procedure for connecting it is not particularly complicated, but there are some nuances, about which information is given below.
How to connect a Denn set-top box to a TV to receive digital television
The TV broadcast connection is the same, regardless of the set-top box model (ddt 111, ddt 121, ddt 131, ddt 160). It consists of several stages:
- connecting to a TV and connecting a cable;
- search for TV channels, save detected broadcasts;
- additional settings and selection of display parameters.
Connecting the device
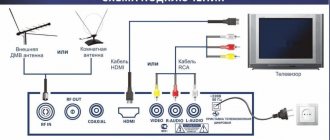
To connect a dvb-t2 set-top box, you just need to connect the antenna cable, power cord and cable for connecting to the TV to the device. When connecting an antenna cable, you should focus on the shape of the connector and plug, and when connecting a TV cable, on the color of the connectors, which indicate the correct location of the wires.
Initial settings
After turning on the receiver, the viewer has to choose:
- broadcast country;
- menu language;
- channel sorting mode (according to the decision of the broadcaster or the choice of the receiver owner).
Adjustment occurs using the remote control and switching arrows. This setting is necessary when you turn on the equipment for the first time or after resetting the settings to the basic level.
Basic Operations
Having set the starting operating parameters, the viewer is taken to the main menu, which consists of several items:
- settings - used to search for digital TV channels;
- channel manager for creating lists and distributing broadcasts;
- personal settings that allow you to connect subtitles, change the language and set up TV broadcasts;
- operating parameters;
- video;
- multimedia capabilities.
Why IPTV Player does not show on computer and TV: reasons, what to do?
Program Manager
The channel manager allows:
- renaming TV channels according to the user's choice;
- creating lists and categories;
- blocking unnecessary broadcasts;
- air sorting.
To understand broadcast control, just follow the instructions on the TV screen.
Image Settings
To configure video, you need to open the AV section. It contains several points:
- digital sound (PCM);
- screen format;
- screen resolution;
- television format;
- adjusting the sound when using additional speakers.
The TV format requires special mention. This is what owners of old TVs need to change.
Search channels
Viewers don't have to worry about how to set up their Denn digital set-top box, as all they need to do to find channels is run an automatic scan. Fans of manual search need to know the reception frequency in advance. Different regions of the country use their own frequencies, so the necessary numbers will have to be clarified before scanning.
Setting the time
To set the correct time, you need to go to the “settings” section and select the appropriate item. After that, all that remains is to set the exact date and time and save the changes made. Other system parameters of the set-top box are also located here, including software updates and factory resets.
If you have any questions or complaints, please let us know
Ask a Question
Setting options
A review of the digital terrestrial receiver would not be complete without mentioning that in the section with personal user parameters, viewers are able to:
- enable subtitles;
- activate the audio sequence.
But it is important to remember that the function will work if the TV program supports it. The set-top box cannot independently create audio and translate text.
System Settings
System settings have already been discussed above. Users are allowed:
- install software updates;
- perform a factory reset;
- set parental controls;
- select the time for the tuner to automatically turn off.
The full list is wider and contains additional functions for convenient control of equipment.
Connecting the Denn DDT set-top box
Currently, the price for denn ddt 111, 121, 131 set-top boxes varies around 1000 rubles. According to reviews, the device is quite reliable and performs its functions. Playback of digital channels on it occurs without delays or interference. For other points, the console contains:
- Possibility to work with 2 multiplexes DVB-T and DVB-T2.
- Play additional audio and video formats via USB.
- Additional “Mini Jack” connector for connecting speakers.
It is worth noting that viewing and connecting to digital channels here is done via the available HDMI input. Therefore, it is advisable to make sure in advance that your TV is equipped with this connector.
Otherwise, you can purchase an adapter for RSA cables (tulips). It costs around 200 rubles.
Note that in practice, the operation of such an adapter is not always adequate for one or another TV. On most models the picture will be perfect, but some TVs do not convert the format correctly and display everything in black and white.
The general connection diagram will be standard and no different from any other
Cons Denn DPE831B: #
- Small corners of the screen, made on the basis of a low-resolution TN matrix.
We also recommend reading
- News Denn DPE831B: video review of the gaming player
- Video:
- 02:08MultimediaDenn DPE831B: gaming media player review
20431
Reviews
6 Leave a review
- furry 07/08/2019 at 10:48
Please tell me where to download pre-installed games? I erased it by accident..Answer
- Leila 03/06/2016 at 19:27
Hello, I'm looking for a charger for this set-top box, can you tell me where I can buy it? Thanks:Answer
- Rud17 02/11/2013 at 18:10
Please tell me where to download pre-installed games? I erased it by accident...Answer
- dead? 02/03/2013 at 12:51
I bought a Chinese miracle Denn dpe831, week 4 it worked fine, I decided to look for firmware for it since there were many shortcomings in the set-top box itself, well, I couldn’t find anything on Denn except for links to stores. I rummaged around on the Chinese JXD forum, there were a bunch of consoles similar to DENN DPE 831. And since it is Chinese, I assume that its native manufacturer jxd rummaged through the firmware for the stats of my console. I found a similar one, found a program for firmware, after flashing the firmware the screen stopped turning on, the light was on, and the screen was dead. And the PC stopped seeing the console. only after holding down X and connecting to the PC, but it’s not like a removable drive, I can only flash it. Help me figure it out or is there standard firmware for it?Answer
Denzee03/12/2013 at 14:28
This prefix is most likely Yinlips ydpg86 and has nothing to do with JXD. If everything works, it’s better not to install the wrong firmware at all, 99% will be unsuccessful.
Answer
Total reviews 6 Leave a review
The process of connecting a digital set-top box to a new TV step by step
Important! All manipulations must be done with the equipment turned off. If you connect working equipment, there is a high probability of its failure.
Let us describe the order of our actions:
- You need to select the interface for connecting the set-top box to the TV. It can be analog (tulips, D-SUB, SCART) or digital (HDMI, DVI). The choice is made depending on the specific TV model. Despite the fact that many FULL HD television receivers have an analog input, it is better to feed them “digital”, since double conversion of the signal will negatively affect the quality of the “picture”.
This interface allows you to transmit video and audio, so the connection can be made with one cable.
If the TV does not have a digital input, it can be connected using any analog interface; the easiest way to do this is using tulips. In the case where the device only has a bulky SCART connector, you can purchase a tulip adapter for it. In this way you can connect almost any model, except for very ancient ones.
- We check the availability of the cable necessary for connection; it may come with the receiver or television set. If you cannot find one, you will need to purchase it.
- We remove the protective film from the set-top box (if any), install it in the chosen place and connect it to the TV. The cables are made in such a way that it is physically impossible to insert them into a connector not intended for this purpose. The exception is tulips, they can be mixed up. But to prevent this, manufacturers make nests for them in the appropriate color.
As you can see, the colors of the connectors match the colors of the sockets (4 in Fig. 3).
- Connect power to the console. If the network adapter is built-in, simply plug the plug into the socket; pre-connect the remote power supply to the corresponding socket of the receiver.
- We connect the provider’s cable, a decimeter antenna or a satellite dish to the antenna input (2 Fig. 3).
- We insert the batteries into the remote control, turn on the set-top box and the TV.
This completes the connection procedure, and you can begin setting up channels. If your TV does not have the interfaces listed above, do not worry, we will tell you how to get out of this situation.
Searching for channels on the Denn set-top box
We figured out the correct connection. All that remains is to understand the principle by which the search for digital channels occurs. The menu of the Denn set-top box is somewhat different, so here we will show you everything in screenshots.
After you have turned on the set-top box, you will need to press the AV button on the TV. If it is not there, then you should switch to audio-video mode. If everything was done correctly earlier, the console menu should open. It will have several sections:
- Settings
- Auto search.
- Manual mode.
- Filter.
- A country.
- LCN.
- Antenna power on/off.
- Channel
- Manager.
- List.
- Personal settings
- Menu.
- Subtitles.
- Audio tracks.
- General settings
- Output settings.
- Media center
- If you do not care about the order of channels or do not have the proper experience in searching for them, then you can entrust this process to the set-top box itself and click “Auto search”. The device will independently go through all frequency zones and find those TV channels that have a strong signal strength. The channel list will be saved automatically.
- If the order is important, you can use a manual search. To do this, you need to go through a number of steps yourself.
- Find out the best reception frequency in your region using the CETV map.
- Specify the channel number when setting up manual search.
- Wait a few seconds and make sure that this channel gives the strongest signal.
- Click OK and wait until the set-top box finds the packages you are interested in.
- The picture of digital channels is very distorted / They do not show.
- You need to check the digital reception in your region.
- Reset the set-top box to factory settings. To do this, go to the “General Settings” section and select “Factory Settings”. Enter the password “0000”. After this, perform an auto-search for channels.
- If you have an indoor antenna, you should replace it with an outdoor one with a good signal amplifier.
- No image/black and white screen.
- Check the connection plug. If these are RSA (tulips), then they need to be connected according to the corresponding colors.
- In the case of a black-and-white image, there is a “TV Format” setting in the audio-video output settings menu. In it, you should sequentially select different display modes and, after saving, look to see if the image has changed.
- The set-top box automatically reboots and turns off . First, check all connectors and the power cord for wear. If everything is fine, then try updating the device. This is done using a USB flash drive. The set-top box supports flash drives no larger than 8GB.
- The latest version of the software for your set-top box model should be stored on the drive. After this, you need to go to the settings menu and select “Update via USB”.
- Then the “flash drive” itself will open, in which you should specify the update file.
We need a settings menu. To configure the channels of both multiplexes, you must do the following:
Important! When entering the installation menu, turn on the antenna power switch. This way you use a signal amplifier when searching
Possible problems
No one is immune from them, and depending on a number of factors, such as the TV model, some problems may arise, which we will try to solve below.
This is how the Denn prefix is configured. According to reviews, it is quite reliable, however, as you probably noticed, it has a number of features, which we talked about today. If you have any other problems with the device, please contact us in the comments.
We constantly receive questions regarding the settings of digital set-top boxes. This is how it turns out, but most of the errors come from Denn DDT model devices. Of course, these set-top boxes can show digital channels. However, their setup is somewhat different from the others, and because of this, users have a lot of questions.
Today we will try to give detailed instructions for installing and configuring these set-top boxes. We will also provide information on solving the most popular equipment errors.
Possible problems and their solutions
Given the ease of control of the receiver, configuration difficulties are practically eliminated. But sometimes it turns out to be impossible to avoid troubles, such as a black screen. In such cases, it is necessary to understand the reasons for what happened and correct the situation. A service call is usually not required.
Denn box does not find channels
If the set-top box does not search for channels, you should:
- check the correctness and reliability of the cable fastening;
- correct antenna position;
- cable integrity.
When manually searching for TV channels, you need to make sure that the frequencies entered are correct.
Also, sometimes difficulties arise due to errors in the basic settings, for example, an incorrectly specified country.
Does not respond to the remote control or the button does not work
In case of difficulties with the remote control, you should:
- change batteries;
- make sure that there are no obstacles between the receiver and the remote control, and that the receiver itself is not blocked.
Typically, it is these problems that interfere with switching programs and controlling the set-top box.
Which digital TV receiver is better?
The choice is large, but to solve the problem of connecting digital TV, only one fact is important, the DVB-T2 standard. Otherwise, receivers differ in connection methods (RCA, HDMI, SCART, etc.), as well as additional options.
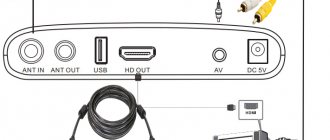
- ANT IN or RF IN - antenna input to connect a coaxial cable from the antenna to the tuner. You either already have this cable in your apartment, if the apartment building is connected to a common antenna, or you need to buy it separately. The length should be sufficient to reach the location of your external antenna.
- RCA - three sockets: red, white, yellow - for connecting the “tulips” cable connecting the set-top box to the TV. This cable is included with the device in most models. It’s better to make sure of this in advance so you don’t have to buy more later.
- HDMI is an elongated connector for a special cable that provides increased clarity of signal transmission. An HDMI cable must be purchased separately if you want to get a better image on the screen. It is important that your TV in this case must also have this connector. Old TV models before 2014 do not have it.
The receiver may have a USB connector, which is convenient for playing audio and video files from a flash drive, external hard drive, or smartphone. To watch video from external devices with sound, you still need Dolby Digital support.
Additional options: Wi-Fi, watching movies from the Internet, child control, recording to external media, HDTV, are optional, but depending on your tasks they may be useful.
The complete set of the set-top box also includes a power supply, remote control, and instructions. The power supply can be external or built-in. The external one can be replaced in case of breakdown. Built-in is less practical in this vein.
A small thing, but important! Now you will switch channels using the remote control of the set-top box, and not the remote control of the TV. This means it must be comfortable. Pay attention to this.