How to set up a JVC TV
JVC TV manual
JVC TV manual, JVC TV model LT-32M340 has the following control keys and connectors on the TV body:
On the front panel of the JVC LT-32M340 TV there are:
1) IR sensor of remote control system
2) Operating/standby indicator
3) Power switch (bottom) to turn off the power supply to the TV.
On the back of the JVC TV are:
4) Key to turn on the TV and switch to standby mode.
5) Vol key - decreases the volume level. In Menu mode, used to go to the previous item.
6) Vol + key - increase the volume level. In Menu mode, used to move to the next item.
7) CH key - - goes to the previous channel. In Menu mode, used to move down.
CH + key - goes to the next channel. In Menu mode, used to move up.
Beeline
Early models of remote control devices from this company had many shortcomings, since they could only be connected if the user had a special set-top box. Also, the remote control did not have a “SETUP” button. However, Beeline corrected itself and released an improved version of remote control equipment. The PU has decreased in size, but has acquired a larger number of functional buttons.
To pair the Beeline remote control with the signal receiver, you will need to follow the following step-by-step instructions:
- Turn on TV.
- Press the “C” and “SETUP” buttons.
- We are waiting for the initialization to complete.
- When the indicator blinks twice, the buttons can be released.
- You can check the functionality of the device using the “VOL” button.
Each of the remote controls has its own configuration algorithm, which should be described in detail in the operating instructions included in the kit.
Answers to questions on JVC TV
JVC TV does not respond to buttons
The JVC LT-32M545W TV turns on in the lower right corner with the word Android and ripples on the screen, the remote control does not respond and the buttons on the TV do not respond either, what should I do? 9.09.2018, Kemerovo.
If the LT-32M545W TV freezes, you need to unplug it from the electrical outlet, wait 1 minute and turn it on again. There is a possibility that the device will reboot and recover. If after rebooting it still does not respond to either the remote control or the buttons located on the TV body, you should contact a service center.
I need help setting up channels for my JVC TV.
I ask for help in setting up channels for a JVC TV, SUPRA set-top box, CAYMAN antenna. After a long vacation, I turned it on: the TV only works with one channel RUSSIA1. I didn’t experiment with the buttons because... I'm afraid of losing this channel too.
It worked. I restarted the SUPRA set-top box, everything worked, but there is a “video1” icon at the top right, which cannot be removed, and there is a hum on all channels of the TV, although it shows purely without interference (moving the antenna from side to side does not help: the hum does not disappear). 07/23/2018. Khabarovsk.
It is necessary to reconfigure the Supra console in auto search mode. The JVC TV must be in AV input playback mode.
The hum on all channels may be from an incorrectly set sound system in the TV settings, or from the fact that the sound cable is not connected to the TV correctly.
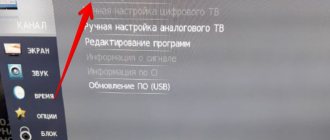
I. Press the button on the remote control twice.
II. In the submenu that appears, select SET-UP, for which you need to press button 5 on the remote control.
III. In the next submenu, select CH PRESET by pressing button 1.
IV. Next, use buttons 1 or 2 (+,-) to start searching for a station. When the image and sound appear, to save the setting in the TV memory, press button 5 (MEMORY). If it is necessary to fine-tune the channel, use buttons 3 or 4 (FINE +,-). To exit the setup mode, press button 7 (END).
With the transition to digital television, many people have problems setting up digital channels on their TV. Many TVs do not support the DVB-T2 digital broadcast format, then you will have to purchase a DVB-T2 digital set-top box, since analogue television will soon be turned off.
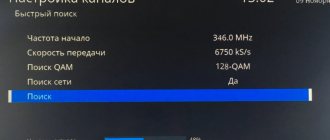
Setting up channels.
In order to independently set up digital television on your JVC TV, connect the television cable coming from the antenna to the TV socket.
- Take the remote control and press the MENU button.
- Use the right button to go to the Channel section.
- Next you need to select the Tuner Type Cable or Antenna.
- To configure DVB-T2 digital terrestrial television, select Antenna. If you are connected to a cable operator and want to set up DVB-C cable television, select Cable.
- Click on Autosearch.
- Now you need to select the broadcast country Russia.
- You need to select the search type when you want to install cable channels, it is better to choose Full.
- Click on Start and wait for the setup to complete.
Content:
Before you can enjoy watching your favorite movies or TV shows, you need to configure the channels on your device. Setting up a TV is a rather complex and responsible procedure, which, firstly, includes searching for channels, and secondly, it will allow you to remove unnecessary things and rank the list by frequency of views.
This procedure is especially relevant in our time, when the list of channels is regularly updated, which leads to failure of all previously specified settings. When working with cable and satellite television, the task of setting up a TV becomes more complicated.
Setting up channels.
In order to independently set up digital television on your JVC TV, connect the television cable coming from the antenna to the TV socket.
- Take the remote control and press the MENU button.
- Use the right button to go to the Channel section.
- Next you need to select the Tuner Type Cable or Antenna.
- To configure DVB-T2 digital terrestrial television, select Antenna. If you are connected to a cable operator and want to set up DVB-C cable television, select Cable.
- Click on Autosearch.
- Now you need to select the broadcast country Russia.
- You need to select the search type when you want to install cable channels, it is better to choose Full.
- Click on Start and wait for the setup to complete.
How to set up digital channels on your TV. Complete Guide!
The advent of digital TV caused great excitement as a wide range of users gained access to high-quality materials. Currently, this area is developing rapidly, and many organizations have appeared that are ready to set up digital TV for a fee. However, you can do this yourself by carefully studying the instructions.
This article will discuss in detail the issue of setting up digital channels on TVs from the most popular manufacturers. It should also be noted that the proposed instructions apply to cable television.
Samsung setting up digital channels
Before tuning digital channels on your TV, set in the menu:
- “Slovakia, Slovenia or others”;
- “Auto search for digital and analogue channels”;
- "Cable";
- "Net".
General scheme
To get started, go to the menu and select:
- “Channel” (satellite dish icon).
- "Cable".
- "Auto-tuning".
- "Digital".
Click Start.
On models released since 2010
- To start setting up, press “” on the remote control.
- Select “Channel” (the icon with a satellite dish).
- Make sure that in the “Channel - Antenna” tab there is o.
- Next, go to the “Channel - Country” section. You will need to enter your PIN, and if it has not been changed, it is 0000.
After this, check that the parameters are set correctly.
In the “Channel - Country” section there should be:
- Digital channel - “Others”;
- Analog. channel - “Eastern Europe”.
Next, go to the “Channel - Cable Search Options” section. There should be displayed:
- Frequently beginning - “338 MHz”;
- Frequently OK. - “458 MHz”;
- Speed — “6875”;
- Maud. - “256”.
Open the “Channel - Auto-Tuning” section. There should be:
When the search is completed, you will need to click “OK”.
All channels will be found, but you will only be able to watch those that are broadcast in unencrypted form. The rest can be deleted.
Removal
- To get started, open the “Channels - Channel Manager” menu or press “CHLIST” on the remote control.
- Select a channel, press “TOOLS” on the remote control and “Delete”.
- You will be asked to confirm the operation.
Sorting
- To sort, mark the desired channel (in the “Channel - Channel Manager” menu or using the “CHLIST” button on the remote control).
- Press "C".
- Click "TOOLS".
- Enter the “Sort” menu and move the channel to the desired location.
- Click "SmartHub".
- Click on the “channel” icon.
- In the list, open "Editing".
LG connection to digital television
Click "" and select:
- "Options".
- "Auto-tuning".
- "France, Switzerland, Sweden or Finland."
- "Cable".
- "Digital".
The procedure will take about 10 minutes.
Settings
Let's look at how to set up digital channels on an LG TV.
- Press "" on the remote control.
- Go to the "Options" tab.
- ABOUT.
- Open Settings, About and Cable.
In “Settings” enter the following values:
- Type - “Fast”;
- Frequently — “338000 (kHz)”;
- Speed — “6875”;
- Maud. - 256;
- ID - “Auto” or “777”.
If the parameters are entered correctly, channels will be found during the process.
To disable the feature, go to Digital Cable Settings - Channel Auto Update >> OFF.
Sorting
To sort, go and check:
- "Settings".
- "Autosearch".
- "Cable".
Uncheck "Auto numbering" and click "Run". When the process is complete, buttons will appear in the Program Editor.
Sony setting up digital TV
Since not all models have a digital cable TV tuner (DVB-C), you should check:
- those equipped with DVB-C are marked KDL-**EX*** or KDL-**NX***;
- models marked KLV-**BX***, etc. are not equipped with a tuner.
General scheme
- Press "" on the remote control (sometimes it is "Home" instead), it is usually blue.
- Go to "Settings".
- Open Digital Configuration.
- O >> "Cable" >> "Full Scan".
Or, oh, enter:
- Frequently - 338 MHz (338000 kHz);
- Code - “Auto” or 777;
- Speed - “6875.”
Click “Start” and wait for the process to complete.
Settings
- Press "" on the remote control.
- Open "Settings".
- О >> “Digital tuning” >> “Auto-search for digital stations”.
- A question will appear asking you to start the search. Click "OK".
- O >> Quick scan.”
- Frequently - “338.000”;
- Code - "Auto";
- Speed - “6.875.”
Panasonic setting up reception of digital channels
Let's look at how to set up digital channels on a Panasonic TV. There are two ways.
First way
- Press "" on the remote control.
- Open "Settings".
- Click "Menu Analogue". settings" >> "Add TV signal".
- Check the box next to “DVB-C”.
- Click “Start Auto Configuration”.
After the process is completed, the line “DVB-C setup menu” will appear in the menu in the “Settings” tab. Once you go there, you can adjust the setting manually (define the frequency of 338 MHz and speed of 6875 KS/s).
Second way
- Press "" on the remote control.
- Open "Settings".
- Open "DVB-C Settings".
- Open Auto Configuration.
In the menu that appears, enter:
- Frequently - 338 MHz;
- Speed - 6875;
- "All channels";
- "Quick"/"Full";
- ID - “Auto” or “777”.
Attention! There is no Modulation option.
Click “Start scanning automatically.” Once the search is completed, the TV will show the list. It can also be viewed in the “DVB-C” menu.
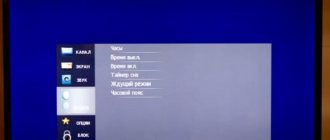
JVC setup in a couple of clicks
- Press "" on the remote control.
- Open Settings.
- You may need to change the language before making settings. This can be done in the “Settings” tab.
- Open the "Channels" section and o.
- Next, check the DVB type - “DVB-C Standard”.
- ABOUT.
Once the process is complete, the TV will be in working order.
How to set up digital channels on Mystery TV
- Press "" on the remote control.
- Open the "Channel" section.
- Select "Auto Search".
- Oh, the mode is “DTV+ATV”.
- Set it to "Fast".
Next enter the values:
We have looked at all aspects of properly setting up digital TV. But you should always remember that on different models there are differences in the menu interface, item names and procedure. However, the general scheme is always identical, so during the setup process, be guided by the similarity and general meaning of the instructions.
Connecting to a TV
Any VCR must have RCA connectors through which the cable of the same name, also known as a “tulip”, is connected.
As you can see, the RCA cable plugs are color coded:
- Yellow - video signal.
- White - left audio channel.
- Red - right audio channel.
You don’t need to understand the markings - just set the color match between the connectors and plugs (yellow to yellow, red to red, white to white).
Accordingly, you need to select AV OUT ports on your VCR, and AV IN on your TV if you want to play back recordings from cassettes.
Peculiarities
The JVC TV, in the production of which Light Emitting Diode technology was used, will delight users with high image quality achieved thanks to the well-coordinated operation of the diodes. The manufacturer divides such TVs into options with static and dynamic backlighting.
Modern JVC TVs, compared to legacy tube equipment, have the following features:
- economical use of electricity;
- bright colors;
- miniature sizes;
- small mass.
In addition, the consumer can watch TV and enjoy high-quality images from any part of the room. At the same time, looking at the screen from a large angle, the curvature of the picture is imperceptible.
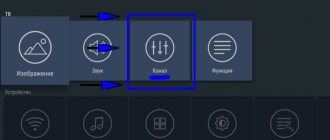
Installing channels on JVC Smart TV
Modern JVC Smart TV models are mainly produced on the most popular Android TV operating system.
Therefore, below are instructions for setting up channels on a modern TV with Smart TV.
- To search for digital channels, you must immediately switch to the DTV format by pressing the corresponding button on the remote control. If there is no such button, then click Input and select DTV.
Wait for the scan to finish; this may take several minutes. After this, if you wish, you can edit the found programs.
Supra
This device is a popular model for adjusting Samsung, LG, Philips TVs and other models of TV signal receivers. The installation algorithm for Smart TV and older models is the same.
»
Automatic setup
The remote control device can be adjusted quickly and conveniently. The process of automatic debugging of the UDPU with the receiver is as follows:
- Connect the screen to the network.
- The remote control needs to be pointed at the TV.
- Press the “POWER” button for 6 seconds until the indicator on the UDPU lights up.
- When pairing is successful, the volume icon will appear on the screen. Press the POWER button once.
- The UDPU is ready for use; you need to check its functionality.
Manual adjustment
If the described method of adjusting the Supra did not help, and you still cannot control the television through the remote control, there is also manual adjustment of the universal remote control for the TV:
- In this document, select the code corresponding to the model of the TV signal receiver.
- We connect the TV to the network.
- We point the remote control directly at the screen.
- Press “POWER” and enter the code found earlier.
- Do not release “POWER” until the indicator flashes twice.
- We try to check each of the buttons on the remote control. If some of them do not work, then you will need to find another code.
Tips for choosing
Choosing a TV is not easy - in order to increase sales, manufacturers are introducing new developments into the equipment they create. The presence of Smart TV, 3D, 4K, HDR, Ultra HD, Curved screens greatly complicate the choice. But don’t panic - it’s better to take the advice of experts and remember the criteria that you need to pay attention to when purchasing in the first place.
- Screen size. The latest models are characterized by the presence of a flat screen. When choosing sizes, you need to decide on the installation location. The second thing to keep in mind is distance. The further you plan to sit from the TV, the larger the screen you should choose. The cost of equipment is related to the size of the diagonal. The larger it is, the higher the price.
- Screen resolution. Today, most models have Ultra HD 4K resolution. This is almost double the previous Full HD and is designated 4K.
- Frame update frequency. Usually this value is denoted Hz, Hz. They usually try to increase the frequency of frame changes in order to smooth out the picture when the intensity of the scene changes is high, in order to prevent a trail in the image. Movies usually run at 24 Hz, so the best way to watch movies on the device is at that rate or a multiple of it.
- Sound, speakers. Much attention should be paid to the acoustics of the equipment, especially if there are no external speakers. To test your speakers, you can turn up the volume to three-quarters of the maximum and see if there is any cabinet vibration and if the overall sound quality is satisfactory.
- Connectors. When choosing equipment, the availability of connectors plays an important role. It is necessary to have several USB to connect a flash drive, camera, video camera. You also need HDMI connectors so that you can connect players, game consoles, and a computer. The HDMI version plays a big role - 1.4 or 2. It must match the version on the player or any other equipment. If you plan to use an access card to commercial channels, you may need a CL+ slot.
Model overview
These days there is an extensive line of JVC TVs. Despite their low cost, these devices delight their users with stylish design and a variety of functions.
Many options do not have gesture and voice control, but they do have many features for comfortable use in small rooms. Therefore, before purchasing, it is worth studying a review of JVC equipment lines.
LT 43M650
This model with a 43-inch screen allows its owner to watch his favorite programs in a new quality. Screen resolution - 1920x1080.
It is possible to watch video content from the built-in tuner with support for digital DVB-T2.
The equipment can be installed on a surface or mounted on a wall. The device comes with a Wi-Fi adapter.
LT 32M355
This TV will be an excellent option for the living room; in addition, it will look good in the bedroom and office. The device matrix is responsible for maintaining the quality of the transmitted image.
Model with a diagonal size of 32 inches, LED backlight is used. There is no support for 3D images.
LT 24M440
This option is better suited for the kitchen. The 1920x1080 resolution combined with the dimensions guarantees a high-quality picture. The image will be updated at a frequency of 50 Hz. This simple model can even compete with more expensive ones.
To enjoy programs in digital quality, there is a built-in tuner that supports DVB-T2.
GG20059 001A
This model has a good full-screen mode. To watch TV with maximum comfort, you need to study the instructions for use and use the remote control. The equipment is characterized by good sound transmission.
LT 40M640
A common model with a 40-inch screen, 1920x1080 resolution. Information from any media will remain in good quality. The screen allows you to view microscopic elements with rich color reproduction. The picture refresh rate is 50 Hz.
This is a reliable TV that is reasonably priced. Smart and Wi-Fi even allow you to play games on it.
Using the regular menu, you can use the Internet, update games, and send messages to friends. Using DLNA functions, connecting a laptop or smartphone, you can easily connect them into a group and make a gaming center in an apartment.
Comparing the cost of devices and the number of functions makes it a good TV in terms of price and quality. When viewing programs, do not be afraid of missing something, because the Shift function will not allow this.
AV G21T
A model with a small diagonal - a little more than 20 inches. The display design is a cathode ray tube with a scanning frequency of 0.050 kHz. There are 60 channels. This option supports NTSC, PAL, SECAM modes. It is possible to use sleep mode. There is no jack for connecting headphones, as well as for gaming devices.
LT 32M340
The main features of this LCD TV are surround sound and LED backlighting. HD resolution - 1366x768, 3-inch diagonal.
The maximum angle at which the image is seen in excellent quality is 160 degrees. The picture update frequency is 50 Hz. The sound is adjusted by AVL volume, there is a NICAM stereo sound system with a total power of 0.010 kW. Acoustics are represented by two speakers.
A good model that can become an entertainment center in an apartment. The sizes are good for both living room and bedroom.
A large screen with HD READY resolution will allow you to see even the most microscopic elements in high-quality media content.
C 21ZE
This model does not have stereo sound and is quite miniature. This is a tube TV with a diagonal of just over 20 cm.
Other connection methods
If you don't find RCA connectors on your TV, you can use the SCART interface. If this interface, in turn, does not support the VCR, purchase a SCART-RCA cable or adapter. An extreme option is to use a coaxial cable that is installed in the antenna connector. With its help, you need to connect the RF OUT (VCR) and RF IN (TV) ports.
It should be noted that when using coaxial cable, you cannot expect good signal transmission quality. There may be some minor interference and noise, so it is better to use other interfaces.
If you want to watch your videos in good quality, digitize them and burn them to disk.
In this case, you will only need to connect the DVD to your TV to enjoy your old recordings. Alternatively, you can rewrite the video onto a flash drive and simply connect the flash drive to the TV.
Tuner connections via VCR
For some reason, the TV may not accept the set-top box (the required input is missing or the equipment is not supported). There is a way to solve this problem - connect an old VCR, and to it, in turn, a tuner.
Tune your TV to the VCR channel and you'll be able to watch channels even if your old TV doesn't have an AV input.
Watching digital TV on a regular TV is quite possible, but to do this you need to connect and configure a digital set-top box. Tuners are cheaper than new TVs, but have similar functionality. Set-top boxes can work with TVs that have been produced since the mid-90s, but the main condition is the presence of a SCART connector or “tulips”.
Source
User manual
When using the device, do not forget about safety precautions. The equipment should be protected from liquids. Only use the power source indicated on the back of the product. The cord must not be twisted or broken. Ventilation gaps should not be blocked. There is no need to install the device in a place with insufficient ventilation. Avoid damaging the screen. If dust accumulates on it, wipe it with a soft, dry cloth.
A universal remote control is suitable for the device, that is, it is a regular remote control configured to control several devices.
Make sure that the equipment is turned off before connecting the power cord.
To set up digital television, you first need to connect the antenna to the TV, use the remote control to open the menu and go to “Settings”. Here you should select the reception section, indicate the type of signal source (antenna or cable), click on the “OK” button
Now you can configure digital channels yourself. To do this, press the “Menu” button on the remote control. Now, using the “right” and “left” keys, you should find the “Channel” section. Tuner type - “Antenna”. Now you need to click on the “Autosearch” button and select the broadcast country. By clicking on “Start”, you need to wait for the settings to complete.
If the TV does not have a built-in tuner, then you should connect a set-top box to broadcast digital television. This set-top box receives a set of codes, decrypts them and transmits them to the TV. It is possible to connect a phone and turn the timer on and off.
What is a universal remote control
It sounds complicated, but in fact, it is a simple device that creates signal pulses suitable for most TVs and set-top boxes.
Huayu, Gal, DEXP, Supra are considered popular and high-quality manufacturers of UE.
To set them up, special codes are used, which differ depending on the brand of TV, and you can view them on this page.
The universal model will fit a large number of common and popular manufacturing companies, for example, Samsung, LG or Philips.
Differences from a regular remote control
The original remote control and the universal one have two significant differences, which significantly increase the cost of the first - this is its “branding” and quality.
A remote control made by the owner-manufacturer is undoubtedly of higher quality than a Chinese one. However, if the TV is already 5-6 years old, then you will not be able to find a branded remote control for such an old model.
Preparing the TV
Before you start directly setting up channels, you should connect the TV to the broadcast source. With an analog signal, the cable from the antenna or cable television operator is connected directly to the antenna input of the TV (marked in the photo):
At the same time, it is worth separately considering the situation in which more than one TV is used in the apartment. In this case, a special antenna splitter is used for connection, which in most cases has two or three outputs:
How to tune channels from a regular antenna to several TVs?
People often complain that the channels on their TV in one room are worse than in another. Some of them are missing, and the rest have interference. This is due to an incorrect connection. It is important that both TVs are equidistant from the main cable. Otherwise, the one that is located closer will take over most of the signal. Also, to connect two or more TVs, you should use a high-quality cable that is better protected from interference. Therefore, a standard cheap cable, which is usually offered by many cable television operators, will not work here.
(1 rating, average 4 out of 5)
TV codes for universal remote control
Each TV model has an individual set of characters. Thanks to it, you can establish a connection between the remote control and almost any device. The code is a sequence of 4 or 5 characters. Different manufacturers have different codes accordingly. You can find it out from the technical documentation that comes with the device itself. There is also a universal table with encodings of the most common models.
Reference! The individual code was made for the sake of safety and comfort, since it would not be very convenient if a TV in one apartment accidentally picked up signals and switched channels due to the remote control, which is located in a completely different room and is used for completely different purposes.