VLC media player has been a long-time partner in the game for seamless media playback on the computer. And the Android app also has many features. But then what about the idea of streaming media files from a Windows computer to your Android device?
Sounds interesting, right? This is actually true. Of course, a desktop system contains a lot of media files compared to a smartphone, and keeping both systems in sync will be a huge task. So a business streaming media directly from a Windows PC to a phone seems more than appropriate.
So, without further ado, let's get started.
Prerequisites
- Both devices must be connected to the same network.
- Make sure your firewall has the necessary settings to allow media to flow smoothly between the two devices.
No. 1. Enable background playback in the app
Obviously, activating background playback allows you to listen to songs in the background. Since we are talking about media elements in this post, meaning both audio and video, it is imperative that this option is enabled. After all, you don't want your favorite song to stop halfway when you press the Home button, right?
Go to VLC settings and check the Playing videos in the background box.
Error opening URL
After setting up the video broadcast, we move on to playback. And here the problem “VLC cannot open MRL...” may arise.
In this case, you should check the correctness of the entered data. You need to pay attention to whether the local address is specified correctly and whether the specified path and port match. You need to follow the following structure: “http (protocol)://local address:port/path”. The URL entered in the “Open URL” must match the one entered when setting up the broadcast.
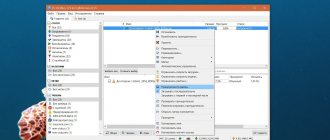
No. 2. Start sharing a homegroup
The following is a picture of a Windows system. This process uses the Windows HomeGroup sharing feature. So just in case the homegroup is not set up yet, create one by clicking on the Create homegroup button.
Once there, check the media options such as music and video and continue by clicking Next and Finish (in the next window).
Homegroup sharing is found in Network and Internet settings. Alternatively, you can search for it directly in the settings.
Receive stream
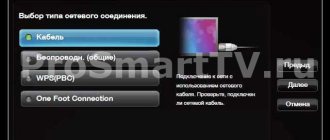
To view a broadcast from a VLC server created according to the instructions above on devices connected to the local network, you need to follow a few simple steps. As an example, we use the Android version of the player. In other operating systems, reception settings are carried out similarly.
- Open the player, and in the playback source selection menu, select “Open MRL…».
- In field "MRL network address» Enter the IP address of the server device and port.
- Click on the added item, which will open the video playback window.
As you can see, organizing streaming within a small network is a simple procedure if you use a tool like VLC-Server and follow simple instructions.
VLC Media Player is a high-quality and multifunctional video and audio player. It is noteworthy that additional codecs are not required for its operation, since the necessary ones are simply built into the player.
It has additional actions: watching various videos on the Internet, listening to the radio, recording videos and taking screenshots. In certain versions of the program, an error appears when opening a movie or broadcasting. The open window says “VLC cannot open MRL '...'. Look for more detailed information in the log file." There are several reasons for this error, let's look at them in order.
No. 3. A-Allow other media
Once setup is complete, return to the homegroup home page. Here you need to prevent other media such as television from streaming content from the PC.
So, click on the box called Allow all devices on this network, such as TVs and game consoles, to play my shared content and uncheck the Allow box.
Problem opening video
In some versions of the program, a problem occurs when opening a DVD. Most often, VLC Player cannot read the path in Russian.
Because of this error, the path to the files must be specified in English letters only.
Another solution to the problem is to drag the VIDEO_TS folder into the player window.
But the most effective way would be to update VLC Player , since new versions of the program no longer have this error.
So, we found out why the error “VLC cannot open MRL...” occurs. We also looked at several ways to solve it.
Thank the author and share the article on social networks.
IPTV is online television that can be watched on websites or in special players. Today we will use VLC Media Player for this.
VLC is the most common and simplest program for watching IPTV. It is available on Android, Windows and other popular platforms, and is quite easy to use.
In this article I will tell you where to download the player, how to configure it for comfortable viewing and where to get m3u playlists.
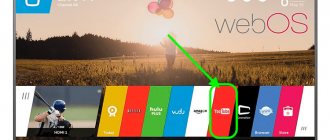
No. 4. Select local network
This completes the Windows installation. All you need to do is go to VLC settings on your smartphone and click on “Local Network”. If everything is configured correctly, you will see a folder with your computer's name.
Click on it and select the folders containing files for music and videos and enjoy the videos without leaving your Android smartphone.
Please note that the videos or song files should be placed in the default Music or Videos folders on your Windows PC.
Do you know all the VLC keyboard shortcuts? Here is a quick guide for the same.
Setting up a streaming server
The only condition for the following to bring positive results is that the current version of VLC player must be installed on all devices on the network that are planned to be used as a stream receiving party, as well as on the PC server.
- Launch the player, open the menu “Media" and go to the item "Transmit».
- Add the source file to the appropriate field on the “ File ” tab. In the event that the broadcast will be based not on local video or audio, but on a physical disk drive, an Internet source, or a video capture device, we will use the corresponding tabs at the top of the window.
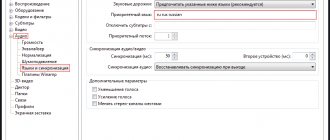
- Parameters defined in the "Output Settings" are essential for properly configuring the player as a server.
Click “ + ” and add a protocol from the drop-down list, the capabilities of which will be used in the future transmission of the media stream.
- Multiple protocols can be added for greater "versatility» broadcasts in relation to receiving devices. The simplest method for transmitting media data to devices on a local network is to use the “ HTTP" We create a broadcast based on it by clicking the “ Add».
- Field values "Port" And "Path"do not change, just press the button "Next».
- Select a profile that determines the format of transmitted video and audio data from the drop-down list. If you are in doubt about the correctness of the definition, you can leave the default profile.
- The final Wizard window opens "Stream output", offering opportunities to configure additional parameters. In most cases, there is no need to change the values in this window; click the “ Flow».
- The creation of the server is completed, and the transfer starts automatically.
Running VLC Video on Demand
Now we get to the good part. The Video on Demand streams you just installed in Video Manager will allow any PC to connect to any of these available streams at any time.
But first you need to start all these threads. Open a command window by typing Ctrl-Alt-T .
Launch VLC using the following command line. Type this very, very carefully so that every space and stroke is copied exactly.
vlc -vvv --color -I telnet --telnet-password --rtsp-host 0.0.0.0 --rtsp-port 5554
Replace <password> with the password of your choice (to connect via telnet you will use below).
This scrolls an entire bunch of text through the command window. And don't worry too much about any errors (this might mean you clicked on some settings in VLC that don't quite work - the important parts are set correctly by the command you just ran.
This command enables telnet, but now you need to load the VLM configuration file you just created in order to properly start network streaming of all media files.
Open a new terminal window using Ctrl-Alt-T and navigate to the folder where your media files are stored (in my case it was the My Documents folder). Once there, connect to the newly created telnet server on port 4212 (telnet default) using the command:
telnet localhost 4212
Enter the password you created above to login.
Then enter:
load.vlm
Replace with the name of the exported VLM file you created above when exporting the list of media files. In my case it was PlayList2.vlm (remember, this is Linux, so it is case sensitive).
You should see a "load" response.
That's it, your media server is now fully configured with the entire list of downloaded media files, which are now available for streaming using any client on the same network.
Let's see how you set them up for the first time.
Summary
The latest update to the VLC player clearly showed that there is practically nothing to update in this application in the near future. Every detail of the interface is in its place, managing catalogs and playback is literally reduced to an intuitive level.
The player still starts up quickly and does not slow down even when downloading large files. VLC is well thought out both in terms of design and software environment. While remaining a free utility, it can easily compete in its functionality with advanced paid players.
How to watch IPTV on VLC Player?
After the setup, which I wrote about in the last section of the article, launching a playlist on VLC will not be difficult.
Option 1. Using the URL where the file is located.
- In the upper left corner, click and open the Media section.
- In the drop-down box, select Open URL.
- All you have to do is enter the site address and everything will be ready.
Option 2: Open a playlist that was previously downloaded to your device.
- Also go to Media, but click on the Open file section.
- Download the desired file and enjoy watching.
VLC player interface for Android
The latest update finally managed to get rid of the clutter of player control buttons. The developers have removed the rewind buttons, leaving only locking, subtitle management, the Play button, settings and video cropping to fit the screen resolution.
The player has become even more convenient to control using gestures. The slide on the left side of the screen controls brightness, and the slide on the right controls volume. Double tapping on a specific edge of the screen rewinds the video 10 seconds forward or backward, respectively.
In the settings of a specific video you can configure:
- Sleep after a set time
- Playback speed
- Go to specified time
- Equalizer
- User Hints
- Subtitle and audio delay
- Overlay on top of windows
- Loop playback
VLC player for Android still plays all popular formats, including MKV, MP4, AVI, MOV, OGG, FLAC, TS, M2TS, WV and AAC. Plus, all codecs are already included in the app without any separate downloads.
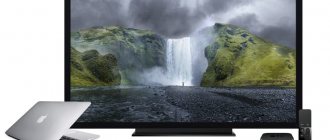
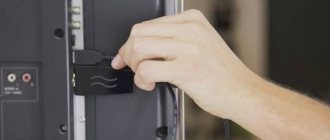
How to display video on TV screen
Before you can display video content on Smart TV via VLC, you need to download the program from the developer’s official website. It is distributed free of charge, has a simple and intuitive user interface with wide functionality.
VLS broadcasting to a TV is also possible via the Apple TV digital set-top box. The user receives all the functions of a media player and format support, as well as several options from Apple. Transferring video content is possible even from mobile devices. To do this, you need to download the VLC app for free on iOS.
When you launch the player for the first time, accept the license agreement. Then configure the media source. To do this, do the following:
- In the program window, click on the “Media” item, then go to the transfer settings menu.
- In the “File” tab, click on the “Add” button. After that, the explorer will open, where you select the desired video. You can select multiple files at once. In the window below, an action item with the selected video file opens. Click on to select actions. Click on "Stream" to proceed to the next steps.
- In the stream output window that appears, click on the “Next” button.
- In the next settings menu, click on the drop-down list opposite the selection of destination paths. You need to add “HTTP”, then click on the corresponding button.
- In the tab that appears, you will see the already specified port 8080 and the path in the form /. Click the button to go to the next menu.
- In the transcoding options window, check the box next to enable. In the profile line, select the value Video – H.264 + MP3 (MP4).
- In the additional broadcasting parameters section that appears, select the values you need and click on the “Stream” button.
If all parameters are set correctly, the main window will be displayed with a playback indicator, and the broadcast will start on the external device.
In the same way, video is transferred to another computer or device. Please note that the broadcast is not played from a file, but live. Therefore, you cannot pause or rewind the broadcast content.