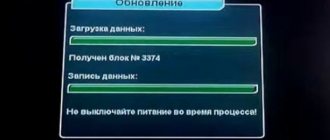
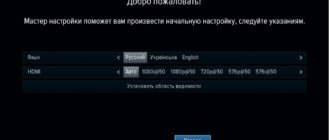
One of the most common complaints about the operation of Tricolor TV is that errors occur when scanning channel frequencies, especially after updating the firmware during initial setup. This leads to this. That instead of the declared package of channels, the subscriber has the opportunity to watch only some of them, i.e. do not receive the service in full.
According to official information from the company, each user can solve this problem independently, without resorting to the services of service centers.
General principles of satellite television operation
In general terms, the operating principle of broadcasting a television signal via satellite is quite simple. At the transmitting equipment station, an encrypted signal is prepared and transmitted at certain frequencies to the satellite. The satellite is in a stationary orbit (geostationary). This means. That its location remains unchanged over time in relation to the observer from the surface of the Earth, and therefore there is no need to constantly reconfigure the antenna.
The satellite receives this signal, amplifies it, and transmits it back to Earth. The transmitted data stream is received by an antenna directed towards the satellite, then the signal is transmitted to the receiver (receiver). The receiver decrypts the signal and converts it directly into a video signal, which is output to the TV.
The satellite is broadcast not by one, but by several transmitters. Each of them is assigned a main, or frequency carrier. This frequency is called a transponder.
If you have ever scanned frequencies manually, you have noticed that one transponder contains not one, but several television and radio channels. That is, packet data transmission is carried out.
It is also possible to highlight as a characteristic feature the fact that in the package (transponder) the channels are grouped not chaotically, but strictly according to certain criteria. Basically, the grouping principle is thematic affiliation of the channel, for example, the following channels can be found at the following frequencies:
- 11919 — educational channels (Discovery and Animal Planet family);
- 11881 - assigned to the entertainment content line;
- 11747 are channels A2, Amedia Hit HD, Nika TV, KHL TV HD, TDK, etc.;
- 12169 - to watch Comedy TV, My Joy. A lot of TV, Jewelry, Russian detective, etc.;
- 11728 - Broadcasts Game Play, MTV Rocks, VH1, VH1 Classic.
Problems most often arise when scanning the last three transponders from the list - 11747, 12169, 11728.
What is Tricolor TV?
This is a high-quality satellite connection that operates over a vast territory (including Siberia), and includes many interesting channels, even such as TNV, which is quite rare in packages . However, in order to be able to enjoy all the benefits of this offer, you need to be able to configure it correctly.
Setting up broadcasting (all channels, including TVN, and throughout the entire territory, including Siberia) is possible if you have:
- Receiver for receiving signals from TV channels (including TNV).
- Antenna of the required diameter (namely, 90 cm).
- Two converters - linear and circular polarization.
- Multifeed.
The broadcast package from Tricolor TV is becoming very popular, and everyone can connect to it. This can be done even without the help of specialists. It's enough to just know what settings you need to set. Of course, the list of channels (Siberia) is not ideal (although it includes TNV). They may not have many of the channels you want, but that's not a problem since you can watch them on other satellites.
Main causes of scanning errors
After analyzing the possible causes of errors when scanning channel frequencies on Tricolor TV, experts identify the following:
- The software of the satellite set-top box does not work correctly after the next update;
- the antenna mirror is not focused with the receiver head, or the antenna is not located in the direction of the satellite;
- During automatic search, not the entire frequency range is scanned.
Based on this, you should take appropriate steps to resolve the error:
- “zero” the receiver;
- check the antenna position and search for channels manually.
Let's consider each of the points in more detail.
Where to get frequencies
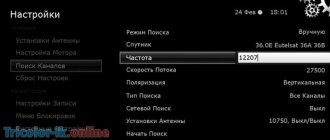
The official website of the Tricolor company provides the only recommendation: use automatic channel tuning . However, you can find more data on a wide variety of enthusiast resources on the Internet. Here you will find a table that shows the channel frequency, its polarization, modulation, video format, encoding algorithm and much more.
It is this data, at least some of it, that will be required if the subscriber wants to manually configure the list of favorite channels or eliminate problems when receiving broadcasts.
Resetting your satellite receiver
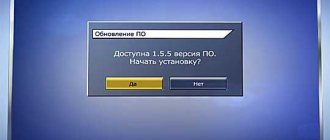
Quite often, updated firmware is released somewhat “raw”. They are tested, but not always fully and sufficiently to improve the quality of work. This may be a stumbling block causing unstable operation.
Another criterion may be to retain old configuration files that store records of non-existent or non-functioning transponders. You can completely clear the receiver's memory only by resetting its state to the factory state.
This is done very simply:
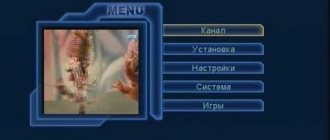
- open the main menu of the console;
- We find the item “Reset settings” (usually in the “About the receiver” section);
- enter the PIN code (default “0000”);
- we confirm our actions;
- we wait for zeroing and reboot the receiver;
- We re-tune and search for channels.
These are necessary actions performed as a priority. But they may not lead to the desired results. If after scanning the list of channels from your subscription remains incomplete, then proceed to the next step.
Setting up Tricolor TV and NTV Plus on TVs that support DVB S2
If the TV has a built-in digital tuner that supports the DVB-S2 standard, this means that the TV will receive (if the antenna is correctly tuned to the satellite) a signal from satellite channels.
But be careful:
This is where confusion can sometimes occur, because other tuners with similar names are built into the panels and have nothing to do with satellite TV.
— The tuner for terrestrial digital broadcasting is called DVB-T2 or DVB-T (not suitable) — The tuner for cable digital broadcasting is called DVB-C (not suitable) — The tuner for satellite digital broadcasting is called DVB-S2 (Suitable)
The letter T stands for terrestrial TV, the letter C for cable, and S2 for satellite. As you can see, the difference is only in one letter, and the tuners are completely different.
Installation of antenna equipment does not differ from standard installation using an external receiver.
TVs with a built-in satellite receiver can easily scan channels both manually and automatically, but will only show unencrypted channels.
Almost all modern TVs with a built-in satellite tuner support the DiSEqC 1.0 protocol, which means you can receive signals from at least four satellites using a 4x1 DiSEqC switch.
The satellite receiver and antenna built into the TV alone will not be enough.
The fact is that almost all television channels broadcast from satellites are not broadcast in an open format, but in one encoding or another.
Tricolor TV - in DRE Crypt, NTV Plus - in Viaccess.
And therefore, having installed an antenna and tuned in the channels of one or another operator on your TV, on the screen, instead of the long-awaited high-quality image and favorite program, you will only see an inscription something like “Coded channel”.
To solve this problem, you need to purchase and install a decoding device in your satellite TV - the so-called CAM access module and a Tricolor TV access card
CAM module and NTV plus access card
Do you mean that 96% of satellite TV channels are encoded!
So…
Setting up Tricolor TV (NTV Plus) on a Samsung :
Using the remote control, you need to reset the TV settings to factory settings. To do this, press the “menu” button and select: - “support” - “self-diagnosis” - “reset”, press the “OK” button, after which the TV will reboot. After the reboot is complete, press the “menu” button, then select the menu item “channel” - “antenna” and select the “satellite” submenu. In the “channel” menu, go down to the “satellite system” submenu and click “OK”; A window will appear asking for a PIN code, where we enter the values - 0000 (by default), a list of satellites will appear, where you need to uncheck all the boxes next to the list of satellites, except for the satellite with the designation - Eutelsat W4/W7 36E. We go to the “satellite selection” menu and select the satellite - Eutelsat W4/W7 36E.
And in the LNB settings we indicate the following data, for Tricolor TV: Transponder - 11804 L (H) Lower gen. LNB - 0 Upper gen. LNB - 10750;
Then go to the “manual settings” menu, look for transponder 11804 L and press the “search” button.
After scanning Tricolor TV satellite channels, press the “save” button.
for NTV Plus in LNB settings: Transponder - 12322 R (V) Lower gen. LNB - 0 Upper gen. LNB - 10750;
Then go to the “manual settings” menu, look for transponder 12322 V and press the “search” button.
After scanning NTV Plus satellite channels, click the “save” button.
Instructions for setting up an LG TV
Connect the cable coming from the antenna from the converter to the connector on the back of the TV marked “SATTELITE” Insert the DVB-CI+ CAM module labeled to you with the TV access card installed in it (card number to you)
Press the “SETTINGS” button on the remote control, and select “CHANNELS” from the main menu that appears. Click "OK"
In the window that opens, use the downward arrow on the remote control to select “Program Mode” and press the “OK” button on the remote control. In the drop-down list, select and place a dot next to the “Satellite” inscription, go to the “OK” inscription and press the “OK” button on the remote control.
We refuse automatic search.
Select "NO".
In the “CHANNELS” window, select “Satellite Settings” using the down arrow on the remote control and press the “OK” button.
The Satellite Setup window will open.
Go to the “Satellite” field with the specified default satellite using the down arrow on the Remote Control.
In the “List of satellites” window that opens, select the satellite “EUTELSAT 36 A/B 36.0 E” and press “OK” on the remote control.
Returns to the satellite settings window. In the “Satellite Settings” window
Be sure to specify the following parameters:
LNB frequency: must match 9750/10750 or 10750/10750.
Power LNB" - "ON"
Selecting “Close” returns you to the “CHANNELS” window.
In the “CHANNELS” window, select “Manual tuning” and press the “OK” button on the remote control.
In the window that appears with the “Transponder” field active, click OK.
In the “Transponder” window that opens, select the desired transponder. For NTV Plus frequencies here (for example 12322, R, 27500), for Tricolor TV (for example 11804. L, 27500) or here.
The active entry xxxx,R or L,27500 will appear in the “Transponder” window with a list of transponders.
Make the Network Search field active and click Update.
If everything is done correctly, the built-in tuner of the TV will find TV channels of the selected operator. By pressing the EXIT button on the remote control, we go to the TV program viewing mode.
This completes the setup of the TV cam module on the TV.
Tuning your SONY Bravia to NTV-Plus channels (Tricolor TV)*
- On your remote control, press the HOME button
- Select the Settings icon (“briefcase”) and click OK
- Select the line “Digital configuration” and press OK
- Select the line “Satellite auto-tuning” and click OK
- In the window that opens with the request “Start auto-tuning?” select YES and press OK
- In the window that opens, check the parameter in the “Antenna configuration” line. It should be "Fixed Antenna or DiSEqC" Then select the "Next" button. and click OK
- In the window that opens, select the line “Reinstall satellite settings” and click OK
- Confirm the action by selecting "YES" and clicking OK
- In the window that appears with the message “ALL PROGRAMS AND SETTINGS IN THE GENERAL SATELLITES ITEMS RESET”, click OK
- The “Digital” menu will open again. Configuration". Select the line “Satellite auto-tuning” and click OK
- In the window that appears with the message “Start auto-configuration?”, select YES and click OK
- The window » Select satellite configuration will open. antennas" Select "Next" and click OK
- The window “Select scan type, channel type and service type” will open. The parameters must be set: Scan type Network scanning Channel type All stations Channel type All Then, select “Next.” and click OK
- In the window that opens with a list of satellites, go up to the line “Satellite1” and click OK
- In the window that opens, select the line “LNB Configuration” and click OK. In the window that opens, you need to set the following parameters: Lower range 10750MHz Upper range 10750 MHz Tone AUTO DiSEqC control OFF. LNB voltage 13/18 V After setting these parameters, press the return button (BACK or RETURN) to exit to the previous window.
- Go to the "Transponder" line and click OK
- In the window that opens, you need to set the following parameters: for NTV Plus - Transponder frequency 12341 MHz (for the Tricolor TV operator you need to set the frequency 11804) Polarization Horizontal or left Symbol rate 27500 After setting these parameters, press the return button (BACK or RETURN)
- An indication of the signal level will appear in the “Signal Level” and “Signal Quality” bars. After the indication appears, press the return button (BACK or RETURN)
- Go to "Get Started" and click OK
- In the scanning window that appears, an indication of the progress and the number of channels found will appear. When the channel search is complete, exit the menu.
- *Menu sections, depending on the TV software, may differ from those presented in the instructions
Setting the position of the satellite dish
Over time, the position of the satellite dish may change. This is influenced by many factors. For example, the wind gradually loosens the mounts, they weaken, and the antenna moves out of focus into an area of uncertain reception. This has a strong impact on the quality of signal reception and increases errors to the level of critical.
The easiest way to check the location of the antenna is to compare your dish with neighboring ones, and align it in the same way. This method is not always possible, and from a technical point of view it is not the best option.
It is best to contact the official Internet portal of Tricolor TV, located at www.tricolor.tv. Here in the “Help for Subscribers” section you can find a complete satellite coverage map with angles and azimuths for the largest cities.
The azimuth is set very simply using a compass. The elevation angle is a little more complicated. The vertical aiming angle depends on the antenna manufacturer and can be found in the technical data sheet. If your passport is lost or was missing initially, then you can resort to an easy but effective method.
First, we set the azimuth and connect the working and configured receiver to the antenna. The angle is selected in such a way that the signal level is the best and the errors are minimal.
Please note the fact that satellite equipment only works in line of sight. This means that if there are foreign objects in the path of the intended signal, such as trees, houses, power poles and others, then the signal will not be received of adequate quality.