The development of modern technologies does not stand still for a second; new ideas and inventions appear every day, the main task of which is to make our lives as simple and comfortable as possible. Previously, in order to change the channel on a TV, you had to go up to it and press a button that was located on its body.
A little later, an electric remote control appeared, but its main drawback was the wires through which the signal was transmitted; you must admit, it’s not very convenient. It was replaced by a remote control, the signal transmission of which was based on an infrared ray, invisible to the human eye.
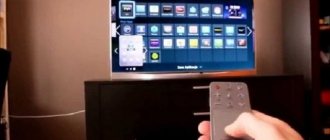
Such devices, although quite common these days, are still not very convenient, because when using them you need to point the remote control directly at or towards the TV. Today, more and more often, they are being replaced by gadgets that work via Bluetooth connection; they are easier to use and versatile.
All global brands are daily improving their devices and accessories, so there is a touchscreen remote control for Samsung TV on sale.
Features of the SMART TOUCH CONTROL remote control
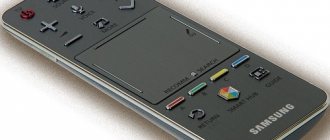
The device with touch control from the South Korean company Samsung is called Smart Touch Control. Its main feature is the presence of a touch touchpad, which occupies about 40% of the entire working surface.
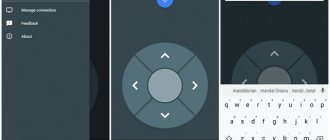
With its help, you can control both the TV itself when watching TV channels and the cursor while working in a web browser. In addition, with the help of such a device, you will have the ability to voice control your smart TV. Another interesting feature is the presence of a gyroscope.
Roughly speaking, it is equipped with a motion sensor that will allow you to control the cursor by simply moving the gadget in your hands. To use this function, you need to press the touchpad once, after the cursor appears, just move the gadget, and the cursor will move after it.
It is worth noting that not all devices from the manufacturer support the use of this remote control; only those released after 2012, the Samsung smart TV series, will be able to work correctly with it.
Peculiarities
The main feature of the device is the sensor on the top panel. Thanks to this, you can control the TV and access the Internet using a browser. Thanks to the touchpad, there are no problems with cursor direction.
The device has a built-in motion sensor. This allows you to control the receiver by simply moving the remote control from side to side, up, down. The cursor appears on the screen after you touch the touchpad. After that, it will move to where the remote control directs it with a simple movement of the hand.
The device is equipped with a joystick. It allows you to move from one menu item to another.
With Samsung Smart Control you can:
- configure the receiver;
- activate options;
- adjust the menu.
To avoid problems with the operation of the touch device, it is not recommended to move it from the TV to a distance of more than 6 meters.
Is the remote control included?
At this stage, the Smart Touch Control is not available on all Samsung TVs. The models it comes with are the H, K, J and F series.
Please note that depending on the model range of the purchased device, they will differ. The difference, at first glance, may seem only external. This is partly true, the functions remain virtually unchanged, the main difference will be in the setup process.
Connecting Smart Touch Control to your TV
As mentioned earlier, depending on the series of the device, the procedure for connecting the smart touch control is slightly different.
So, in addition to installing batteries in the device, you need:
1. For F series models:
- Press the TV power button;
- Press and hold the “Pairing” button, which is located on the back side, until the Bluetooth icon appears on the TV;
- Wait for the connection notification.
2. For H series models:
- Using the power button, turn on your TV;
- Simultaneously press and hold the “Return” and “Guide” buttons on the remote control until the Bluetooth icon appears on the screen;
- Wait for the connection process to complete.
3. When setting up a J series model:
- Turn on the device;
- Hold down the “Extra” and “Return/Exit” remote control buttons, wait until the Bluetooth icon appears on the screen;
- Wait until pairing is completed;
4. For K series models:
- still turn on your TV;
- press “Back” and “Play/Stop” at the same time, a message about connecting the smart remote control will appear on the monitor;
- At the end of the process, a message will appear indicating that the pairing of your devices is complete.
In each of the above cases, when connecting for the first time, it is recommended to keep it at a distance of no more than half a meter from your TV.
CS-CS.Net: Laboratory of the Electroshaman
Avolites Tiger Touch II light control with demo show
This post is not entirely planned, because I promised to write as many as 7 posts about the King Kong 1024S remote control and, using the example of that remote control, I wanted to show the Avolites Titan remote control system (as the control software itself). But it so happened that now I decided to do a mini-review of the hellishly cool Avolites Tiger Touch II remote control, which I bought for myself last fall. Other projects have stalled somewhat because I need to pay off the debts for this remote control. But damn, he's worth the money! And how!
The main advantages of this remote control for me are that you can work normally with timecode (see its time and correct it if you make a mistake), there is a touch screen - which means you can sign everything normally (playbacks, chase/cuelist steps, groups of devices and even the devices themselves). And most importantly, there is a visualizer! That is (if there are models for it that Avolites is slowly making for Chinese heads) you can sketch your show in advance without appearing on the site - and then come, set up - and immediately go into battle!
I now need a review of the Tiger not to talk about how to work on it, but to show how it differs from the King Kong 1024S and - most importantly - to show you that if you learn correctly once (without fucking Sunlight , Pilot 2000 and comb remote controls) - then you will NOT need to relearn the terms and programming methods, and you can easily sit down at any remote control that has similar standard programming (and now all major remote controls from Avolites, MA Lightning, Hog ,Chamsys have a similar system).
So today we're looking at the Tiger Touch II as if we already knew the basics of King Kong - scenes, chases, effects generator, timecoded show recording, fixture groups, Go button operation. And in posts about King Kong I will show photos from this post and write “You see? The good thing about King Kong is that knowing it, you can easily switch to larger consoles!” =)
Let's study the remote control from the inside and change the noisy fan!
Where do we start studying remote control? Of course, from the guts! Because, damn it, ALL - ALL stage equipment manufacturers never bother with fans! More precisely, no, not like that! For some reason, manufacturers of heads costing around 500-800 rubles apiece are worrying, although in vain: usually heads of this cost and such power are hung high and no one gives a damn about the ventilation noise. But small heads and remote controls will obviously be located closer to people. And the howling fan is very disturbing (in some videos - for example about blinders - you could hear it in the background).
The remote control seems small, but in fact it measures 600mm wide and approximately 500mm high and weighs 13 kilos, and in the case - about 20 kilos! I’ll tell you about its external interface later, but for now we’ll open it and see what’s there.
Appearance of the Avolites Tiger Touch II remote control
The remote control is designed in such a way that its top cover is hinged rather than removable. To lift it, you need to unscrew three screws at the bottom of the front of the remote control:
Screws that must be removed to open the Tiger Touch II remote control
And the wonderful world of USB cords opens up for us! I’ll write right away that ALL the connectors in the remote control (in fact, ALL of them - even the most unimportant ones) are filled with sealant so that none of them falls off. Let me remind you that the remote control is designed to control shows where you can lose money several dozen times more than the cost of this remote control.
Internals of the Avolites Tiger Touch II light console
All boards of the remote control are separate pieces that are connected to a USB hub (and in the system menu of the remote control there is a USB Panel Manager utility that allows you to configure and debug them). I don’t understand how everything is connected so cleverly that there are three connectors plugged into the USB hub, and there are much more cables. I haven't figured it out yet. If I open the remote control again, I’ll study everything more carefully.
When the remote control is working, a bunch of LEDs light up on all the boards, and it looks really nice!
Interface boards, processor and power supplies
Yes Yes! Inside such serious remote controls are no longer some kind of ARM processors, but a full-fledged ordinary computer with a motherboard and an SSD drive. This was done for several reasons.
Firstly, the program that controls the light is usually released in a couple of versions: one for the remote control, and the other for working on a computer via a USB wing. A wing is some part of the remote control - for example, the most basic buttons, knobs and faders, which are convenient to press using hardware rather than poking with a mouse on a computer. It connects to the computer via USB, and the computer runs a program that recognizes this wing and controls the light through it.
For example, the wing of the Avolites Titan Mobile is the most basic buttons on my remote control:
Avolites Titan Mobile wing for controlling light from a computer
And so, in order not to support several different programs and shells (for the console, for the computer), manufacturers make one program for Windows (sometimes MacOS), and computers are installed inside the light consoles. By the way, a conspiracy has also begun with programs - they have all been abruptly transferred to Windows 10 over the past couple of years, even if this is not necessary and nothing has changed in the program.
Secondly, the reason that computers are installed in remote controls is that they need support for the file system and functions for managing USB keyboards, external monitors, LAN networks (TCP/IP) and even launching some third-party programs (for example, there is officially WinAmp, from which you can take timecode, and load a playlist from a network NAS into WinAmp - you can sense where this will lead me;). That’s why the usual classic operating system turned out to be more convenient here.
So now I not only have a remote control, but also Windows 10 Embedded, which runs on an Intel Core I7 =)) You can joke - install some CodeSys thread on the remote control and at the same time develop programs for the PLC. Or you can get insolent and plug it into the GrandMA onPC remote control, buy an MA Command Wing and get a collective farm harvester like “What show control system do you need to develop for?” =)) Yay! =))
Well, another plus of all this is that you can quickly back up everything. To the point that you can go to the remote control via a grid (if you allow this in the Windows properties) and merge all shows and working files from it (through the KLS Backup program, for example). Or simply clone the entire disk to get a backup of the entire system (by the way, I’ll do this one day).
Let's move on! Let's take a look at the power system, which is not entirely simple, but with battery backup! Yes Yes! I checked! If the remote control is simply plugged into the network, its batteries are charged and then the remote control is able to work for some time without connecting the network. Of course! This is no longer a simple remote control, but a remote control with an operating system, which obviously should not be turned off by pulling the plug from the socket. Yes, and you can play shows on it that are already responsible, where even a short-term power loss should not cut off the remote control.
The remote control power supply is Mean Well LRS series (I will give a link to the manufacturer’s website). The website says that this is a more reliable series for industrial use.
Mean Well power supply is good!
But this is the remote control power control board, which receives power from the power supply and controls the charging of the batteries, switching the remote control to work from them (there is a relay) and supplies power to the motherboard of the built-in computer.
Remote control power control board (with switching to batteries)
The batteries themselves are hidden under a metal cover, which is made of millimeter steel. I really liked this, it’s really nice to see that they thought about the fact that batteries could explode and burn everything inside. A very smart solution with a lid.
Protective cover for remote control batteries
The batteries themselves are classic 18650. They, together with the balancing board, are mounted under this steel cover. It seems that when they die, this board is replaced entirely (although, of course, you can resolder the batteries themselves if you know how to do it ;)).
An assembly of 18650 batteries that powers the Tiger Touch remote control for some time without power input
Now let's look at the DMX interface board (the MIDI interface board can be seen in the distance). All of it is divided into equal pieces according to the number of DMX outputs (my console has 12 of them on board, and they are also available via ArtNet).
External interface board for Tiger Touch II DMX console
Each output has complete galvanic isolation from the console and from adjacent outputs. The power is isolated by a DC/DC converter, the signals are isolated by a high-speed optocoupler 6N137. And the line signal transmitter is the classic MAX485 (we remember that the physical interface for DMX-512 is classic RS-485 in its purest form).
One of the output channels of the DMX board. DC/DC converter, optical isolation and MAX485 visible
Well, I brought a soldering iron directly to the control panel and resoldered the cooler to a quieter one. There is nothing special to warm up here, the cooler simply pumps air through the remote control so that it does not stagnate there.
Let's resolder the cooler to a quieter one!
Why did I bring a soldering iron and not solder with my own station? Yes, because, damn, all these stations have short wires! And who the hell can you reach for a soldering iron (later, I lengthened everything on mine - I finally found a cable)!
So, we looked into the guts of the remote control, made sure it didn’t howl like a fan - and it’s time to look at it in action and write about its capabilities and how it differs from King Kong and how it is similar.
The main features of the remote control and why it attracted and pleased me.
I’ll write a list of the remote control’s features that caught my attention (and for which I bought it):
- It has a 15.4″ touch screen. Additionally, you can connect another monitor and display different images on them (for example, presets on one monitor, and a visualizer on the other). Also, since we have a computer inside, a keyboard and mouse are supported. I’m even thinking about buying some kind of wireless kit and throwing them in the remote control case, because sometimes it’s convenient to type all sorts of signatures from a regular keyboard, and not from the screen.
- Has a multi-window interface. You can place the windows that are convenient on the screen (and move them as convenient). And you can save these presets of open windows, and then call them up using the convenient View button (and enter the preset number or name).
- All elements of the show can be labeled (well, heh, since we have a screen), and they begin to look clearer. Well, the point is clear, it’s more convenient to remember when you don’t have faders “1”, “7”, “5”, but the names “Pre-Chorus”, “Solo”, “Chorus”! You can sign playbacks, devices, groups of devices, names of presets and pallets, and a bunch of other settings and elements.
- There is a separate set of buttons and faders (Preset Playback), on which you can throw either presets or scenes/chases and use them as beats (poke briefly as additional show effects). You can also purchase external wings with additional faders for the console, connect them via USB and add faders. If you are a Cthulhu and you have a lot of hands or fingers on them! =)
Additional wing with faders Avolites Titan Mobile Wing
- Some buttons and faders can be assigned some special functions. Such settings are also saved as settings presets (Keyprofile), and they can be quickly changed. You can assign multiple master faders (brightness, position, effects) that will turn these functions on or off. You can assign effect parameters to the faders - size, speed... In general, you can create several faders for yourself, which you can use to quickly adjust the speed of the effects or other parameters that the remote control is currently giving out during the show. All these special buttons and faders can be assigned to any physical buttons and faders: on Playbacks, on additional Playbacks (Preset Playbacks), on additional wings.
- It has 12 DMX universes on board and supports all of them without any external processors (GrandMA supports only two, and the rest requires an external processor). There are LAN and, accordingly, outputs via ArtNet, it seems that there are up to 16 universes in total. All IOs are assigned in the remote control settings. You can duplicate DMX on ArtNet, or you can scatter the universes across different outputs. For example, plug the heads into DMX, and immediately send some matrix strings for the starry sky via ArtNet.
- It can connect via a network with the same remote controls and back up between each other. It can also connect to media servers (I haven’t figured out how yet) and manage the videos they output to projectors/screens/mapping.
- Has a built-in visualizer that works at scale. The visualizer requires separate libraries (there are no problems with regular libraries for the remote control - you can make them yourself), which are made only by Avolites (here is a list of requests for new devices). There is still a problem with Chinese devices, but many standard brand ones have them. As a result, the entire show can be prepared in advance on a visualizer, and then only checked live - and immediately into battle. That's why I took this remote control!
- Has normal Presets for everything. That is, you can create sets (they are called presets) of settings for positions, colors, gobos, device effects, and the effects generator of the remote control itself - and then refer to these sets in light shows. And then, if you changed the settings of the set (say, color or position), then those settings will change wherever you referenced them. Well, exaggeratedly, there is a preset “At the guitarist” (when he plays solo, you need to direct the light there). You moved to another site, and your guitarist is in a different place. Instead of digging through all the scenes/chases for places where your rays were directed at this guitarist, you change the preset ONCE - and everything works immediately. In King Kong it's called Palette (and here, by the way, it's the same!).
- Full control over DMX channels and patching. Without getting into the device libraries, you can reassign the DMX channels of a device (for example, take some head from the library, say that its channels in real life have different numbers and thus push a non-existent but similar head into the console), you can for each channel set your own behavior logic (minimum-maximum, HTP/LTP).
- Of course, all created shows can be uploaded to a USB flash drive (or via a grid) and transferred to those who also have remotes on such a system (Titan, Quartz, Tiger Touch). That is, you can do the same as with the shield scheme - you made a show, passed it on to others, and they use it. Or I received someone else’s, downloaded it, ran it on the visualizer, corrected errors or suggested something.
- All devices are conveniently assembled into groups. The same device can be included in different groups. Here the group is a list of devices that must be selected at the same time.
- The remote control supports working with matrices and grouping devices in the effects generator. Here you can place devices on the screen schematically as they appear in real life. Let's say, a pyramid from top to bottom. And then tell the remote control: “Come on, play the effect in the direction from top to bottom.” And the remote control itself will understand that first you need to light the first top one, then the two middle ones, then the three in the next row even lower, and so on. The effects generator also supports effects based on key steps (Keyframes). This is when you don’t take a standard effect like “Circle”, “Wave”, but place the devices (or turn up their dimmers) as you need and say “This is the first step”, then put them in a different position, say “This is the second step” ( and so on) - and after all this you set up laws according to which the steps will transform into each other. And this will not be a chase, but an effect generator that can be applied to these devices whenever you like.
- What was very important for me in King Kong is that the remote control shows what attributes you have now changed in the Programmer with icons - I (Intensity - dimmer), P (Posotion - position), C (Color - colors), G (Cobo - gobo) and so on. That is, you can clearly see what things will be recorded if you use the channel recording mode. You can exclude unnecessary items from the recording.
- And what is even more important for me is normal work with timecodes. Timecode can be taken from four sources: simply the built-in timer of the remote control, which starts counting from 0 onwards when pressing the “Start” button, the system clock, MIDI and from the built-in WinAmp. And in those places where this timecode is recorded, you can adjust its offset, which allows you to pull off one really cool trick. Timecode is time in the form Hours:Minutes:Seconds.Hundredths. Usually a track doesn't last more than an hour, and so people spend hours coding the number of this track. That is, we agree in advance and know that some key player will be given the conditional track number “11”. We write the timecode for this track as usual - from zero time. And then, when we recorded it, we set the offset to +11:00:00.000. Now if the sound engineers send us a time like 11:04:54.000, then we will know that this is 4 minutes and 54 seconds of the 11th track. Everything that was recorded using timecode can be viewed and the time can be corrected if you make a mistake. But I haven’t fully figured out whether it’s possible to edit the hundredths. So far it hasn’t worked out, I’ll figure it out.
- As usual, there is HTP/LTP and adjustment of all four times for each scene or chase/cuelist step: Delay In, Fade In, Delay Out, Fade Out. All this is edited in the form of a plate, so the clarity is awesome!
- There is an advanced setting for how the chase/cuelist steps will be connected to each other (Link). This is what in King Kong determined how the chase/cuelist would switch to the next step - automatically or by pressing the “Go” button. Here this thing is more expanded. For each of the steps there is a mode for immediate activation (as soon as the chase/cue is turned on) or loading simultaneously with the previous step. This is usually used in conjunction with different Delay In/Fade In. Let's say we take three steps, in each of which we use three groups of heads. For the first step we set Delay = 0, for the second - 2 seconds, for the third - 4 seconds. And we screw them all up at the same time. Then it turns out that three groups of our heads will light up in a row. Yes, this could be done simply with a chase - but here it could be part of a 30-step chase, and not one piece. And to be in the middle: before this piece we set Link = Wit For Go (on the “Go” button), and for three steps we set “After Previous” so that they turn on all three immediately after the previous one. And then again - using Go.
- There is a cool feature - tracking. It works in chases and cuelists and is responsible for how the console will handle the fixtures in the previous chase/cuelist steps. If tracking is turned off, then each step works on its own - what is recorded is what is lit. If tracking is turned on, then what was in the previous steps remains burning, and new steps are mixed in with them. This is also used to make sequential steps in which something is turned on or moved in parts.
- And one more feature - Move In Dark (MID). I told everyone about it, but when I tested it myself, I was blown away! This is the mode of “predicting” the next position of the devices when they will shine somewhere. If it is turned on, the remote control monitors when the device’s “Dimmer” channel turns to zero. As soon as the dimmer turns off to zero, the remote control understands that the device is not shining - and in this off state it automatically moves the device to the place of the next chase/cuelist step when the device has the dimmer switched on!!! Got it, right? There are no more situations where you have to think about how to place the device in advance at the point from which it should start shining! I’ll give an example using my fingers (and a little with mistakes in logic). Let's say we have a group of Spot heads. First, she shines white light into the hall through a gobo and a prism (to give a blurry fan). Then a few steps are not used, and then it should shine narrow blue beams onto the edge of the stage. If you just write down these two steps, then on the second step your heads will light up on the fly, then the color and gobos will scroll through them, the size of the beam will change - and they will move to the new desired position. To prevent this from happening, it was necessary to take one more step in which to assign a new position to these heads with the dimmer turned off and the necessary color settings (I did this in the light for the Rosanna track, here is a post with it). Now you write a couple of scenes, turn up MID - and the remote control will do everything for you.
- Another feature: all these Link, Tracking, MID can be configured not for the entire chase/cue - but for individual steps! All this is clearly displayed in the form of a table in which you can select either the entire column at once and set the overall value, or select the desired cell and set the value only for it (there will be a screen photo in the post below). The car is a beast!
The remote control interface and the main differences (moments) for the transition from simpler ones (King Kong).
Now let’s try to imagine that we already know King Kong remotes and these things (there will be separate posts about King Kong about them later, when I buy a couple of Wash heads, which I presented to one comrade for help in other matters):
- Patching and working with the selection of devices - All/Odd/Even, Group;
- Scene/Chase/Kewlist;
- Effect generator;
- Programmer (programmer) and editing of device attributes (which we change with faders - colors, gobos, position);
- Playbacks and Go button;
Externally, the remote control interface looks like this:
Avolites Tiger Touch II remote control in use
Below the screen we have faders for playbacks, buttons above them and (on the left) buttons that scroll through playback pages:
Tiger Touch II Interface: Playbacks with Flash/Swop/Go Function Buttons
This remote control contains 60 pages of 10 playbacks. This is pretty damn awesome, considering that every playback can be a chase or a cuelist and have a bunch of steps inside! The current page and which playbacks are doing what on it are displayed in the bottom line of the screen.
King Kong had one button above the faders that did Flash (as long as you press it, the playback works, when you release it, it doesn’t). There are two buttons here. Their purpose may change, and this is also shown on the screen. Usually the top blue button does Swop (when only this one playback is turned on and working, and the others are turned off), and the bottom gray button does Flash.
But if we have a Cuelist recorded, then instead of Flash we get the “Go” button. YES! A personal Go button for each player, and not one common one, as in King Kong. That is, here you can write several cuelists (for different groups of devices, for example) and go to different steps in them in different ways.
What's important is this! In King Kong, cuelists are simpler and almost equal to chases. Here there is a clear distinction of this kind:
- Chase can work automatically or with the Go button;
- The cuelist can only work using the Go button;
- Timecode and some tracking and MID features can only be applied to the cuelist (not to the chase).
This was done to protect against fools, like ABB - if something doesn’t add up or doesn’t fit, then think before you continue. It is believed that first you throw on individual pieces from scenes or short chases on the remote control. But if you need to build a big show, then you type all these pieces into a cuelist, and it’s stupid to run it in automatic mode, because it’s a ready-made show - and it should be driven by timecode or manually. This remote control even has a “Quick Build” mode - when you press the buttons for the pieces you need, and they are automatically added as steps to the cuelist you are creating.
On the top left there are those additional faders for beats. There are no page switches for them - they are always available, no matter what page you are on. It’s convenient to write small effects-beats on them (you can roll up a scene or chase). For the top row of faders there are the same Swop/Flash buttons, and at the bottom there are ten more buttons for very short chops (Flash only).
Tiger Touch II Interface: Additional playbacks for chops/macros
The remote itself has an on-screen menu and the same buttons (A, B, C, D, E) that were in King Kong (that's where they came from!). Here these buttons repeat the on-screen menu. You can click on the buttons, if it is more convenient for you, or on the screen:
Tiger Touch II interface: Buttons for the on-screen menu (you can also press on the screen)
The most important buttons on the remote control are arranged in two rows. That's how I laugh right now - if you learn these terms, you can quickly sit down at any remote control!
Tiger Touch II Interface: Buttons for the most important functions (attributes/record/edit)
The top row of buttons is responsible for selecting the group of attributes that we will edit for the device. This is an analogue of the top buttons above the attribute faders in King Kong, only here they are collected in one place, and the attributes are edited on the screen.
Part of the remote control for selecting devices and managing their attributes
The bottom row of buttons repeats the system buttons on King Kong with similar functions (scene/chase/cue recording, pallet recording, macros, copying, deleting, editing recorded, Fan mode):
Redesigned colors of system buttons on the King King 1024s remote control
Below there is the Main Red Button - Go, and above it there are buttons for controlling the steps of the chase / cuelist - skipping steps, going one step back or one step forward. See, everything is very similar!
Tiger Touch II Interface: Chase and Keylist Control Buttons (and Go Button)
In the same way, there are buttons for controlling selected devices and moving through the selection - forward, backward, even/odd/all, and another red Locate button:
Tiger Touch II Interface: Control buttons for selected fixtures (and Locate button)
Therefore, the operating technique on this remote control is the same as on King Kong. But at first you need to know that attributes are now edited on the screen, that timecode and advanced features are only available in cuelists, and that the effects generator is called up from the remote control menu, and not by pressing a button.
In general, I have some complaints about the buttons. Firstly, the inscriptions on them are made with a laser, and gray on gray looks faded. And secondly, these are wildly bright blue LEDs! This is fucked up! There, resistors for diodes can be safely reduced by half! And my hands are already itching to re-solder the LEDs and change the buttons themselves by color, just like I did on King Kong! =))
On the remote control screen itself there are usually the following windows: groups of devices (top left), visualizer (bottom right) and then a window of different pallets according to your taste. For me - on position (bottom left) and colors (top right). Now you can see that I have selected one group of fixtures and used pallets to give it a color and position. As I already said - if the pallet changes, then these changes will appear in all places where the pallet is used.
Tiger Touch II interface: Main windows on the screen (groups, color presets, positions, visualizer)
Entering parameters and attributes of devices.
Now let's look at how the editor of device attributes (parameters) has changed. In King Kong, for all the attributes we had a bunch of faders that had to be moved. We could press a button and move the two faders that relate to it to the knobs to adjust the attributes more precisely.
What was the inconvenience there? The fact is that if our device was complex - for example, a DMX laser (or SkyPanel - I was once asked to configure a King Kong for it), we did not fit into the standard names written on the remote control and buttons - and we had to invent linking channels to faders as convenient for us. Because of this, everyone suffered as much bullshit as they could, and when you came to someone else’s console, you had to figure out by poking or torture why the color temperature was recorded on the “Color” fader, and the RGBW colors were recorded on the faders of the second page.
Therefore, in large consoles they began to do things harshly and cruelly. All parameters of the device are divided into several groups, which are switched by the same buttons. Offhand (I remind you of the link to the post where I gave a glossary of terms for what the devices themselves can do):
- Intensity - dimmer and strobe
- Position—device position
- Color - colors
- Gobo, Gobo2 - gobos and their parameters (rotation, indexing)
- Zoom/Focus - control beam parameters: zoom, focus, iris
- Effect/Prism - control effects or prism
- Speed - movement speed control
- Shutter - control of strobe (it is most often found in the dimmer) or lamp
- CMY/RGB—color management if the device supports CMY or RGB/RGBW.
Attributes are measured differently depending on the type. Some things (brightness) are in percentages, and some are in numbers. Most often, percentages are used so that different devices can be told “Well, make everything Pan at 45%.”
The device library records which attributes belong to which group. And so to change the attribute you want, you press the hardware button and look at the screen (I pressed "Effect/Prism"):
Tiger Touch II Interface: Easily view enabled attributes and their values
Here we show the following schematically:
- Which attribute groups did we change (based on the first words of the buttons). We changed the dimmer, position and effects. This is convenient for seeing what you will record in the “by Channel” recording mode. Unnecessary groups or specific attributes can be erased with the “Off” button.
- Directly below these icons are clear attribute names.
- Attributes are displayed in threes so that they can be changed using twists. If all the attributes do not fit into three spinners, then an arrow is displayed that shows that the list continues further (I took a photo of this example). In this case, the list is scrolled by pressing the button of the same attribute group again.
- Next, the values of these attributes themselves are displayed. It all depends on the creator of the device library for this remote control. If we know the exact values of the DMX channels, then we can write names for them (as has been done here), and the remote control will offer clear options for names. Or you can not enter anything, and the value will vary from 0-255 or 0-100%.
There are three ways to select values. The first is to point at the screen, at the “up” and “down” arrows. Then the value will be selected from the list. This is convenient if you need to quickly scroll through it to the next option without turning the encoders (twist). The second method is encoders. You twist them and the meaning changes.
And the third way is to enter the numbers directly and accurately. This is convenient if you need to enter one value into different places or sets of heads. Well, for example, we need to set the brightness to 36% for some heads, and then after a few steps return it to exactly 36%.
We go to the “Intensity” section and see that after Locate our dimmer is set to 100%, as it should be.
Setting attribute values in Tiger Touch II: We will set for the dimmer
Turn the encoder and catch exactly 36%? Broke! Press the button next to the encoder. In our case, we need the leftmost one - so click “@A”.
Setting attribute values in Tiger Touch II: Press the @A button near the spinner...
And then we go to the KEYBOARD (at the same time, check out the fucking brightness of the LEDs)!
Setting attribute values in Tiger Touch II: Enter the desired value on the keyboard...
Well, then everything is clear. We type what we want on the keyboard. Exactly, without twisting and wasting extra time on it.
Setting attribute values in Tiger Touch II: The value has been entered and can be set
In some cases, you can also set the speed (for example, of an effect). Please note that it can be selected in two options - seconds or BPM (beats per minute). BPM is convenient for synchronizing with music.
Setting attribute values in Tiger Touch II: Option when the value can be set in different units (for effect speed)
Well, then press Enter!
Setting attribute values in Tiger Touch II: After entering the required value, press Enter
That's it, here's our 36%! Convenient, fast and technical, if you get used to it a little.
Setting attribute values in Tiger Touch II: Set the new value in a visual way
Signing the much-missed Playbacks!
Now let me show you what I was sorely missing - signing playbacks! It's pure paradise here!
Legend of Playbacks (and their status flags) in Tiger Touch II
To sign something (a group of devices, a playback, a preset, a pallet), you need to click on the “Set Legend” item in the main menu:
Installing the Playback legend in Tiger Touch II: Click the 'Set Legend' button
And then select with the button what we need to sign:
Installing the Playback legend in Tiger Touch II: Click the Playback selection button to sign
Please note that the same flags of the attributes involved (I, P, C, G, B, E, S, FX) are shown in the playback captions. So you will immediately understand what you wrote down here if you write channel by channel.
The easiest way to sign is to write text. The on-screen keyboard comes out (there is an Auto Hide option - the keyboard will either come out/hide itself, or it will have to be shown and hidden manually).
Installing the Playback legend in Tiger Touch II: Entering the desired legend text
Here is the text (and at the same time a close-up view of all the icons around the playback):
Our playback is signed, now you can navigate conveniently!
Instead of text (in general, this is strange - you could leave the text too), you can use the icons that are inside the remote control in the image library:
Installing the Playback legend in Tiger Touch II: Selecting one of the standard pictures for a signature
If you want, you can upload your icon from a USB flash drive as a JPG image.
Or DRAW! Choose a color:
Installing the Playback legend in Tiger Touch II: Editor of your own drawings for signatures
And we begin to paint... =)
Let's start drawing crap =))
I drew crap like this. Nothing else came to mind - I need to show you the principle itself!
Installing the Playback legend in Tiger Touch II: Draw your own picture
Here you are:
Installing the Playback legend in Tiger Touch II: Now the Playback is signed with a picture (in some cases this is convenient)
It’s not clear why you can’t use text and a picture at the same time, but it’s not fatal! The thing is cool, very cool! Navigating playbacks has now become much easier, and this is also important if you drive around the venues with this remote control!
View Chase and Cuelists in table form, tracking, position prediction, timecode!
Well, for something tasty - the keylist plate I promised (where there are the most settings). Click on the playback on the screen - and a huge table of all its steps appears for it:
View a list of Cuelist Tiger Touch II steps: Step names, durations, how the step is triggered, position prediction, tracking
This is where you can also sign the step number, set all the Fade/Delay/In/Out times, and turn on those modes that I talked about - Link, MID, Tracking (barely visible on the right). Separately for each step!
And here is our timecode! Here he's fucking recording. You turn on the recording mode, choose what and where to write - and press Go, and the current time is recorded in steps:
View a list of steps Cuelist Tiger Touch II: Timecode (yay!)
What you have already written down can be selected and corrected (and at the same time set an offset, add or subtract something to the current step or the entire table):
View a list of steps Cuelist Tiger Touch II: Enter or edit timecode for the selected step manually (to accurately record the step time)
Not a remote control, but a solid Excel! I'm happy as hell, I'm happy as hell! The only thing that upset me was that I would have to wait a while for Avolites to add Chinese heads to the visualizer. You cannot make models for him yourself, because their models are drawn responsibly - completely to scale, with all the small details and features.
In the future, I plan to use this remote control to do my home shows and, if necessary, travel with it for complex work. I will keep the simple King Kong for master classes as an example of Avolites system remotes and similar ones, because it is very good for beginners.
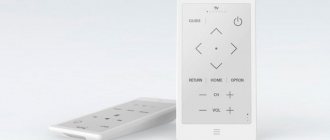
What to do if your Samsung TV does not respond to the remote control
If your Samsung TV does not respond in any way to touching the buttons or touchpad of the touch remote control, you should follow these steps:
- Make sure the batteries are charged. Usually, when their charge is low, a notification about this and recommendations for replacement appear on the TV screen.
- Try removing and reinserting the batteries. Check if they are installed correctly.
- Turn off the TV's power by unplugging the plug from the outlet. This will “reboot” the device. After a few seconds, turn it on again.
- If the remote control was not included with your TV, check its compatibility with your device. Some older TVs are not compatible with newer models of such devices.
- Try connecting the remote control to the TV again.