A standard set of equipment for accessing satellite television includes the television receiver itself, a satellite dish and a receiver that provides their connection. However, you can completely do without the latter device if you purchase a TV with a CI (CAM) module. This module, in fact, performs the functions of a built-in receiver, but at the same time it can be reconfigured, at the request of the subscriber, to any operator, including Tricolor TV. Setting up the ci module on the Tricolor satellite can be done by the subscriber independently, without the involvement of company technicians. We'll tell you how to do this.
Standard recommendations
To independently carry out the full range of activities that will allow you to watch Sony Bravia TV without interference, people must follow the instructions. Initially, you must correctly connect all additional devices. All steps to configure TV options involve using the remote control. After completing the work, you should save the changes. If the TV is disconnected from the power supply before this point, you will have to reset all the parameters again.
Source
Satellite television
Setting up Tricolor TV on a Sony Bravia TV
Preparing to set up your Sony Bravia TV:
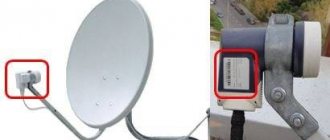
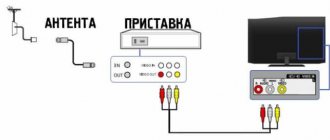
Set up the dish and point it at the EUTELSAT W4 (36B) satellite. Details about the Tricolor satellite coverage area and the direction of the satellite dish in your locality are indicated on the Tricolor website. Write down the local oscillator frequency parameters indicated on the satellite dish converter.
In our case, the upper frequency is 10.75 GHz
Make sure the TV is turned off. Connect the cable from the satellite dish to the TV's satellite dish input, marked with the icon:
Install the smart card with your subscription into the CAM module (DRE-Crypt CI+ module) provided by the satellite TV operator:
Install the CAM module (CI module) into the appropriate slot on your Sony Bravia TV, marked with the icon:
Note: it may be necessary to first remove the safety plug from the CAM connector of the DRE-Crypt CI+ module of the TV
Setting up your Sony Bravia TV
1. Turn on the TV and go to Settings -> Digital configuration -> Auto satellite tuning
2. Confirm that Auto Satellite Tuning will begin.
3. Select your satellite dish configuration. With conventional individual satellite dishes, you should select the option
| Transponder frequency | 12226 MHz |
| Polarization | Horizontal or Left |
| Symbol Rate (SR) | 27500 ksym/sec |
For this reason, no settings changes are required at this point. It may be required if the signal parameters are changed by the satellite TV operator or if TV is configured in other regions.
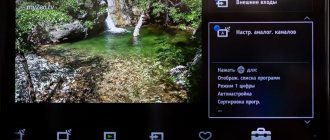
If the antenna is connected and the initial parameters are entered correctly, the screen will display an indication of the signal quality and strength.
Return to the list of satellites and click "Start".
8. Scanning of radio and TV channels begins, during which the progress and number of found TV channels (programs) are displayed.
9. The Sony Bravia TV setup is complete. Depending on the current set of programs transmitted by the satellite TV operator, the number of channels found may vary. Now you can either exit the setup menu or immediately sort the channels by pressing the corresponding button according to the prompt.
Attention! Some of the detected TV channels may not be available for display if they are paid and are not included in your subscription plan with the satellite TV operator.
Author: silver from 04/12/2015, views: 60530
Source
General information for all subscribers
Using the CI module, the subscriber can watch both TV programs in standard quality and HD channels. To gain access to broadcasting, it is necessary that the equipment installed in the home meets the minimum standard requirements set by the operator.
equipment requirements
TVs equipped with a CAM module can work with Tricolor content only if the subscriber's antenna is tuned to the Eutelsat W4 satellite (currently called Eutelsat 36A/36B). In this case, you will not have to set any special Tricolor TV tuning frequencies for the ci module on the receiver - the devices will find the signal automatically.
In addition to the requirements for the satellite, there is one more nuance - the user’s television receiver must be equipped with a satellite tuner that receives a signal in the DVB-S2 format. It is also desirable that the TV supports 4K UHD and HEVC. This will make it possible to view channels from Ultra HD packages on it.
Important! If there is no support for the specified formats, even channels from standard packages may not be available.
Well, besides this, to access broadcasting you will have to purchase a smart card from the operator and connect it to the equipment. Once the installation is complete, you can begin setting up.
What other devices are equipped with CI slots?
In addition to televisions, receivers for receiving satellite television and some set-top boxes for receiving digital and cable television are equipped with CI and CI+ slots. At the same time, slots for the CAM module are available in set-top box models that are comparable in price to a TV. Inexpensive models usually do not have such slots.
As a result, the user of a set-top box equipped with a DVB-C tuner, but without a CI slot, will not be able to watch all cable television channels, since they are encoded by the provider. If the CAM module is missing, only a limited range of broadcasts will be available that are not encrypted by the provider. Be sure to consider this point when planning your purchase and connecting to media content providers.
Source
Search for digital TV channels
Many owners do not know how to set up digital channels on Sony Bravia TVs. This is quite easy to do by following the detailed instructions. Setting up digital channels on such a TV is done as follows:
- In the main menu, select the “installation” section, then click the “digital configuration” subsection and click on the ok button.
- Next is the “digital setup” link.
- Press the “auto search for numbers” key. stations."
- The intention to perform an automatic search is confirmed.
- A window opens.
- The “cable” link is selected.
- For the search, enter the basic parameters.
- The “quick scan” key is pressed.
After setting up digital TV and saving the changes, you can proceed to viewing.
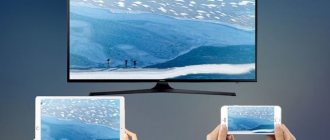
Connecting Sony Bravia to Smart TV technology
There are 2 options for connecting the function to your TV - wireless and wired. This is due to the fact that Smart TV requires the Internet, so there are only 2 ways - through a cable or through a Wi-Fi signal.
If you plan to connect via cable, you will need a special patch cord cable. It is important to choose exactly the right cable; a consultant at any hardware store will help you with the choice.
To connect via Wi-Fi, select “Network” in the settings, find your network, enter the password and connect.
So, when the network is found, follow these instructions:
- Click the Home button
- Next, in the upper right corner, select the “Install” button, then the “Network” section.
- To make the Internet work, go to “Network Settings”, then to “Network Connection Settings”.
- A window will open in front of you, asking you to select the type of setting - for beginners and for experienced users. Select the “Simple” option and the setup will be done automatically.
Now everything is simple. You will see a window with the choice of the desired network type. Choose your network.
- After this, you need to restart the TV and set up Smart TV technology.
- When the TV turns on, press the Home button, then go to the “Settings” section and then to “Network”.
- Click on the “Update Internet Content” button.
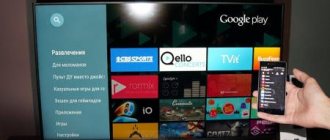
Your Sony Bravia TV with Smart TV will automatically connect to all Sony services and services. Now the installation and configuration of Smart TV is officially completed. To start enjoying all the services, press the “Sen” button on the control panel.
Next we will talk about applications and programs.
Setting up a SONY TV
After connecting the satellite dish and installing the CAM module, you can turn on the TV receiver and start searching for channels. Setting up a TV on Tricolor in the case of a Sony TV is performed in several steps:
- Turn on the TV and go to the “Auto Setup” section. It can be accessed from the Digital Configuration section of the Settings menu.
- Confirm the start of autotuning. You should first familiarize yourself with the information on the screen.
- Select satellite dish configuration. You can usually leave the default setting of Fixed Antenna or DiSEqC. After selecting the parameters, just click the “Next” button.
- Specify scanning settings. There is no need to change anything in this section and you can proceed directly to the next screen of the installation wizard.
- Enter the satellite settings menu. To do this, select “Satellite 1” and press the central button of the remote control.
- Setting LNB parameters. It is necessary to set the upper and lower range of the LNB in accordance with the local oscillator parameters. Sometimes they immediately match the transponder parameters, and sometimes not.
- Setting parameters for receiving a packet. They are indicated in the “Transponder” menu. On SONY TVs, by default they are suitable for Tricolor TV in the western region. If you install equipment in other regions, you may need to change these settings.
- Start search. To do this, you need to return to the list of satellites and click on the “Start” button.
During scanning, the system shows the current progress of searching for channels and radio stations. Once completed, the user will be shown how many channels were found. He can immediately finish setting the parameters and begin viewing the content. If you wish, you can also sort TV channels in the desired order.
Important. Some channels may be found but not viewable. This is usually associated with an active subscription. You can check information about active subscriptions on the operator’s website in your personal account or through customer support by calling 8-800-5000-123.
It is not difficult for a Tricolor subscriber to install a CAM module for a Sony Bravia TV and configure channels on it. The main thing is to follow the instructions and not rush too much. Usually the whole procedure takes no more than 10-15 minutes.
What is CI and CAM module
CI (Common Interface) is a slot located on the back of the TV. May also be called PCMCIA connector. Common Interface is a system that provides the device owner with access to encrypted content. Basically, the content is provided by TV channels, but access, for example, to a database of films and animations can be provided.
"CAM" stands for "Conditional Access Module". The CAM module is inserted into the CI slot. A decoding smart card from the content provider (cable or satellite television provider) is placed in the CAM module. Without it, the CAM module will not work, since all the information necessary for decryption is located on the card and is read from it during operation. Essentially, a CAM module is an adapter for an access card to the provider’s licensed/paid content. The smart card contains a microchip. It provides identification of a specific subscriber in the operator’s network and unlocks content in accordance with the tariff plan.
The CAM module is usually included with the TV. If for some reason it is not there, but there is a CI slot, then the module will have to be purchased separately. Alternatively, content providers provide CAM modules along with the service. It is usually offered for rent for little money.
Automatic channel search
The user must find the corresponding connector on the TV and insert the antenna into it. After this, you will have to select the signal source of the same name. To prepare the TV for searching channels, you should disconnect all previously connected devices (additional). Tuning channels on a Sony Bravia TV can be done either manually or automatically. If the TV owner does not want to waste time, he can use the remote control to perform automatic setup. To do this, enter the main menu, find the “parameters” section, select the “auto-configuration” link, and confirm the action.
Selection of TV channels broadcast
After the TV is connected to the antenna, the owner must follow the instructions. It tells you how to set up channels on your TV, as well as what to do next. The user will be asked to select a method for receiving and transmitting the signal. For example, we only plan to set up digital television on a Sony TV. In this case, you need to click on the appropriate link, after which the search for digital TV operator channels will begin. Also, the TV owner can give preference to cable television, choose over-the-air broadcasting and carry out analog setup.
After this, select the following parameters in a separate tab:
- network ID;
- scan type;
- frequency.
Important! If necessary, you can change the default data. After confirming the action, the TV will automatically find and display all available TV channels.
What is a CAM module and why do you need a CI slot on a TV?
Modern TVs are designed so that the owner gets maximum access to different signal sources with a minimum of additional funds. It is inconvenient for the user, for example, to control a separate satellite tuner or set-top box for receiving digital cable television channels. It’s much easier when there are no additional devices, because everything is built into the TV and controlled from one remote control. This is implemented in modern TV models. But it is necessary to resolve the issue of restricting access to content to ensure intellectual property rights. Companies providing content solve it using CAM modules and CI.
Tariff “We are MTS”
Internet, digital TV and mobile communications for the whole family - in one tariff! Connect up to 5 SIMs on the “We are MTS” tariff. The first month is free!
Setting up the CAM module on different TV models
SAMSUNG
Enter the menu (green button) - “Channel” (icon “Satellite dish”) - “Auto-tuning” - signal source - “Cable” - “Digital” - “Start”.
PHILIPS
On the back of the TV you need to find a sticker where for each tuner (DVB-T and DVB-C) there is a list of countries in which, according to Philips, digital television is available (at the time the TV was released). If Russia is not there, then another one will need to be installed.
“Home” icon - “Configuration” - “Installation” - “Reinstall channels” - “the country indicated on the sticker on the back panel” - “Digital mode” - “Cable” - “Automatic” - “Start”.
Philips TV models 2011:
“Home” - “Installation” - “Search for channels” - “Reinstall channels” - “the country indicated on the sticker on the rear panel” (usually France, Finland or Germany) - digital mode “Cable (DVB-C)” - in the “Network frequency” line, enter the frequency; in the “Transmission speed” line, enter the speed; select the “Frequency scanning” line.
SHARP
If the “DTV” item is not on your TV, then you need to select another country - France, Switzerland, Sweden or Finland.
Button - "DTV" - "DTV" - "Installation" - "Auto-installation" - "OK"
Not all SONY TVs are equipped with a tuner for digital television (DVB-C), so first check whether your TV receives the signal: models with a DVB-C tuner are marked KDL-**EX*** or KDL-**NX** *. Models KLV-**BX*** etc. do not have tuners.
Button "" (or "HOME") on the remote control (green) - "Settings" - "Digital configuration" - "Auto-search for digital stations" - connection type "cable" - scan type "full scan" or "manual" - enter frequency - Access code “Auto” - enter the symbol rate - “start” - wait until the channel search ends.
Panasonic
“Menu” - “Settings” - “Menu analogue. settings" - "Add TV signal" - check the box "DVB-C" - "Start auto-tuning".
After completing the search for channels in the main menu, in the “Settings” item, the line “DVB-C setup menu” will appear, where you can adjust the settings manually (set the frequency and speed). If your TV asks for a search step, enter 8 MHz.
Toshiba
Language “Russian” - DTV tab manual tuning - OK - enter frequency, modulation, symbol rate - OK - channel search will begin
"" (Menu) - "Options" - country Finland or Germany - menu "Settings" - "Auto search" - method of connecting to TV "Cable" - "Settings": search type fast, Frequency (kHz), Speed. characters, Modulation, Network ID: auto - save all parameters.
Be sure to turn off “Automatic channel updates”, otherwise the TV will periodically reset the channel list you have configured.
Source
Manual channel search
Digital channels on a Sony Bravia TV can be installed manually. To do this, you will have to connect an analog antenna, take the remote control and use it to enter the main menu. In the “manual search” section, frequencies are changed using the minus and plus keys. After the TV channels have been found, everyone should fine-tune them. Thus, it will be possible to adjust the quality of digital broadcasting:
- Select the “manual” option in the menu.
- The frequency parameter is entered manually.
- You should leave “auto” in the access code box.
- In manual mode, the symbol rate parameter is entered.
- Click on the “start” button.
How does decoding work?
Providers of digital content - cable television or satellite channels - transmit it in encrypted form. In order to unblock the signal of encrypted channels, you need a code that is changed by the provider according to a certain algorithm.
This code is transmitted via the CAM module from the decoding smart card issued by the provider to the tuner. As a result, those channels that are paid and included in the tariff plan will be unblocked, while others will remain closed. When changing the tariff plan, the provider remotely changes the codes on the smart card, opening or closing channels to the user.
This way you can unblock digital cable or satellite TV channels.
In order to have something to unlock, the TV must be equipped with the appropriate tuners. Reception of cable television signals is carried out using tuners - DVB-C or DVB-C2, and satellite - DVB-S or DVB-S2. Also, to receive satellite television, you must have an antenna that receives the signal from the satellite. The cable TV provider will transmit via cable.
Types of CAM modules and CI
Depending on the version, CI can support the installation of one or two access cards. Why might this be needed? For example, if you want to receive content from two providers. Now, in addition to CI, there is CI+. This is an updated version of the system with an increased degree of protection against piracy. CI+ implements such options for the operator as a ban on recording programs, permission to view media content once, or a ban on advertising.
CAM modules come in two types:
Single-system modules can only work with one specific type of encoding. Usually content providers supply them along with a smart card when concluding a contract. Therefore, when changing providers, you will need another module that provides signal decoding in another network.
Universal modules support several encoding algorithms. In this case, cards from different operator providers can be installed in the CAM module. The device will automatically determine which decoding algorithm to use in a particular case. If you have a universal module, it is enough to obtain only a smart card from the provider.