Accessing the Internet directly from the TV allows users to watch movies and TV series, listen to music, visit social pages, check news and weather, and solve many other tasks. Most models of modern television panels provide this opportunity. To do this, they are connected to the Network via cable or wirelessly. But sometimes it turns out that the TV does not connect to Wi-Fi. There can be a number of reasons, ranging from violation of connection rules to faulty equipment.
The TV does not connect to the wifi network - check the compatibility of network standards
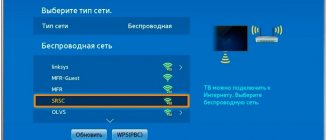
If other wireless networks appear in the list, and only yours is invisible, then it probably works with a standard that is not supported by the TV.
Wi-Fi networks can operate using 802.11B, G, N or AC standards. The latter operates on a completely different frequency band (5 GHz), while the previous ones operate at a frequency of 2.4 GHz.
If yours transmits on the 5 GHz band using the 802.11AC standard, older devices operating on the 2.4 GHz band will not detect it. What's the solution?
Routers that support 802.11AC usually have a dual-band feature, which means you can activate a second Wi-Fi network on the older 2.4GHz band in 802.11G or 802.11N.
Then your TV will be able to connect to such a network. To do this, on your computer/laptop, go into the settings of your router and find the Wireless Settings.
If it has this option, then you should find a parameter associated with “Dual Band”, that is, transmitting on two bands at the same time.
For example, in TP-Link routers this option is located on the “Dual Band Selection” tab.
There you can choose whether the network should broadcast only on the 2.4 GHz band, only on the 5 GHz band, or both.
If the router transmits only one standard, activate the option to transmit in both bands and save the changes. Your Wi-Fi network should now appear on your TV.
What is Vidaa OS
The Vidaa Smart TV operating system is specially designed for the new Hisense TV range. It has become more practical, comfortable, easy to operate and at the same time functional. The control of Vidaa's built-in intelligent system is implemented taking into account the requirements of Smart TV users, as a result of which all unnecessary elements that complicate the use of the software have been eliminated. The updated interface simplifies navigation through applications on the TV display; the convenient arrangement of elements allows you to quickly navigate to the functions you need and customize the user environment directly from the home page of the screen.
The platform is based on a Linux-like system, which makes it possible to use Android applications, including Netflix, Pandora and YouTube. An application previously available only for Google TV – the Amazon Prime Video service – is also supported. It is possible to download compatible programs from the standard store, and in addition, the new operating system of Hisense TVs allows you to record content to a connected external storage device or to the cloud.
Continuing the review, we note that the Vidaa Smart TV operating system from Hisense is updated over the air using an Internet connection. The user has the opportunity to manually check and install the software.
Vidaa U 3.0 AI OS has a decent level of security against unwanted and malicious software, and also demonstrates the privileges of using Artificial Intelligence, including compatibility with voice assistants. There is full integration with Amazon Alexa and interaction with Google Home Assistent, so it is possible to control ULED TV using a virtual assistant. Controlling the operating system from your smartphone using the proprietary RemoteNOW app makes it easier to communicate with other smart devices integrated with Alexa.
Troubleshooting
To fix the problem, the user needs to check all possible causes of the problem one by one.
Rebooting the router and TV receiver
If the user has lost the TV's connection to the Internet via WiFi, both devices must first be rebooted. Software malfunctions may have occurred in the operation of the equipment, which can be eliminated by initializing the hardware drivers in a new way.
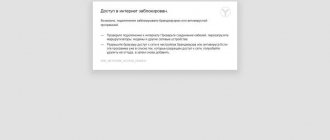
On a note! If the TV receiver does not access the Internet, but sees the network and tries to connect to it, this means that the problem lies precisely in software errors in the equipment.
To reboot the television panel, you need to turn it off and turn it on again after a few minutes. At the same time, for television receivers that are on the local network even after the screen goes off, you need to unplug the plug from the socket and, after waiting 2 minutes, return it to its original place.
When rebooting your router, wait at least 30 seconds after turning it off and before turning it on again . This is necessary to end the previous Internet session on the service provider side. A new connection will be established with the settings reset. And after the TV and router are started, you need to set up the wireless connection again.
Manual data entry
If the problems persist after rebooting the devices, you should connect the TV receiver to Wi-Fi, specifying the connection data yourself. To do this, you need to open the network settings menu and select manual input mode.
To specify an IP address, you need to open the router's web interface, find the start and end addresses of the local range and enter any IP within these limits. A “subnet mask” is a part of the IP range used to address local network clients. Usually this line indicates 255.255.255.0. "Gateway" is the router's IP address used to open the web interface.
Important! You can find out the parameters for the “Gateway” and “Subnet Mask” lines using any PC connected to your home Wi-Fi network. To do this, you need to right-click on the “Start” button, select the command line in the context menu that appears, type “ipconfig / all” and press the enter key.
Fixing errors in DNS servers
The following troubleshooting method is most often used for Samsung Smart TV devices. Connecting to the Internet via Smart Hub becomes difficult if the manufacturer's servers are overloaded. After entering your own addresses for DNS servers, the television panel connects to the Internet directly, without accessing company resources.
To obtain DNS server addresses, you should contact your provider's technical support. You can also use free public DNS from numerous well-known companies.
On a note! Google provides its own addresses: IP of the main server is 8.8.8.8, alternative - 8.8.4.4. If there is no line for entering a secondary address, just enter the main one.
Another WiFi connection method
If the connection was made by selecting your home network and entering the password manually, then you need to try connecting in another way - via WPS. This technology starts a fast connection in the settings of the TV panel. It should also be applied on the router by pressing the button on the back of the device or through the web interface.
To open the web interface, you need to use the data indicated on the sticker on the bottom of the device. The username, password, and standard IP are written there. You must enter the IP in the address bar of any browser, and then specify the account information . After logging in, you need to go to the “WPS” tab and launch the function. The connection will be established within a few minutes.
If the connection was originally configured via WPS, but is currently not working, you must enter the data manually. If you are connecting to a hidden network, you need to enter its name and password yourself.
Advice! You should be aware that television receivers with old firmware often do not find hidden networks, so before setting up a connection it is recommended to disable this mode in the router settings.
Changing the location of the router
Interruptions in the wireless connection can be caused by the poor location of the router, which means the weakness of the signal coming from it, which the TV constantly loses. This can happen if there are walls, furniture, or working equipment in the way.
The router should be placed so that there are as few obstacles as possible between it and the television receiver, preferably on a hill. The device can be placed on a cabinet or hung above the door.
Advice! If you can't move the router, you can install a signal booster or an improved antenna.
Troubleshooting router problems
Sometimes the TV panel cannot connect to Wi-Fi due to the router settings. You can change them in the web interface. To do this, you first need to open the “DHCP” tab. In order for the TV set and other devices connecting to the home network to be automatically assigned a local IP, the DHCP server must be turned on and functioning without errors. Otherwise, the equipment will not have access to the Internet.
Next, you need to go to the “Security” page and disable client blocking by MAC address, if it is activated. On routers from many manufacturers, for example, TP-Link, ASUS and others, the user can place the MAC address of any connected equipment in the trusted list . While the router is operating, devices from this list will not be blocked, which means that Wi-Fi on the TV set will also be stabilized.
You can find the MAC address of the TV panel in the device settings. Each manufacturer's path to this data looks different.
On a note! On LG TVs, to get the MAC address, you need to open the “Settings” section, then “Support”, where “Device Information” is located. To find this section in television receivers from other companies, you need to use the instruction manual.
After adding the MAC address of the TV receiver to the trusted list or after making changes to the operation of the router, the device should be rebooted through the “System Tools” section in the router menu or by pressing the power button on the product body. Another way to reset is to unplug the appliance.
Resetting settings and changing standards
Quite often, resetting the TV receiver to factory settings helps resolve problems.
Advice! It should be remembered that in this case, not only the network settings will be changed to the initial values, but also the rest - sound, image, etc. Therefore, it is recommended to write down all custom settings in order to return them after restoring the TV to factory settings.
In television receivers from various manufacturers, this function is located in different sections of the menu.
- In LG technology, you need to open “Menu”, then “Settings”, then “Advanced”. Here you will need to find the “General” section, which has a “Factory Reset” button.
- On Samsung TV panels, you can find the “Reset” function in the “Self-diagnosis” section, located in the “Support” tab.
- On devices manufactured by Panasonic, open "Settings", go to the "System Menu" and select "Initial Settings".
- A similar function is available in television receivers from other manufacturers - Sony, TCL, Sharp, Philips, etc. The user can find it independently in the menu or use the operating instructions.
After performing the reset, you need to reconnect the TV to Wi-Fi and check the functionality of the established connection.
Other faults
In addition to the above faults, there may be other reasons why the TV does not establish a wireless connection. Thus, the user may mistakenly select the wrong Wi-Fi network or enter the wrong password.
Sometimes the problem may come from the service provider, which means that access to the Internet will not be available on other devices. To check this version, you need to try to access the Internet from another device, for example, from a mobile device.
The problem is the location of the router
Disturbances in the connection to the Wi-Fi router may occur due to a weak signal. If possible, move the router as close to the TV as possible. In order for the router to see TV, you need to remove all obstacles that weaken the signals: large indoor plants, furniture, household appliances. What to do if the TV and router are in different rooms? Walls also block radio waves. Therefore, it is advisable to place the equipment in one room.
To improve signal quality and Internet connection speed, you need to place the router at an elevated location. For example, you can place the access point on a large closet or hang it above the door. If it is not possible to change the location of the router, an additional antenna is connected to it to increase the power. As a result, the signal quality will noticeably increase. The quality of the signal directly depends on the RF gain of the antenna.
Sometimes the router does not see the TV because interference is caused by other household appliances: a refrigerator, a microwave oven. This point is also worth taking into account. Place equipment so that it does not interrupt the Internet connection.
How to connect iPhone to Smart TV
Finally, you've replaced your old TV with a Smart TV, and now you can't wait to take full advantage of its full potential: in particular, you're excited about being able to take your iPhone and send videos, photos and music to your TV with just a few clicks. Well, I understand you, it's a comfort that even I can't do without... but if you're here right now and you're reading this tutorial, that means something is wrong, right?
Let me guess: Not being a tech expert, you've been trying to "tweak" your iPhone's settings a little, but you haven't figured out how to connect your iPhone to a Smart TV . This is true? Well, don't worry, you're not the only one in this situation. In fact, connecting your smartphone to your TV isn't always intuitive, but I'm here today to help you.
Take five minutes of your time, follow the instructions I am about to give you, and I assure you that you will succeed. First, I will explain how to connect iPhone to TV, stream videos or other content to the latter, then I will explain how to mirror the iPhone screen to Smart TV, and finally, I will recommend some applications that will allow you to use iPhone as a remote control management. I guarantee you that there is nothing difficult about this because the instructions for them are the same for all Apple smartphone models. Enjoy reading and have fun!
Setting up digital TV
Before you start searching for TV channels and radio on your Hisense TV, make sure that it supports digital TV format, otherwise all your efforts will not be successful. In order to configure digital terrestrial channels from the Antenna with currently twenty programs, your model must support DVB-T2. You can find out in the product passport or by contacting the manufacturer. This information will soon be available on our website. In the meantime, look at the RTRS website in the Everything for Admission section.
Auto channel tuning
In order to set up digital channels on your hisense Smart TV, you will need a remote control and a little of your time.
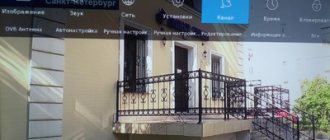
- Press the Menu button and look for the System section, this is where the settings we need are located.
- Find the Settings item and click OK.
- Next, click on Channel.
- Select Auto search.
- The next step is to select Signal Reception Satellite, Terrestrial or Cable. Check the box for your broadcast standard.
- Go to Mode Settings.
- We set All channels.
- DTV scanning mode, if you need analog, then choose ATV as well
- LCN better turn off this channel sorting.
- Click on next and wait for the scanning to finish.
- When choosing cable TV, you will need to select the Full or Frequency Scan search mode, in this case you need to know the starting frequency.
- When choosing satellite TV, select your operator and start auto-searching for channels. Don’t forget that the antenna must be tuned to the satellite of the exact provider you have chosen. Or you will need to maintain all the data manually.
Installing applications
Among the basic features of the OS there is a standard App Store application store, accessible from the home screen. Through it, the necessary applications optimized for this TV are installed. Typically this is software related to watching videos, listening to music, playing games, as well as social networking applications and other software.
TV Browser is also available; it can also be used to install software. At the same time, do not forget that when downloading software from third-party resources, you should be vigilant and it is better to avoid dubious sources.
Installing applications through unofficial resources is simple:
- go to Smart TV and open the browser;
- enter the address (you can use the resource https://hisense.clan.su/ or the page https://hisense.alexxnb.ru/ with a small selection of useful software) and go to the site;
- select the desired application and install by pressing the appropriate button.
Software installed by the user can also be easily removed. To do this, on the Applications screen, you need to click the “Delete” icon and delete the selected application. Factory-installed programs are not removed.
Connection rules and causes of problems
Troubleshooting should begin by eliminating the human factor, that is, you first need to make sure that the login is correct, the password is correct, and the procedure for establishing a connection is followed . So, to connect the TV receiver to Wi-Fi, you need to perform the following algorithm of actions:
- make sure that the router is working properly;
- turn on Wi-Fi on the television panel, and if an external adapter is connected, make sure that it is functioning correctly;
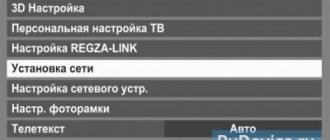
- open the TV menu, go to the “Network” section, then “Network settings”, select the wireless connection type;
- select the desired one from the list of detected networks;
- specify a password, after which the connection will begin;
- Once the process is complete, you need to confirm the action by clicking “Ok”, that’s it - the wireless connection setup is complete.
If the connection of the television receiver to the router was completed correctly, the credentials are entered correctly, but there is no connection, you should proceed to troubleshooting. The most well-known reasons are:
- equipment failure;
- the connection does not function if its parameters are detected automatically;
- error in DNS servers;
- The Wi-Fi connection method you are using is not suitable;
- the router is poorly placed in the room, or there are interruptions in its operation;
- Wi-Fi module does not work.
The above reasons need to be identified and eliminated.
Best apps
Among the useful software that can be installed:
- OTTPlayer. An excellent universal service for Smart TV, which allows you to combine IP-TV in one playlist, as well as set up a list of channels in a certain sequence and receive an electronic program guide/
- Gismeteo. A service for Smart TV that offers detailed weather forecasts in Russian cities and other parts of the world.
- Yandex. A service that offers information not only about the weather, but also about exchange rates, and also supports news and events.
- Rutube. The largest Russian video hosting site where you can watch films, TV series and user videos.
- Peers.TV. Application for watching TV online and recording.
- Zaycev. FM. Online music radio station.
- Dom.ru Movix. An online cinema, characterized by fast content search and viewing comfort, offering more than 200 live channels. The archive of TV shows is stored for up to 7 days.
- LG Plus Channels. New online TV from LG and Megogo.
- In contact with. Popular social network application.
Although Vidaa OS has a fairly good set of firmware, the pre-installed applications are usually not enough for the user. To solve this problem (equipping the device with new software and personalization), the system’s functionality includes an App Store. Here, among the supported applications, you can find the necessary software in accordance with your preferences, and if it is not available, then use third-party resources.
Built-in Wi-Fi module is faulty
To determine why the TV does not connect to the Internet, you need to check whether the equipment supports Wi-Fi. If the model does not support Wi-Fi, then buy a special adapter. It is advisable that the TV and external Wi-Fi module are from the same manufacturer, otherwise compatibility problems may arise.
If the TV supports a wireless connection and everything worked correctly, but then the connection is lost, it means that the hardware Wi-Fi module has failed. Diagnostics are carried out according to a similar principle, but there are still certain differences. Let's take an LG TV as an example:
- First you need to check whether the TV connects to other wireless networks. For example, if the device does not detect any other available connections at all, the module is most likely damaged.
- Open settings, and then go to the "Support" section. Open detailed information about TV. In the address line, pay attention to the symbols. If the address consists of zeros, this indicates a module malfunction.
It is extremely difficult to fix a hardware problem on your own. This requires special equipment. It is more rational to contact the service center so that engineers can normalize the operation of the TV.
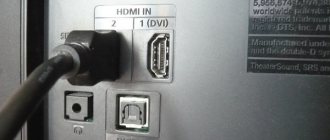
Another way out of this situation is to buy an external adapter. We have already talked briefly about this possibility earlier. Visually, the Wi-Fi adapter resembles an ordinary flash drive. The device is connected to the TV via an HDMI interface or USB connector. Supermarkets and electronics stores also sell external adapters with multi-directional antennas. Such devices are capable of providing the highest quality signal reception.
Experts recommend using a USB cable so that the adapter and the TV are located at a certain distance. Connecting according to this scheme allows you to minimize interference that reduces the quality of reception. As a result, the speed of your Internet connection will noticeably increase.
We have previously talked about possible compatibility issues. Therefore, open the instructions for your TV and see which devices your model supports. Information about supported external adapters can also be found on the official TV manufacturer portal.