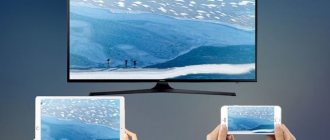
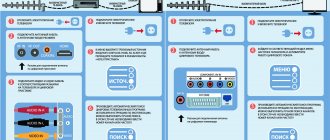
You can connect a large number of external devices to SONY BRAVIA. Acoustics, DVD players, smartphones, video cameras, flash drives. After reading this text, you will learn how to turn on Bluetooth on a Sony Bravia TV, how to connect speakers to a Sony Bravia TV, and instructions for connecting other external devices.
Wired connection of the TV to external devices: general information
Not all cables that may be needed during the procedure are included in the basic package. Therefore, they will need to be purchased separately. Use quality wires. After all, insignificant savings can result in the breakdown of expensive equipment, or the quality of image or sound reproduction will suffer. Also, do not forget that you need to connect the wires on devices that are unplugged from the outlet.
The designs of the brand in question provide many different connectors. Let's look at them in more detail.
This state-of-the-art high-definition multimedia interface allows the transmission of ultra-high-resolution digital images and multi-channel discrete audio. It is the support for multi-stream digital audio that distinguishes HDMI from DVI. But if the second device has DVI instead of an HDMI jack, don’t worry: special adapters are available for sale.
HDMI is ideal for connecting Blu-Ray players, game consoles, PCs, camcorders, and home theater receivers.
The picture when transmitting an image via the NDMI wire has the maximum possible resolution (if the capabilities of the TV receiver allow it). But do not forget that there are different versions of cables: from 1.0 to 2.1.
The difference between them lies primarily in bandwidth and supported resolution. Thus, HDMI1.0 had a data transfer rate of up to 4.9 Gbit/s, while in the recently introduced HDMI2.1 this figure reaches 48 Gbit/s. HDMI 2.1 supports 4K, and even 8K and 10K (such displays have not yet appeared, but the interface for them has already been developed), as well as a higher screen refresh rate.
As a rule, Sony TVs have several NDMI ports, which allows you to use high quality transmission for all devices that support this standard. The ports are numbered; when connecting, remember the number that was used. After connecting, press the “Input” button on the remote control. A dialog box will open in front of you in which you need to specify which signal you want to apply. If you have several NDMI connections, the port number will help you navigate.
If your multimedia system consists entirely of Sony devices, they are connected to each other via the NDMI interface and support BRAVIASYNC technology, you can synchronize them. For example, you insert a disc into a DVD or launch a game console, and the TV itself will turn on and off after use.
To configure the use of SYNC technology, follow these steps:
- On the remote control, press the HOME button to enter the main menu.
- Go to the “Setting” section and select “External Input” – “SettingSYNCBRAVIA” – “Device List”.
All devices that support SYNC will be displayed on the screen; activate the one you need. After this, enable the technology in the outdoor device.
If the external device is not equipped with an NDMI interface, you can use analog ports. There are several of them on Sony TVs.
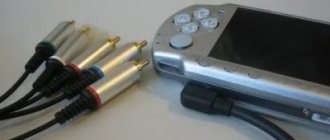
And first of all, this is the AV input - three (rarely two) round connectors of different colors. This standard was developed over 70 years ago, so don't expect high image quality from it. People call it “tulip” due to the unique appearance of the plugs. RCA is used in DVD players, VCRs, and analog cameras. AV with two plugs outputs mono sound, with three - stereo.
There is also a composite connector on TV. This is a set of five round inputs (similar in appearance to tulips): three of them are used for video and two for audio. This panel jack may be labeled RLP r P b Y or COMPONENT. Unlike tulips, the composite interface allows you to output high-quality video, up to the Blu.Ray standard, but it is very sensitive to the quality of the wires and their correct connection.
Some models also have a SCART connector. It collects much less interference than any other type of cable. This universal port can be used to connect a wide variety of devices. It is a single tip with two rows of contacts.
To switch your TV to any of these sources you need to:
- Press the INPUT button on the Sony remote control.
- Select the desired signal source.
- The TV will mark the input to which the external structure is connected with an icon. In this case, the SCART connector is designated as AV1 and is always marked as active, even if not in use.
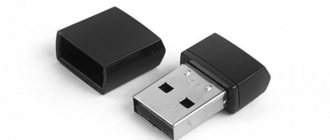
How to connect a flash drive to a TV
If your TV has a USB connector, then using the drive will not be difficult. But on older models there is no such connector. However, if you wish, you can use a flash drive on an old TV. There are several ways to connect a USB drive through intermediate devices. This is what we are talking about:
- set-top box for watching digital broadcasting;
- media player;
- DVD player.
Let's consider all possible connection methods.
Method 1: Using a USB port
Most modern TVs are equipped with a USB connector. It is usually located on the back of the TV, sometimes on the side or front. The port we need looks like the one shown in the photo below.
So, if your TV has a USB connector, do this:
- Insert your flash drive into this slot.
- Take the remote control and switch to operating it with the “TVAV” button or something similar (depending on the model).
- A list of files on the drive will open, from which you select the one you need to view. To view selective information, use the forward and rewind keys.
When viewing, files on the flash drive change automatically at a certain time interval. Such files are sorted not in alphabetical order, but by recording date.
To play back data, the removable storage media must have the correct file system format, usually “FAT32” or in older models “FAT16”. If your flash drive has an NTFS or EXT3 system, then it is not recognized by the TV.
Therefore, first save all the data, after which you will need to format the flash drive into a format compatible with the TV. The process looks like this step by step:
- To remove the drive, press the “Stop” key and wait until the LED on the flash drive goes out.
- Remove the device.
- Insert it into your computer. Open “This PC”, right-click on the drive and select “Format” from the drop-down menu.
Next to the inscription “File system”, put the one you need. Put o. Click "Get Started."
- A warning will appear. Click “Yes” or “OK” there.
The flash drive is ready to use!
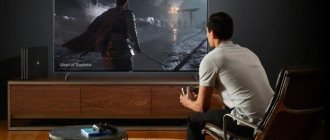
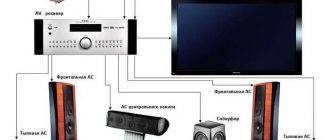
How to connect a home theater to a Sony Bravia TV
Connection methods largely depend on the configuration. Let's focus on the classic version, when the recreation center kit includes:
- The receiver is the “brain” and processing center of all peripheral devices. It decodes signals, reproduces audio and images, and broadcasts images to the TV screen and sound to acoustics.
- Audio system. Consists of several speakers and a subwoofer.
- Signal source – DVD or multimedia player.
Next, you need to study what connectors are on the TV and receiver. If the receiver does not have HDMI, you can use a Scart or component connector. But the image quality in this case will be worse.
Find the HDMI-IN connector on your TV and connect it to HDMI-OUT on the receiver. With analog ports, everything is identical: we connect the receiver’s outputs to the TV input jacks.
How to connect speakers to a Sony Bravia TV
The most convenient way is to connect external speakers to the receiver and use HDMIARC. The meaning of this technology is as follows. When an external signal arrives at the receiver (for example, from a multimedia player), it separates the video and audio into separate streams: the video comes to the monitor via the NDMI wire, and the sound goes to the speakers. When watching broadcasts, audio and video go directly to the TV. Logically, to get sound to the speakers, you need another wire. But when using ARC technology, there is no need to use wires. After all, as noted above, an NDMI cable is capable of broadcasting a picture both to a TV screen and to an AV receiver (but already sound). But it is important that HDMI have a version of at least 1.4, and that the audio system, just like the TV, supports ARC technology.
If ARC is not supported, you can connect speakers through an optical connector, speakers, or a headphone jack. With a “tulip” connection, you need to manually translate the audio stream. If you connected via a jack, you don’t need to switch anything: the equipment will do it automatically.
Reading a movie through a DVD player
Despite the fact that DVD technology is gradually becoming a thing of the past, it is still found in many houses and apartments. There are users who like the quality of playing movies and cartoons through DVDs. And this same device often has a connector for connecting a standard flash drive.
To connect a flash drive to your TV via a DVD player, do the following:
Often, owners of high-quality DVD players switch to playing movies only from drives. And there are a number of reasons for this:
Important! You cannot play video with the new 4K resolution from a flash drive through a DVD player if the equipment itself does not support this format. To transmit such quality, it is better to buy Smart TV with new matrices.
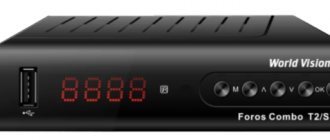
Playing movies through a set-top box
Tuners for digital TV have a USB input as standard. The equipment itself is connected to the TV via an HDMI connector or via “tulips” for older versions of TV.
Connecting a flash drive follows the standard algorithm: install the drive, turn on the TV, use the remote control for the set-top box to find the desired file through the Menu.
Important! Before connecting the flash drive to the tuner, make sure that the files are written in the required format. Not all set-top boxes reproduce all format options. It is better to immediately purchase an Android set-top box that expands the functionality of the TV into a Smart device. And through it it’s easy to connect a drive with any movie option.
Sound, Using me nu functions
Page 217
- Image
- Text
33
RU
Using ME functions
NU
~
•
“Additional” parameter Settings” is not available when “Picture Mode” is set to is set to “Vivid” and is also not available for USB (Video) input.
Noise reduction for MPEG
Reducing noise in the image when viewing a video image compressed using the MPEG algorithm.
Film Mode
Provides improved picture quality when playing DVDs or VCR tapes by reducing blur and grain. “Auto”:
Ensuring that films are reproduced exactly like the original.
“Off”:
Disables the Movie Mode function.
~
•
If there is an incorrect signal in the image or there is excessive noise, “Film Mode” is automatically turned off even if “Auto” is selected.
Add. installations
Used to fine-tune the Picture function. “Reset”:
Return all additional settings to factory presets.
“Add.
improved Contrast: Automatically adjusts the Backlight and Contrast settings to optimally match the screen brightness.
This setting is especially effective for dark scenes as it increases the contrast of details in dark images. Black Corrector:
Increases contrast by enhancing dark areas of the image.
“Gamma”:
Adjusts the balance of bright and dark areas of the image.
“Bright White”:
saturates white shades.
Vivid Colors:
Increases the brightness of colors.
Sound
Sound mode
Selecting a sound mode. “Dynamic”:
Enhances sound clarity and sonic presence for enhanced listening experience and musical realism.
“Standard”:
Improves sound clarity, detail and presence.
“Speech Clarity”:
Makes your voice sound clearer.
Reset
Restores all Sound settings to factory defaults.
Equalizer
Used to adjust frequency settings. Using buttons
G/g select the desired audio frequency, then with
using buttons
F/f adjust parameters and press
. Changed
The settings are applied after selecting the “Sound Mode” options. Select “Reset” to restore the original Equalizer settings.
~
•
The High Frequency setting affects the sound in the high frequency range, and the Low Frequency setting affects the sound in the low frequency range.
Balance
Allows you to adjust the sound balance between the left and right speakers.
Continuation
Viewing photos/movies and listening to music from a USB device
You can view photos/movies and listen to music stored on a USB device on the TV screen.
- If the USB device is connected to a TV with a power switch, turn it on.
- Press the HOME button, select the desired option.
If you selected a folder, select a file.
The selected file will start playing.
Did you manage to solve the problem?
Thank you very much and this works on Sony smart TVs, but unfortunately they did so, but on this android kdl 43w756c with such movements and the sequence of actions of your answer, the sub icon does not appear. I express my gratitude to you for your help! Dear friend, there is no USB sign on the TV screen when we press Home, that’s the whole problem. Can we contact SONY via Skype? Sorry mother-in-law, thanks again for your help Evgeniy
Many of us will gladly agree to watch our favorite movie, video, or just photos that are stored on a flash drive. And if all this is also in good quality and on a large TV, then even more so. But in some cases, users simply do not know what is needed to connect a removable storage device to a TV. Let's consider all possible ways to complete the task.
Sony KDL43W756C
Please help! We can’t look at the flash drives, we can’t find a pointer or icon for the usb input anywhere
Answers 13
The whole family looked up and down and the usb icon does not appear
So in the picture it is directly drawn where look at the top of the page, on the back panel where the antenna is connected there and the USB
The flash drive is inserted and we can’t find where to turn it on. There’s no usb reflection on the screen
We looked through it and sorry, persistence. Maybe it’s not for us. We didn’t find anything and sorry again
For example, look at a photo like this from a flash drive
- Connect a USB device or network device to the TV.
- Press the HOME button, then select [Album] - USB device, server or specified folder containing the file you want to play - folder or file from the list. If you selected a folder, select a file.
And look here
Possible errors when connecting directly
It’s easy to plug a flash drive into a Dexp, LG, Samsung TV if it has a USB input. But during this process the following errors may occur:
All these errors can appear if you connect a flash drive to the TV through additional equipment. The correction methods will be the same as above.
Incorrect flash drive format
Besides the wrong video format, some flash cards have a different native file system format. And if it does not match the possible options for the TV, then he will not see the equipment.
Connection via media player
One option for connecting a flash drive is to use a media player. Unlike DVD, this equipment supports and recognizes all format options. You can watch videos and photos of almost any type. There is no need to do any conversion.
The connection principle is similar to a DVD player.
Movies, clips and cartoons will start playing. Difficulties can only arise with fairly old versions of players. Then you will also need to convert the file system format of the USB drive through formatting to FAT32.
How to connect a flash drive to a Sony Bravia TV: instructions
TV panels usually have several USB connectors. You can record your favorite music, movies, photos and other content onto a flash drive, connect it and watch it on the big screen.
What would seem simpler? But some users have difficulties with playback, so let’s take a closer look at how to connect a flash drive to a Sony Bravia TV:
- connect the USB drive to the corresponding connector on the TV panel;
- press the “Home” button on the remote control;
- next you will need to find the “multimedia server” (icon);
- click on USB, then select a folder, you will need to open the desired file in it;
- To return to the previous source, you need to press HOME on the remote control 2 times.
How to connect a microphone to a Sony Bravia TV
Although many karaoke bars have sprung up these days, some telly owners want to sing at home. Pleasant entertainment for adults and children appeared many years ago and is very popular even today. And the first question that arises for those who want to use this function is how to connect a microphone to a Sony Bravia TV.
Most often, microphones have a 3.5 mm mini-jack connector. Some models have this input on the side or rear panel. Near it is an image of a microphone or the words Audio IN. To connect a microphone, insert it into this port.
If your TV panel does not have such a socket, you can get out of the situation in the following ways:
- Connect the DVD to the TV and the microphone to the DVD player. This option is suitable if you plan to insert a karaoke disc into a DVD.
- Buy a microphone with a USB connector - with this connection you will have access to all the voice capabilities of Smart TV.
Direct connection via USB connector on TV
The easiest way to connect a flash drive is to use the USB connector built into new TV models. It can be located on the back, side or front panel. It is signed with the appropriate designation.
The drive connection process is as follows:
It's easy to return to broadcast mode. It is enough to change the signal source again and return it to TV if the broadcast was carried out through an antenna. If the television was digital cable, then select HDMI, to which additional equipment is connected.
General methods for connecting a USB storage device
Almost all flash cards are equipped with a standard USB connector. This is done for ease of connection to a computer and laptop. But not all TVs are equipped with this connector, which makes the connection process slightly more complicated.
You can connect a flash drive to your TV in the following ways:
It is not possible to use adapters to connect equipment. The thing is that the flash drive itself does not have a “full-fledged filling”. It's just a drive that needs another device to play files.