Setting up a Hyundai TV
Hyundai TV manual
The TV model Hyundai H-LED22V20, according to the operating instructions, has the following sections: Before starting operation: Disposal of the product. Precautionary measures. Installation. Hyundai TV wall mount. Installation on a stand. Connection: Connect an external antenna. Other connections. Device management: Control elements. Front panel of the TV. Back panel. Remote control: Installing batteries. General operations: Teletext operations. OSD menu: Channel settings. Image settings. Screen settings. Sound settings. Setting the timer. Settings. USB operations: File playback operations. General Information: Troubleshooting Guide. Sources of interference. Contents of delivery. Specifications.
Hyundai TV remote control
The designation of the remote control buttons for a Hyundai TV is shown in the figure:
1. POWER button 2. Number buttons 3. SIZE /ZOOM button 4. SLEEP button
5. LIST/REPEAT button 6. VOL+/VOL- buttons 7. MUTE button 8. MENU button
9. ENTER button/Cursor buttons (LEFT/RIGHT/UP/DOWN) 10. AUDIO button 11. SOURCE/REVEAL button 12. RED/GREEN buttons
13. HOLD / STILL button 14. TEXT button 15. P.MODE button 16. S.MODE button
17. INFO/INDEX button 18. RECALL button 19. CANCEL button 20. FAV button
21. CH+/CH- button 22. EXIT button 23. USB button 24. Yellow/Blue buttons
25. SUBPAGE button 26. E/W button 27. PC button 28. HDMI button
On our website you can download the TV remote control, location and designation of remote control buttons, as well as instructions and User Guide
How to set up a Hyundai TV
Setting up TV channels
Image Settings
Picture Mode: Custom/Standard/Dynamic/Soft. Contrast, Brightness, Saturation, Sharpness, Hue (Hue adjustment is only available for NTSC system) Color Temperature: Normal/High/Low/Custom Red: Adjust the red level. Green: Adjust the green level. Blue: Adjust the blue level. Screen type: 16:9/4:3/Panorama/Zoom1/Zoom2. The available formats may vary depending on the signal source.
Troubleshooting H...
Page 10
- Image
- Text
20
Trouble-shooting
H14212908M.DIO.007
Before contacting the service center, check the table: you may be able to resolve the problem yourself.
Attention! If any other signs of malfunction occur, immediately unplug the TV from
power supply and contact the service center.
Symptom of malfunction
Debugg
The remote control does not work
Plug the power cord into the electrical outlet and turn on the power of the TV / Is the power of the TV turned on? / Check the remote control batteries
Poor color rendering
Try another channel / Check the antenna (is the antenna connected to the TV?) / Check the antenna (broken wire?) / Adjust the color saturation / Check the A/V jacks (if using a VCR)
Black and white image
Try another channel / Check the antenna (is the antenna connected to the TV?) / Check the antenna (broken wire?) / Adjust the color saturation / Check the A/V jacks (if using a VCR)
Poor reception of some channels
Try another channel / Check the antenna (is the antenna connected to the TV?) / Check the antenna (broken wire?) / Check if there is a source of interference nearby?
Lines or stripes in the image
Try another channel / Check the antenna (is the antenna connected to the TV?) / Check the antenna (broken wire?) / Check if there is a source of interference nearby? / Check the A/V jacks (if using a VCR)
Fuzzy image
Try another channel / Check the antenna (is the antenna connected to the TV?) / Check the antenna (broken wire?) / Check if there is a source of interference nearby?
The picture is normal, the sound is bad
Try another channel / Check the antenna (is the antenna connected to the TV?) / Check the antenna (broken wire?) / Check if there is a source of interference nearby? / Adjust the volume / Check the A/V jacks (when using a VCR)
Sound is ok, picture is bad
Try another channel / Check the antenna (is the antenna connected to the TV?) / Check the antenna (broken wire?) / Check if there is a source of interference nearby? / Adjust the contrast / Adjust the brightness / Check the A/V jacks (when using a VCR)
No picture No sound
Plug the power cord into the electrical outlet and turn on the power of the TV / Is the power of the TV turned on? / Try another channel / Check the antenna (is the antenna connected to the TV?) / Check the antenna (broken wire?) / Check the A/V jacks (if using a VCR)
˝-TV1408_2108_2908PF-mitsu.qxp 08/28/2006 9:44 AM Page 20
Comments
Select → I found the instructions for my TV here! #manualza
- Click →
Who smoked the anti-smoking instruction?
Manualza!manualza.ru
Still not with us?
Reviews and answers to questions
Digital channels cannot be tuned in
To set up digital channels, just use automatic tuning by selecting DVB-T2 for terrestrial or DVB-C for cable television. Most likely, the problem is the lack of a digital signal in the cable.
Can't tune to satellite TV
If you have a configured tricolor receiver, then you only need to select the connection input on the TV. If your receiver worked with another TV (and if you did not reconfigure the receiver), then you just need to connect it to the TV and select the desired input, for example HDMI1, HDMI2 or HDMI3.
Controlling your TV without a remote control
The TV can be controlled without a remote control: In standby mode, press the button on the body to turn on the TV. When the TV is turned on, briefly press the button to display the control menu on the screen. Briefly press the button to select the desired menu icon, press and hold the button for 3 seconds to perform the corresponding operation: - turn off the TV; - switch to the next channel; - increase the volume; — volume reduction; — switching signal sources. When the control menu is not displayed on the screen, press and hold the button for 3 seconds to turn off the TV
Manifestations of malfunction, the elimination of which requires contacting a service center
Attaching the TV stand
You need to insert the stand leg into the bottom of the TV so that the screw holes line up. Next, the stand is secured with screws. Most likely, your new TV did not come with a stand or stand at the factory. This happens sometimes. It is necessary to contact the manufacturer to complete the product.
Sorting (editing) channels
Channel numbers are not renamed or sorted when the LCN option is enabled - the numbering is strictly tied to the order established by the provider. This option should be disabled.
How to connect to the Internet
According to the user manual, the TV does not support Smart functions, and the Internet cannot be connected to it.
Image Settings
Check the Color Saturation setting in the Picture Adjustment menu. Lack of color can also occur with a weak television signal from the antenna in analogue television viewing mode.
You need to do a factory reset in the menu.
Operating mode "Store"
It is necessary to set the value to “Home” in the “Shop/Home” operating mode setting menu
Pay TV connection
You will need to contact your cable provider.
12.7.2020 HYNDAI H-LED55EU7008 Voronezh How to connect Wi-Fi 12.21.2020 Hyundai H-LED 43EU7001 Sevastopol The TV is stuck in the endless process of optimizing applications, android applications are constantly being optimized. They disconnected it from the network, turned off the Internet, it still happens again. They found a power off button on the case and pressed it, to no avail. How to reset your TV to factory settings? 27.12.2020 HYUNDAI H-LED43U601BS2S Volgograd region The application is not downloading
Hyundai TVs include not only high quality, but also modern technology. Also an advantage is the prices that are affordable for buyers. New TV models produced under the Hyundai brand are equipped with Android TV software and have the ability to receive digital television of modern broadcast standards. Smart TV models have the ability to access the Internet and connect via Wi-Fi technology.
ANTENNA CONNECTION To ensure high-quality phone reception...
Page 4
- Image
- Text
ANTENNA CONNECTION
To ensure high-quality television signal reception, it is recommended to use a collective antenna. For better reception of over-the-air broadcasts, use a coaxial RF cable with a characteristic impedance of 75 Ohms (included in the kit).
delivery kit not included).
Preparing for work
9
Attention! Do not mix old and new batteries. It is prohibited to select
throw batteries into places not intended for this purpose, including fire and bodies of water.
If you will not be using the remote control for a long time or if the batteries are already
unusable, remove them from the remote control to avoid electrolyte leakage.
INSTALLING POWER ELEMENTS FOR THE REMOTE CONTROL
Open the battery cover of the remote control. Insert two AAA batteries, observing the polarity according to the instructions.
marked on the bottom of the compartment. Replace the battery compartment cover. It is recommended to use alkaline batteries.
TV INSTALLATION
Place the TV on a flat, stable surface away from direct sunlight. There must be at least 10 cm between the back cover of the TV case and the wall for free ventilation. Optimal distance between viewers and TV
4 5 screen diagonals. Connect the TV to an AC power supply of 170-242 V, 50 Hz. Do not use direct or alternating current that does not comply with these parameters.
Firmly insert the antenna cable plug into
antenna socket located on the rear
TV lid.
Attention! When using external
The individual antenna must be installed
lightning rod
Attention! When changing the channel, a number is displayed in the upper right corner of the TV screen
current channel, installed color and sound system.
While watching a TV program, when you press the CALL button, the TV screen will display
current channel number, color system, sound system and clock.
8
general description
H14212908M.DIO.007
*buttons are present only in model H TV2908PF
˝-TV1408_2108_2908PF-mitsu.qxp 08/28/2006 9:44 AM Page 8
Does TV support digital?
In order to set up digital television, make sure that your TV supports the DVB-T2 format. This format is supported by all new models, but to make sure of the TV’s capabilities, check the instructions or product data sheet. Also, any Hyundai TV can be checked on the website, see the RF figure. Where do you choose the brand and model of your TV receiver?
To set up your Hyundai TV, you can use two different setup options. Manual search – suitable for quickly searching for channels. To do this, you need to know the name of the multiplex frequency. Automatic search - you need to select when you need to update or find all available channels on the network.
Share on social networks
How to find out your TV's resolutionHow to set up your TV for the best picture
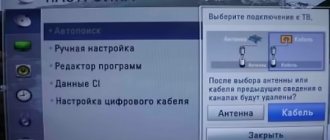
Digital channels are configured on one of two devices:
- on the TV (if it supports digital, i.e. is equipped with an appropriate built-in tuner);
- on the set-top box (aka receiver, tuner, decoder).
On this page we will look in detail at the first option - automatic and manual search for 20 digital channels (in Moscow - 30) on TVs.
Automatic Digital TV Search
In order to enable automatic tuning on your Hyundai TV, you will need a remote control. If it is not available, this function can be enabled using the buttons on the TV panel.
- Press the MENU button and go to the Channel section.
- Next, you need to select the first item in the Auto Configuration section.
- We select the Country of digital TV broadcasting, in our case it is Russia.
- Tuning type DTV is digital, ATV is analog. You can choose both options.
- The next item is the Digital Type broadcasting standard.
- To search for terrestrial digital, select DVB-T, then click on start and wait for the setup to complete.
- To set up cable TV, you need to select DVB-C, which is the format most cable operators broadcast in.
- The search type must be selected Full for a complete scan of the entire frequency plan.
- If you know the network parameters, you can select the NETWORK type. But for this you need to know the initial frequency and other data.
If your provider encodes the signal, you need the module itself and an access card.
Setting up cable TV on Panasonic VIERA
First, you need to conclude a contract for the provision of services with the provider and after connecting to the cable operator’s network, we set up the TV. Make sure that your Panasonic TV supports the DVB-C format as almost all operators broadcast in this format. You can check with your operator for network parameters, starting frequency, modulation and symbol rate. This data will help you set up your TV faster.
- Press the MEHU system menu button on the remote control.
- Next we find Settings.
- Click on the DVB-C setup menu, if you have DVB-T mode enabled, then find the Add TV signal item and select DVB-C
- Click on Auto Configuration
- In the Auto Configuration Settings we set the following parameters.
- Search mode All channels or DTV to search for digital TV only.
- Scan mode Full.
- Frequency Auto, if you know the parameters of your provider, enter them, this will speed up the process.
- Flow speed, also set to Auto.
- Network >
If you were unable to install cable channels. You can submit an application to the company providing the service to call an adjuster, but this service is generally paid.
After setting up digital television on a Panasonic TV, you can adjust the Picture, adjust the sound, set the time, etc.
Manual DTV setup
To search for channels on a Hyundai TV, find out the multiplex parameters on the RTRS website. Select your locality and the frequencies available in your broadcast area will be shown.
- Turn on the menu on the TV and go to the Channel section.
- Next, click on Manual setup.
- Enter the frequency number.
- The search step is generally 8 MHz.
- Turn on scanning.
- We save the found TV channels.
- We repeat the procedure for the next multiplex.
In this mode you can also view the signal strength and quality, which will help when setting up the antenna. After scanning, you can use the program editor and set your list of favorite TV shows.
General procedure for setting up broadcast channels
The easiest way is automatic configuration. The general algorithm for TVs of all brands is the same:
- Connect your TV to the antenna. It should be clearly oriented towards the nearest repeater: unlike the MV antenna, DVMs are very sensitive to the direction from which the signal comes.
- Open the menu (there is a special button on the remote control for this).
- Go to the “Options” or “Settings” section (the name depends on the manufacturer and the interface it uses).
- Here select “TV” or “Reception”.
- Specify the type of television signal source: antenna (to search for over-the-air channels) or cable.
- Select the automatic search function (for cable and satellite TV, specify the frequencies of the provider; for terrestrial TV, nothing is needed).
- The TV will display a list of channels found.
- Click "OK" to confirm the entry. The programs will be stored in the TV memory.
- You can start watching shows.
Manual setting
If automatic tuning does not produce results or shows an insufficient number of channels, proceed as follows:
- Using the RTRS online service, find your location and click on it. Parameters will open, which indicate the frequencies of digital channels for the 2 nearest towers. Write down these values (in the example below, highlighted with gray frames).
- Go to the menu and then to the “Settings” mode.
- Select the “TV” item, but now go not to the auto search section, but to the manual setup item.
- Select the signal source "antenna".
- Enter the frequency (MHz) and channel number (TVK) values for the 1st multiplex that you wrote down in the first step.
- Start your search.
- Once the channels are found, save them in the TV receiver's memory.
- Repeat the search procedure for the 2nd multiplex using the appropriate values.
- You can start watching.
Connecting the set-top box
If your Hyundai TV is not digital, then purchase a digital set-top box for it. After this, the TV will act as a monitor, since the set-top box will act as a tuner. The antenna cable must be connected to the set-top box.
- You can connect the set-top box and TV via RCA-Tulips; almost all TVs are equipped with them.
- Also, some TVs only have a SCART output, then you will need a SCART-RCA adapter.
- Hyundai LCD TVs have an HDMI output, so choose a set-top box with this interface.
Relatively recently, there has been a complete transition of television to digital, and TV users have a new task - to set up high-quality reception. This can be done either with the help of specialists or independently.
Setting up an old Panasonic TV
For an older TV model, you will have to purchase additional equipment to receive a digital signal. Connect the digital set-top box using various cords, but it is better if you do it via HDMI, but this method is suitable if there are corresponding connectors on the devices.
After setting up digital television on Panasonic, you will get a clear picture without any interference. If you notice that the broadcast is distorted in the form of scattered pictures, it is possible that your antenna is not powerful enough and does not receive a strong enough signal for stable broadcasting.
Advantages of digital television
Compared to analog television, digital technology benefits from a longer list of advantages, significantly expanding the capabilities of TV users. The main advantages of digital television:
- improved sound and picture quality;
- expansion of the number of channels in the same range;
- the ability to record television programs and create archives;
- no need for powerful transmitters;
- choice of broadcast language and subtitles;
- the ability to add a radio to the multiplex;
- ability to receive EPG signals.
Digital television has very few disadvantages:
- During a thunderstorm and other adverse weather conditions, the signal may be poorly transmitted;
- if the signal weakens (often this depends on the choice of antenna), individual fragments of the image or the entire picture as a whole partially freeze.
What you need to connect digital television - necessary equipment
To watch digital channels, you need to buy a TV that supports DVB-T2, or buy additional equipment for a regular device. You will need a high-quality cable, a digital television receiver and an antenna capable of operating in the UHF range.
Free installation of DVB-T2 digital television:
Choosing an antenna
Any home antenna can receive a digital signal. For residents of high-rise buildings, the best option would be to install a common antenna (CETV) for the entire house.
For private sector residents there are the following options:
- a satellite antenna for signal reception is a reliable option that works regardless of the proximity of the tower, terrain and weather conditions;
- internal antenna - a standard model, suitable if the television tower is located close to it;
- standard outdoor antenna - if the signal is not too strong, the TV tower is located far away or the terrain makes it difficult to receive the signal;
- cable television – expands the package of available channels;
- IPTV – makes it possible to simultaneously use all the advantages of digital television in combination with Internet access.
TV
An antenna alone is not enough - the TV must be able to receive a digital signal. For owners of modern equipment that was released over the past 3 years, there is no need to purchase additional equipment. Manufacturers have provided the ability to connect digital television without using a set-top box/receiver, so modern models come with built-in equipment for receiving such a signal.
When purchasing a new TV, you need to make sure that the model you choose supports digital standards. The specifications must include DVB-T2.
Console
If you are using a TV that does not support DVB-T2, you must additionally purchase a receiver - a set-top box that connects to the TV and allows you to receive a digital signal. The assortment of TV equipment stores includes set-top boxes that differ in their functionality:
- SMART set-top box is an addition to the TV for receiving digital signals and the Internet. Expands functionality - the TV can also be used as a computer.
- Set-top boxes for satellite dishes - equipped with a powerful processor and additional inputs.
- Hybrid receivers – allow you to receive satellite and cable signals.
- Terrestrial broadcast receivers - work in conjunction with standard antennas.
- Set-top boxes with a built-in card reader - for using cards purchased from the provider.
- Receiver with CAM slot. Such equipment can be easily reprogrammed, so there is no need to worry that it will become outdated and will not be able to receive a signal.
- Combined receivers. They are equipped with a card reader, have a CAM slot and are capable of receiving FTA channels. Such devices can work with standard multiplexes, as well as with encrypted channels. It is enough to enable automatic key updating in the settings menu or enter them manually using the remote control.
- Receivers equipped with a conditional access system. This is a hardware and software complex that is used to gain access to a number of encrypted channels that are not available in standard multiplexes.
It is worth paying attention to the functionality of the console and its additional capabilities. The best option is a SMART receiver, which will significantly expand the capabilities of even the simplest TV.
When purchasing a digital receiver, you must check with the seller about the possibility of returning or exchanging the product within 14 days. This is necessary even if the device was checked in the store and turned out to be fully functional. It is possible that when you connect the set-top box at home, it will not receive the signal from the antenna well enough - in this case, you will need to choose a more suitable model.
Cable
When choosing a set-top box for your TV, you need to pay attention to the cable included. In some cases, you may need to purchase an adapter if it is impossible to connect the included cable to the TV.
Preparing for work...
Page 5
- Image
- Text
Preparing for work
11
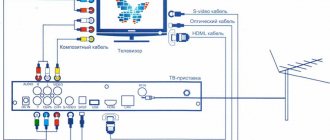
Connecting a video camera
Connect the camcorder to the TV using one of the following options: —
using an audio video cable (SCART in the H TV 2908PF model);
—
using an audio cable and an S Video cable.
Connecting a DVD player
Connect the DVD player to the TV using one of the following options: —
using an audio video cable;
—
using an audio cable and an S Video cable;
—
using an audio cable and a component video cable (Cr/Cb/Y) (in the H TV 2908PF model);
—
using a SCART cable (in the H TV 2908PF model).
Connect the video player to the TV using one of the following options: —
using an audio video cable. To display a signal from a
video player, press the TV/AV button; —
using a SCART cable (in the H TV 2908PF model).
Connecting a video player
Connecting a stereo amplifier
Connect the stereo amplifier to the TV using an audio cable.
10
Preparing for work
H14212908M.DIO.007
During connection, you must disconnect the TV and connected equipment from the power supply. Pe
Before connecting, read the instruction manual of the connected equipment. For reception
signal from an external device, select the appropriate video/audio input correctly (see page 16 “SELECTING
AV/TV"). If the audio signal from the external device is monaural, connect the audio plug to the
Audio L. The figure is shown for connecting to the audio/video connectors on the back of the TV, also in
Some models can use the front panel audio/video input jacks.
Connect using one of the options: 1.
Connect the antenna to the VCR (ANT IN). Connect the antenna cable to the antenna jack of the TV (ANT IN) and the VCR (ANT OUT). Tune to the VCR output channel at the desired serial number, using the instructions in the “MANUAL TUNING” section
CHANNELS" on page 14. Select that channel number and the VCR image will appear on the TV screen. 2.
Connect the audio video cable to the audio video inputs on your TV. To record TV programs, connect an audio video cable to the audio video outputs on your TV.
CONNECTING ADDITIONAL EQUIPMENT
Connecting a VCR
˝-TV1408_2108_2908PF-mitsu.qxp 08/28/2006 9:44 AM Page 10
How to set up digital television reception and connect digital channels
Once all the equipment has been purchased, you can begin the installation process. If you follow the instructions, you can install and configure digital television reception yourself.
How to connect digital television and set up terrestrial digital channels:
Options
To configure the built-in DVB-C tuner to receive digital cable television programs, you must use the following parameters (selected in the TV menu):
- The initial broadcast frequency is 298 MHz (298000 kHz);
- A total of 16 transponders with a step of 8 mhz;
- Symbol rate - 6875 Ksim/sec;
- Modulation - 256 QAM.
These parameters are suitable for tuning based on the network search principle; if the TV does not support it, then you need to use a full search or select frequencies for manual tuning in megahertz: 298, 306, 314, 322, 330, 338, 346, 354, 362, 370, 378, 386, 394, 402, 410, 418.
The following are conditional examples of TV settings.
Digital TV setup example
SAMSUNG TVs
Decoding of SAMSUNG TV models:
- Country - Slovakia, Slovenia or Others;
- Auto search for digital and analogue channels;
- Source - Cable;
- Search mode - Network.
General algorithms for setting up digital and analog channels for various models of SAMSUNG LCD TVs:
- Click on enter the menu;
- Select in the menu - “Channel” (icon “Satellite dish”);
- Select the signal source - “Cable”;
- Select - “Auto-tuning”;
- Select - “Digital”, “Digital and Analog” or “Analog” (depending on the preferred television signal); Click “Start”. Setup takes approximately 5-10 minutes.
Detailed description of setting up digital channels on SAMSUNG brand TVs starting in 2010:
- Open the “Channels-Channel Manager” menu or press the “CH LIST” button on the remote control.
- Select the desired channel (or several, using the “C” (yellow) button on the remote control), press the “TOOLS” button on the remote control and select “Delete”.
- After confirmation, the selected channel will be deleted.
- To sort the channels, select the one you need (in the “Channel - Channel Manager” menu, or press the “CH LIST” button on the remote control), press the “C” button, then the “TOOLS” button, the “Sorting” menu and move it to the desired position place in order.
- If you have a SMART TV: Look at the “smart hub” button on the remote control, click and select the channel icon, then see the list of channels, select editing in the upper right corner.
LG TVs
General algorithms for setting up digital and analog channels for various models of LG LCD TVs:
- Press the button - “Menu”;
- Select “Options” from the menu;
- Select - “Auto-tuning”;
- Select the country - “Finland”; (possibly France, Switzerland, Sweden)
- Select the signal source - “Cable”;
- Select - “Digital”;
- Click - “Search”.
Setup takes approximately 5-10 minutes.
Detailed description of setting up digital channels on LG TVs:
- In order to set up high-definition digital TV channels on the vast majority of LG models, press the “Menu” button on the remote control, you will see the TV menu in which you will need to select the “Options” section.
- Specify the country "Russia".
- Go to the “Settings” menu, “Auto search” item and specify the method of connecting to the TV “Cable”.
- In the window that opens, go to “Settings” and enter the following parameters: Search type: “Quick”; Frequency: 298000 (kHz); Speed characters: 6875; Modulation: 256 QAM; Network ID: auto.
- If you did everything correctly and saved all the changed parameters, then during the search your channels will be detected.
- An important feature of LG TVs is the “Automatic channel update” function. It must be disabled, otherwise the TV will periodically reset the channel list you have configured. To do this, go to “Digital cable settings - Channel auto update”: Off
To sort channels, select “Settings” -> “Auto search” -> “Cable” -> Uncheck (√) from “Auto numbering” -> “Run”. After setting up all channels, the necessary buttons will appear in the “Program Editor”.
SONY brand TVs
Since not all SONY models are equipped with a digital tuner for cable TV (DVB-C), you need to check the model of your SONY TV. Models equipped with a DVB-C tuner are marked KDL-**EX*** or KDL-**NX*** - for example KDL-2EX402R2, the first 3 letters in the model name (KDL) indicate that the TV is digital.” In models KLV-**BX***, etc. There are no DVB tuners.
General algorithms for setting up digital channels for various models of SONY LCD TVs:
Pay attention to the bottom of your TV's OSD menu. The bottom menu bar displays hints on which remote control buttons to perform certain actions in the TV menu.
PHILIPS brand TVs
- Press the “Home” button on the remote control
- Select “Search for channels”
- Select “Reinstall channels”
- Select the country “Germany”
- Select “DVB-C cable”
- In the list of operators, select “Others”
- Press right on the remote control and select “Settings”
- Set frequency scanning to “Full”
- Set the transfer speed to “Manual”
- Set the transfer speed to “6875”
- We will turn on analogue channels only if they are needed
- Click “Done”, return to the previous menu
- Let's start the search
Alternative option
To set up a PHILIPS brand TV, first read the stickers on the back of the TV, where separately for each tuner (DVB-T and DVB-C) there is a list of countries in which, according to PHILIPS, there is digital broadcasting (at the time of release of the TV, but If you update the firmware through their official website, then this list may change in subsequent firmware). If Russia is not in the list, then select Slovakia, Slovenia or Others.
General algorithms for setting up digital channels for various models of PHILIPS LCD TVs:
- Click on the icon - “House”;
- Select - “Install”;
- Select “Search for channels”;
- Select - “Reinstall channels”;
- Select - Country - Russia or Others. If Russia is not in the list, then select Slovakia, Slovenia or Others;
- Select digital mode - “Cable (DVB-C)”;
- In the line “Network frequency” we enter the frequency - 298 MHz (298000 kHz);
- In the “Transmission speed” line, enter the speed - 6875 Ks/s;
- In the line “Frequency scanning” - 256 QAM.
Setup takes approximately 5-10 minutes.
Detailed description of setting up digital channels on PHILIPS brand TVs:
If you did everything correctly and saved all the changed parameters, then during the search your channels will be detected.
TVs of the PANASONIC brand
Setting up digital channels on PANASONIC brand TVs:
- Press the “Menu” button;
- Select the item “Settings”;
- In the window that appears, select “Menu analogue. settings";
- In the window that appears, select “Add TV signal”;
- In the table that opens, put a tick in the “DVB-C” line;
- Click “Start auto-tuning”;
- After searching for all digital channels, going to the main menu in the “Settings” item, the line “DVB-C setup menu” appears. By selecting this item, you can adjust the setting manually (set the frequency to 298 MHz (298000 kHz) and speed to 6875 Ks/s).
The menu of your TV may differ from the model offered. In this case, you need to find tabs that are similar in meaning. If your TV asks for a search step, enter 8 MHz.
- Press the “Menu” button;
- Select the item “Settings”;
- Go to the subsection “DVB-C Settings”;
- Select the “Auto Configuration” subsection;
- In the “Auto Configuration” menu enter the following values: Frequency: 298 MHz; Symbol rate: 6875 Ksim/s; Note that there is no “modulation” parameter. Search mode: “All channels”; Scan mode: “Fast” (or “Full”); Network ID: "auto".
- Click on “Start scanning automatically”.
Channel scanning lasts from 3 (“Fast”) to 10 minutes (“Full” scanning), after which the TV automatically displays a list of all channels configured by this tuner. The channel list will be displayed automatically, or it can be found in the DVB-C setup menu.
SHARP brand TVs
Setting up digital channels on SHARP brand TVs:
Models: 46 (52, 65) XS1, LE700. If your TV model provides reception of digital channels, but there is no “DTV MENU” item, then first select another country - Slovakia, Slovenia or Others.
- Press the “DTV” button;
- Press “DTV MENU”;
- Select “Installation”;
- Select “Auto installation”;
- Click "OK".
Setup takes approximately 5-10 minutes.
DUNE HD media players
DUNE HD TV-102W-C can also act as a set-top box for watching digital television (cable (DVB-C) and Internet television (IPTV). Settings:
- Go to the main menu by pressing the “TOP MENU” button on the remote control;
- Select “Settings”
- Select “Applications”
- Select “Cable TV” or “DVB-C”
- In the “Cable TV” or “DVB-C” section, enter the following values: Network scanning: No; Initial frequency, kHz: 298000; Final frequency, kHz: 418000; Interval: 8 MHz; Modulation: QAM 256; Symbol speed, kS/s: 6875
- Confirm the scan by pressing the “OK” button
- To view channels, go to the main menu by pressing the “TOP MENU” button on the remote control
- Go to the “TV” section
- Select “Cable TV” or “DVB-C”
- To start watching TV, select any of the found channels
New feature - news subscription
Do you want to always be aware of new promotions and special offers? Is it important for you to know about the timing of technical work and maintenance?
We invite you to subscribe to notifications and not miss important news!
To subscribe, click “Subscribe”, and then confirm your decision by clicking on the “Allow” button.
With the widespread use of modern television, there has been a stir, and therefore many questions about how to set up digital television. The reason for its popularity is the variety of channels in terms of direction, quality, language, type of content, etc. Due to the lack of information on setting up digital TV, companies have appeared like mushrooms after rain, charging fees for these manipulations. You don’t have to pay at all, you can actually achieve the goal on your own.
Features of searching and tuning channels without a remote control
Don't panic or get upset if your TV remote control gets lost or stops working. You can cope with the situation and configure the equipment using control buttons, the functions of which are described in detail in the instructions for the equipment.
When setting up a TV without a remote control, consider the following nuances:
- The MENU key is not available on all devices. Sometimes, in order to get into the settings, you need to simultaneously press the buttons that control the volume;
- To confirm the actions taken, you can use the “OK”, “MENU” or “Vol+” buttons;
- On Sony brand TVs, you can start automatic search and tuning of channels by long pressing the “MENU” button;
- Philips TVs cannot be set up without a remote control.
In recent years, Russians have almost completely abandoned conventional antennas, giving preference to more modern and high-tech receivers - special digital set-top boxes that receive signals from a satellite or via the Internet. Such devices operate similarly to smartphones or tablets: they have an operating shell (Android) installed, in which settings and work with channels were carried out using mobile applications. Users can download the necessary software from the PlayMarket store.
How to set up digital television on a TV - general provisions
Mostly all methods for setting up digital television reception use approximately the same scheme, but due to the variety of manufacturers, the actions may be slightly different, but their logic is similar. In order not to get confused in all the sequences, it is worth applying the algorithm directly to each TV model. Thanks to logic and intuition, you can correctly configure the settings on almost every TV model using the instructions provided.
- Take the remote control and expand the menu;
- Proceed to the “Options” item;
- Next, you need to activate “Auto Configuration”. With this action, a window appears containing information about the signal sources; it can be a cable or antenna signal. In our case, we need to select a cable;
- At the end of the operation, information about the quality of signal reception should appear in a new window, here you should select “Digital”, then click “Start”;
- The final setting point is “Search mode” and select the method for detecting channels. The proposed fields must be filled in with information. The frequency is 314 MHz, the speed is 6875 kS/s, and the modulation is 256 QAM.
More advanced TV models allow you to perform a network search, which will independently perform all the necessary actions. When the desired method for detecting TV channels is selected, you need to click on “Search”.
Why doesn't automatic tuning of TV channels work?
Modern models of television receivers support both manual and automatic channel tuning. Most TV viewers use automatic search, which copes with the assigned tasks perfectly; the user can only remove unnecessary channels from the presented list.
However, for various reasons, sensitive equipment may not be able to recognize the scan range or signal source. In this case, the procedure must be carried out manually.
As practice shows, there are no particular advantages in choosing one or another method of setting up channels. And if the automatic mode can save the user’s time and is suitable even for inexperienced TV viewers, then the second option will require more time and special knowledge, but at the same time provides more detailed channel settings even with poor reception quality.
In particularly difficult cases, you should use the services of a professional teleworker. The cost of his services will depend on the region of residence, distance from the workshop and the company’s pricing policy. In addition, today there are a number of volunteer organizations that help everyone switch to the new broadcast format free of charge.
How to set up digital TV on LG
If this instruction is not effective, you should use a detailed algorithm for LG TVs. The technique is relevant for almost all models of the manufacturer.
- From the remote control go to the Menu;
- Click on “Options”;
- In the “Country” category, change the checkbox to Finland or Sweden;
- Then go to the “Settings” category and launch “Autosearch”;
- In the fields you need to enter a search method, usually a fairly fast type, frequency - 298 MHz, modulation - 256 QAM, characters - 6952, ID - auto;
- If everything is done correctly, then during the search a number of TV channels will be displayed;
- The manufacturer LG integrates an automatic system for searching and updating TV channels into the system. This function can be inconvenient as the prepared list will be reset regularly. To prevent this phenomenon, be sure to go to the settings for connecting via cable and turn off “Auto channel update”;
- For convenient sorting, you need to remove the check mark from auto-numbering in the “Cable” section in “Autosearch”.
The final stage of setup is working with image quality
Quite often there are situations when, after completing the search and settings of the program, they are broadcast in poor quality. In order to improve picture clarity and eliminate other defects, you can perform the following steps:
- enable the HD option in the settings;
- select the picture broadcast mode, for example, for Samsung and LG TVs, the “Cinema” mode is considered the best option;
- manually set the contrast, brightness and colors of the image.
As practice shows, you only need to spend time and effort once to understand the TV settings and compile a list of saved TV channels, in order to subsequently comfortably watch any films and programs, without being distracted by annoying little things and problems that can ruin anyone’s mood.
Found a mistake? Select it and press ctrl+enter
- Sorting channels on a Samsung TV
How to set up digital television on Samsung
Now let’s look at how to set up digital television channels on Samsung, because the manufacturer is one of the most popular in the industry. The actions are like:
- Press Menu on the remote control;
- Next, go to the “Channel” category (there is a satellite dish on the icon);
- On the right you need to select the “Antenna” option, and in the type field - “Cable”;
- Now in the “Country” section you need to set “Other”, now you will need to enter a PIN code, by default 0000;
- Go to the “Auto-configuration” menu and specify the source of the signal – “Cable”;
- You need to specify the parameters, they correspond to the data in the first, general example of the article, and click “Search”;
- Now the TV will find all TV channels.
How to set up digital television on Smart TV
Let's look at digital television and how to set up channels on a TV with the Smart function using Samsung as an example. The action is performed fairly standardly, but there are some differences.
- Go to the “Channel” section in the Menu;
- Click on “Country”, you may now need to enter a PIN code, by default 0000, 1111 or 1234;
- Follow the "Other" section;
- Then, step back, select “Cable search options”;
- Standard parameters are now being introduced;
- Again you need to go to “Auto Configuration”, here select the “Cable” source mode;
- You need to activate the “Digital” section;
- Using the search mode, select “Network” and activate the setting.
All methods allow you to create a high-quality connection to digital TV channels and find the maximum available number of interesting programs. Despite the lack of data on devices from Toshiba, Philips and others, the connection method is no different.
Adding regional analogue channels
In most regions of Russia, in parallel with the broadcasting of two federal multiplexes, regional analogue television channels are also broadcast. How can I increase the number of programs by adding them to the list on my TV?
Do you watch local analogue channels?
Proceed according to the following algorithm:
- Point the antenna exactly at the repeater and turn on the analog channel search mode on the TV.
- The specific scenario of action depends on the brand of television receiver. For example, on a Samsung TV you need to specifically indicate that when scanning you need to take into account only digital channels: the default auto-tuning system will search for everything that is received from the antenna. If you also need to catch an analog signal, select the appropriate item.
- After all TV channels have been found, record them in the memory of the TV receiver.