Setting up your Fusion TV
Our technicians configure the Fusion TV for analog and digital channels of terrestrial, cable and satellite television, adjust the brightness, color and geometric parameters of the screen, wired or wirelessly connect the TV to the Internet, connect external playback players or recording devices.
We know how to set up channels on your Fusion TV!
Fusion FLTV-32C10 TV manual
Control buttons on the TV body
I - button to turn on the TV or switch to standby mode
SOURCE - playback source selection button
— button to go to the settings menu
VOL+/- - buttons for volume control, moving right and left when working with various menus, in some menus VOL+ is used to confirm
PRO+/- - buttons for switching programs, moving up and down when working with the menu
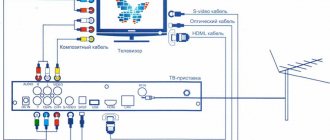
TV connectors and their purpose
USB - connector for connecting USB devices
AV1 IN - composite video input 1 and RCA audio input for connecting a video camera, set-top box or other equipment.
HDMI - HDMI interface input connector
AV2/COMPONENT IN (Y-Pb-Pr/Y-Cb-Cr) - Component video input connectors for connecting a DVD player or other equipment, component connection provides high image quality, because the video signal is divided into three separate parts; AV2 - composite video input 2
AV2&PC&COMPONENT AUDIO IN (LR) - Paired audio input connectors for connecting an audio signal when connecting a TV to a PC or connecting video equipment to a component video input or composite video input 2
AV OUT (VIDEO, AUDIO-LR) - Composite video output and RCA audio output (right and left channels) for connecting a VCR for recording TV programs
VGA - VGA input connector for connecting a PC video signal (this connector may also be labeled PC)
ANTENNA IN - Antenna/TV cable jack
AC IN - Connector for connecting the power cable
How to set up digital television on Samsung
Now let’s look at how to set up digital television channels on Samsung, because the manufacturer is one of the most popular in the industry. The actions are like:
- Press Menu on the remote control;
- Next, go to the “Channel” category (there is a satellite dish on the icon);
- On the right you need to select the “Antenna” option, and in the type field - “Cable”;
- Now in the “Country” section you need to set “Other”, now you will need to enter a PIN code, by default 0000;
- Go to the “Auto-configuration” menu and specify the source of the signal – “Cable”;
- You need to specify the parameters, they correspond to the data in the first, general example of the article, and click “Search”;
- Now the TV will find all TV channels.
Fusion TV remote control
TV remote control fusion
Sound Sound mute / mute mute button.
I Button to turn on the TV or put it into standby mode.
0-9 Numeric buttons for entering channel numbers.
Button for calling up the current information screen.
Return Button to switch between the currently watched channel and the previous one.
Source Button for selecting the signal source.
Button to call the settings menu / return to the previous page when working with the settings menu.
Left/Right/Up/Down Navigation buttons for operating various menus
OK Confirmation button when working with various menus.
The Play and Rewind buttons are used to control playback in USB mode.
TXT Button for switching Teletext, Mix, TV modes (if the TV does not support the teletext function, then this button is inactive)
Exit Button to exit the current menu.
VOL+/VOL- Volume level adjustment buttons.
Index Button to go to the main teletext page
USB Button to switch to USB mode.
CH+/CH- Buttons for switching TV channels.
Scale/Size Button for selecting screen format: 16:9, ZOOM1, ZOOM2, 4:3/ changing the teletext display mode (enlarged upper part of the teletext window, enlarged lower part, full display).
Picture/Rev. Button to select picture mode: Standard, Bright, Soft and Personal / show hidden text in teletext mode (to hide text, press this button again).
Sound/Hold Button to select the sound mode: Stereo, Music, Movie, News and Personal / hold the current teletext page.
Freeze/Sub. Button for freezing the image on the screen (for some models the Freeze button is inactive) / going to teletext subpages.
RED/MTS button to quickly navigate to correspondingly colored teletext/NICAM audio mode selection links.
GREEN button to quickly navigate to correspondingly colored teletext links.
YELLOW/ button to quickly navigate to correspondingly colored teletext links.
BLUE/DEMO button to quickly navigate to correspondingly colored teletext links.
On our website you can download the TV remote control
location and designation of remote control buttons, as well as instructions and User Guide
Setting up your Fusion TV
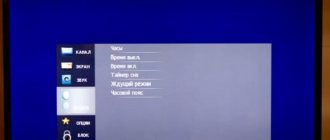
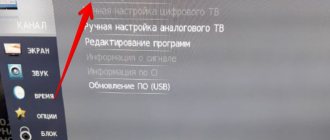
Setting up the TV is done by pressing the MENU button on the remote control. The TV settings menu allows you to configure various settings. All operations in the settings menu are accompanied by prompts at the bottom of the screen. Use the Left/Right buttons to select the desired menu pages: Channel, Picture, Sound, Setting, Geometry, Source, Source . To move to the selected page, press the Up or Down button. Use the Up and Down buttons to highlight the parameter you want to adjust. Use the Left and Right buttons to adjust the setting you want, or press the Right or OK button to access the additional menu. To return to the previous menu, press the button. To exit the TV settings menu completely, press the EXIT button.
Setting up a Fusion TV without a remote control
If the remote control is lost or does not work, you can use the VOL+/VOL-, PROG.+/PROG.- and buttons on the TV body to make adjustments. If any menu option is grayed out, it means that its settings cannot be changed in the current mode.
How to adjust picture settings
How to adjust the image on a Fusion TV using the corresponding Menu items.
BackLight — Backlight brightness. Use the Left/Right buttons to set the required backlight brightness depending on the lighting conditions.
Picture Mode - Image mode. Use the Left/Right buttons to set the appropriate mode: Standard, Bright, Soft and Personal. When you select any mode except Custom, the backlight brightness is adjusted automatically.
Scale — Screen format. Set the appropriate screen format: 16:9, ZOOM1, ZOOM2, 4:3. It is recommended to use 16:9 widescreen mode. Certain screen formats may not be available for some signal sources.
Brightness - Brightness.
Contrast - Contrast. The contrast adjustment allows you to adjust the difference between the light and dark areas of the image.
Saturation - Color Saturation.
Sharpness - Sharpness. As sharpening increases, the edges of the image will become more distinct.
Tint - Tint of color. This setting is only available for NTSC mode.
Noise Reduction - Reduce noise. Use the noise reduction feature to improve image quality. You can select one of the noise reduction modes: Low, Middle or High, or turn the function off (Off). Color Temp - Color temperature. Highlight this option and press the OK button to go to an additional menu in which select the desired mode: Cool (with a predominance of blue tones), Normal (Normal), Warm (Warm - with a predominance of red tones).
Dynamic Contrast - Dynamic contrast. You can enable (On) or disable (Off) this function. If the function is activated, the contrast will be adjusted automatically.
Processing modes
Once the basic parameters of a static image are set, it’s worth talking about processing it. Most TV manufacturers include a full range of processing functions in the menu, which are not only confusing, but also greatly affect the picture - and not always for the better.
This is not to say that they are all completely useless; In recent years, their quality has increased noticeably, but more often than not, gains in one respect are accompanied by deterioration in others, and finding the right balance is not easy.
As a general rule, it's best to start by disabling all active processing modes, adjusting the basic image settings, and then experimenting with each individual mode, starting with the smallest values, to see if it improves the picture.
Here are some of the most popular image processing modes and the functions they perform:
Black and white booster
In most cases, the best thing you can do to produce high-quality blacks and whites is to set the contrast and brightness correctly; but the best models allow you to get even more spectacular images using such amplifiers.
However, on older or inexpensive TVs it is better to disable such modes, since at the same time as the darkness of black or the brightness of white increases, the detail of the image decreases. In other words, proceed with caution.
This parameter and various variations of the “dynamic” mode force the TV to change brightness depending on what is happening on the screen: in dark scenes it will make the picture darker to increase the depth of blacks, in light scenes it will be brighter.
The best TVs allow you to improve picture quality by adjusting this parameter, but the percentage of improvement varies significantly from model to model, and all that remains is to continue experimenting in search of the optimal result. On some TVs, when this option is enabled, the screen begins to flicker or change brightness abruptly. If you notice any signs of this behavior, disable the feature.
Fusion TV Q&A
How to control a TV without a remote control
How to confirm FUSION FLTV-16C10 selection of the signal source “Antenna” if there is no remote control, i.e. do "OK"? 12/07/2018, Lobnya, Moscow region.
Confirmation of the choice is made by pressing the “VOL+” key on the TV body.
Connecting a smartphone to a TV
13/3/2019 Fusion FLTV-32B100V1SO6 Kostroma How to connect a smartphone to a TV via USB
Setting up TV channels
18/3/2019 fusion FLTV-32C100 Krasnogorsk I can’t set up channels, namely 10 channels for free
3.23.2019 Fusion FLTV-24B100T Krasnogorsk I can’t set up channels, I can’t find any. How to find channels?
13/9/2019 FUSION FLTV -22T9 St. Petersburg “How to fix the tuned channels? With everyone! When I turn it on, I start auto-tuning.
4.6.2019 Fusion FLTV-28C12 Bashkortostan, Meleuzovsky district, village of Voskresensk Hello. I can’t tune my TV to 20 free TV channels. Maybe this model cannot receive digital television at all. It's not even configurable. The DTV set-top box doesn't even work on it.
7.31.2019 FUSION FLTV-32C110T Krasnodar region Stanitsa Kushchevskaya Doesn’t pick up digital channels, previously showed 10 channels, now nothing
Issues with USB port
24/7/2019 Fusion FLTV-32B110T Moscow, Podolsk I somehow went into the flash drive control menu, I can’t get out of it. I tried resetting it didn’t help, unplugging it from the socket didn’t help. NO REMOTE 11.30.2019 Fusion FLTV-19T9D Gatchina district In this The TV has an “update via USB” function. The question is, how do I update it myself?
When to contact a specialist
26.12.2020 Fusion Nekrasovka Moscow The TV screen does not show but the sound is audible
Features of settings for different types of television
Signal transmission is possible in four ways:
Analog
An outdated format that most modern countries have abandoned. It does not allow high quality images to be transmitted. There are several analogue channels left on the Russian airwaves, which should be considered as a temporary alternative during the migration to digital, receiving a signal on obsolete TVs, without connecting a set-top box.
Setting up analog TV is done in standard automatic and manual mode. A regular antenna is sufficient for reception.
Setting up satellite channels
Connecting satellite TV is not difficult:
- connect the receiver to the TV using a cable;
- select the appropriate connection port in the settings menu;
- using the remote control, set the satellite settings, which can be found on the Internet;
- by going to the menu, start scanning the satellite in automatic mode (the mode will significantly speed up the setup);
- after scanning is completed, a list of found channels will appear on the screen;
- for ease of use, delete blocked channels that you do not plan to watch;
- Click "Save Settings".
Remember that satellite television is sensitive to bad weather conditions; the signal may deteriorate or be lost during rain, snowfall, or gusty winds.
Digital
A modern standard for television broadcasting, capable of providing high-quality images in Full HD format under any reception conditions. To view it, your TV model must have a built-in DVB-T2 TV tuner. If this option is not available, you will need to purchase a set-top box with this option.
Before setting up, read the instructions provided by the manufacturer, below:
- go to “Menu” - “Settings” - “Auto settings”;
- select the signal source “Digital”;
next, enter the search parameters: frequency (kHz) - 314 000 (314 MHz), speed - 6875 kS/, modulation - 256 QAM;
- Click Start.
After a few minutes, a complete list of found channels will appear on the screen; if desired, the user can manually edit the list.
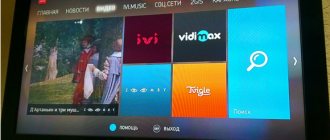
Smart TV
The Smart TV function is an advanced technology that turns the TV into a multimedia center that provides access to the Internet. The user can surf the web, make purchases, play games, use applications, view news, and access streaming services that feature thousands of channels and original content, such as Netflix.
- How to tune channels on TV
There are several ways to configure channels:
- installation of a branded application with monthly payment for services (Ivy, Megogo);
- using free media players, where you need to enter information about a playlist with TV channels.
The procedure for installing, configuring, and watching TV on smart panels depends on the modification of the TV, the chosen method, and the features of the application.
Setting up the Smart TV function.
Setting up digital channels
There are two ways to set up digital television on your Fusion TV: auto channel search and manual channel search. If you need to find all channels, then use the first option; if you need to add several channels to an existing list of channels, use the second setting option. Connect the antenna cable to the appropriate socket on the back of the TV.
- On your remote control, press the button
- Select the Channels section.
- In this section you need to select Auto Configuration and click OK.
- Setting up a search, in this menu you need to do several actions.
- We select Russia as the broadcasting country.
- Setting type, you can select only DTV; if you need analog, click both options.
- Digital type, to watch digital terrestrial channels select DVB-T, for cable television you need to select DVB-C.
- Click on start and wait for the setup to finish, this is for DVB-T.
- If you select DVB-C, additional setup options will become available.
- Search type Full, set everything else to auto.
- All DVB-C format settings are set, we start searching for channels.
Digital TV on Samsung
Setting up 20 TV channels on
Samsung TVs with a built-in receiver is as follows:
- Connect the antenna;
- Enter the menu using the special button on the remote control;
- Go to the “Channel” section, which has a satellite dish icon;
- On the side you will see a list of tabs, among which you should go to the “Antenna” tab and select “Cable” as the connection;
- After this, open the “Country” tab and select “Other”;
- As a result of these actions, a PIN code request will appear on your screen. The initial pin code is 0000;
- After you enter the PIN code, a window will appear in which you should select “Cable” as the signal source through the auto-tuning menu;
- Next, you should select quick search mode, automatic network selection, as well as data from our table and click on “Search”.
Once everything is completed, your device will begin to display all available 20 channels.
#2 Without wire
Here's what you need to do to connect your TV to a Wi-Fi router without a wire:
- Remember the following data - login and password for the wireless network (preferably your own). But many people manage to find out their neighbor’s WiFi password and waste their traffic, not their own.
- Turn on the TV;
- Open the menu and select “Network”, then go to settings;
- Select "Wireless Connection";
- The system will search and display the available option;
- Click on your network and enter your password. Ready!
Where to place the TV?
Installing the TV in a suitable place, and not at the first available point near an outlet, is the simplest thing that will help you achieve the best quality.
First of all, try to provide as many spectator seats as possible directly in front of the screen. When viewed at an angle, colored and black objects become faded - this is especially true for LCD TVs. For OLED models, the problem is less acute, since the image does not noticeably lose quality when viewed at an angle - but we still prefer to sit directly in front of the screen so that the entire picture is in the palm of our hand. If the dimensions or shape of the room do not allow this, a TV with a swivel stand will help.
Connecting a digital set-top box.
If your Fusion TV does not have a digital tuner, you will need a digital set-top box to view digital TV channels. To connect it to the TV, use an RCA tulip cable; if possible, it is best to use an HDMI cable. The antenna cable must be connected to the set-top box, and the converted digital signal will already go to the TV through tulips or another cable.
DVB T2 is needed to receive analog and digital signals. Thanks to this, you can watch channels in high quality.
Digital terrestrial television frequencies DVB-T2
The UHF frequency range for television broadcasting in the DVB-T2 standard is divided into 49 channels, each of which is assigned a specific frequency. Each multiplex can transmit only on one of the channels (frequency), broadcasting 10 TV programs simultaneously.
Please note that UHF digital television channels have nothing to do with TV channels that are switched using the remote control.
| Digital terrestrial television frequencies DVB-T2 | ||||||||||||||||
| Channel number | 21 | 22 | 23 | 24 | 25 | 26 | 27 | 28 | 29 | 30 | 31 | 32 | 33 | 34 | 35 | 36 |
| Frequency, MHz | 474 | 482 | 490 | 498 | 506 | 514 | 522 | 530 | 538 | 546 | 554 | 562 | 570 | 578 | 586 | 594 |
| Channel number | 37 | 38 | 39 | 40 | 41 | 42 | 43 | 44 | 45 | 46 | 47 | 48 | 49 | 50 | 51 | 52 |
| Frequency, MHz | 602 | 610 | 618 | 626 | 634 | 642 | 650 | 658 | 666 | 674 | 682 | 690 | 698 | 706 | 714 | 722 |
| Channel number | 53 | 54 | 55 | 56 | 57 | 58 | 59 | 60 | 61 | 62 | 63 | 64 | 65 | 66 | 67 | 68 | 69 |
| Frequency, MHz | 730 | 738 | 746 | 754 | 762 | 770 | 778 | 786 | 794 | 802 | 810 | 818 | 826 | 834 | 842 | 850 | 858 |
When manually setting up your TV to receive a DVB-T2 digital signal, you may need to enter a frequency or channel number. Each city and each multiplex has its own channel. Therefore, before tuning, you will first need to find out the channel number on which the broadcast is broadcast from the RTRS-1 and RTRS-2 multiplexes in your area.
Line with screens of 22, 26 and 32 inches
My attention fell on the Fusion line of TVs with screen sizes of 22-32 inches. There are two reasons:
- Low price relative to famous world brands with fairly high quality;
- Picks up the signal well. Already tested on two Fusion brand devices: one for me, the other for my parents.
I specifically took this 22-inch TV smaller for the kitchen or cottage. With diagonals of 26 and 32 inches they are completely similar, only the screens are larger. I ordered it on Aliexpress here.
Algorithms for setting up channels by brand
In order for the user to easily cope with setting up the TV, manufacturers, as a rule, unify access to settings and the search algorithm. The only difference may lie in the names of the menu items, the access method (using a separate button on the remote control, sequential navigation through the menu). If you are unable to use the standard TV channel search algorithm, use the manufacturer's instructions included in the package. If it is lost, you can find information on the manufacturer’s website, knowing the modification of the TV panel.
Outdated TV models
On old TVs, which are still found in Russian homes, programs are searched using special controls hidden behind the buttons. To gain access, you need to pull out the panel, then turn the control until the image appears. Considering that terrestrial television has switched to digital broadcasting, and only a few channels are available in analogue, for outdated TV it is recommended to buy a digital set-top box, which will provide access to the full list of channels and allow you to switch programs remotely.
For outdated TVs, it is better to buy a digital set-top box.
How to set up DVB T2 on your TV
The setup process is identical for most types of receivers. The buttons and menu sections, as well as the general window interface, may be different. But the algorithm is the same for all devices.
Connect to digital television and setup is easy. To do this, you just need to connect the cable to the required connector and configure the channels. If your TV model is outdated and cannot receive such signals, you will need to purchase additional equipment.
The TV has a connector for an antenna, a tulip connector, and a Scart (for audio and video). Instead of the latter, the device may have an HDMI port. This is even better.
With a dual connection via HDMI and tulip, you can switch the cable if necessary. But it is better to use HDMI for viewing as it guarantees good quality.
Reference! Also, when connecting, the distance to the tower transmitting signals is taken into account. To effectively tune the signal, you should install an antenna with a mounted amplifier on the street.
How to set up digital TV on LG
If this instruction is not effective, you should use a detailed algorithm for LG TVs. The technique is relevant for almost all models of the manufacturer.
- From the remote control go to the Menu;
- Click on “Options”;
- In the “Country” category, change the checkbox to Finland or Sweden;
- Then go to the “Settings” category and launch “Autosearch”;
- In the fields you need to enter a search method, usually a fairly fast type, frequency - 298 MHz, modulation - 256 QAM, characters - 6952, ID - auto;
- If everything is done correctly, then during the search a number of TV channels will be displayed;
- The manufacturer LG integrates an automatic system for searching and updating TV channels into the system. This function can be inconvenient as the prepared list will be reset regularly. To prevent this phenomenon, be sure to go to the settings for connecting via cable and turn off “Auto channel update”;
- For convenient sorting, you need to remove the check mark from auto-numbering in the “Cable” section in “Autosearch”.
Propagation of television radio signal in the UHF range
Digital broadcasting in Russia from multiplexes is carried out in the decimeter range (UHF) at frequencies from 474 to 858 MHz. In each region, to eliminate the mutual influence of television transmitters, two frequencies are allocated.
The distance to the tower at which stable reception is possible depends on the transmitter power. Under normal conditions, the multiplex transmitter with a power of 1 kW provides reception at a line-of-sight distance of the tower up to 40 km. But if it rains or there is high solar activity, then this distance is significantly reduced.
For stable reception of a digital signal over the air, the receiving antenna must be in the line of sight of the transmitter antenna installed on the tower.
In urban environments, the path of the radio signal is often blocked by multi-storey buildings, power lines and other obstacles. Therefore, at a distance of even several kilometers, if the TV is successfully configured, the sound may periodically disappear or the image may crumble into colored squares or disappear.
If the electromagnetic signal has high power, then part of it can be reflected from neighboring buildings and it is often possible to tune the TV to receive channels thanks to the reflected signal. In this case, the antenna turns out to be directed in a completely different direction from the TV tower.
List of free terrestrial digital television channels
The DVB-T2 digital terrestrial television system allows, unlike analog television, to transmit up to ten channels at once on one carrier frequency. Therefore, the list of channels approved for free broadcasting is divided into groups of ten channels each.
A selection of ten channels are broadcast over the air using one set of equipment called a Multiplex. To eliminate mutual influence, each Multiplex operates on its own carrier frequency in the decimeter range (UHF) 470-862 MHz, in which analogue programs were also broadcast. Therefore, to receive a DVB-T2 digital signal, there is no need to change the antenna and cables if they are designed for UHF reception.
| List of channels of the RTRS-1 multiplex | ||||
| Number | Channel name | Logo | Genre | Founder |
| 1 | First | The main TV channel in Russia. News, politics, educational and entertainment programs, films | VGTRK | |
| 2 | Russia 1 | The flagship of VGTRK. Has single air windows for all regional branches. News, politics, educational and entertainment programs, films | VGTRK | |
| 3 | Match TV | Sports programs and everything related to sports | Gazprom-Media Holding | |
| 4 | NTV | The first private TV channel is a serious competitor to state channels in terms of professionalism and quality of programs | Gazprom-Media Holding | |
| 5 | Channel 5 | It is the successor of Leningrad Television. News, politics, educational and entertainment programs, films | National Media Group Government of St. Petersburg | |
| 6 | Russia-Culture | The TV channel presents viewers with a wide range of programs dedicated to various areas of cultural and social life | VGTRK | |
| 7 | Russia 24 | News, politics, finance, analytical programs | VGTRK | |
| 8 | Carousel | TV programs for children and youth, cartoons, educational programs | VGTRK, JSC "Channel One" | |
| 9 | Public television of Russia | A platform for discussing the most pressing issues that concern society, as well as a means of open and direct interaction between the authorities and citizens of Russia | ANO "Public Television of Russia" | |
| 10 | TV Center | TV Center devotes most of its airtime to covering the political, social and cultural life of Moscow | The government of Moscow | |
What difficulties may arise
There are times when it is not possible to set up DVB T2 reception. If there is such a problem, you need to make sure that there is no damage to the antenna. If it is intact, you need to check the direction. The antenna should be directed towards the tower. It is also necessary to install it outdoors; if you place it indoors, it will block the signal. If the user does not know where exactly the tower is located, torsion of the antenna will help. It must be moved very slowly and smoothly. As soon as the antenna makes contact with the tower, the device will work.
Attention! There are errors during the automatic channel search process. For example, the receiver found few channels or did not find them at all. A manual search will help.
It is also possible that the TV has found channels, but the quality of their display is very poor. This means that the antenna is turned towards the tower, but the contacts with it are bad. Try moving it a little. This problem can occur in bad weather.
Noise reduction and motion processing
Noise reduction and other similar features often reduce the sharpness of a good HD or 4K picture, sacrificing detail to reduce noise.
The opposite is true for edge correction, which amplifies noise in an attempt to improve resolution.
Both of these features may only be useful when watching TV in standard definition; in other cases it is better to do without them.
It is one of the most important components of image processing; But despite notable recent improvements, smooth object movement still comes at the expense of overall picture stability.
Depending on the manufacturer, this feature may be called Trumotion (LG), Motionflow (Sony), or Motion Plus (Samsung). It analyzes the image and inserts repeated or empty frames to avoid motion jerks.
Setting the processing level to high results in unpleasant blurry halos around moving objects. In films, this approach creates a “soap opera effect”: a Hollywood blockbuster shot at 24 frames per second begins to look like an episode of a television series at 60 frames per second.
Sports fans may prefer a smoother image and accept some artifacts.
Technology has matured in recent years, so we recommend using a low level of motion processing when watching movies if necessary (or turning it off completely if you don't mind a little judder). It's all a matter of personal preference, so don't be afraid to try different options.
The best results are achieved by separating motion processing into blur and judder control (LG OLED models and Samsung QLED TVs offer this option). If your TV allows it, turn off shake reduction and adjust the blur level to suit your taste.
Setting up DVB T2 on TV: step by step
To set up, we need a device called a receiver. It receives signals and transmits it to the TV. Signal sources: Internet, dish or antenna. The receiver is configured as follows:
- First you need to take it out of the box and remove the covering film. Failure to remove it will cause the device to overheat.
- Cut off the cable protection sheath. Its length is approximately 15 mm from the end. We clean the shell.
- We bend the protective film and screw ports F to the wires.
- We connect the cable to the receiver and TV.
- The tulip wires are inserted into the receiver and monitor ports.
- You can connect an antenna to the TV. It must be installed outdoors (house wall, balcony). Now you can start setting up.
Note! You need to be careful when stripping, as there is a risk of damaging the film covering the center conductor. It is needed for protection.
The setup is as follows:
- We are looking for a menu. There we go to settings.
- By default, the country should be specified. If not, we indicate it ourselves.
- We select the language, region, mode and search format.
- Set the signal format. Most often, DTV-T/T2 is placed at this point. This means that the TV can pick up both analog and digital signals.
- The process of searching for channels has begun. You don’t need to do anything here; the device will find all available channels on its own. The search can be interrupted at any time and continued later. If necessary, you can choose the manual channel search method. Standard means that the TV will find all channels that are not on the TV. Manually means searching only those channels that are needed. For example, a user only watches sports and does not need channels with cartoons and TV series. The manual search method allows you to ignore the latter. To implement this, you need to set a frequency that broadcasts channels in your area of residence. This can be found out from providers or on the Internet.
- Once all channels are found, or you decide to pause the search, click the save button so as not to lose the found channels.
General setup instructions
To begin with, you can consider how digital TV is configured on TVs with a built-in receiver in general. The differences usually lie only in the sequence of some actions and the names of the items.
To connect terrestrial digital television, you should:
- Connect an antenna to the TV;
- Press the “Menu” button on the remote control;
- Go to "Options" and select automatic setup;
- After this, a window will appear on your screen in which you will need to determine the signal source. O and click "Start";
- Next, another window will appear. Here, from the proposed signal sources, select “Digital” and again click on “Start”;
- After this, another window will appear in which you need to go to “Search Mode” and select “Full”.
- You will see columns that you will need to fill in with the following data and click the “Search” button:
| Frequency | 314 MHz |
| Transmission speed | 6875 kS/s |
| Modulation | 256 |
Some models have a network search feature. If it is, then you do not need to enter data. It will be enough just to select the search mode and run it. After this, your TV will start displaying 20 free channels.
Review
Let's now look at the pros and cons and then I will draw my conclusion.
- How to connect and set up 20 free digital television channels
pros
- High resolution FullHD always gives a high-quality picture. It’s just that it’s not worth buying HD now - it will be a return to the past;
- Screen. Fusion TV has a matte screen, good colors, good preset color presets, “pleasant to the eye.” The frame around it is very thin, we are waiting for this frame to be removed altogether and the entire front surface will be a solid picture, like in top-end smartphones;
- Finally, they redesigned their menu and now it is more “intuitive” and convenient. It used to be much worse;
- The built-in digital tuner picks up the signal perfectly in two modes: DVB-T2 and DVB-C. Very relevant today;
- Ability to view files from a flash drive. At the same time, it “eats” perfectly and understands quite rare formats. For example, Samsung or Panasonic understand only a few of the most popular file extensions. They say this has something to do with licenses for formats and global brands comply with the rules, but little-known Chinese “wanted to lay down” on this. But I'm not sure exactly.
- Sound: this is a plus and a minus at the same time. On the one hand, the volume level is sufficient for watching TV channels even in an apartment with one or two rooms. On the other hand, the low end is clearly not enough and may not be enough to watch modern action films or science fiction; you need to be smart with the speakers.
- There are many connectors, you can connect everything at once without having to constantly switch. Two HDMI, can also be used as a computer monitor.
Minuses
- I already wrote about the sound above, to a strict B;
- Blue bright LED that lights up in Stand By mode. When turned on, it goes out.
How to set up your TV and get the highest quality picture
Save and read later -
Screen size, viewer position, picture modes - we will look at all the characteristics.
Choosing the right TV is only half the battle; You still need to get the highest quality image from it. To ensure that your TV always pleases you, you will have to take care of the settings.
It is best done during the initial installation of the TV; If you're looking for something new on Black Friday or Cyber Monday, be sure to take the time to do the basics (like choosing the right location) immediately after it arrives. It is permissible to fine-tune the parameters at any other time; The difference in the image before and after adjustment can be dramatic.
Our guide will help you choose the optimal position to install your TV, connect multiple sources to it and the TV itself to the Internet, and then move on to fine-tuning brightness, contrast, motion processing functions and other parameters, each of which will help you get even more high-quality picture.
Setting up digital channels
There are two ways to set up digital television on your Fusion TV: auto channel search and manual channel search. If you need to find all channels, then use the first option; if you need to add several channels to an existing list of channels, use the second setting option. Connect the antenna cable to the appropriate socket on the back of the TV.
- On your remote control, press the button
- Select the Channels section.
- In this section you need to select Auto Configuration and click OK.
- Setting up a search, in this menu you need to do several actions.
- We select Russia as the broadcasting country.
- Setting type, you can select only DTV; if you need analog, click both options.
- Digital type, to watch digital terrestrial channels select DVB-T, for cable television you need to select DVB-C.
- Click on start and wait for the setup to finish, this is for DVB-T.
- If you select DVB-C, additional setup options will become available.
- Search type Full, set everything else to auto.
- All DVB-C format settings are set, we start searching for channels.
Setting up LG TVs
The menu and firmware on LG TVs with a built-in receiver may be different. It mainly depends on how modern the model you have. If the TV is old, then you will have to buy a special device that will receive a digital signal. However, despite this, the menu of each TV has similar items and characteristics.
In order to connect 20 channels of digital terrestrial television you will need:
- Connect the TV antenna;
- Go to “Options” through the menu;
- Next you will see a list of parameters that can be changed;
- In the “Country” item, select Finland or Germany;
- Next, go to settings and select “Auto search”;
- Next, you will need to select a connection method. From the proposed options, select “Cable”;
- Next, a window will appear in front of you in which you need to go to the setup mode and enter the data indicated in the table above. After that, click "Start".
If you do everything correctly, your TV will begin to display 20 over-the-air channels, as well as some radio stations that it can detect.
It is worth saying that LG TVs have auto-updates. This means that from time to time the TV itself will reset all found channels and search for them again. If you do not want this, then simply disable this feature. To do this, you will need to go to “Digital Cable Settings” and turn off the auto-update function.
In conclusion, it is worth saying that setting up a TV is quite simple.
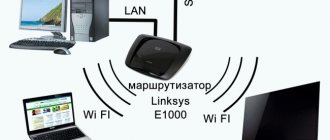
#3 Through a router
The previous instructions are only suitable for devices with a built-in module. What if you need to connect a TV without WiFi to the Internet via a WiFi router? Read below:
- Purchase a special module at a hardware store;
- Place the device into the USB connector;
- Go to the wireless connection settings again (as described above);
- Find the connection you need;
- Select “Setting from a list of access points (AP)” if you know the login and password for the home. networks;
- Click on “Easy installation (WPS button mode)” if the device supports automatic connection to Wi-Fi;
- Click on “Settings (Ad hoc)” if you need a local connection.
Great, so we figured out how a router for digital television works! It's time to move on to the next part of the review, dedicated to Smart TV.
Philips setup
The steps for setting up 20 digital TV channels on Philips TVs are essentially the same as those described above. To do this, you should also connect the antenna, enter the menu, and then perform the following steps:
- Go through the menu to the “Configuration” section;
- In the window that opens, select “Install”;
- After this, an additional menu will appear. In it you must select the “Channel Settings” item;
- Next, another auxiliary menu will pop up. Here you will need the “Automatic installation” tab;
- After you get to it, a window will appear in front of you warning that the list of channels will be updated;
- Click the “Start” button and in the new window select “Reinstall channels”;
- Next you need to click on the “Country” item and set Germany or Finland;
- After this, you will need to decide on the connection method. This is the “Cable” item;
- Next you should make some more changes. To do this, click the “Settings” button;
- In the window that appears, click “Baud Rate” and select 314.00;
- Only after this should you click on the “Start” button and your TV will independently find and configure 20 over-the-air channels.
Setting up TVs for DVB-C reception
Options
To configure the built-in DVB-C tuner to receive digital cable television programs, you must use the following parameters (selected in the TV menu):
- The initial broadcast frequency is 298 MHz (298000 kHz);
- A total of 16 transponders with a step of 8 mhz;
- Symbol rate - 6875 Ksim/sec;
- Modulation - 256 QAM.
These parameters are suitable for tuning based on the network search principle; if the TV does not support it, then you need to use a full search or select frequencies for manual tuning in megahertz: 298, 306, 314, 322, 330, 338, 346, 354, 362, 370, 378, 386, 394, 402, 410, 418.
The following are conditional examples of TV settings.
Digital TV setup example
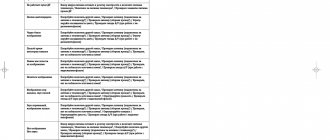
SAMSUNG TVs
Decoding of SAMSUNG TV models:
- Country - Slovakia, Slovenia or Others;
- Auto search for digital and analogue channels;
- Source - Cable;
- Search mode - Network.
General algorithms for setting up digital and analog channels for various models of SAMSUNG LCD TVs:
- Click on enter the menu;
- Select in the menu - “Channel” (icon “Satellite dish”);
- Select the signal source - “Cable”;
- Select - “Auto-tuning”;
- Select - “Digital”, “Digital and Analog” or “Analog” (depending on the preferred television signal); Click “Start”. Setup takes approximately 5-10 minutes.
Detailed description of setting up digital channels on SAMSUNG brand TVs starting in 2010:
- In order to set up digital TV channels for the vast majority of SAMSUNG models, press the “” (Menu) button on the remote control, the TV menu will open in which you will need to select the “Channel” section (Satellite dish icon).
- Make sure that the Cable option is selected in the Channel-Antenna menu
- To select a country, go to the “Channel-Country” menu item. The TV will ask for a pin code, if you have not changed it, then enter 0000
- To have the necessary DTV search parameters, make sure that the following settings are selected in the “Channel-Country” menu: Country -> Digital channel: Other; Analog channel: Eastern Europe
- Open the “Channel-Cable Search Options” menu: Start frequency: 298 MHz (298000 kHz); Ending frequency: 418 MHz (418000 kHz); Baud rate: 6875 KS/s; Modulation 256 QAM;
- Open the “Channel-Auto-Tuning” menu: Signal source: “Cable”; Channel type: “Digital and analogue.”; You choose the type of channels at your discretion; you can find only digital channels, or digital and analog, or only analog. Click "Next"; Search mode: “Network”.
- Click "Next". Once the channel search is complete, click OK. After an automatic search, all digital channels existing on the cable network will be found. Only those broadcasting in unencrypted form will be shown. It is most convenient to remove the remaining channels.
- Open the “Channels-Channel Manager” menu or press the “CH LIST” button on the remote control.
- Select the desired channel (or several, using the “C” (yellow) button on the remote control), press the “TOOLS” button on the remote control and select “Delete”.
- After confirmation, the selected channel will be deleted.
- To sort the channels, select the one you need (in the “Channel - Channel Manager” menu, or press the “CH LIST” button on the remote control), press the “C” button, then the “TOOLS” button, the “Sorting” menu and move it to the desired position place in order.
- If you have a SMART TV: Look at the “smart hub” button on the remote control, click and select the channel icon, then see the list of channels, select editing in the upper right corner.
Which TVs support digital broadcasting?
Modern televisions capable of receiving a digital signal operate according to the DVB-T2 standard. They are equipped with the appropriate components and can switch to a new broadcast format without connecting additional telecommunications devices. We have a separate instruction on how to set up digital channels on new models.
The DVB-T2 standard is supported by all TVs from the following manufacturers:
Television devices with the DVB-T standard, which processes exclusively analog signals, do not support the digital broadcast format. Models with this broadcasting technology were produced until 2013. To set up digital channels, you will need a set-top box with a built-in DVB-T2 standard.
Example of a set-top box with the DVB-T2 standard
To check your TV for support of the DVB-T2 standard, you must read the instructions or contact the technical support of the device manufacturers. But the easiest thing is to look at the connectors on your TV. If there are connectors for tulips or SCART, then by purchasing an additional set-top box you can set up digital channels and watch them for free.
Those who only have a SCART connector will need to buy an adapter for tulips.
For those who have very old TV boxes, see the instructions below.
Is an old analogue TV antenna suitable?
If you live in a city on high floors, then you can first connect the set-top box to see if it can find digital channels. If the channels are found, then you won’t have to buy or connect an old antenna. Where a weak signal level cannot be avoided without an antenna, you may even need an active antenna with power.
Antennas, as well as set-top boxes, can be bought inexpensively in China:
Common problems and their solutions
Channels are not picked up at all, “no signal”
Check the following factors:
- Serviceability of the equipment (the TV itself, the antenna and the cable connecting them). If problems are found, it is better to contact a repairman;
- Antenna adjustment. UHF antennas are extremely sensitive to the direction from which the signal comes. The problem may be resolved by changing the orientation of the antenna.
- Distance to the repeater and its power. This information can be obtained from the RTRS service. You may be in a “dead zone” that is not yet covered by the broadcast. Until new towers are built, there will be no reception in this area. All that remains is to use satellite broadcasting, which is available wherever the direction to the south is free.
- Radio shadow from nearby natural (hills, mountains and other elevations) and man-made objects (major buildings made of steel and reinforced concrete), which can interfere with the passage of the signal. This can be corrected by changing the position of the antenna (for example, raising it higher to get out of the radio shadow) and adjusting the reception of the reflected signal. You can also try to catch the air from another broadcaster if it is within 30-40 km from you.
Only part of the channels are caught
Here you need to check:
- Broadcast parameters of the nearest tower. Perform manual tuning of each multiplex on individual frequencies.
- Tuner settings on the TV itself. Perhaps some channels were not saved. The situation can be corrected by repeated automatic or manual tuning of the TV.
Read a detailed analysis of what needs to be done if only 10 channels out of 20 are caught.
There were channels, but they disappeared
If reception was previously carried out reliably, but then suddenly the channels disappeared, the reason may be:
- The emergence of a new obstacle between the antenna and the repeater. It is worth studying the reception map and exploring the surrounding area.
- Technical problems at the repeater. As a rule, they are written about in local news, so you need to check reports in regional media and local public pages and forums.
- Problems with the antenna. If you use a collective one, you need to contact the company that services it. If we are talking about an individual one, you should check whether it has moved or whether the antenna cable is broken.
Weak signal
The following is possible here:
- The repeater is too far from the receiver. There is nothing that can be done here, except perhaps purchase a new active antenna capable of receiving such signals.
- Radio shadow. The solution is to move the antenna to another location.
UHF antennas - features of digital signal reception
Any UHF antenna is designed to receive analog and digital signals, because from a physical point of view, the same electromagnetic wave is transmitted. A digital signal differs from an analog signal only in the modulation method, which does not affect the transmission of the signal from one antenna to another.
Industrial antennas can be simple or multi-element and are designed to receive signals over the entire UHF range. The more elements in the antenna, the more sensitive it is and will be able to receive the signal at a greater distance from the TV tower.
Antenna sensitivity is indicated in decibels. But if a multi-element antenna and an indoor one have the same gain, this does not mean that the indoor one will be able to receive a signal at a great distance, since it has an internal amplifier built in, and there will be nothing to amplify.
The geometric dimensions of the UHF television antenna elements are selected based on the frequency of the received signal. Industrial antenna designs are configured to receive the mid-frequency UHF range 474-858 MHz, so the efficiency of receiving a television signal at the edges of the range is much lower.
If reception needs to be carried out at a great distance from a TV tower in an area of uncertain reception, then the sensitivity of a multi-element antenna can be significantly increased by changing its geometric dimensions in accordance with the frequency of the digital channel package.
The ideal case is to install a separate antenna for each RTRS-1 and RTRS-2 multiplex, tuned strictly to their broadcast frequency in a given region, to receive over-the-air digital channels.
It is worth noting that the sensitivity of the antenna strongly depends on the accuracy of the location step and the length of the directors (parallelly located rods). A displacement of even one of them by 1 mm greatly worsens the gain of the antenna as a whole.
Today digital television is becoming increasingly popular. It replaces the outdated analog TV. In this article we will talk about how you can set up new programs on your device.
Adding regional analogue channels
In most regions of Russia, in parallel with the broadcasting of two federal multiplexes, regional analogue television channels are also broadcast. How can I increase the number of programs by adding them to the list on my TV?
Do you watch local analogue channels?
Proceed according to the following algorithm:
- Point the antenna exactly at the repeater and turn on the analog channel search mode on the TV.
- The specific scenario of action depends on the brand of television receiver. For example, on a Samsung TV you need to specifically indicate that when scanning you need to take into account only digital channels: the default auto-tuning system will search for everything that is received from the antenna. If you also need to catch an analog signal, select the appropriate item.
- After all TV channels have been found, record them in the memory of the TV receiver.
General procedure for setting up broadcast channels
The easiest way is automatic configuration. The general algorithm for TVs of all brands is the same:
- Connect your TV to the antenna. It should be clearly oriented towards the nearest repeater: unlike the MV antenna, DVMs are very sensitive to the direction from which the signal comes.
- Open the menu (there is a special button on the remote control for this).
- Go to the “Options” or “Settings” section (the name depends on the manufacturer and the interface it uses).
- Here select “TV” or “Reception”.
- Specify the type of television signal source: antenna (to search for over-the-air channels) or cable.
- Select the automatic search function (for cable and satellite TV, specify the frequencies of the provider; for terrestrial TV, nothing is needed).
- The TV will display a list of channels found.
- Click "OK" to confirm the entry. The programs will be stored in the TV memory.
- You can start watching shows.
Manual setting
If automatic tuning does not produce results or shows an insufficient number of channels, proceed as follows:
- Using the RTRS online service, find your location and click on it. Parameters will open, which indicate the frequencies of digital channels for the 2 nearest towers. Write down these values (in the example below, highlighted with gray frames).
- Go to the menu and then to the “Settings” mode.
- Select the “TV” item, but now go not to the auto search section, but to the manual setup item.
- Select the signal source "antenna".
- Enter the frequency (MHz) and channel number (TVK) values for the 1st multiplex that you wrote down in the first step.
- Start your search.
- Once the channels are found, save them in the TV receiver's memory.
- Repeat the search procedure for the 2nd multiplex using the appropriate values.
- You can start watching.