Setting up digital TV
There are two main formats of digital TV, cable digital and terrestrial digital TV.
DVB-C setup.
- First, connect the cable to the TV socket.
- Next, you need to go to the TV menu by pressing the menu button.
- Find the Channel section
- Select the connection type CABLE or DVB-C.
- Click on Autosearch.
- DTV search mode.
- Full search or Network search, but if you know the parameters.
- We all turn on the search and wait for the setup to complete.
DVB-T2 setup
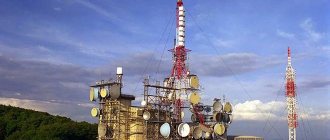
In order to set up twenty digital terrestrial channels without a subscription fee on your Orion TV, you only need a digital TV and an antenna. Which can be either outdoor or indoor, it depends on your distance from the TV tower.
- Use the left or right buttons to find the Channel item.
- There are several points here; we need the Tuner Type to be set to Ether.
- Next, go to the Auto search item.
- We set DTV to search for digital channels and start searching for channels.
You can also use Manual Search, for this you need to know the multiplex frequency.
Using the Channel Editor, you can sort the found channels in a different order or delete unnecessary channels.
If after tuning the channel picture is scattered, check the signal level in the Signal information section.
Operator "Orion Express": a short excursion into history
The group of companies includes Orion Express itself), Sky Progress LLC, Telekarta LLC, Vision LLC (a subsidiary in Kyrgyzstan).
The company, established at the end of 2005, conducts its own activities to provide services in the following areas:
- digital TV broadcast from satellites to subscribers individually;
- services regarding the placement of television channels on satellites 140° east. long and 85° east d.;
- services regarding the maintenance and production of television channels;
- services regarding the delivery of TV content on cable television networks;
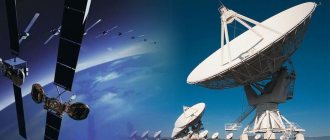
- provides two-way satellite high-frequency Internet service (VSAT).
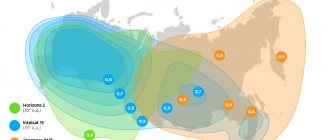
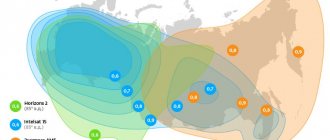
Today, the Russian digital broadcasting operator in question is the only one that covers 100% of the coverage area of the Russian Federation and partly the CIS countries.
The company's broadcast is reproduced from satellites:
- "Express-AM5";
- Horizons 2;
- Intelsat 15 is a NASA satellite that has been in orbit since 2009 with a 17-year warranty.
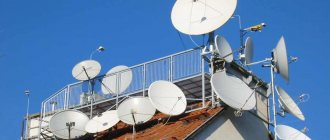
Digital set-top box.
Automatic and manual setup of DVB-T2 digital channels can be done independently; for this it is not necessary to seek help from specialists.
How to set up digital television
How to set up DVB-T2 on your TV? The setup process is suitable for almost all receiver models. The design of windows, the names of buttons and menu sections may vary, but the general algorithm is approximately the same for everyone.
- Review of the best Orion TVs: reviews, settings and malfunctions
Connecting a device that supports the DVB-T2 standard to digital television and setting it up is not at all difficult. To do this, just insert the cable into the appropriate connector and perform some simple manipulations to configure the channels. If you are using an outdated TV model that does not support receiving this type of signal, you will need to purchase a special set-top box.
The TV must have a special input for connecting an antenna, as well as a tulip-type connector and an input with a video output (scart). If your TV has an HDMI input instead of a SCART connector, then this is a better option.
If you can make a double connection – both via the “tulip” and via HDMI, you will be able to switch from one cable to another. It is best to watch via HDMI, because... In this case, a higher quality image is obtained.
The distance to the transmitting station (tower) matters. Most often, to effectively tune a TV, it is recommended to install an outdoor antenna with an amplifier, and in city houses on the 4th-5th floor you can use an antenna with a “mustache” or in the form of a frame without an amplifier, but with the “signal amplification” option on the TV set-top box.
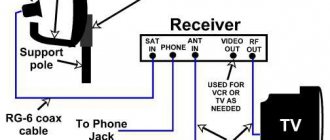
A receiver is a device designed to receive a signal and transmit it to a TV. The signal source can be a satellite dish, antenna, or the Internet. Connecting a digital set-top box to a TV can be done either directly or via DVD or via a monitor. But in this case you may need a special adapter.
How to connect to a TV and set up a receiver (digital receiver)
- Remove the device from the box and remove the protective film. The film must be removed, otherwise the device will constantly overheat.
- Cut off the protective sheath from the TB cable approximately 1.5 cm long from the end (both ends). Stripping the sheath must be done very carefully so as not to damage the shielding film that protects the central conductor.
- Carefully peel back the shiny protective film and screw the “F” connectors to the wires.
- Connect the cable to the TV and set-top box.
- Insert a bunch of “tulip” wires into the connectors of the TV and set-top box.
- Connect the antenna to the TV. The antenna must be installed on an external wall of the house or on a balcony. After this, you need to move on to the actual setup.
To configure the DVB-T2 set-top box, you need to click on “Menu” on the control panel, and then go to settings. If the country is not specified by default, you must select it. You also need to select the region, language, image format, search mode.
After that, select the signal standard. By default, DTV-T/T2 is installed - this is analog and digital television. If this setting is not changed, the TV will search for both channels.
The program will prompt you to choose automatic or manual settings. You need to select automatic and click on the “Ok” button.
After this, the TV itself will search for all available paid and free channels. After completing the search, click on the “Save” button.
- How to set up a Samsung Smart TV - step by step instructions
If “DVB-T/T2” is set in the “Search mode” item, then the device will independently find all those channels that are available in your region. But this is only possible if you already have a working antenna installed, which is directed towards the transmitter.
Orion TV remote control
The Orion TV remote control has the following remote control buttons: 1 – POWER: Turns on the TV and switches to standby mode. 2 – MUTE: Mute or unmute the TV sound. 3 – SOURCE: Pressing the SOURCE button displays a list of signal sources. The selection of video equipment connected to the TV inputs is carried out using buttons. Click OK to confirm your selection. 4 – Button block – P.MODE: Select image mode. S. MODE: Selects sound effect options. AUDIO: Button for selecting audio settings. P.SIZE: Switches image size options. 5 – 0-9: Pressing one of these buttons selects the corresponding channel. 6 – FAV.CH: Pressing the FAV.CH button displays your favorite channels. 7 – SLEEP: Set the sleep timer. 8 – JUMP: Switches between the channel you are watching and the previous channel, and back. 9 – MENU: Displays the OSD menu. 10 – EXIT: Exits the OSD menu. 11 – INFO: Press once to display various information such as current channel and input source. 1 2 – The cursor buttons allow you to navigate between OSD menu options and configure the system. The selection of the appropriate menu options is confirmed by pressing the OK button. When you click the OK button, a list of channels is displayed. 13 – V+/V-: Increase and decrease volume. 14 – P+/P-: Scans the frequency range up and down to search for channels. 15 – Colored Button Block – Use the corresponding color buttons to directly access functions in TELETEXT or EPG OSD mode D.SETUP – In DVD mode, press this button to enter/exit the DVD setup menu. ZOOM – Enlarges/reduces the displayed frame. REPEAT: Pressing the REPEAT button will replay all selected tracks/individual songs, or cancel repeating tracks. A-B: Press the button to repeat playback between marks A and B. GOTO: Playback from a specific point. 16 – DTV/RADIO: In DTV (digital television) mode, pressing the DTV/RADIO button switches to DTV (digital television) mode or RADIO (radio) mode. Still picture of multi-page switching in teletext mode 17 – PVR LIST(lndex): In DTV mode, the running PVR and Index (Index) are displayed. Displaying the main list in teletext mode 18 – TIME SHIFT: in DTV mode. Click this button to activate the delay function, click the play button to start the program with a delay. Press the button to end the delay function. Display hidden information, such as answers to quizzes in teletext mode. 19 – REC: In DTV mode. When you press the REC (record) button, recording begins. Press the button to stop recording. 20 – USB: Press this button to switch to USB mode. Display the top, bottom of the page, and the entire page. 21 – In Media mode (mode of working with data storage devices), accelerated playback is used for reverse scrolling/moving. In Media mode, press to go to the previous section or track. In Media mode, press to skip to the next section or track. In Media mode, press to stop playback of a section or track. In Media mode, press to start playback or pause. 22 – DVD MENU: This function is not available for non-DVD models. TEXT: Turns the teletext function on or off. SUBTITLE: Displays the subtitle menu on the screen in DTV mode. Use buttons to select subtitle settings. GUIDE: Displays the TV guide on the screen in DTV mode. To turn off the TV guide, press the button again. The DVD MENU and OPEN/CLOSE buttons are only available on TVs with a built-in DVD player. On our website you can download the TV remote control, location and designation of remote control buttons, as well as instructions and User Guide
Digital terrestrial television channels of the DVB-T2 standard
If you bought a TV, antenna and set-top box just now, then when you open the welcome window, you need to click on the “Menu” button on the control panel. Next: “DVB-T setup” -> “Channel search” -> “Search mode”. Here you can both find the channels themselves and set the frequency.
To simplify the search process, you can first go to a special website with information to find out what frequencies the channels are broadcast on in your city.
If the antenna is directed correctly, then after a few seconds the “Signal Strength” and “Signal Quality” scales will be filled. If the level is good, then you need to click on “Search”, and the device will perform the adjustment itself.
If you do not know the correct direction of the antenna, you can rotate it very slowly and smoothly. In this case, you need to carefully look at the scales of intensity and quality. Once these scales are full, secure the antenna in this position and perform a search.
This is one of the easiest ways to set up a digital TV yourself. If automatic tuning turned out to be ineffective - the set-top box found few channels (or even did not find them at all), then you need to use manual tuning.
To do this, you need to delete all those channels that were found earlier. After that, select the manual search mode in the same way. A window will appear on the screen. In it you need to set the frequency on which all channels in your city are broadcast. You can find out the frequency on the Internet or from your service provider.
After the channels of the first multiplex have been found, you will need to find out the frequency for the second multiplex and start the manual search again. You can find many channels this way.
- DVB C set-top box: all about devices and technology itself
Checking the signal quality
To make sure that everything is done correctly, you need to find the “INFO” button on the receiver. (In some models, this button has a different name. To determine which button is intended for checking the signal quality, you need to look at the instructions.) This button must be pressed 3 times, as a result of which a window should appear on the screen with information about the signal quality, number channel, frequency and encoding. If the first two parameters are greater than 60%, this means that the signal level is acceptable.
If the signal is of poor quality (constantly changes its level) and shows 30% of the full signal, then the image quality will be very poor. In such cases, it is necessary to either raise the antenna higher, or install it in another place, or simply strengthen the signal.
If the TV can receive several multiplexes, you need to check the signal quality on each of them, because they work with different transmitters. It may well be that the signal will be good in one multiplex, but not in another.
The Orion company has long appeared on the Russian market and is known to consumers for its television receivers. Orion TVs are reliable, stand out for their low prices and extensive functionality. The model range includes many devices, among which each user will find a television panel that suits his wishes.
Top 5 best models
The range of Orion television receivers is very wide, and diagonal sizes vary from 20 to 55 inches. The functionality of television receivers is extensive, but you need to understand that these devices are intended only for watching over-the-air, cable or satellite television, as well as for playing multimedia content from USB drives. Options such as Internet access, Bluetooth and Wi-Fi modules are not provided on television panels from this manufacturer.
The following Orion TV models are widely popular among buyers:
- PT-55ZhK-240CT;
- OLT-32400;
- OLT-32502;
- PT-81ZhK-170CT;
- PT-127ZhK-24CT;
Orion PT-55ZhK-240CT
This small TV receiver is often purchased for small kitchens or as a PC monitor for watching television. The device is equipped with a DVB-T2 digital tuner, has a resolution of 1920x1080, LED backlighting, and a brightness of 200 cd/sq. m., contrast ratio of 60,000:1, and viewing angles of 178°. Screen response time – 5 ms.
The speakers for a TV of this diagonal are loud, their total power is 4 W. The device is equipped with a USB connector for connecting USB storage devices and then viewing movies and photos, as well as listening to music. You can connect a computer or other device using HDMI, VGA, and component connectors.
Audio output to external audio devices is possible via the headphone output. If necessary, the TV can be hung on the wall; there are holes for a bracket on the back side.
Orion OLT-32400
An inexpensive TV in a stylish case with a thin front frame and a screen size of 81 cm. Screen resolution – 1366x768 cm, response time – 8 ms, contrast ratio 80000:1. The device has wide viewing angles – 178° vertically and horizontally. Buyers note loud sound when watching thanks to the built-in speakers with a total power of 16 W.
The Orion OLT-32400 TV is equipped with a built-in media player and a USB connector for viewing multimedia content from a flash drive or hard drive. To connect a DVD or digital set-top box, there are composite and component inputs, as well as two HDMIs. The TV receiver can be used as a PC monitor using the VGA input. Audio transmission to external audio devices is possible via the headphone jack and coaxial output.
Orion OLT-32502
Like the previous model, the Orion OLT-32502 TV has a thin front frame and a stylish design, as well as a screen size of 81 cm. Unlike it, this TV receiver is distinguished by LED backlighting, which provides better color reproduction. Display contrast – 100000:1, brightness – 200 cd/sq. m. Viewing angles are large – 178°. The device has a DVB-T2 tuner for receiving digital television channels and a DVB-C tuner for cable television.
The sound is loud, spacious, speaker power is 12 W. The TV is equipped with a built-in media player and a USB connector for playing movies, music and photos from USB media. To connect external devices there are 3 connectors HDMI, SCARD, VGA, component and composite. For audio output, component and coaxial outputs are provided, as well as a headphone jack.
Orion PT-81ZhK-170CT
This television receiver is very similar in its technical characteristics and functionality to the previous model, but stands out for its greater brightness (260 cd/sq. m.) and better sound (power of the built-in speakers - 16 W). The Orion 81ZhK-170TsT TV has Direct LED backlighting, display size 81 cm, HD Ready resolution. Contrast ratio 100000:1, viewing angles 178°.
A DVB-T2 tuner is built in to watch digital television. The installed media player supports playback of video and audio recordings, as well as graphic images from flash drives and hard drives connected via a USB connector. To connect DVDs, game consoles, PCs and other equipment, there are 3 HDMI connectors, as well as a component input and VGA. Sound output is possible through the headphone jack. There is a slot for installing CAM modules. On the back wall of the Orion PT81ZHK CT TV there are holes for mounting the device on the wall.
Orion PT-127ZhK-240CT
This TV is made in a thin stylish case with a narrow front frame and is equipped with a 127 cm screen with LED backlighting and a resolution of 1920x1080 cm. Display brightness is 300 cd/sq. m., contrast 100000:1. The viewing angles are large – 178°. Response time – 8 ms. The TV has two tuners DVB-T2 and DVB-C for watching digital terrestrial and cable television. The speakers are loud, their total power is 16 W.
On the back of the Orion PT-127ZhK-240CT television receiver there are holes for wall mounting. Through the USB connector, the user can connect a hard drive and flash drive to the TV and play recorded movies, music or photos. If you need to connect a home theater or game console to the device, you must use one of the three HDMI connectors.
The TV panel can be used as a PC monitor via the VGA connector. To output sound to external audio devices, you need to use a headphone output. There is a connector for connecting CAM modules. The remote control for the Orion TV is made very conveniently, and navigation in the menu is simple and understandable even for inexperienced users.
Conclusion Orion TVs stand out for their high quality and reliability, but their functionality is limited to watching television and supporting USB storage devices. Internet access is not provided on equipment of this brand. The range of television receivers from this manufacturer is very wide; you can choose from a device with a compact screen for a small kitchen, or a large television panel for the living room.
Sources used:
- https://tv-nastroy.ru/kak-nastroit-televizor-orion.html
- https://sputnik.guru/263-ruchnaya-nastrojka-resivera-dlya-tsifrovyh-kanalov-dvb-t2.html
- https://televizore.ru/obzor/televizor-orion
Answers to questions on Orion TV
Orion PT-50zhk-100 no digital television signal
Orion PT-50zhk-100 TV, when connecting an antenna for digital television, the message “no signal” is displayed on the screen, what is the reason? 09/14/2018, Irkutsk.
The “No Signal” message may appear on the screen for several reasons: 1) Due to incorrect settings 2) Due to lack of signal in the antenna 3) Due to a malfunction of the TV However, the Orion PT-50zhk-100 TV does not have a built-in decoder Digital television and viewing of DTV channels are not provided.
Orion Olt 32102 there is a picture but no sound
I connected the TV, there is a picture but no sound. 11/22/2018, Protvino.
If you connected your TV to a set-top box, you should check that the audio cables are connected correctly. If there is no sound when watching regular television channels, try turning on the initial setup mode and selecting the correct sound system (country).