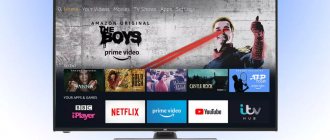
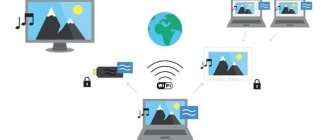
Almost all modern TVs use the Wi-Fi function, so you can access the Internet from the TV. Smart TV is a TV or set-top box with a built-in or additional adapter that allows the owner to use the Network on the device. Using this technology, you can watch YouTube videos and take advantage of other useful features on your TV. However, many people have a question about how to set up Smart TV on a Samsung TV via Wi-Fi. The following instructions will help you solve it in a few minutes.
Wi-Fi adapter: what is it and why does your TV need it?
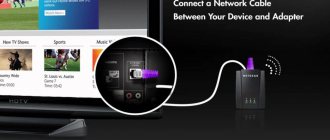
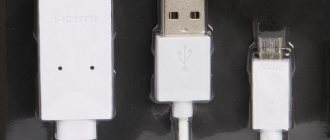
As we have already mentioned - a small device thanks to which you can connect your TV to the wireless network of your router, like a regular computer or phone. It can be built-in or removable. We are looking at removable devices in this article.
Externally, the device resembles a regular flash drive, which connects to a specific connector on the back or side of the TV (USB, HDMI and other interfaces).
The adapter may come with a USB cable.
How to determine if your TV supports adapters
The main thing you need to understand is that if your TV has a Wi-Fi adapter inside the case, you do not need to purchase it additionally. You can immediately connect to your network and surf the Internet from your TV screen.
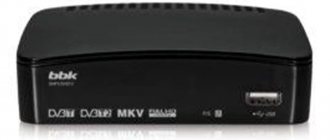
The next point: if your TV does not support Smart TV, you need to buy not a Wi-Fi adapter, but a full-fledged TV set-top box.
If your TV does not support Smart TV, you do not need an adapter, but a set-top box
How to determine whether the adapter is built into your TV or not? Does he have a Smart TV? If the TV was purchased before 2010, there is neither “Smart TV” nor an adapter in it.
If you have a more modern TV, you may have both. But each case must be analyzed separately. Therefore, look immediately at the documentation for the TV: there should be the designation Smart TV. The technical specifications indicate the presence of a built-in Wi-Fi adapter. Typically, all models released after 2014 have a built-in adapter, unless they are budget. But it’s still worth looking at the documentation to make sure.
Look at the documentation for the TV - it will be noted there whether it has a built-in adapter or not
If there are no documents for the TV, no problem - go to the official Samsung website, find your TV model there in current models or archival ones (which are no longer produced). Use the search on the site (magnifying glass icon on the top right). Study the technical specifications of your TV there.
You can search for information about your model on the official Samsung website.
If there is no documentation and no access to the Internet (to go to the official website), open the menu with the TV settings: if there is no “Network” item there, your TV does not support “Smart”. Also, if the device has “Smart”, there will be a LAN output on the back of the device for a wired Internet connection.
How to determine the TV series: you can use it to find out if there is a built-in adapter
Look at the back panel of the TV device: there should be a label with the model name. Or open the documentation - the same information is indicated there.
By the model name you can determine the series of the device
Look at the third letter in the combination - it will be the name of the series. In our example, this is the letter F. Another example: model UE32D6100SW, TV series - D.
So: models from the M, Q, LS, K series have built-in adapters - there is no need to buy a removable device. But the C, D, E, H, F, J series come without a built-in adapter.
How to access the Internet from a Samsung TV via Wi-Fi depending on the TV model
On different Samsung TV models, the instructions may differ. In most cases you will have to follow the guide above. However, on some lines the items are slightly different.
R, N, M, Q and LS Series
How to connect your phone to TV via Wi-Fi
They may all be slightly different, but the essence remains the same. Before you begin, you need to make sure that the password is familiar, because you cannot connect to any router that the TV can see. If your own network password is unknown, it is recommended to contact your Internet provider. Wi-Fi connection:
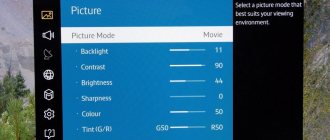
- First you need to open the TV menu. To do this, you can press the “Home” or “Home” button on the remote control. Typically this is a house icon. In the window that opens, click “Settings”.
- Using the keys on the remote control, select the “General” tab. A window with parameters will appear on the side.
- Then go to the network options tab.
- Next, select “Open network settings”. Typically this is the second parameter.
- After that, click on “Wireless”. If you want to connect via wire, then you need to select “Cable”.
- When the device finds available connections, this may take a few seconds, you must select a router.
- A keyboard appears on the display for input. You need to write a password in the field. There is also a “Show Password” option on the side to make sure there are no typos.
- The device will check that the information entered is correct, then click “OK”. Done, the TV is now connected to Wi-Fi.
Series K and J
The essence of the setup is similar to the same process for models of previous lines. However, some parameter names are different. How to set everything up:
- First, you need to open Settings by pressing the Menu button on your remote control. In some cases, you need to press “Home” and select the appropriate item.
- Go to the “Network” tab, “Open network settings”.
- At this stage, you can select the connection type: wireless or cable.
Important! Otherwise, the settings are the same as in the previous guide: select the network and enter the password.
Entering a password when connecting
Selecting an adapter manufacturer
You have two options: buy a branded adapter from the same manufacturer or look for a third-party model that will fit your Samsung.
Samsung branded adapter
Samsung itself offers to purchase a Wi-Fi adapter in addition to the TV. There are two models of removable branded adapters available: WIS12 and WIS09. Each model is suitable for a specific series of Samsung TVs. For WIS12 the following series are needed: J, H, F, E. For WIS09: B (B7000, B650), C (C5xxxx), D (D5000~D64, D550~D64, D53~D55, D51~D53).
WIS09 - an earlier version of adapters from Samsung
Everything is simple here: you determined your TV series and went to the store to buy the appropriate branded adapter. You don't have to choose anything: once you connect and configure the adapter, it will work like a clock. And if it doesn’t, return it under warranty and get a new one without defects.
WIS12 looks more like a flash drive than WIS09
What are the advantages of a branded device:
- There will be no compatibility problems. Samsung TVs will sync perfectly with the original device.
- You will have a guarantee and service from the company itself.
- The service life will be longer than that of a budget model from a third-party manufacturer.
The obvious disadvantage is the cost. Not everyone can buy a model for 4 thousand rubles (or even more). But at the same time, you will pay money for quality and the absence of problems with the device in the future.
Adapter from a third party
You can, of course, save money by purchasing a model from another company in the range of 1 – 3 thousand rubles. This is the advantage of models. But you will need to select the device carefully. First of all, you will need to pay attention to compatibility. The characteristics of the adapter should indicate which Samsung models the device can work with. Plus, you will need to take into account other technical characteristics of the gadget, which we will discuss below.
Judging by the reviews on Yandex.Market, some of the best are Mirascreen, Tenda, D-Link, AnyCast and others.
The following adapter manufacturers are popular: Mirascreen, Tenda, TP-Link, D-Link, AnyCast
How to choose a device with optimal characteristics for your TV
What features of adapters should be taken into account when choosing?
Connector where the adapter will be inserted, and equipment
It is better to choose a gadget with a USB connector, since two main adapters () work through this connector.
What about the package: if the TV and the router are far from each other (this may mean a low Wi-Fi signal level), it is advisable that a special USB cable (extension cable) be included with the adapter. It will help to place the adapter further away from the TV and closer to the router so that it can catch the router’s Wi-Fi.
Using an extension cord, the adapter can be positioned closer to the router
Wi-Fi standard and operating frequency
These two settings should be the same as your router. If you have a modern router, it will support Wi-Fi of almost all standards: a/b/g/n. Also consider the range: if your router only supports 2.4 GHz, you cannot buy an adapter that only supports 5 GHz.
By the way, the Internet speed will depend on the Wi-Fi standard (real speed shown):
- Wi-Fi a/b – up to 3 Mb/s.
- Wi-Fi a/b/g – up to 24 Mb/s.
- Wi-Fi a/b/g/n - up to 50 Mb/s (in new adapters - up to 150 Mb/s).
Transmitter power
It is better to buy an adapter with a transmitter power of 17 - 20 dB (this is the power of most routers). However, first look at the characteristics of your router (check its documentation). If the indicators of the router and adapter are different (for example, 20 and 10 dB), there will be places in the Wi-Fi zone with low signal levels. What is this connected with: the router must also catch the signal from the adapter (that is, not only the adapter must “hear” the router).
Encryption
Choose an adapter that provides WPA and WPA2 protection: these are the most reliable types of encryption that will protect your devices from hacking. Do not use outdated adapters with the WEP protocol.
What to do if your TV doesn't connect to the Internet
When connecting, various types of errors often occur. Their reasons are different, but they are usually divided into two groups: problems on the side of the TV or router. The latter also includes cases when there is no network due to the provider. There are several different ways to solve the problem.
Set Smart TV settings manually
This is due to the DHCP protocol. As a rule, most problems arise precisely because of it, so you should try to disable it. The TV will usually notify the user that the wireless connection could not be established. In this case, you need to do the following:
- You must disable DHCP in your router settings.
- Then go to the TV settings and open the tab with the IP address. The “Receive automatically” option must be replaced with “Enter manually”. This is done for IP and DNS settings.
- Once these parameters are set, you will need to enter the addresses manually. This must be done in accordance with the settings of the router itself.
If the router has the address 192.168.1.1 set (usually written on the device itself), then the TV can be configured as follows:
- IP address - 192.168.1.104 (can be 105, 106, etc.);
- the subnet mask must be 255.255.255.0;
- the gateway is the same as the router - 192.168.1.1;
- The DNS server can be made the same as the gateway, or you can use the address from Google - 8.8.8.8.
Entering the MAC address
The router probably has gadget filtering by MAC addresses installed. This is media access control. To add another number to the list, you need to do the following:
- Open router settings.
- Find the “Binding IP and MAC Addresses” page (some routers have different names, for example, “Binding IP and MAC Addresses”).
- Go to "ARP List". The list contains the MAC addresses of devices that are connected to the network.
- Next, you need to go to the wireless network settings, select “MAC Address Filter”, click on the “Add” button.
Note! Some routers are in English. If nothing is clear, then you should use a translator.
When the window for adding an address appears, you need to enter the code from the TV. It can be found out as follows:
- Press the “Home” or “Menu” button on the remote control. Open settings.
- Select "Support".
- Go to the “About this TV” item.
- MAC will be displayed on the screen.
Important! If the code contains only zeros or “X”, then the TV is not equipped with a module.
Samsung TV MAC address
Other problems and solutions
If all else fails, then, firstly, you should reboot all equipment after the settings. In many cases, without this, the settings will not be saved. The Wi-Fi signal can also be affected by:
- Bluetooth;
- other Wi-Fi devices;
- long distance;
- obstacles.
Note! It may also be that the signal is weak, but in such cases the TV itself notifies you about this.
If none of the solutions above helps, then it is recommended to contact a specialist or service center. The cause may be a module failure. It is also worth contacting the provider and asking if any technical work is currently being carried out.
The last tip is to try connecting to Wi-Fi using the WPS button.
The Wi-Fi function on a Samsung TV is one of the most useful and convenient options. The main thing is to figure out whether the TV has a wireless network module, as well as how to connect it. The instructions above will help with this.
Common connection problems
The first connection and setup does not always go smoothly. As a result, the Internet may not appear on TV. What to do in this case:
- If you are not connected to the Wi-Fi network: try repeating the authorization procedure on the network, but only now enter the Wi-Fi password more carefully. Make sure you don't confuse small letters with big ones.
- If you are connected to the network, but there is still no Internet: check the connection via your PC or phone. If there is no Internet on these devices, reboot the router. If it doesn’t help, call your provider - perhaps the problem is on their side.
- Try connecting to another wireless network (temporarily ask your neighbor for the Wi-Fi password or create an access point using your own smartphone). If there is also no connection on the TV, but there is mobile Internet on other devices (PC, tablet) and on the smartphone itself, then the problem is in the adapter. If you bought a branded adapter, call the hotline. The number for Russia is 88005555555.
Connecting to Wi-Fi: Step-by-Step Guide
First you need to ensure the most important condition - the presence of a home network. Then you need to decide how the TV will be connected:
- connect directly - the Internet cable is directly inserted into the device. In some cases, you have to drill into a wall, so it pays to plan everything in advance;
- connection via router. This is the most convenient method and is recommended to be used whenever possible. The router needs to be connected to the provider (Internet), then using the TV module to connect to the router itself. This method works regardless of the connection type.
Preparing to connect
How to connect an iPad to a TV - instructions
Next, you need to check the settings of the set-top box or SmartTV function. To do this you need to do the following:
- Go to the menu.
- Open the “Network”, “Network Status” tabs.
- In the window that opens, click “IP Address Settings”. Address and DNS parameters should be set to “Obtain automatically”.
Note! It is important that the DHCP function is active on the router. This is a dynamic node configuration protocol. You can check or enable it through the router settings. To do this, you need to go to the gateway address (written on the router), usually it is 192.168.1.1 or 192.168.0.1. After this you need to enter your username and password. They are also written on the router.
How to connect TV to the Internet
After the setup is completed, you can connect the TV to the Network. The following instructions are written for the UE40ES model, however, using the same principle, you can configure and connect other lines.
Selecting a network when connecting
A detailed guide for different models will follow:
- First you need to press the “Menu” button on the remote control or using the button on the TV itself. In the settings window that opens, click on the “Network” tab, then “Network Settings”. A window will open with a message stating that the system will then connect to the router and begin establishing a connection.
- Before clicking on the “Start” button, you should make sure that the router is configured, since without this the connection will not turn on. Internet access is also required.
- Upon completion of the search, you must select the router and click “Next”. After this, the system will ask you to enter a password. If everything is done correctly, a corresponding message will appear in the window.
Important! Once your TV is connected, you can use the built-in browser and other features.