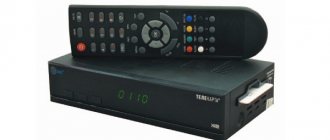
Coffee capsule Nescafe Dolce Gusto Cappuccino, 3 packs of 16 capsules
1305 ₽ More details
Coffee capsules Nescafe Dolce Gusto Cappuccino, 8 servings (16 capsules)
435 ₽ More details
Laptop stands
Repairing LED TVs, at first glance, may seem like too much of a task. But in reality this is not the case if you know exactly what is causing the problem. Many of them are fixed by the device owners themselves. In particular, those related to lighting and cables.
Advantages of LED backlighting
Both gas discharge lamps and LED backlight solve the same problem. They form a background light for the TV display matrix, which has cells with controlled transparency of the pixels and their color. However, the modern technical solution based on semiconductor crystals has many advantages. Moreover, these are advantages for both manufacturers and users, increasing the reliability of the TV, its safety, durability and other characteristics.
- TVs have become thinner. The conductor on which the diodes with lenses are mounted, as well as the scattering filter, occupy a very small height. Compared to the previous generation of lamp-backlit TVs, the gain in thickness is up to 10 cm.
- LEDs are durable and reliable, indifferent to falls. They will withstand shock if the TV is dropped or vibrates during transport.
- The user gets a much brighter screen for the same operating cost. The level of energy consumption of semiconductor crystals is many times less than that of gas-discharge lamps.
- The level of heat generation from diodes is negligible. Using TV becomes safer.
- For semiconductor crystals, the service life is measured in hundreds of thousands of hours of continuous glow without a drop in flux intensity. The TV will show for years the same bright picture as on the first day after it was first turned on.
The benefits to public health are also clear. LEDs are easier to recycle. They do not contain mercury vapor; service workshops do not need to keep strict records, responsible storage and delivery of failed parts to special collection points. As a result, the user receives low repair costs and high speed.
In addition, there is no danger of injury from mercury vapor inside the apartment. If a child suddenly accidentally breaks an LED TV, no particular problem will arise. The safety of LED backlighting lies in the fact that each of its elements operates at low voltage; in case of breakdowns, arc discharges, flames and other situations that can lead to significant negative consequences do not occur.
BINGO!!!
In order not to reduce the duty cycle of the PWM backlight to less than 85-95% (more on this below), we simply will not reduce the Backlight
below 18-20 uh... “parrots” (20 “parrots” in this case is its maximum value), but the required for office work, we obtain a low operating screen brightness of 100-125 cd/m2 by significantly reducing the
Contrast
.
Obviously, the inevitable price for this is a decrease in the Contrast Ratio between the black level and the white level, but “of two evils”, compared to flickering backlighting, this is IMHO the lesser. More on this below.
Actually, that's all. Further -
Why might the LED backlight break?
It is immediately worth noting an important design feature of LED backlighting. Although each of its elements operates at low voltage, all diodes are connected in series to stabilize the power supply to them from a single source. The result is a huge disadvantage: if one semiconductor crystal fails, the entire backlight goes out.
A twofold situation arises. On the one hand, the user receives a solution with increased reliability. The circuit for supplying voltage to the diodes is simple, it has great fault tolerance. Modern semiconductor elements are reliable and stable. However, no one is immune from manufacturing defects and other unpredictable things. As a result, if one light element fails, the backlight turns off.
This is unpleasant, to say the least. After all, without background light, you can’t see anything on the screen. The matrix is completely dark. You can only see the picture with a flashlight by shining it on the display. But there is no need to be upset. With some skills and a little special equipment, you can even fix your TV yourself.
Voltage drop
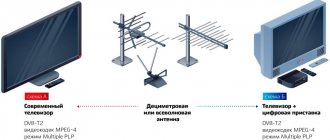
If the LV is completely extinguished, this does not always mean that the equipment is broken. Often the TV does not turn on if there are problems with the electrical network at home or the common antenna.
This happens due to:
- cable damage;
- socket failure;
- problems with the electrical network.
Then you should act according to the scheme.
- Plug the TV into a different electrical outlet and boot it up immediately.
- If you cannot turn on the equipment, then check whether another electrical appliance works from this outlet.
- When there are no problems with the operation of another device, but the television does not turn on, contact a TV technician.
Another reason that an old model LV does not turn on may be a blown fuse.
When the light is on in the usual color (red, green, blue), then the TV may not be communicating with the TV signal source. In this case, you need to start the monitor’s standby mode and try to open any media file from a smartphone or flash drive connected via USB or HDMI on the large display. This way you can make sure whether Smart-TV is working or not.
How to check the backlight
The simplest and most effective method is already indicated above. If you can see an image on the screen when you shine a flashlight through it, you don’t even have to look for other problems. Decoders, power supply system, signal loops, graphic processors and other key components are working normally. The problem has occurred in the backlight or its control unit.
To check the backlight, you need to remove almost everything from the TV. But all this can be done carefully and quickly. Checking the backlight consists of two stages.
- You need to make sure that voltage is applied to the diode structure. This problem is solved by the LED driver, a separate circuit of the TV power supply. If there is no voltage at its output, the backlight will not work.
- If there is voltage on the driver, and during inspection no areas of local overheating, fallen off conductors or damage to current-carrying paths are found, proceed to checking each of the crystals.
Although the work will require special equipment, its operation requires only minimal knowledge and skills. The list of equipment includes a multimeter, a soldering iron (air soldering station) and sharp probes. But the scope of knowledge is somewhat broader. The repairman will need to be able to check the parameters of sections of the circuit. It would be useful to know about the basic voltage values with which semiconductor crystals operate. You will also need accuracy, dexterity and confident soldering skills with an air dryer. Therefore, if all this is not available, it is not recommended to start self-repair. It is better to contact the service for qualified help.
Introduction
Clearly, the question arises, what is all this for? Of course, there will be supporters and opponents of any action, and everyone has their own arguments, behind which various reasons and arguments are hidden.
With regards to doing work, it always requires a loss of time, and time, as we know, is the most important component of our lives and for some, checking LED strips is completely absurd, as they say, it’s easier to pay.
There is another point of view that some work is quite simple and does not require skilled labor and can be done by the average person. Even a schoolboy can figure out the backlight.
On top of everything else, I would like to add that, oddly enough, all the simplest work is quite expensive and for the majority of people it is financially significant, so for the majority, self-repair is still a necessary measure, especially since the Internet can help.
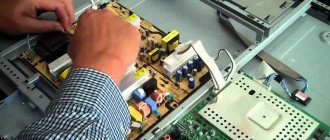
Disassembling the product
The TV has three main boards - main, T-con and power supply, all of which are clearly visible in the photo.
Removing and disassembling the matrix with your own hands is a very painstaking job, one careless move and you can buy a new TV, so it’s better not to undertake repairs without experience. Experts highlight the following main points when disassembling the matrix:
- it is necessary to prepare a work area and two tables on which to lay matrices and scattering films;
- Before starting this work, you should thoroughly wash your hands so as not to accidentally leave traces of dirty fingers on the filters and the matrix itself - this can harm the image quality later;
- special attention must be paid to decoders - one inaccurate movement can lead to a break in the cable.
Subsequent dismantling is carried out in several stages.
- The T-con board is easily removed after disconnecting the cables and unscrewing the bolt located between them.
- It is necessary to remove the metal protection from the decoders - to do this, unscrew the fastening bolts on the sides, after which they are held only by rubber fasteners.
- It's time to remove the front frame of the TV - unscrew the fastening bolts along the entire contour, place the product on the back cover and remove the frame.
- We remove the frame, turn the screen over, but at the same time carefully hold the matrix, because it is not secured by anything. The product lies on the matrix, the decoders are on top and you can remove them from the rubber mounts, but with extreme caution.
- The matrix remained on the table so that it does not interfere with further work - transfer it to the previously prepared place.
The power indicator is no longer lit
It happens that the device cannot turn on at all, the light does not light, the TV does not respond to the remote control and the buttons located on the front panel of the device. It is likely that the electricity has disappeared.
Important! It may happen that the indicator burns out, but then the TV should still turn on.
Based on the facts that the light does not light and the TV does not turn on, we conclude that there is a problem with the electricity supply.
Power failure occurs in several situations:
- there is no electricity anywhere in the house;
- the machine gun in the dashboard was knocked out;
- the socket where the cord plug from the television device is plugged in is broken;
- the extension cord is damaged if the TV device is connected to the outlet through it;
- There were problems with the electrical wiring.
The first thing to do first is to check if the outlet and extension cord are working properly. It is also necessary to look at the shield and change the position of the toggle switches.
If the previous action did not help, you should then look for the cause of the problem in a broken socket. To do this, it is recommended to simply plug the plug from the TV into another outlet.
When it doesn’t work, there is no electricity. To fix a wiring problem, you will need to call an electrician.
When the model of the TV device is a picture tube, the cause of its breakdown is a blown fuse. A blown fuse can be replaced with a new one.
Most often, the reason for the inability to turn on a TV device is a breakdown of the TV device of more modern models (for example, a breakdown of the microcircuit, power adapter or capacitor).
All equipment as a whole should be diagnosed. Once you have identified a part that is not working correctly, you should simply replace it. After replacing the broken part, the TV device should, in theory, turn on.
Troubleshooting
Now the actual repair of the LED backlight of the TV begins: to do this, you need to carefully unclip all the latches along the contour, remove the plastic frame and remove the diffusing films to expose the LEDs.
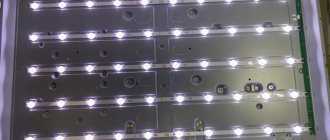
Different models of LG TVs will have their own set of LED backlights: for the LG 32LN541U there are three rows of 7 LEDs, and for the LG 32LB582V there are three rows of 6 LEDs.
As noted above, in all TVs that use such backlighting, the LEDs are connected in series, so if one of them burns out, the entire system stops working. If the LED driver is faulty, then no voltage is supplied to the entire system, and when one of the LEDs burns out, then the voltage flows, but all the efforts of the device to illuminate the system are in vain: even if you supply 200 volts, the circuit is open.
As we can see from the photograph, the backlight consists of 18 LEDs; during measurements, the voltage without load was 140 V, that is, each one accounted for 7.8 V. When we take into account the voltage drop on each strip and the total load, the conclusion will be as follows: this model uses 6V LEDs.
Finding a burnt-out LED is not easy: if there is no burnout at the mounting location, then you need to check each element separately.
No image
But there are situations when a perfectly working LG TV has no image. Or the image fades and turns off immediately, the device decides to go dark and the screen goes blank for no apparent reason. It may not be immediately clear to the consumer why there is no image and what is the reason for such a breakdown.
There are several reasons why the screen might darken. The main ones:
- lack of power supply to the lamps;
- their breakdown;
- malfunction of the scanning electrodes.
To determine the cause of the breakdown and how to fix it, the first step is to understand the general principles of operation of LCD devices and what is the main difference between their related CRT and picture tube.
The product diagram, in particular, does not imply the presence of all kinds of posistors. In most cases, the problem lies in one place - the backlight. And the master is faced with the task of determining what disabled it. To do this, it is necessary to take into account that LCD screens come in two main types:
- diode;
- based on gas-discharge lamps.
It is important not to confuse gas lamps on televisions and those used for indoor lighting. Their structure is very different. The first step is to check whether the lamp is receiving power. To do this, open the back wall of the LG TV and conduct a visual inspection, determining the functionality of the cables connected to the matrix. After a visual inspection, you can disconnect them and check their performance using the standard method - by connecting a light bulb.
In some models, illumination is provided not by one, but by several discharge light sources. In this case, they pull out the matrix and connect it to see which specific lamps work and which do not. If necessary, replace the burnt-out LED.
When making repairs, do not forget that there are several types of LCD screens
Other models provide the ability to detach the lamp from the end of the product, without any intervention in the matrix itself. The required element is covered with a special protective gasket, which is pushed aside and the broken part is soldered off. In its place, a new one is installed in this way.
Attention! When replacing lamps, their position must be taken into account. It can be either top or side. In addition, there are cases when several devices are located in one cell.
Sometimes consumers are faced not just with the absence of a picture, but with the presence of a line on the LG TV screen. Such a strip can be either vertical or horizontal. It is a symptom of problems with the sweep electrode. In order to verify the correctness of the diagnosis, it is enough to connect to it another product with a working matrix. The only way to repair is to replace the part. The same reason is most likely for the appearance of a spot on the LG TV screen.
Where to get spare parts
Today, finding spare parts for your TV is not difficult. The easiest way is to order them from the model manufacturer. In this case, you can buy ready-made rulers assembled, with conductors, diodes and lenses glued to them. They just need to be installed in their regular places and connected. But there is a problem of long delivery and quite high prices.
The second option is to order LEDs in online stores or on the Aliexpress site. In this case, the price of the kit will be acceptable, but you will have to wait quite a long time. Finally, there is the option of going to service workshops in order to select and purchase light elements that have already been used.
Replacing LEDs
Replacing the backlight of an LG TV yourself is extremely difficult, and it is possible that you will encounter certain difficulties. Let's assume that during the diagnostic process you were able to identify a couple of damaged diodes. Purchasing a strip of new light bulbs is very problematic. Service centers do not supply these parts, so the only option is to purchase from the manufacturer. It is clear that you will have to wait a very long time for delivery, not to mention the cost.
To avoid buying a strip, you should replace the LEDs in LG LED TVs one by one. You can buy it on the market. Mostly they sell already soldered parts, but that’s okay, the main thing is that they work.
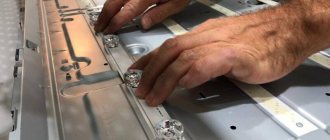
Remember that absolutely all planks are fixed with double-sided tape. Therefore, they need to be heated with a soldering hair dryer to loosen the fixation of the adhesive tape. Fix the LED strip in a special holder. Warm it up with a hairdryer from below, eventually the tin will melt. This is how the broken part is removed. Soldering is carried out in a similar way; this is the only way to change a part without damaging it.
Remember that in the factory, absolutely all lenses are attached with a compound, therefore, be extremely careful when dismantling them. Each of them will have to be installed in its place. So as not to disturb focus.
There is one more subtlety: it is possible that you will come across LEDs with a large negative platform, therefore, the positive one will be smaller. Trim the contact point to solder the diode.
If the paint is slightly damaged, that's okay. The remaining structural elements are soldered using a similar principle. As for the lenses, they need to be glued using superglue.
How to change diodes
If you are lucky enough to buy ready-made rulers from the manufacturer, the problem is solved simply: they are installed entirely in place of the old ones. Even without checking individual diodes. There is a more difficult way. Having found the burnt diodes, they are cut out along with the section of the substrate with conductors. The same part obtained from the new line is placed in this place. All that remains is to restore the tracks, that is, solder a couple of short conductors into the gap.
But if you only have a set of used diodes or a set from Aliexpress in your hands, you will have to tinker.
How to remove a lens
The main thing is not to damage the legs of the lens. This will make it easier to install it in place. The operation is carried out very carefully. The temperature is set on the hairdryer to 100-120 degrees, the exhaust is directed to the substrate tape from below. The distance is selected empirically, usually about 10 cm. A thin strip of plastic is placed under the lens and a light attempt is made, like a lever, to lift it. As soon as the hair dryer straightens the glue, the part will separate from the backing. As you work, it is recommended to write down where everything is removed from, so that you can then reinstall it correctly.
How to remove a diode
The diodes are also heated with a hairdryer. The air temperature is set at 320-350 degrees. You can tell that the diode has separated by the melting of the solder along its edges. The part is removed with tweezers.
How to prepare a landing site
After removing the old diode, a place is prepared for the new one. That is, they remove excess tin on the conductive areas, get rid of leaked flux, and clean everything. Then the contact points are tinned.
How to install a new diode
The new diode is very carefully placed on the prepared area with tweezers. Without displacing the part or moving the backing tape, the latter is heated from below with a hairdryer. As soon as the molten tin is visible, the heat supply is stopped. After the metal on the contact pads has cooled, the diode is ready for operation.
Putting the lenses back in place
There is one operation left before the installation is completed. It needs to be done quickly. The lenses are returned to their places according to the recorded dismantling card. Superglue is applied to the legs of the part. It is advisable to use gel, as it hardens more slowly. The legs are placed at the same points, while ensuring that the optical axis of the lens passes through the center of the semiconductor crystal.
Important! If you place all the lenses quickly, the glue will not have time to harden. This makes it possible to check and, if necessary, make adjustments.
To do this, the backlight is connected to the driver and a light-scattering filter plate is placed on top. If it is evenly lit, you don't need to do anything. But if defects are detected, the lens at the location where they are found can be slightly moved to the correct position.
And this is a repaired view of the backlight panel assembled and ready for further use:
Final works
When the repair of the LED system of LG TVs has been completed, before making final assembly, we connect the voltage to the strips and check the glow of all LEDs. If everything is fine, then we assemble the TV, performing all operations sequentially and with caution, as during dismantling.
After finishing, it is better not to turn the backlight brightness to maximum, but to limit it to 75% - in this mode, the LEDs operate in normal mode and, according to experts, will last much longer.
We install the TV in its original place, turn it on and enjoy the quality: if there are no extraneous spots of light or dark color anywhere on the screen, it means that the repair was carried out correctly, in compliance with all recommendations. And you can get the most out of your TV by learning how to properly set up digital channels on your LG TV.
Firmware problems
TV devices supported by LG WebOS may malfunction if there is a glitch in the firmware. Due to the next update of the operating system, if it is unsuccessful, a situation may occur where the device reboots repeatedly. This can be resolved by updating the firmware manually from a USB flash drive. This can be done by any user who has read the instructions for the TV.
Situations when Smart TV on the WebOS platform does not work are somewhat different from the previous ones. These models malfunction due to problems in the operating system. To avoid such cases, it is recommended to update the operating system on time.
Important! Incorrect device updating is eliminated by downloading the firmware installation files to a flash drive, and the TV OS is updated from it.