Using a computer
In this way, official firmware is installed, as well as some custom ones. You will need to install the SP FlashTools utility, device drivers and download the firmware file on your computer or laptop, then connect the phone to the computer and complete the process using the computer utility. This option is the simplest. The most difficult part may be installing the driver on your computer. The whole process takes literally a few minutes.
Via custom recovery
This method is used to install the vast majority of custom non-standard firmware. Its huge advantage is its independence from the presence of a computer, because it may not always be at hand. To flash a DEXP phone via custom Recovery, you need to get root rights, and then install a custom recovery using a special utility for an Android smartphone. After that, you need to download the firmware file and install it through recovery. The most difficult part may be obtaining root rights, because in some cases the utilities for obtaining them do not work correctly.
Characteristics
- Battery capacity: 1500 mAh
- Battery type: Li-Ion
- Talk time: 5.6 h
- Waiting time: 175 h
- Contents: smartphone, charger, USB-microUSB cable
- Type: smartphone
- Weight: 120 g
- Control: touch buttons
- Case material: plastic
- Operating system: Android 4.4
- Case type: classic
- Number of SIM cards: 2
- Multi-SIM operating mode: alternating
- Dimensions (WxHxD): 65.3x125x9.5 mm
- SIM card type: regular+micro SIM
- Screen type: color, 16.78 million colors, touch
- Touch screen type: multi-touch, capacitive
- Diagonal: 4 inches.
- Image size: 800×480
- Automatic screen rotation: yes
- Camera: 2 million pixels, LED flash
- Video recording: yes
- Front camera: yes, 0.3 million pixels.
- Audio: MP3
- Headphone Jack: 3.5mm
- Interfaces: Wi-Fi 802.11n, Bluetooth 2.1, USB
- Standard: GSM 900/1800/1900, 3G
- Satellite navigation: GPS
- A-GPS system: yes
- Processor: Spreadtrum SC7731, 1300 MHz
- Number of processor cores: 4
- Built-in memory: 4 GB
- RAM capacity: 512 MB
- Video processor: Mali-400 MP2
- Memory card slot: yes, up to 32 GB
- Control: voice dialing, voice control
- Sensors: light, proximity
- Speakerphone (built-in speaker): yes
- Airplane mode: yes
»
Preparing for firmware
Before flashing your phone with DEXP, you need to prepare for it. Let's look at what you'll need, depending on the method you choose.
When flashing via computer
By and large, the main tool is a special utility SP FlashTools (for models with an MTK processor) or UpgradeDownload (for models with a Spreadtrum processor). It is with their help that we will install new firmware on our DEXP phone. From us you can download each of these utilities at the bottom of the page.
We immediately warn you that “the latest” does not mean “the best”; in addition, in some cases you may need a certain version of the utility that works most stably with a specific firmware.
The second required component is Windows drivers for your smartphone model. They are vital for the computer to correctly recognize your device and be able to flash it correctly. From us you can download drivers for the most popular models. You also need to download the firmware file you want to install.
In addition, be sure to stock up on a working USB cable with which you can connect the device to your computer. If it malfunctions, you may not succeed.
When flashing via Recovery
If you plan to install custom firmware, you will have to take slightly more measures. But in the future you will be able to do without a computer altogether.
Obtaining root rights
In this case, it is mandatory to obtain root rights. If you have them, your capabilities increase significantly. The best option would be to use a mobile application for Android or the King Root computer program. Let's choose the mobile application, since it has Russian-language menus, while the computer program exists only in Chinese.
- Download the application to your smartphone from the official website (https://kingroot.net/);
- We install it on the phone, having first allowed installation from unknown sources in its settings;
- We go to the main menu, where we see a large blue button in the middle of the screen.
- Click it and wait for the process to complete;
- In just a minute or a minute and a half, the application will notify you that you have successfully obtained root rights.
Installing custom recovery
- Once you have root access, install a utility to change your recovery called Flashify.
- We launch it, on the main tab “Firmware”, which will be displayed on the screen, click on “Recovery Image”;
- Next, you will be asked to select a file or automatically download the appropriate version of one of the most popular versions of custom recovery. It is best to first download a working version of TWRP recovery;
- Click the “Select file” button, look for the recovery.img file using Explorer, confirm the selection;
- In less than a minute, the application will prompt you to boot into the already updated recovery.
Note. The appropriate version of TWRP can be downloaded at the bottom of the page.
An alternative option for installing a custom recovery
- Loading the archive.
- Unpack its contents into the C drive to create the C:\Platform-tools folder.
- Download the appropriate version of recovery, rename the file to recovery.img and copy it to the same folder.
- We put the DEXP phone into fastboot mode, holding the volume up button while turning it on.
- Next, run the command prompt on your computer as an administrator and sequentially enter the following commands:
cd C:\Platform-tools
fastboot flash recovery recovery.img
To enter recovery, you need to simultaneously press the power and volume down buttons.
How to get root rights
This is knowledge loaded so to speak. We can recommend two universal applications for this case:
These are the latest versions at the time of writing, there may be newer ones, this can be viewed on the websites of these programs
- ZYKURoot 2.2 – (website zykuroot.info)
- Rootkhp Pro 2.7 – (website rootkhp.pro)
These programs have a list of supported devices, but this list is updated haphazardly, so it happens that a device has been supported by the program for a long time, but the developers forgot to write about it.
Firmware for DEXP smartphones
When installing via computer
- Install drivers on the computer. If you are using Windows 8 or 8.1, you will need to disable digital signature verification. To do this, press Win + C - Settings - Change computer settings - General - Special boot options. The computer should restart, then click Diagnostics - Selective Boot. After rebooting again, when a list of 9 items is displayed, press F7 and install the drivers in the usual way.
Next, let's pay attention to the features of the firmware, depending on the installed processor. First, let's look at the firmware of a smartphone with an MTK processor.
- Unpack the archive with the SP Flash Tool computer program, as well as the firmware, into the desired folder. It is best to unzip the files to the root of drive C and D.
- Run the flash_tool.exe file from the folder with the unpacked utility.
- In the launched window, click Download - Scatter-loading and look for the file MT65xx_Android_scatter.txt in the folder with the firmware, after which all the necessary files will be detected automatically, and also uncheck PRELOADER.
- Disconnect the phone, connect it via cable to the computer and click Download.
- We wait until the process is completed, which we will be notified by a green circle with the inscription Download OK.
- We wait for the phone to turn on and start using it.
Note. Instead of Download, you can click Options - Firmware-Upgrade, after checking the box for DA DL All With Check Sum. The firmware will begin immediately after connecting the device.
Now let's turn our attention to models with a Spreadtrum processor.
- Launch the UpgradeDownload.exe utility, click the first button on the left and select the folder with the firmware.
- Click the third Play button from the left.
- We turn off the device, connect it to the computer, simultaneously holding down both volume buttons.
- We are waiting for the firmware to finish and start using the device.
When installing through recovery
Subtleties may vary depending on the firmware, but the principle is as follows:
- We put the device into recovery mode.
- Go to the “Cleaning” section, check all the items except the memory card.
- We return to the main menu, click “Install”, select the file with the firmware, make a swipe, confirming the operation.
- We are waiting for completion.
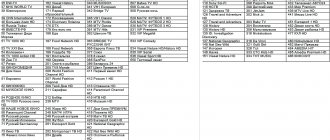
List of supported devices:
- DEXP A240
- Aircraft DEXP 7594 3G
- DEXP Ursus S380
- DEXP AL240
- DEXP Ursus VA110
- DEXP Ursus N310 4G
- DEXP Ursus S180
- DEXP B260
- DEXP GS155
- DEXP Ursus N570 4G
- DEXP Ursus N470
- DEXP Ursus N370
- DEXP Ursus S470 MIX
- DEXP Ursus S280
- DEXP Ursus VA170
- DEXP Ursus VA210
- DEXP Ursus P410
- DEXP Ursus N210
- DEXP B340
- DEXP GS150
- DEXP AS260
- DEXP Ursus M210
- DEXP G253
- DEXP B355
- DEXP BS155
- DEXP Ursus M110
- DEXP AL140
- DEXP Ursus P380i
- DEXP GL355
- DEXP G355
- DEXP B245
- DEXP Ursus S370
- DEXP Ursus L170
- DEXP Z250
- DEXP BL150
- DEXP Z455
- DEXP Ursus L180
- DEXP Ursus L110
- DEXP B255
- DEXP T155
- DEXP BL250
- DEXP B450
- DEXP G255
- DEXP A150
- DEXP BS650
- DEXP BS550
- DEXP Z355
- DEXP A140
- DEXP AS160
- DEXP Ixion XL 150 Abakan
- DEXP Ursus H170
- DEXP GL255
- DEXP G250
- DEXP B350
- DEXP Ixion B140
- DEXP Ixion B145
- DEXP Ursus S110
- DEXP BS150
- DEXP Ixion Z150
- DEXP B160
- DEXP Ursus P380
- DEXP Ursus S270
- DEXP Ixion Z255
- DEXP Ixion G155
- DEXP Ixion G150
- DEXP Ixion ML450 Super Force
- DEXP Ixion ML245 Electron
- DEXP Ursus P310
- DEXP Ursus S190
- DEXP Ixion Z155
- Iron DEXP Ixion ES850
- DEXP Ixion M850
- DEXP Ixion XL 155
- DEXP Ixion ML350 Force Pro
- DEXP Ixion M355 Mercury
- DEXP Ixion ES1050
- DEXP element Ixion MS255
- Iron DEXP Ixion MS650 Pro
- DEXP Ixion ES950 Hipe
- DEXP Ixion M750 Surf
- DEXP Ixion M545
- DEXP Ixion EL450 Force
- DEXP Ixion M340 Steel
- DEXP Ixion X150 Metal
- DEXP Ixion M445 Onyx 2
- DEXP Ixion ES355 Ice
- DEXP Ixion E345 Jet
- DEXP Ixion ES750 Connect
- DEXP Ixion MS550
- DEXP Ixion M240 Strike 3 Pro
- DEXP Ixion E245 Evo 2
- DEXP Ixion E340 Strike
- DEXP Ixion P245 Arctic
- DEXP Ixion ML250 Ampere M
- Coil DEXP Ixion MS155
- DEXP Ixion ES255 Fire
- DEXP Ixion ES550 Soul 3 Pro
- DEXP Ixion E350 Soul 3
- DEXP Ixion MS450 Born
- DEXP Ixion P350 Tundra
- Model DEXP Ixion X245 Rock Mini
- DEXP Ixion ES650 Omega
- DEXP Ixion ES450 Astra
- Navigator DEXP Ixion ES260
- DEXP Ixion MS250 Sky
- DEXP Ixion E250 Soul 2
- DEXP Ixion M345 Onyx
- DEXP Ixion E240 Strike 2
- DEXP Ixion X355 Zenith
- DEXP Ixion EL250 Ampere E
- DEXP Ixion EL350 Volt 8
- DEXP Ixion ES350 Rage Plus
- Hotline DEXP Ixion X255
- DEXP Ixion XL145 jerk SE
- Armor DEXP Ursus GX180
- DEXP Ixion M350 Rock
- DEXP Ixion ML150 Ampere M
- DEXP Ixion P145 Dominator
- DEXP Ixion XL140 Flash
- DEXP Ixion X147 Puzzle
- DEXP Ixion X145 Nova
- DEXP Ixion M250 Ferrum
- DEXP Ursus KX110 AVA
- DEXP Ixion XL240 Triforce
- DEXP Ursus NS110
- DEXP Ixion XL145 Jerk
- Charger DEXP Ixion EL150
- DEXP Ixion X250 OctaVa
- DEXP Ixion X LTE 4.5
- DEXP Ixion M LTE 5
- DEXP Ixion ML2 5
- DEXP Ursus 9X 3G
- DEXP Ursus 8X 4G
- DEXP Ursus 7W
- DEXP Ixion W 5
- DEXP Ixion X 5
- DEXP Ixion Y 5
- DEXP Ixion M 5
- DEXP Ixion ES 4
- DEXP Ixion X 4.7
- DEXP Ixion P 4
- DEXP Ixion ML 5
- DEXP Ixion Energy
- DEXP Ixion XL 5
Software update via menu
A quick and easy way to update the firmware is to go to the menu and configure the installation from the remote control. The operation will take no more than 10 minutes, and the operator will only need to press a few buttons.
Procedure for flashing the TV firmware:
- On the remote control you need to press the Smart TV button and find the installation shortcut.
- Next, click on “software update”.
- The next step is to “search for available updates.” When all possible options have been found, you need to select “download method via the Internet”, select “update”.
- The user agreement will appear on the screen. They agree with it and give confirmation for downloading.
- While downloading, you can use the Internet or watch TV channels without any problems. At this point, the software will begin downloading.
- On some models, for example, Philips smart TV, a reboot will be required.
- After turning on the device, the program will automatically begin installing the software. The final stage is to reboot the system.
After this, you can use all the innovations that have become available with the new firmware for the TV. Updating the firmware is not a difficult procedure if you follow the instructions.
Where is the model number?
To prevent the firmware from ruining the device, you need to find out what benefits it will bring. The user may not benefit from system updates. To study the nuances, you need to find out the model number of your TV device.
The information should be on the back panel or in the technical documentation. By entering this number in the search on the manufacturer's website, you can find a complete guide to updating the system and study the necessary characteristics that will be presented to the user after installation.
If all the parts fit, you can download the update via the TV menu without a doubt.