Today, digital technologies have penetrated so deeply into the everyday sphere that life without them has become simply unthinkable. The new broadcast format - digital television, provides improved image and sound quality and greater noise immunity. Modern set-top boxes allow you not only to passively view HDTV channels, but also to control this process. The user has the opportunity to “rewind” the broadcast, pause it, not to mention the banal recording of favorite programs. But the real capabilities of TV set-top boxes do not end there; only to gain access to the full functionality of the device will you need to update its software. Reflashing a technical device means updating the software on it. The procedure is comparable to reinstalling Windows on a personal computer. Manipulations are carried out in order to expand functionality and improve technical characteristics.
Reflashing the Rostelecom set-top box: losses and gains
Let's try to figure out what the firmware of the Rostelecom set-top box provides and what risks exist when carrying out this procedure. The most popular model of the operator’s set-top boxes is IPTV RT-STB-HD Standart. Technically, it is a complete copy of the MAG-250, developed by the Ukrainian manufacturer Infomir with the functionality reduced by Rostelecom firmware. And in order to return the set-top box to its original capabilities, you need to reflash it to the original MAG-250.
The latest IPTV RT-STB-HD Standart models are produced by Rostelecom with its own remote control, which is unsuitable for controlling the MAG-250 due to the absence of some functional buttons on it.
In this case, you will have to use not only the standard firmware from Infomir, but also a modified one. There is a nuance - from experience it is easier to first install standard firmware, and only then, if necessary, upload a modified one to it.
First, about the losses : when updating the iptv firmware of the Rostelecom set-top box, the operator’s interactive services will become unavailable, since access to them is provided by the original software. This is where the disadvantages probably end.
Among the acquisitions : a home media center with support for WI-FI and DLNA, as well as the ability to watch TV channels from a playlist without operator tariff restrictions.
Digital Living Network Alliance (DLNA) is a standard that allows you to combine various multimedia devices into a single user network.
Rostelecom is constantly expanding its 3G coverage area and even outside the city you can use the Internet at high speed. Find out how to set up a 3G modem from Rostelecom.
You can find out how to connect the Rostelecom set-top box to two TVs here.
Firmware for Rostelecom TV set-top box: preparatory procedures
If you have read to this section, the question is: “Is it possible to reflash the Rostelecom set-top box?” not standing in front of you. The procedure is quite simple and usually ends in success. All that remains is to figure out what is needed for this.
So, to flash the Rostelecom TV set-top box, you will need:
- Hardware: PC with cable for connecting the set-top box;
- software: mcast.exe, any dhcp server (one of the most convenient and popular is dualserver), the current version of the official firmware, if necessary, a modified version.
All downloaded software must be placed in one folder created in the root of drive C. For the convenience of further explanation, we will call the folder infomir.
This completes the preliminary stage of flashing the Rostelecom iptv set-top box. Now let's get to the fun part.
How to flash a Rostelecom set-top box: step-by-step instructions
If you have completed all the preparations and feel the strength to start, let's get started. Let's look at step by step how to reflash the Rostelecom set-top box.
Firstly, you need to reset the set-top box to the initial, default factory settings. Firmware for the Rostelecom TV set-top box can be completed successfully without this procedure, but it’s better not to risk it.
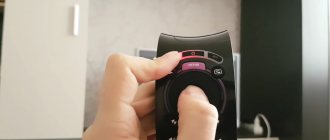
Keep in mind that the Default button on the rear panel of the set-top box, seemingly intended for this purpose, does not work. Therefore, you need to reset the settings through the menu - item Def. Settings. After the message “Set default settings. Press OK" press OK and exit the menu saving the changes - select "Exit & Save".
Next, the flashing process is performed on the computer. In the main menu, select Run and in the Open line and type ncpa.cpl, and then click OK. In the list of network connections, select the required one, call the context menu for it and go to Properties. At the bottom of the tab there is a list of components used by this connection. Open “Internet Protocol Version 4 (TCP/IPv4)” and double-click on the protocol properties. Enter the IP address - 192.168.1.1 and subnet mask - 255.255.255.0.
Then the DHCP Server service starts. Win+R → cmd→ C:infomirdualserver –v (full path to the program).
Find out how to program the Rostelecom remote control.
You can read about the benefits of the Social tariff from the mobile operator Rostelecom here.
Having launched mcast.exe, click on “Local Area Connection” (IP 192.168.1.1) and click Select on the right side of the window. In the program window you need to enter the values of the IP addresses of the processes: 224.50.0.70:9000 for thread No. 1, 224.50.0.51:9001 - for thread No. 2. Click the start button for both streams. The set-top box is connected to the PC and in its main menu, select the command Upgrade Tools → MC Upgrade. As a result of these actions, the firmware will be downloaded and saved in the console’s memory. We reboot the device and - voila - the new media center is ready to work.
Modernization of the MAG TV set-top box - Sky Bridge: accessible communication for everyone!
We will describe a simple way to make a budget multimedia center from a regular MAG-250 (Aura_HD) TV set-top box and their compatible copies and models.
The problem with standard solutions like Smart-TV and all other standard tools is that, for a number of reasons, they do not allow us to create a truly real multimedia service, fully using the capabilities of the device we purchased. And the capabilities of this “hardware” are much more extensive than what the manufacturer, constrained by copyright agreements and contracts with large holders of multimedia content, can offer us.
Standard applications
You can view content from popular social networks such as VKontakte. You can also access television services and content from popular entertainment resources.
To get additional functions using standard tools, you can simply download additional applications to the set-top box. To do this, go to the “internal portal” of the set-top box through the “Settings” menu, and then to the “Applications” section.
But if this is not enough, you can turn the set-top box into a full-fledged multimedia center with a torrent client and the function of automatically downloading files to the set-top box for later viewing.
Attention! The operations described below may damage your device and void your warranty.
Modernization of the set-top box
Since we plan to load the device somewhat more than designed by the manufacturer, we recommend adding cooling for the set-top box’s CPU. We installed a radiator measuring 26x26x14 mm. Such a radiator and hot-melt adhesive for attaching it to the processor can be purchased at any radio electronics store.
The firmware from “DNA” was chosen as an alternative software for the set-top box, but it can be any so-called. “custom” firmware. Due to the popularity of this console, the choice of firmware is quite extensive.
A resource where you can discuss the operation of the firmware: https://www.pristaa.de/
Resource where you can download the latest firmware versions from DNA: https://cloud.mail.ru/public/MzBX/qbaLX9gWS/
Please note that before updating the firmware you need to check the model of your set-top box. Our example involves the MAG250 prefix. Next, follow the instructions from the author of this firmware:
- The flash drive must be formatted in FAT32 and no more than 8 gigabytes , unpack the contents of the flash drive to get the disk name\ mag250 \*.*
- We insert the flash drive into the USB at the back of the console.
- We restart the set-top box and hold down the button on the remote control (R/C) and go into the BIOS of the set-top box
- (Reset all settings) – in the BIOS menu select Def. Setting click OK
- Next, go to Upgrade Tools
- We select USB Bootstrap - we agree with everything by pressing the OK button - the firmware is ready (once the firmware is completed, the set-top box will reboot)
Note that after downloading the firmware files, they need to be renamed to Bootstrap and imageupdate, respectively.
After updating and downloading, the set-top box, in addition to standard functions, will receive a number of additional applications
Torrent client
The “Transmission” torrent client and the “shared files” server are already installed on the set-top box. However, these extensions are not activated yet. You can enable them in the Set-top box Settings in the Extensions menu.
If you want to access files or use the media center as also a file storage, then both extensions must be enabled.
Now, you need to insert a USB flash drive or removable hard drive into the rear connector.
The set-top box supports popular file systems such as NTFS, FAT32/64, EXTx, and also supports large disks, so you can easily use modern external hard drives with a capacity of more than 1TB as a storage device. This already adds to your set-top box the role of a NAS drive with multimedia functionality.
Our example involves a ready-made solution - an external hard drive from the manufacturer Western Digital, My Passport Ultra Metal Edition line, with a capacity of 2 TB.
The choice of device is due to the fact that the disks of this manufacturer are durable, subject to operation in 24/365 mode.
It has an aluminum body, which means it is less susceptible to overheating when used around the clock, and is also equipped with a built-in energy saving mechanism.
Therefore, at a time when you are not using it and there are no active file sharing tasks, your drive stops spindle rotation, which significantly saves hard drive resource.
Now you need to get to the set-top box through a regular Internet browser, having found out its IP address on your network using this path: https://set-top box ip-address:9091/
Also, there is an even more convenient way to add files to the download list using programs for Android devices that allow you to manage Transmission .
For example:
- Remote Transmission GUI
- Remote Transmission
- Torrnado
- Transdrone
The example shows the interface of the Torrnado program. It seemed to us the most convenient to use, but they are practically no different from each other either fundamentally or functionally.
Just open the link in your browser using this program and the download will be added automatically.
All the files that you add for downloading to this program will automatically appear on your set-top box and all you have to do is start viewing them.
Viewing multimedia files is carried out through the internal portal in the Home Media
That's all! With relatively simple manipulations, it turns out that you can get a budget version of a multimedia center at home, which can also be equipped with a NAS function, where you can not only store your library of photos, videos, documents, etc., but view it all from the same device.
Enjoy watching!
Source: https://fiberbridge.ru/ru/modernizatciia-tv-pristavki-mag/setup-connect/modernizatciia-tv-pristavki-mag
What is needed for flashing
To flash a TV set-top box from Rostelecom, you need to go through four steps:
- Preparation.
- Reset settings.
- Official firmware.
- Alternative firmware.
It is important to understand that not all models can be reflashed. The instructions described below are suitable for the MAG-200, MAG-250 and IPTV RT-STB-HD Standart brands.
There are two ways to flash a Rostelecom set-top box:
- By Multicast.
- C USB flash drives.
Preparation
Before you begin the software update process, you must have the following ready:
- A PC or laptop that includes a network card for connecting to the Internet;
- a special cable (LAN), with which the set-top box will be connected to the computer (if the firmware is flashed via multicast);
- flash card less than 8 GB (for the USB flashing method);
- Infomir firmware program (available at https://soft.infomir.com/mag250/release/);
- DHCP server and MCAST utilities (can be downloaded from the link https://yadi.sk/d/PJxJM6KJsY7US and https://yadi.sk/d/wQdEmBL2sY7Wx).
It is best to flash the device in two stages: first with the official firmware, then with an alternative firmware to remove restrictions.
Reset settings
For the firmware process to work correctly, it is recommended that you start resetting the receiver to factory settings. This can be done using a special “DEFAULT” button, which is located on the back panel of the device and is slightly pressed into its body to protect it from accidental pressing.
If after pressing the button nothing happens. Resetting the settings can be done through the main menu by selecting “Default settings”. Confirming the selected command will delete the parameters.
Connection
Connecting the set-top box to the TV is not difficult. If you study the instructions, this will not cause any big problems, besides, all the necessary wires are included in the kit. The setting is performed according to the following algorithm.
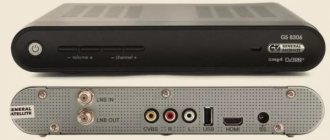
- The set-top box is connected to the Internet via a LAN cable.
- After plugging in the device, the blue ready-to-use indicator will light up on its display.
- The TV and receiver are connected via an HDMI cable. If the TV is an old model, then you can use an RCA or SCART cable through an adapter.
- On the TV, you should indicate the signal source (HDMI, SCART, RCA, depending on the selected connection method).
- A window will appear for entering your login and password. The necessary data is indicated on the back of the device.
- In some cases you will need to enter a PIN; by default it consists of four ones or zeros.
- If all the steps are performed correctly, a start window will open with the question “what to watch.”
Official firmware from USB flash drive
- Download the Informir software version.
- Upload the bootstrap and imageupdate files to the “Mag250” folder on the prepared removable media.
- Insert the flash drive into a special slot on the device body.
- Go to the console menu.
- Follow the path: “System settings” - “Setup” - “Update software” - “Update via USB” - “Start update”.
- Check the serviceability and correctness of the files copied to the flash drive.
- Click "OK".
If an error occurs during the installation process, do the following:
- delete data from the memory card and write it again;
- check the folder name for errors and correct them;
- start the process in another way.
The second way to launch firmware from a flash drive:
- Insert a USB flash drive with downloaded files into the receiver.
- Press and hold the “Menu” button on the remote control.
- In the Bios settings, select the Upgrade Tools section.
- And enable USB Bootstrap.
After installing the new firmware, the set-top box will reboot.
Official firmware via Multicast
To reflash the receiver via Multicast you need to:
- Copy the Bootstrap, imageupdate, mcast, dualserver files into one folder on your computer.
- Connect the set-top box.
- Go to the BIOS settings (by holding down the “Menu” button).
- Select the Upgrade Tools section.
- Connect the receiver to the computer via a LAN cable.
- Go to network connection properties.
- Select the sub-item “Internet Protocol Version 4 (TCP/IPv4)”.
- Enter the data: IP address - 192.168.1.1, subnet mask - 255.255.255.0.
- Run the “dualserver” file from the folder via the command line (the command line is called by the WIN+X button combination).
- Run file
- Select the changed connection type.
- Press the “SELECT” button.
- Enter the data in the window that appears:
- IP – address of the first stream – 224.50.0.70:9000;
- IP address of the second stream is 224.50.0.51:9001.
- Click "Start" for both streams.
- Wait for the process to complete.
- Open the BIOS settings of the set-top box again.
- Select the path “Upgrade Tools - MC Upgrade”.
- Receive a message about the start and end of the firmware.
- Reboot the receiver.
This completes the official flashing process. To get more advanced set-top box capabilities, you must install an alternative option.
Settings
After checking the availability of the Internet, the set-top box is connected to the TV and then configured. All the necessary wires, as noted earlier, are included with the purchased equipment. It is necessary to connect devices strictly in the off state, since a difference in potential is possible, which can lead to damage to one of the devices.
Setting up interactive television provided by Rostelecom is quite simple. To do this you need:
- Switch the TV receiver to AV mode using the TV remote control. If you are using an HDMI cable to connect to the screen, then you should select HDMI rather than AV.
- If you have correctly selected the source of information, a branded splash screen will appear on the screen. Consequently, digital television is loaded. This process takes on average no more than a minute.
- Once the download is complete, enter the username and password specified in the service agreement. The data has purely digital meaning. They can be entered using the remote control.
- If the data is entered correctly and the user identification is completed, a list of television settings will appear on the screen. Therefore, the connection was completed successfully. All you have to do is configure the channels and make additional settings, which include setting up the remote control and its subsequent synchronization for full operation with the set-top box.
Alternative firmware
Before you start, you must also prepare a bootable USB flash drive:
- Select a flash card no larger than 8GB.
- Format it in FAT system
- Create a folder “mag250” on the media.
- Transfer the Bootstrap and imageupdate files to it.
Alternative firmware via the console menu
- Open the “Settings” section in the device menu.
- Press the “SETUP” button.
- Select the “Software Update” section.
- Find “Update via USB”.
- Click "Start".
- Check the integrity of the data on the media.
- Click "Start".
After the update is completed, the bailiff will reboot on its own.
Alternative firmware via BIOS parameters
The flashing process from BIOS is similar to the method described above with the standard version.
- Open the BIOS (while turning on the device, press and hold the Menu button).
- Open "Upgrade Tools" and "USB Bootstrap".
- Insert the removable drive into the special USB connector on the receiver body.
- Click "OK".
- Wait until the firmware is installed and the system reboots.
Functions
The main task of the Rostelecom set-top box is to receive, decode and display the signal on the screen. In addition, you can use it:
- subscribe to paid services;
- write data to external media;
- view the TV program, including archived programs;
- install informational and entertainment widgets.
The functionality of a digital set-top box for interactive television does not end there. It offers a large set of settings, which are divided into system and user. It is not recommended to change anything in the first category, as this may lead to failures.
Important! The advantage is the presence
parental controls
– You can set restrictions on the content that your child can access.
It is worth noting that this model is used not only by the provider Rostelecom. It is universal, and to work for a specific operator, proprietary firmware is installed on it. And this is a huge minus. If the user refuses the services of the provider, then he will have to flash the Rostelecom IPTV HD Mini set-top box in some unofficial way in order to use it with other telecom operators. Otherwise, it will simply turn out to be a useless gadget.
Blog about modems, routers and gpon ont terminals.
For many users of Rostelecom digital television, it has long been no secret that channels can be watched using a playlist without tariff restrictions. And Rostelecom is in no hurry to close this opportunity. The playlist can be launched on a computer using VLC player, or on Smart TVs using widgets. The playlist can also be launched on several models of Rostelecom TV set-top boxes - MAG-200, MAG-250 and IPTV RT-STB-HD Standart. It is on these set-top boxes that you can download the standard firmware from the manufacturer (Infomir) and use all the advantages of a very good media center with WiFi and DLNA. This instruction will also be very useful for those who, when connecting to digital television from Rostelecom, bought a TV set-top box, and after some time they turned off and now the set-top box lies as a dead weight. Now this situation can be corrected and I will tell you how to flash MAG-250 and its clone copy IPTV RT-STB-HD with Rostelecom on Infomir.
Equipment
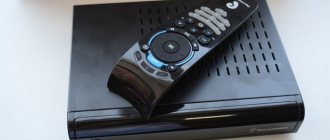
Rostelecom was one of the first to offer clients the opportunity to connect to digital television. More than a million people in the country use TV set-top boxes. The receiver allows subscribers to watch TV in 3D and HD quality. The equipment makes it possible to pause a program or record a broadcast on channels. You can rewind the broadcast or use files saved in the archive.
Manufacturers provide more than ten models of set-top boxes. Users prefer the SML-482 HD device. You should check the equipment before purchasing. If the kit does not contain enough components, you will not be able to connect the receiver. The standard set should include:
- Rostelecom set-top box for TV;
- battery, i.e. AAA battery;
- universal remote control;
- power supply from the company or adapter (1.2A and 12V must be present);
- The set includes a one and a half meter AV cable, also called a “tulip”;
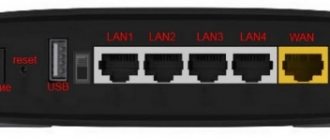
- Ethernet cable to connect to the router, three meters;
- HDMI cable, without it connection to LCD and LED TVs is impossible;
- instructions for operating the equipment and setting it up;
- SCART 3xRCA adapter;
- Additionally, the manufacturer includes documentation with a warranty card and a code book.
- note
- An HDMI cable is not included as standard, so you will have to purchase it separately. Otherwise, the connection will not be possible.
Preparation for firmware MAG-250 and IPTV RT-STB-HD
To flash TV set-top boxes with Rostelecom software (Smartlabs) to Infomir software, you will need: - a computer or laptop with an Ethernet network card. — network cable (patch cord) for connecting the set-top box to the computer. - programs - mcast.exe and dhcp server (for example, dualserver). - latest version of official firmware - link. You need to download the Bootstrap file (bootstrap) and imageupdate (firmware). It is best to flash your MAG-250 with alternative firmware after you have flashed it with the official one. Otherwise, you risk fiddling around for a long time with zero results.
Additional features
They affect the quality of use of the device and its price level. You need to figure out what you need and what you can refuse. It may turn out that a high price implies the presence of unnecessary functions, and a low price provides truncated functionality. What you can count on:
- Using a card reader;
- HDMI type connector for enhanced media clarity;
- LAN – input for simplified use of the Internet;
- The presence of an increased number of USB connectors for various purposes;
- Own browser for the Internet of high quality;
- Simultaneous viewing of two different video streams;
- Using a hard drive to record and save various video information;
- Functionality that allows you to listen to sound files and view photos;
- Simultaneous recording of high quality video information based on three different sources;
- Using the capabilities of the DVB-S2 format.
Firmware MAG-250 and IPTV RT-STB-HD
Step 1. Place the downloaded firmware, the mcast.exe program and the DHCP server in one folder at the root of the C: drive. For example - C:mag250. Please note that to flash the firmware for the TV set-top box, there must be 2 files in the folder: Bootstrap and imageupdate. Therefore, the downloaded Bootstrap_250 file will need to be renamed simply to Bootstrap. It's the same with imageupdate. The contents of the folder should look like this:
Step 2. On the network card through which we will connect the set-top box, we need to register the IP address 192.168.1.1 and the mask 255.255.255.0. To do this, press the key combination Win+R and in the open window write the command ncpa.cpl
Step 3. We connect the LAN port of the MAG-250 TV set-top box and the computer’s network card with a cable.
Step 4. Turn on the MAG-250 set-top box and immediately press the Menu button several times. The BIOS of the TV set-top box should open:
In some cases, the software will not load until you reset the device config using the “Def.Settings” item.
Step 5. Launch the DHCP server on the computer. In the case of the DualServer I proposed, you need to launch the Windows command line. To do this, press the Win+X key combination and select “Command Prompt (Administrator)” from the menu that opens. In it we write the command: C: mag250dualserver.exe -v Press Enter to start the server.
Step 6. Run the mcast.exe program to broadcast the bootloader and firmware. When launched, it will ask you to select the desired network interface:
Select IP: 192.168.1.1, Local Area Connection and press the Select button. The main program window will open:
Here you will need to correct the address in the first stream (Stream 1). The broadcast address for MAG-250 should be: 224.50.0.70:9000. The address of the second stream should be: 224.50.0.51:9001. Click the Start button on both streams. The bootloader and firmware will be broadcast via multicast:
Step 7. In the BIOS of the set-top box, select the “Upgrade Tools” item:
Next, you need to select “MC Upgrade”. The console will begin to catch the bootloader:
After loading Bootdtrap, the console will write: Bootstrap message: Reception of an image is started! This means that your STB set-top box has started downloading the firmware. This inscription should change to “Bootstrap message: Writing image to flash”.
After the set-top box writes the firmware into memory, it should display the message: Writing image to flash successfull!
After this, the TV set-top box should reboot and your MAG-250 or IPTV RT-STB-HD should start with the new firmware.
Specifications
The Switron IPTV 1500 STB model has the following characteristics:
- Supported video modes: Full HD, 720p.
- Available aspect ratios: 4:3, 16:9.
- Video codecs: MPEG-2, MPEG-3, MPEG-4, H.264.
- Audio codecs: Dolby Digital, MP3, AAC, PCM.
- USB connector: 1.
- Wi-Fi connection: no.
An HDMI port version 1.3a is available for connecting to a TV. The set-top box supports HDD drives.
Alternative firmware for MAG-250 and IPTV RT-STB-HD
Firmware from DNA and Impulse
DNA firmware for MAG-250, Aura HD and IPTV RT-STB-HD Standart turned out to be the only sensible and worthwhile alternative firmware. The rest were minimally modified variations of the regular Infomir firmware.
Update 2021: Since there is no more DNA firmware at the moment, the only worthy alternative is Impulse . You can download it from here - link.
Differences from the official Infomir firmware: - TV program from tv.mail.ru/yandex.ru. — Setting the audio track for each IP-TV stream separately. — Integrated torrent client and samba. — Support for custom menus in the internal portal. — Added support for the Rostelecom remote control. — Added the “Sleep” function (On the Infomir remote control there is a button next to the power supply). — Recording the broadcast to a network drive (NET-USB, connection via the menu in the media browser). — Quick switching between the last 2 channels. — Added autostart of iptv broadcast (TV mode). — Preservation of the screen aspect ratio and the last watched channel when rebooting the set-top box (TV mode). — Package manager (via SSH). — Automatic recovery of set-top box files after firmware update.
Installing Alternative firmware for MAG-250 and IPTV RT-STB-HD
Before flashing the MAG-250 or IPTV RT-STB-HD TV set-top box with alternative firmware, it is first recommended to install the usual software from Infomir. If you try to flash directly from Rostelecom (Smartlabs) to an alternative firmware, problems may arise. Yes, and you can continue to flash it via USB.
Settings
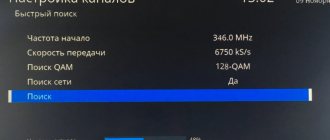
After purchasing IPTV, you need to configure the device so that you can start watching TV channels. On the control panel, activate the Setup function and perform the following steps in sequence:
- Set the date with time. Do this right away because the program recording function is linked to the current time.
- To access the Internet, go to the “Network Configuration” menu and define one of the connection types - wired, wireless, PPPoE.
- Enter your provider's network parameters or select automatic setup.
- Check whether the set-top box is connected to the Internet in the “Network Status” tab.
- In the server settings, in the highlighted field, enter “pool.ntp.org.”.
- Now you need to adjust the display. Disable DVI forcing and auto frame rate switching. You can do this in the video settings.
- To set the resolution in the “Video Output Mode” section, take into account the characteristics of the TV.
- Reboot your device.
- After restarting, open the “IPTV channels” tab and enter the playlist address in the highlighted field. You can get it from your provider or find it yourself on the Internet.
If the settings are correct, the channel list will appear on the display.
Firmware for MAG-250 and IPTV RT-STB-HD with Rostelecom on Infomir: 838 comments
Pavel - no, you can’t. They are not interchangeable.
Apparently the freebie is over. There is nothing special to advise here: if you want to watch all channels, go to the official software.
There is an RT-STB-HD set-top box with a remote control from Rostelecom. Please advise the firmware so that this remote control is also supported. Very necessary.
Hello. Tell. Prefix mag250 firmware bottom. The other day all channels stopped showing. Can Rostelecom block the signal? Or maybe it needs to be activated again somehow?
Andrey - what firmware do you have? Is the service officially activated?
The mag250 prefix from RT, I just can’t get into the BIOS. I press the menu button on the remote control, but it doesn’t react at all.
Andrey, if the set-top box was activated, then everything is shown on the latest firmware version. Perhaps you just have an old firmware, you need to update. Forum four padea to help.
In the near future, I think everything should fall off due to a change in the verimatrix version.
Is it possible to view encrypted channels on Impulse firmware?
As far as I know, no.
Just a man! Everything is simple and accessible. Everything worked out almost without problems! Thanks for the useful information, site! I jumped off this shitty Rostelecom. I watch free TV for pennies. I hope I will)))
Hello, the channels and all services do not work, I think it’s because of the Internet, it is connected via a cable from the router. How can I configure the Internet on this firmware? Thank you in advance
Hello. .
I posted the one that was available in the VK group.
Hello, I'm stuck on step 7, the BIOS does not open, I press the menu button but nothing happens. Help me please.
Most likely you are not getting there at the right time.
I still have a set-top box from Rostelecom Promsvyaz IPTV HD MINI I can’t read further, it’s covered with a sticker.. what can I do with it if I switch to another provider?. or I’ll have to throw it away.. thanks in advance
If another provider does not support it, then nothing.
Functional
IPTV HD Mini set-top box is a device designed to provide reception, decryption and display of a signal. This is the main purpose of the receiver. Let us briefly list the main functionality of the set-top box of this model:
- playback of content in video format;
- subscribing to view paid content;
- recording content to various memory storage devices;
- electronic guide;
- information and entertainment widgets.
The functionality of the device is not limited to this. The console has quite a lot of useful parameters. All settings are divided into two groups: “System” and “My”. Experts strongly do not recommend changing system parameters, since incorrect values can lead to malfunctions in the operation of the set-top box.
Special attention should be paid to the parental control option. It can be accessed through the “Access Level” section. The user will be able to configure age restrictions in this section. The “Social Networks” and “Weather Forecast” widgets will also be useful. All these features can be customized.
We've sorted out the functionality. It's time to briefly list the main advantages of the console in question:
- small and compact body, the device takes up minimal free space;
- intuitive and simple interface;
- playback of content in Full HD format;
- elegant and original design of the console;
- loyal price.
There are indeed many advantages, but there are also disadvantages. The main flaw is the lack of an internal portal. This means that the set-top box will not function without firmware from the provider. Therefore, users will not be able to use the device as a media player. If in the future you refuse the services of the operator, the set-top box will lie idle.
Another drawback is compatibility problems when connecting Wi-Fi adapters. For example, currently the firmware from Rostelecom does not support devices manufactured by Smartlabs. Of course, this may create additional inconvenience. Today, the set-top box in question is also actively used by the operator Bashtel.
Setting up the remote control and synchronizing it
After installing and configuring the equipment, you need to check whether the remote control is synchronized. It allows you to perform basic actions and control the TV - adjust the sound, brightness and contrast, change channels. Otherwise, you will have to use the TV remote control. In some cases, this is inconvenient, since you have to use two remote controls at once.
The remote control is synchronized in two modes:
- Manual, when the configuration is performed directly by a person;
- Automatic, when all codes are entered by the receiver.
In manual mode, the code for synchronization is entered manually. It is used mainly for older TV models. Codes are provided on the Rostelecom website.
The automatic setup mode on the IPTV set-top box starts after successively pressing the TV and OK buttons. As soon as the codes match, the TV will turn off. For further work, you need to save the settings by clicking on the OK button again.