At the moment, the market offers many options for receivers, which at first glance are identical in appearance and parameters. They perform the main role of the tuner, transmitting and converting the signal to the TV in the same way. With proper installation and configuration of digital television, you can enjoy many high-quality channels. The signal can be transmitted to an antenna or set-top box, depending on the modernity of the model. Unfortunately, not every user knows how to configure the receiver and its basic principles of operation.
How to set up DVB T2 on your TV
The setup process is identical for most types of receivers. The buttons and menu sections, as well as the general window interface, may be different. But the algorithm is the same for all devices.
Connect to digital television and setup is easy. To do this, you just need to connect the cable to the required connector and configure the channels. If your TV model is outdated and cannot receive such signals, you will need to purchase additional equipment.
The TV has a connector for an antenna, a tulip connector, and a Scart (for audio and video). Instead of the latter, the device may have an HDMI port. This is even better.
With a dual connection via HDMI and tulip, you can switch the cable if necessary. But it is better to use HDMI for viewing as it guarantees good quality.
Reference! Also, when connecting, the distance to the tower transmitting signals is taken into account. To effectively tune the signal, you should install an antenna with a mounted amplifier on the street.
How to check signal quality
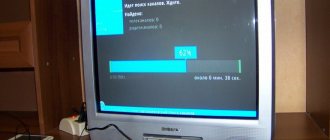
To understand that everything is connected and configured correctly, you need to test the signal quality.
There is an “Info” button on the tuner body. After pressing three times, a window with information will light up on the TV screen. If the indicators in the menu are above 51%, then there are no errors, the level is acceptable. If reception is unstable, move the antenna to another place - raise it higher or point it at the broadcast tower. A special amplifier is used to increase power.
Digital TV is transmitted in multiplexes (10 channels each), so you will have to check the signal quality for all sets. Each element receives different transmitters, which affects the final result. The image during broadcast is affected by the limited screen resolution.
What difficulties may arise
There are times when it is not possible to set up DVB T2 reception. If there is such a problem, you need to make sure that there is no damage to the antenna. If it is intact, you need to check the direction. The antenna should be directed towards the tower. It is also necessary to install it outdoors; if you place it indoors, it will block the signal. If the user does not know where exactly the tower is located, torsion of the antenna will help. It must be moved very slowly and smoothly. As soon as the antenna makes contact with the tower, the device will work.
Attention! There are errors during the automatic channel search process. For example, the receiver found few channels or did not find them at all. A manual search will help.
It is also possible that the TV has found channels, but the quality of their display is very poor. This means that the antenna is turned towards the tower, but the contacts with it are bad. Try moving it a little. This problem can occur in bad weather.
Setting up DVB T2 on TV: step by step
To set up, we need a device called a receiver. It receives signals and transmits it to the TV. Signal sources: Internet, dish or antenna. The receiver is configured as follows:
- First you need to take it out of the box and remove the covering film. Failure to remove it will cause the device to overheat.
- Cut off the cable protection sheath. Its length is approximately 15 mm from the end. We clean the shell.
- We bend the protective film and screw ports F to the wires.
- We connect the cable to the receiver and TV.
- The tulip wires are inserted into the receiver and monitor ports.
- You can connect an antenna to the TV. It must be installed outdoors (house wall, balcony). Now you can start setting up.
Note! You need to be careful when stripping, as there is a risk of damaging the film covering the center conductor. It is needed for protection.
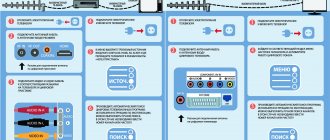
The setup is as follows:
- We are looking for a menu. There we go to settings.
- By default, the country should be specified. If not, we indicate it ourselves.
- We select the language, region, mode and search format.
- Set the signal format. Most often, DTV-T/T2 is placed at this point. This means that the TV can pick up both analog and digital signals.
- The process of searching for channels has begun. You don’t need to do anything here; the device will find all available channels on its own. The search can be interrupted at any time and continued later. If necessary, you can choose the manual channel search method. Standard means that the TV will find all channels that are not on the TV. Manually means searching only those channels that are needed. For example, a user only watches sports and does not need channels with cartoons and TV series. The manual search method allows you to ignore the latter. To implement this, you need to set a frequency that broadcasts channels in your area of residence. This can be found out from providers or on the Internet.
- Once all channels are found, or you decide to pause the search, click the save button so as not to lose the found channels.
What antenna is needed for digital TV
It was easy to pick up analogue channels; any metal stick would do. Some craftsmen made them with their own hands. With digital broadcasting, things are not so simple. You will have to buy an antenna, but choosing one is easy. We need one that perceives signals in the decimeter range (UHF) 300-850 MHz.
Antennas can be indoor or outdoor. For residents of large residential complexes, it makes sense to chip in with their neighbors and install one antenna per house. In private houses within the city, you can use an indoor antenna, but only with direct visibility of the TV tower.
When the landscape interferes with signal reception, even in the city, it is better to choose an external antenna. For residents of houses located in the suburbs, areas remote from towers, an outdoor antenna is also suitable.
An important parameter is gain, which is measured in decibels (dB). The higher it is, the better the image quality. The main thing is not to overdo it, because everything is good in moderation. The measure in this case is a parameter of no more than 30 dB. This is quite enough to get a high-quality picture.
The antenna requires an antenna coaxial cable with a characteristic impedance of 75 Ohms, with plugs at the ends. One plug is inserted into the antenna, the other into the receiver. This cable comes in different lengths, so measure in advance the distance from the TV with the set-top box to the antenna installation site, taking into account all bends. The higher the antenna, the better the signal, but then more cable will be required.
How to set up DVB T2 on your TV
The setup process is identical for most types of receivers. The buttons and menu sections, as well as the general window interface, may be different. But the algorithm is the same for all devices.
Connect to digital television and setup is easy. To do this, you just need to connect the cable to the required connector and configure the channels. If your TV model is outdated and cannot receive such signals, you will need to purchase additional equipment.
The TV has a connector for an antenna, a tulip connector, and a Scart (for audio and video). Instead of the latter, the device may have an HDMI port. This is even better.
With a dual connection via HDMI and tulip, you can switch the cable if necessary. But it is better to use HDMI for viewing as it guarantees good quality.
Reference! Also, when connecting, the distance to the tower transmitting signals is taken into account. To effectively tune the signal, you should install an antenna with a mounted amplifier on the street.
Connection
To connect a set-top box for a digital signal to a TV, you must first connect the antenna to the set-top box, and then the set-top box itself to the television receiver.
The requirements for the antenna are quite simple: the reception frequency must be decimeter. This makes it possible to use a regular indoor antenna for digital TV to connect.
To reliably receive the signal, you may need to raise the antenna we need higher and point it towards the repeater. When connecting the antenna and set-top box via cable, you should use high-quality products that will not negatively affect the signal. After all these manipulations, you can begin to search and configure digital channels.
Connecting the receiver to Soviet TVs
It's no secret that our grandparents often still use televisions that were released back in Soviet times or a little later.
The absence of “tulip” type connectors in them makes it impossible to connect a digital set-top box directly. But don’t rush to save money to buy a new TV. If the old TV has a SCART connector, then the problem is solved by purchasing an RCA-SCART adapter.
Therefore, it is possible to install digital television even on very ancient television receivers; another question is, does this make sense?
What difficulties may arise
There are times when it is not possible to set up DVB T2 reception. If there is such a problem, you need to make sure that there is no damage to the antenna. If it is intact, you need to check the direction. The antenna should be directed towards the tower. It is also necessary to install it outdoors; if you place it indoors, it will block the signal. If the user does not know where exactly the tower is located, torsion of the antenna will help. It must be moved very slowly and smoothly. As soon as the antenna makes contact with the tower, the device will work.
Attention! There are errors during the automatic channel search process. For example, the receiver found few channels or did not find them at all. A manual search will help.
It is also possible that the TV has found channels, but the quality of their display is very poor. This means that the antenna is turned towards the tower, but the contacts with it are bad. Try moving it a little. This problem can occur in bad weather.
Setting up DVB T2 on TV: step by step
To set up, we need a device called a receiver. It receives signals and transmits it to the TV. Signal sources: Internet, dish or antenna. The receiver is configured as follows:
- First you need to take it out of the box and remove the covering film. Failure to remove it will cause the device to overheat.
- Cut off the cable protection sheath. Its length is approximately 15 mm from the end. We clean the shell.
- We bend the protective film and screw ports F to the wires.
- We connect the cable to the receiver and TV.
- The tulip wires are inserted into the receiver and monitor ports.
- You can connect an antenna to the TV. It must be installed outdoors (house wall, balcony). Now you can start setting up.
Note! You need to be careful when stripping, as there is a risk of damaging the film covering the center conductor. It is needed for protection.
The setup is as follows:
- We are looking for a menu. There we go to settings.
- By default, the country should be specified. If not, we indicate it ourselves.
- We select the language, region, mode and search format.
- Set the signal format. Most often, DTV-T/T2 is placed at this point. This means that the TV can pick up both analog and digital signals.
- The process of searching for channels has begun. You don’t need to do anything here; the device will find all available channels on its own. The search can be interrupted at any time and continued later. If necessary, you can choose the manual channel search method. Standard means that the TV will find all channels that are not on the TV. Manually means searching only those channels that are needed. For example, a user only watches sports and does not need channels with cartoons and TV series. The manual search method allows you to ignore the latter. To implement this, you need to set a frequency that broadcasts channels in your area of residence. This can be found out from providers or on the Internet.
- Once all channels are found, or you decide to pause the search, click the save button so as not to lose the found channels.
When setting the DVB-T/T2 format, the receiver will find all signals available in the area where the user lives. But to do this you need to install an antenna and turn it towards the transmitter.
Share on social media networks:
A TV tuner is used to process television broadcast signals in a variety of types of transmission of the above to an image output device. Such a device will allow you to watch different channels in excellent quality. Most modern TV models are equipped with similar technologies. If it happens that you do not have such a TV, do not rush to purchase it. You can always buy a TV tuner and connect it. These devices have different parameters and prices, but the setup principle is the same. So how to set up a TV tuner on your TV? Let's understand this process in this article, will it be difficult?
Connecting a digital set-top box to a TV
Receivers that work with an RCA cable are considered modern technology. Before manipulations, turn off the power to the device and check the presence of cords in the kit:
- Remove the protective film from the tuner and connect the power supply wire to the TV.
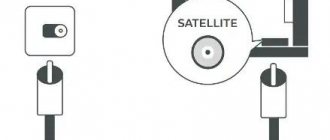
- The antenna is installed in the connector marked “RF IN” (“Ant IN”).
- The set-top box is connected to the TV receiver.
- The HDMI or RCA cable (“bell”) is inserted into the required sockets.
- The connectors have different parameters, so it is physically difficult to install into the wrong one. To prevent errors, manufacturers color-code inputs: yellow – video; red – audio output; white – input sound.
- If the TV does not have other connectors, then the receiver is connected using an antenna wire.
- The cable is inserted into the socket marked “RF-OUT”. The picture quality is lower than when working with a standard “bell” or modern HDMI.
Connecting with HDMI is simple and doesn't require complicated instructions.
You can connect two TVs to one set-top box. Both devices are connected to the tuner using a special adapter - a splitter. A device with connectors for 2 cables is installed in the antenna output. The receivers operate synchronously, so they show 1 channel at a time.
More than 2 TVs can be connected to one tuner using the included cables. To connect the first device, an HDMI interface is used, and for the second, a bell cord is used. If all the sockets are occupied, then purchase a high-frequency RF modulator. The device provides separate decoding for each screen, but the cost of the gadget often exceeds the price of the receiver.
How to connect a set-top box to an old TV
Connecting the set-top box to an older model TV can be done in three ways:
- via SCART connector;
- by purchasing a tuner with a similar output; via AV input with RCA-RCA cord (tulips);
- To a very old television receiver equipped only with a radio frequency antenna connector, you can connect the receiver using a high-frequency modulator.
Connection algorithm via SCRAT (Euro connector, comb):
- Place the antenna where it will definitely catch the signal (as high as possible and in the direction of the repeater).
- Turn off the power!
- Connect the set-top box and TV via SCRAT.
- Turn on the power.
- Switch the TV to AV mode.
- Set up the console.
If the TV does not have digital jacks, then the connection is made through the antenna connectors. Additionally, two F-plugs are purchased. The insulation is removed from the antenna cable, the shielding braid is bent and the sheath (1 cm) is carefully removed from the central core. Screw the plug clockwise until the main thread protrudes 2 mm.
When connecting the receiver to older TV models using a coaxial cable, you should not expect better picture quality. Televisions do not perceive digital signals, so the image is inferior to modern solutions.
Outdated VGA connectors were used to connect a video card to a monitor, and later – to connect a video and DVD player. S-Video jacks are popular in older game consoles. To watch TV through the receiver, you need special adapters.
Older models often do not recognize the tuner, so it is necessary to diagnose digital equipment. If the problem does not disappear when connecting the set-top box to another TV, then the receiver is taken to service. Check the correct connection of cables and connectors, examine the wires for mechanical damage. Areas with kinks and abrasions are signs of faulty cords.
Setting up an “external” device
For installation you will need:
- the TV itself;
- remote controls for it and the “set-top box”;
- antenna, which can be an ordinary indoor one.
To set up a TV tuner on your TV, you need to do the following:
- First, make sure that the device you purchased is intact. Install batteries in the remote control and make sure it works correctly.
- Find a suitable location to install your tuner. Connect the antenna to the corresponding connector on the set-top box.
- Connect the components with the cord (tulip) included in the kit.
- Serve food.
- Connect the TV to a power outlet.
- Go to the menu using the tuner remote control, select “Search for channels” and confirm your actions with the “Ok” key.
Setting up the built-in LG tuner
How to set up a TV tuner on an LG TV? Nothing complicated! It is not necessary to call a specialist for a large sum of money to carry out such a simple procedure. Just follow the detailed instructions.
We classify the setup of built-in modules according to two criteria: fast and long. Which method is best depends only on the device model.
Important! Do you want to set up digital channels on your TV, but don’t know how to do it? A separate review on our website of useful tips will help you with this. Follow the link “How to set up digital channels on a Samsung TV via an antenna?”
Fast way:
- Go to the website of the TV company that provides communication services in your region.
- Here you can find the parameters you will need to configure.
- In settings, find the “Channels” menu.
- Find and set the “Cable TV” mode - this will change the type of reception.
Important! This instruction item may not meet the requirements of your model. If a problem occurs, you should review the accompanying documentation.
- Look for “Manual Setup” and select it.
- In the window that opens in front of you, set the parameters that you saw on the site.
- Start your search.
Check the result, most likely you can already enjoy high-quality viewing of programs. But if you are dealing with newer models, then read on.
Important! On a modern TV with the Smart TV function, you can watch television via the Internet. Follow the detailed instructions on the link to install the flash player on your TV.
Long setup
With TVs equipped with the “Smart TV” function, everything is a little more complicated:
- Go to settings mode using the home key.
- In the “Options” menu, set the country and region you are in.
- In the settings you need to find the “Auto search” window.
- In the window that opens, select the transmission type - “Cable”.
- If all actions were carried out without errors, then set up a quick search and enter the following parameters:
- The starting frequency is 274 kHz.
- The final frequency is 770 kHz.
- Set the modulation to 256.
- Baud rate – 6750.
- Network ID select “Auto”.
- The TV may require some additional information. To agree, check the boxes.
- Start searching. After 15-30 minutes all available channels will be displayed.
- In order not to reconfigure everything over and over again, you can set the auto-update mode in the settings.
If problems arise at any stage and the detailed instructions included with the devices do not help, consult a specialist on the manufacturer’s hotline.
Important! To ensure that the picture on your TV is perfect for many years, you need to take proper care of the screen. We will tell you how to wipe the LCD screen at home.
Possible problems and their solutions
Channels are not picked up at all
Sometimes the connected set-top box does not find a single channel. What could be causing this and what should I do?
- Cable fault.
It is possible that the antenna cable in the input jack is poorly connected or it has become unsoldered on the antenna. You can fix it by checking the connectors and cable integrity. - The antenna is not aimed correctly.
Moreover, if a ground antenna can catch the reflected signal, then a satellite dish is very narrowly directed and can only receive in a small angle. This can be corrected by checking the orientation of the antenna and, if necessary, adjusting the directional setting. - The antenna is of the wrong type.
This is observed when trying to catch digital TV with an old antenna that received analogue channels well. If an antenna was used for the VHF range, it will have to be replaced with a UHF one. There are no other options: digital TV broadcasts only on decimeters. - In the case of cable television, damage to the wire or junction box.
You need to contact your provider and call repairmen. - You are using a receiver that does not accept DVB-T2.
You can check by reading the instructions or information on the manufacturer’s website. Nothing can be fixed here, you can only purchase new equipment.
Only part of the channels are caught
Another common problem is that some channels are missing. How can the cause be identified and eliminated?
- Check which channels are generally received at the point where the antenna is located.
This can be done using the “CETV Interactive Map” service. Here you need to remember that digital TV is transmitted in multiplexes - sets of 10 channels (there are 2 main multiplexes; in MSC and Crimea there is access to a third with fewer channels). Perhaps the specific repeater at which the antenna is pointed does not actually broadcast the 2nd multiplex. In this case, you can try to play with the direction of the antenna: perhaps you will be able to catch a signal from another, “full-fledged” repeater. - Errors when setting up the receiver.
Some of the channels might not have been recorded in his memory and would have gone astray. Since digital TV is transmitted in multiplexes, unlike analogue, either all of them are caught at once, or none of them: a set of 10 channels is on the same frequency. To correct the situation, you need to reconfigure the receiver.
Weak signal
If the set-top box shows that the signal level is weak, then the reasons may be:
- Long distance to the repeater.
The closer to the transmitting antenna and the more powerful the transmission, the higher the signal level. You can correct the situation by purchasing a higher quality antenna with a gain of at least 15 dB, or by using, in addition to the receiver, a signal amplifier. - "Radio Shadow".
UHF radio waves are in many ways similar to light: they propagate in a line-of-sight zone, and many objects are opaque to them. It may turn out that either the antenna is separated from the repeater by a hill, or it is located in a lowland, or there is an “opaque” object between it and the transmitting repeater (for example, a reinforced concrete building, a high steel fence, etc.). This can be fixed by changing the location of the antenna. In some cases, it is possible, by playing with the orientation of the antenna, to catch a reflected signal of suitable quality; - For satellite TV - weather conditions.
Although the frequencies used by satellite transponders are good at penetrating clouds, some weather conditions (such as thunderclouds) can seriously weaken the signal. The only way to solve the problem here is to wait until the bad weather stops.
No signal
If there is no signal at all, the reasons may be:
- Antenna failure or cable break.
You need to carefully check the cable from its connection with the antenna to the plug. - Technical work at the provider or at the repeater tower.
You can check on official websites or local news. Here you can only wait.
The image slows down or freezes
Image freezing is usually due to the following reasons:
- Interference.
Unlike analog TV, in digital TV the receiver tries to restore the signal. Therefore, if there is strong interference, instead of ripples and hiss, there will be pauses in the sound, “cubes” on the screen, and frame slowdown. If the interference is due to weather conditions, you need to wait it out. If some devices are working nearby (for example, a traffic police radar: sometimes they interfere with reception) - try to change the setting by finding a different frequency; - Outdated software.
This is typical for satellite TV. Here you need to get the update kit via the info channel or computer; - Equipment conflict.
Sometimes Chinese-made TVs receive signals in an extremely peculiar way. Here you can try to reflash the TV in a specialized workshop.
There were channels, but they disappeared
If you used to take it, but stopped, the reasons may be:
- Engineering works. Here you can only wait;
- Failure in the signal transmission system. It is necessary to check the integrity of the wire and plug, for cable TV - the safety of distribution devices in the entrance;
- The attachment is broken. Need to get it repaired.
Important: These are common causes of problems and how to fix them. In difficult situations, you should contact the experts.
Source