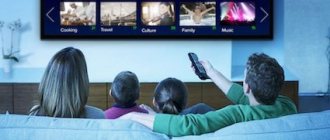
Checking DVB-T2 on a Shivaki TV receiver
There are several ways to find out whether Shivaki's TV supports DVB-T2: the simplest is to open the instructions and look at the technical specifications. There will be an inscription about support for DVB-T/T2 MPEG-4. There are two more options:
- Go to the Yandex Market website. Type the TV model in the search section and find the “all characteristics” field. In the item called “signal reception” we are looking for DVB-T/T2 MPEG-4.
- You can simply call the equipment manufacturer's service center.
What to do if the TV stops turning on?
It will be much more comfortable and better to call a specialist who has been dealing with these problems for a very long time, and who will fix your problem easily and quickly.
The TV turns on with a delay.
Does your AIWA TV turn on with a delay and you can't wait to turn it on? These problems indicate that your device is not working properly and need to be fixed immediately. The beginning of the long-awaited film will definitely be missed, and no one will recover the nerves spent because of this problem. Malfunctions can be due to several reasons:
- The power supply is not working correctly
- There are problems that need to be fixed, for example in the motherboard
- There are problems with the radio channel
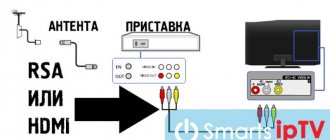
When should you buy a set-top box?
Purchasing a set-top box is necessary if the old TV model does not have the DVB-T/T2 MPEG-4 function. A digital receiver offers many benefits to users:
- It has a large memory capacity, which allows you to save any number of channels.
- Digital television improves picture quality and resolution.
- By purchasing a digital receiver, you can save a lot of money without having to change your TV.
It is important that before purchasing a set-top box, you need to make sure that the TV is in normal working condition. If the board works with difficulty and the chips are old, then the digital set-top box may not function on this TV model. To connect, it is enough to use a decimeter antenna. It needs to be connected to the TV using a cable and directed towards the nearest aerial platform.
If there is no built-in tuner and a set-top box is purchased, then the antenna is first connected to the set-top box, and then to the TV.
Review of the best Shivaki TVs with reviews
02.01.2019
When choosing a television panel, buyers are interested in who produces Shivaki TVs and what the advantages and disadvantages of the equipment are. Every consumer who chooses equipment from this company should know about all this, as well as about the brand’s popular models and owner reviews.
Who is the manufacturer
The Shivaki company appeared in 1988 in Japan and was engaged in the production of audio and video equipment, including televisions. The equipment of this brand was sold in many countries. In the USSR, the Shivaki brand was well known thanks to black marketeers who sold VCRs and cassettes.
In 1994, the Shivaki brand was acquired by the international company AGIV Group, whose head office is in Germany. After this, the range of products was significantly expanded. Shivaki equipment is produced in many countries around the world. TVs coming to our market are assembled in Russia. Thanks to foreign components and Russian assembly under the careful supervision of foreign specialists, Shivaki equipment is reliable and high quality at an affordable price.
Pros and cons of Shivaka technique
At a low cost, Shivaki TV receivers have a number of advantages. Firstly, the range of television panels deserves attention. There are many devices of various diagonals (from 22 to 55 inches) with technical characteristics for every taste.
There are inexpensive TV receivers with HD resolution and a minimal set of functions, but there are also real multimedia entertainment centers with options for connecting to the Internet, broadcasting images from a smartphone to a TV, and other interesting features.
Apart from technical features, Shivaki TVs attract consumers with their design. Most models are made in a stylish and thin case with small frames and can harmoniously fit into the interior of any room.
At the same time, small television receivers are made in various colors - red, white, black, etc. Shivaki TVs stand out from their competitors with excellent images. The picture does not reach the level of such companies as Samsung or Sony, but among television panels of the same price category, Shivaki television receivers show much better.
The disadvantage of some Shivaki TV receivers with diagonals of 24-28 inches concerns their performance. The matrices have a glossy finish, so when installed opposite a light source, glare will appear on the screen.
Popular Shivaki TV models
The following Shivaki TV models are the most popular.
STV-24LEDG9
This 24-inch Full HD TV is perfect for small bedrooms or kitchens. It is equipped with DVB-T/T2, DVB-C and DVB-S2 tuners, which will allow you to connect digital terrestrial, cable or satellite television. The TV receiver supports the use of USB devices for playing multimedia content or recording broadcasts. HDMI is installed to connect additional equipment. The stunning design will make your TV the centerpiece of your room.
STV-49LED16
Equipment for those who need a large 49-inch Full HD screen to watch television channels and do not require additional options.
The television receiver is equipped with DVB-T2 and DVB-S2 tuners for viewing digital terrestrial and satellite television, support for USB drives for playing multimedia content and recording TV shows, as well as three HDMI connectors for connecting additional devices. The TV is made in a thin silver body and is suitable for any interior.
STV-43LED18S
An excellent SMART TV with a screen diagonal of 43 inches and a resolution of 1920x1080. The TV receiver has tuners for satellite, cable and terrestrial television, and there is a media player for playing movies, music and photos from flash drives and hard drives.
The TV connects to the network via Wi-Fi or Ethernet, after which the user can watch entertainment content via the Internet, use a browser, communicate on social networks, etc. The TV receiver is equipped with Android OS, which makes it possible to download applications and games from the Play Market. The thin body, narrow frames and excellent design allow you to place the TV panel in any room.
Reviews
In reviews of Shivaki TVs, the characteristics of the manufacturer and its products are usually positive. Users note the image quality, reliable reception of digital channels, a media player that reads most well-known video formats, and the Android OS installed on Smart TVs.
Many other features of the television receiver are also mentioned, including design and the ability to hang the equipment on the wall. One of the disadvantages is the poor sound quality on most models.
Conclusion Shivaki TVs are excellent value for money. For a small price, the user can buy both a regular TV receiver and a TV panel with wide functionality. The technique is popular among consumers and receives a large number of positive reviews.
Review of Shivaka's best TVs with reviews Link to main publication
televizore.ru
Configuring older models for DTV reception
First of all, you need to check whether the TV is plugged in. Then check that the antenna plug is securely fastened. Next, the installation algorithm is as follows:
- You need to connect the TV to the set-top box and all equipment to the network.
- Select the “Source” button and select digital TV (DTV).
- Press the “ENTER” button.
- Enter the menu on the TV itself or using the remote control.
- Then use the right or left arrow button to go to the channel menu and find Automatic Tuning there.
- Press “ENTER” again, as a result you will be able to exit to the submenu.
- Press start and ENTER again.
You can also configure channels using manual search. To do this you need:
- In the channel menu, select “DTV Manual Tuning”.
- Then in the window that opens, enter the number of the desired channel.
- Start searching and, if necessary, adjust the frequency.
This procedure is carried out for all configured channels.
Connection and setup
It is very easy to assemble and configure the Shivaki STV-40LED14 TV. To do this you need to follow these steps:
- We assemble the multimedia device in accordance with the instructions that come with the kit.
- We make all the necessary connections: connect the power cord and television cable.
- The next stage comes down to step-by-step software configuration. After switching on, the current date and time are set. Then it automatically searches for all available TV programs. Upon completion, save the resulting list.
How to do this on modern models with Smart TV?
Tuning of digital terrestrial channels can be done manually or automatically. Automatic setup algorithm for Shivaki Smart TV:
- Make sure the signal source is connected correctly.
- Exit to the TV menu using the remote control.
- Go to the channel menu.
- To automatically search, click “Auto".
- Confirm with the “OK” button.
- Then you just need to wait until the process of searching for all available digital TV channels is completed. If unnecessary ones appear, they can be deleted.
Shivaki Smart TV is also easy to configure manually. The instructions are completely the same as the previous ones, with the difference that in the channel menu you need to select the option with manual tuning - “DTV Manual”. Scanning on Smart TV will happen automatically here too, but the user will be able to adjust the frequency of the found channels and influence their image. You can use the signal strength icon for guidance.
It is also possible to search for satellite channels, the instructions are as follows:
- Select the signal source. In this case, it is a satellite dish (DVB-S).
- In the channel settings section you will need to select the satellite model. This information can be obtained from the provider that provides the services.
- Set the rest of the settings to default.
- Then click “Search” and wait for the scan to finish.
Feedback from Shivaki TV users and answers to questions
The order of channels on Shivaki is confused
Vitra stv-24ledgr9 channels installed in a certain order after some time spontaneously reboot as during auto-tuning. Couldn't this be auto-tuning with an update in the TV's firmware? I would like to get rid of this problem. 11/14/2018.
Your TV has three ways to create your own channel list, described in the instruction manual. 1) Editing the channel number after auto-tuning. 2) Manually adjust each position number of the list to the desired channel. 3) Formation of a favorite list of FAV channels from the available ones. Try changing the setup method. It is always useful to update the firmware; this can be done at an authorized service center. However, such behavior of the TV due to the old firmware version is unlikely. This situation occurs if the LCN option is enabled on the TV - tuning channels according to the priority of the transmitting station, or the option of periodically updating channels. Look carefully among the sections of the STV-24LEDGR9 Menu - they should be disabled if available.
How to launch the initial setup menu
The fact is that there is no separate button for calling up the initial setup menu on the Shivaki STV-39LED20W (first time setup) and this setup starts only when the TV is turned on for the first time! The TV menu has buttons for setting the language, country, and channel settings. And the point of re-running first time setup is that only there there is an Auto channel update option, which I need to disable! I didn’t know what it was before and missed this position by leaving it on, now I’m tormented by the fact that the TV constantly updates satellite channels, crashes them and loses my settings! I tried to reset the settings to factory defaults and turned it off from the network, but I couldn’t run the “first time setup”!!! How can I repeat this procedure again so that the TV calls up this setting when turned on? 05/02/2018
Your TV probably needs to update its software. We recommend that you contact the Shivaki service center with this question rus.shivaki.com/support.html
How to remember the password on your TV
I set a password on the SHIVAKI STV-32LED13 TV and forgot it. Now I can’t set up channels or change the password, since I don’t remember the old one. Please tell me how to knock down the locks. 03/30/2018
Unfortunately, we do not have specific information on the STV-32LED13 model. Methods for recovering a password for various TVs are described in the section How to recover a password. Perhaps, in your case, the only way to reset the password and restore the ability to retune television channels will be to reflash the memory chip in a service workshop.
Controlling a TV without a remote control
2.27.2019 Shivaki Stv2169 How can you remove the child lock without a remote control
The lock is installed and removed using the standard remote control. It can be ordered online, necessarily for your model, with delivery by mail.
15/12/2020 SHIVAKI Vitra I need to connect the tuner to the TV, how to do this and there is no remote control for the TV. Is this possible?
If the TV has a button for selecting the input source, then yes.
Setting up digital television
3.28.2019 SHIVAKI STV-32LED21 STV - 32LED21 Why do the digital channel switching buttons turn off when watching digital programs, but work when watching analogue channels? What needs to be configured for the digital channel switching buttons to work correctly.
17/12/2020 SHIVAKI 50SU20H How to set up?
When tuning TV channels with the LCN option enabled, digital channels are configured with a three-digit number. To directly go to the desired channel, dial three digits of its number. You can view the numbering in the “Channel List” menu
4.7.2019 SHIVAKI STV-24LEDGW9 When setting up the first digital television multiplex, there are no channels Russia 1, Russia 24, Radio Russia. These channels are part of the regional ones. Allows the insertion of federal channels. The rest are (1, Match, NTV. Channel 5, Culture, Karusel, OTR, TVC). Indoor antenna. According to the tuner's readings, the signal is assessed at a level of 90...95%, quality - 100%. Arrangement of physical layer channels PLP 0,1,2…n for inserting regional channels?
And yet you have a weak antenna signal. An indoor antenna is only in rare cases capable of providing high-quality reception of all TV channels. You cannot rely on the signal quality parameters on the TV screen; they are arbitrary.
How to connect the receiver to the TV
05/22/2020 Shivaki STV 2937 The TV is located in a country house in the suburbs, 5 km from the city, in working condition, we wanted to connect the receiver, but there is no signal, the receiver is new. Without a receiver, it shows 6 channels with a room antenna; before turning off the analog TV, it showed 20 channels without any problems. The whole problem is that the TV does not respond to the receiver's remote control, my receiver has been working on another old TV without problems for several years, but here the remote control works idle, the receiver is new, I checked it on another TV, everything is fine. I turn on the TV, there are analog channels from the indoor antenna, I connect the receiver and switch to AV on the remote control, there is no settings in the settings menu, there is no reaction to either the remote control or the antenna, I tried to change the antenna, but if it didn’t work it would say that there is no signal , and it’s just that the TV doesn’t respond.
With this connection, the TV simply works as a monitor. You must use the television remote control to select the video input to connect the receiver. If a splash screen or some service information appears on the screen when the receiver is turned on, then the connection was made correctly. Tuning to channels is carried out using the receiver's remote control. The TV should not respond to the receiver's remote control. The receiver itself must respond to the receiver's remote control.
Image Settings
12/6/2019 Shivaki STV - 144, STV - 209 The image does not fit the entire TV screen. How to setup?
TV models STV-144, STV-209 are CRT, with an image format of 4:3. Currently, the vast majority of television programs and videos are broadcast in 16:9 format. It is impossible to expand the picture to the full screen in your device.
Setting up satellite TV
26/2/2019 shivaki stv-28led20w Please help me configure my TV to use the Ci+CAM module from NTV Plus.
We recommend that you contact your NTV+ provider for specific settings.
Setting up Smart TV Shivaki
27/10/2019 SHIVAKI STV-49LED18S The spb tv, ivi, Megogo and other Russian applications for watching TV channels and movies cannot be configured on the TV. Maybe he has this feature disabled?
Your SHIVAKI STV-49LED18S TV uses the App Store. Using the cursor keys you can select and install available applications. You can also download the necessary applications to your computer, write them to a USB flash drive and install them on your TV.
Entering the service menu
1.6.2020 shivaki stv-32led13 Is there firmware for this TV and how to access the service menu?
The procedure for obtaining firmware for the shivaki stv-32led13 TV is described in the “Firmware” section
5.18.2021 Shivaki TV LED 32/9000 “Why, when I turn on the TV, the sound volume is 78 It’s also written on the screen in red letters in English “
You probably need to reset your TV through the service menu.
Where to go for questions about connecting to terrestrial television?
Currently in Russia there is a Federal Target Program for the Development of Television and Radio Broadcasting. According to this project, 20 federal channels are available to all residents of Russia free of charge. To receive and configure them, you do not need to call a specialist. It is enough to connect the equipment yourself and carry out automatic configuration.
If you have any problems, you can call the free 24-hour hotline: 8−800−220−20−02. There is also a portal on the Internet “See Digital”. There you can find answers to most of your questions. On the hotline, specialists will be able to answer questions or provide assistance with technical problems when connecting digital TV.
Digital TV is increasingly becoming part of the everyday life of modern people. Therefore, the government developed a Federal program for connecting to digital television and improving television broadcasting. Owners of the Japanese brand Shivaki, regardless of whether their TV model is old or new, can independently set up the main digital channels.
If the model does not have the DVB-T/T2 MPEG-4 function, then you need to connect a digital receiver. It costs from 800 rubles and provides stable viewing of digital television on different TV models. For Smart TV Shivaki, such a receiver is not needed, since it has a built-in tuner for digital reception.
source
Advantages and disadvantages
The country of origin of this equipment is Japan. Production began in 1988. The brand's products were initially sold in a variety of countries, and it quickly gained enormous authority. In 1994, the brand became the property of the German company AGIV Group. But they try to assemble modern Shivaki TVs as close as possible to the points of sale; there are factories in our country.
The characteristic features of this technique are:
- relative cheapness;
- wide variety of model range;
- availability of models with various technical parameters;
- presence in the assortment of versions with both a basic set of functions and advanced technical features.
The design solutions of Shivaki TVs are quite diverse. Any model can be chosen in a variety of colors. When compared with products from other companies in a similar price range, impressive technical superiority is revealed.
The only noticeable drawback is related to the glossy finish of the screen. It creates glare when there is active external lighting.
Setting up a Shivaki TV
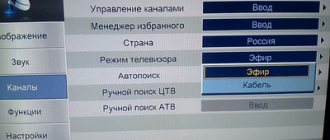
Automatic channel tuning on Shivaki TV
You need to make sure that the TV is connected to the mains and the antenna plug is securely inserted into the socket of the Shivaki TV.
1. Press the Source button to select DTV (Digital Television) or ATV (Analog TV) mode, and then press the ENTER button
2. Press the button on the TV or remote control to call up the main menu.
3. Press the right or left arrow button to select Channel MENU, then use the up and down arrows to select Auto Scan, press ENTER to move to the submenu. Select Start and press the ENTER button to start searching for available channels. The TV will find them automatically. During the automatic search, you can press the Exit button to complete the search. Searching for channels may take several minutes.
Review Reviews
Customer opinions about Shivaki equipment are quite favorable. These TVs are appreciated for their quality and stable performance. The communication set of most models fully satisfies consumer needs. The same applies to functionality in general. The mass of Shivaki television receivers is relatively small, and they successfully work out their cost. Other reviews often write about:
- decent build quality;
- good materials;
- high-quality matrices and anti-reflective coatings;
- possible problems with digital tuners;
- excessive brightness of LEDs;
- excellent adaptation of films on media to the appropriate screen format;
- modern design style;
- plenty of slots for connecting different devices;
- rather long channel switching;
- periodic problems with playing video files (only the MKV format does not cause difficulties).
For a review of the Shivaki TV, watch the following video.
Shivaki TV menu
The Shivaki TV menu system consists of several sub-items:
Shivaki TV initial setup menu FIRST SETUP: Turn on the Shivaki TV and call up the First Setup menu). Use the Up/Down arrows to select Language (menu language), then use the Right/Left arrows to select the desired language.
Country Use the Up/Down arrows to select Country, then use the Left/Right arrows to select the desired country.
Tuner Type Use the Up/Down arrows to select Tuner Type, then use the Right/Left arrows to select the desired tuner type: Antenna, Cable, or Satellite.
Auto Scan Use the Up/Down arrows to select Auto Scan, then use the Right/Left arrows to select DTV+ATV, DTV, ATV.
Auto Channel Up Use the Up/Down arrows to select Auto Channel Up, then use the Right/Left arrows to select On or Off.
Auto Tuning us When tuning digital channels, press the button to skip tuning digital channels. While tuning analog channels, press the button to skip tuning analog channels.
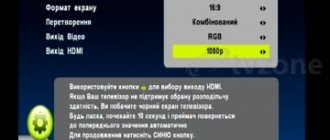
Shivaki TV picture adjustment menu
PICTURE MENU Press the button to bring up the main menu, use the Right/Left arrows to select the Picture item and press the ENTER button to access this menu:
Note: If a menu item is grayed out, it means that it is not available or cannot be configured at the moment.
Picture Mode Use the Up/Down arrows to select Picture Mode, then use the Right/Left arrows to select Standard, Mild, Personal, or Dynamic.
Advanced Settings (Advanced settings for Shivaki TV). Use the Up/Down arrows to select Advanced settings, then press the ENTER button to move to this menu: NR/ Dynamic Contrast Press the Up/Down arrow button to select NR or Dynamic Contrast ), then press the Left or Right arrow button to select Medium, Strong, OFF, or Weak. Press the button to return to the previous menu.
FAQ
Our support team searches for useful product information and answers frequently asked questions. If you notice an inaccuracy in our FAQs, please let us know using our contact form.
How to connect a universal remote control to a TV? Proven To set up a universal remote control, you need to know the model numbers and brand names of the remote and TV. Please refer to your remote control manual for a list of codes that correspond to different brands and model numbers.
This was helpful (1470) share
How do I measure the inch of my LED TV? Proven Measuring inches on an LED TV is done by measuring the diagonal distance, for example, between the top left corner and the bottom right corner of the screen (not the edge). One inch is equal to 2.54 centimeters, so when you measure 99 centimeters, that means your LED TV measures 39 inches.
This was helpful (679) share
I want to connect a speaker to my LED TV via HDMI, which port should I use? Verified You need to use the HDMI-ARC port, which is specifically designed for connecting audio equipment.
This was helpful (674) share
Does it matter which HDMI port I connect my device to? Proven Generally, you can connect a device such as a Blu-ray player or game console to any HDMI port. The device can then be used by selecting the appropriate HDMI channel on your TV.
This was helpful (295) share
What is the difference between LCD and LED? Proven Both methods use an LCD screen, which itself does not emit light. Difference in lighting behind the screen. LCDs do this using a CCFL (cold cathode fluorescent tube) and LEDs use LED bulbs.
This was helpful (284) share
Is it possible to repair a dead pixel yourself? Checked You should distinguish between dead and stuck pixels. A stuck pixel remains colored, and to restore it, you need to lightly press directly on that pixel until it restores itself. A dead pixel is always black or white and cannot be fixed by yourself.
This was helpful (126) share
What is contrast? Tested Contrast shows how different the lightest point of white is from the darkest point of black. For example, a contrast ratio of 400:1 means that the darkest point of black on the screen is 400 times darker than the lightest point of white. The higher the contrast, the sharper the image.
This was helpful (84) share
What is the optimal distance between the viewer and the TV screen? Tested This is partly down to personal preference, but as a general rule, the optimal screen distance is considered to be the diagonal size of the screen multiplied by 3. For a 60-inch (152 cm) TV, the optimal screen distance would be 180 inches, or about 4.5 m.
This was helpful (80) share
How to properly clean an LED TV? Verified Turn off the TV and wipe off dust and dirt from the screen with a microfiber cloth. Do not use paper as this may cause scratches. Don't press too hard or you may damage the pixels. Use a special detergent or make one by mixing 1 part vinegar with 1 part water. Dampen a cloth with detergent and clean the screen. Make sure the fabric is not too wet. Remove stains using rotating movements. Wipe the screen with a second microfiber cloth to ensure there are no streaks.
This was helpful (80) share
Will my remote control work with other TV models of the same brand? Proven Often the TV remote control works with similar models of the same brand. However, it is unusual that it will work on all models of this brand. Universal remote controls are more suitable for this.
This was helpful (69) share
What does HDMI mean? Proven HDMI stands for High Definition Multimedia Interface. HDMI is a connection for transmitting high-quality video and audio from one device to another.
This was helpful (52) share
Why are there letters next to the numbers on the remote control? Tested Some TV settings may require you to enter letters. The button usually has three letters or other symbols. If letter input is required, you can press this button once for the first letter, press twice for the second letter, and press 3 times for the third letter. Thus, text can be written using a minimum number of buttons.
Source
Operation and repair
Of course, as in the instructions for any other TV, Shivaki recommends:
- place the device only on a stable support;
- avoid moisture, vibration, and static electricity;
- use only equipment that is compatible with the technical specifications;
- do not arbitrarily change the layout of the TV, do not remove or add details;
- do not open the TV yourself and do not try to repair it at home;
- prevent direct exposure to sunlight;
- Strictly comply with electrical regulations.
If the TV doesn't turn on, there's no reason to panic. First you need to check the serviceability of the remote control and the batteries in it. Next is to test the front on and off button. If she does not respond, they find out whether there is power in the house. When it is not broken, they examine the functionality of the outlet, all network wires and the internal wiring of the TV, as well as the plug.
If there is no sound, you must first check whether it was turned off normally, and whether this is due to a broadcast failure or a defect in the file being played. When such assumptions are not justified, the search for the real cause of the problems may take longer. In this case, be sure to check that the power supply to the speakers is working correctly and that all speaker cables are intact. Sometimes “muteness” is associated with a failure not of the acoustic subsystem, but of the central control board.
But such cases should be dealt with by a qualified specialist.
Theoretically, a universal remote control is suitable for any Shivaki TV model. But a specialized control device will definitely be a more valuable acquisition. When using it, you must always be careful to ensure that the screen is not scratched. But it is always delicate and can even suffer from contact with the surface of furniture. Only a VESA format bracket can be used to mount TVs on the wall.
Connecting your phone to Shivaki TV via USB port is quite simple. To do this, you just need to use a special cable. But this is only possible if the television receiver itself supports some programs. Synchronization is also possible via a Wi-Fi adapter. True, this device is also usually placed in a USB port, and will be of little use if it is busy.
Sometimes an HDMI cable is used for the same purpose. This mode is supported by many Shivaki TVs. But not all smartphones have yet implemented it technically.
You can find out the necessary details about your mobile device in its technical specifications. You will need an MHL adapter for this to work.
Antennas with a resistance of 300 Ohms can only be connected via a 75 Ohm adapter. In the image settings menu you can change the brightness, contrast, sharpness, color and hue. Through the screen settings you can adjust:
- color noise suppression;
- Colorful temperature;
- frame rate (120 Hz is better for sports, fast-paced films and video games);
- picture mode (including HDMI).
How to setup?
Setting up Shivaki TVs is not too difficult. First you need to make sure that the TV signal source is set correctly. A regular terrestrial antenna is designated in the menu as DVBT. Then you need to enable the main settings menu. Next, go to the “Channels” section (Channel in the English version).
Now you need to use the Auto item, also known as “Automatic search” in the Russian version. You will have to confirm your choice of this option.
It is strictly not recommended to interrupt the auto search. Useless channels are removed as needed. Individual broadcast programs can be configured manually.
Manual search is similar to automatic tuning. But catching channels in this mode is, of course, somewhat more difficult. You will have to select the channel number that you plan to change. Subsequent scanning will be performed automatically. However, users have the ability to manually adjust the frequency, adapting to the broadcasting features more subtly.
Searching for satellite channels is done by selecting the DVB-S signal source. In the “Channels” section you will have to indicate the satellite you are using. If you have any difficulties, it is better to contact your provider and check with them about the satellite. Sometimes the necessary data can simply be taken from the settings of older equipment.
It is recommended to leave all other options unchanged - they are set optimally by default.
Best models
All Shivaki TVs have an LED screen. The Grand Prix selection is quite popular. For example, model STV-49LED42S. The device supports a resolution of 1920x1080 pixels. There are 3 HDMI ports and 2 USB ports, which fully meets modern requirements. Tuners are provided for receiving terrestrial and satellite television in digital standards.
Also worth noting:
- a strong focus on entertainment content;
- very small screen thickness;
- option to record images in digital formats;
- D-Led level LED backlight;
- built-in Android 7.0 operating system.
A good alternative is STV-32LED25. In terms of screen thickness, this model is not inferior to the previous version. By default, a high-quality DVB-S2 tuner is provided. There is also the possibility of processing a DVB-T2 signal. HDMI, RCA, VGA are supported.
Also worth noting:
- PC Audio In;
- USB PVR;
- ability to decode MPEG4 signal;
- LED backlight;
- monitor resolution at HD Ready level.
The Black Edition line is also in demand. A striking example of this is STV-28LED21. The aspect ratio of the 28-inch screen is 16 to 9. A T2 digital tuner is provided. The designers also took care of progressive scan. Screen brightness reaches 200 cd per 1 sq. m. The contrast level of 3000 to 1 deserves respect. The pixel response occurs in 6.5 ms. The TV can play the following files:
- AVI;
- MKV;
- DivX;
- DAT;
- MPEG1;
- H. 265;
- H.264.
Full resolution at HD Ready level is guaranteed.
Viewing angles are 178 degrees in both planes. The broadcast signal of PAL and SECAM standards is efficiently processed. Sound power is 2x5 W. Net weight is 3.3 kg (with stand - 3.4 kg).