Before tuning satellite channels, you must make sure that the satellite dish is connected to the ANT IN (SATELLITE) or SATELLITE MAIN (for a TV with a dual tuner) connector.
2 Select the “Broadcast” section. 3 Select Antenna. 4 Select the Satellite option. 5 Below, select “Channel Settings”.
6 Select Satellite. system".
7 Enter your PIN code (default: 0000).
8 Select "Select Satellite".
9 Deactivate all selected satellites (default: ASTRA 19.2E).
If you cannot deactivate the satellite (the checkbox is not cleared), delete all channels configured from this satellite and repeat the steps from step [05].
10
Select the Eutelsat 36E satellite (to tune NTV+) or USER SAT 1/2/3/4 (any) at the very bottom of the list > Select “Save”.
11 Make sure “LNB Power” is turned on > Below, select “LNB Settings”.
12 Make sure "DiSeqC Mode" is turned off when not in use.
13 Set the “Upper LNB Generator” and “Lower LNB Generator” (LNB local oscillator frequencies).
The table shows the data for setting up NTV+ and TRICOLOR (if the data is not suitable, check with your provider).
CaptionParameter ProviderNTV+TRICOLOR TV
| Upper gen LNB (MHz) | 10750 | 10750 |
| Lower gen.LNB (MHz) | you don't have to change it | 10750 |
14 Set “Tone - 22 KHz”, depending on the LNB type. 15 Check the signal quality.
If the signal quality is poor, try turning off “Tone - 22KHz”. If this does not help, check the settings and antenna connections again (make sure that the antenna is connected directly, without using additional equipment).
After setting the satellite parameters, you can proceed to setting up channels. First of all, it is recommended to use manual settings, because... during auto-tuning, in addition to the necessary channels, encrypted channels from other providers can be found.
3 Select Channel Settings. 4 Select Manual Setup.
5 Select a satellite. 6 Select “Transponder” > “Create” (for NTV+ there is no need to create - select 11900 V/R and go to step [08]). 7 Press ENTER > Enter the Frequency / Baud Rate / Polarity (Polarization) settings > Select Save.
The parameters are specified with the provider. The table shows the data for setting up NTV+ and TRICOLOR (if the data is not suitable, check it on the official website of your provider).
| NTV+ | TRICOLOR TV | ||||
| Frequency (MHz) | Baud rate (KS/s) | Polarization | Frequency (MHz) | Baud rate (KS/s) | Polarization |
| 11900 | 27500 | Vertical/Right (V/R) | 12226 | 27500 | Horizontal/Left (H/L) |
8 Check the “Signal Quality” (if the signal does not appear, check the previously entered data, the antenna connection and the antenna itself) > Select “Network Search” > “Enable”. 9 Select Search > Wait for setup to complete.
If not all channels are found, return to point [01] of this section, create a new transponder containing the missing channels (check the information on transponders on the official website of the provider). In this case, in paragraph [08] of this section, select “Network Search” > “Disable”. After setup, the found channels will be added to the general list.
Source: https://www.samsung.com/kz_ru/support/tv-audio-video/how-can-i-set-satellite-channels-manually/
When do you need to configure channels on Telecard?
There are many cases when you need to search for channels on Telecard. A short list can be given as follows:
- you need to configure the receiver when you turn it on for the first time;
- you need to update the list of broadcasts on your TV when the provider adds new content;
- a new subscription has been activated or the subscriber has switched to another channel package;
- it is necessary to increase the number of broadcasts in the list according to the recommendations of the provider;
- you need to connect a local package when moving the receiver to another region of the country;
- you need to restore channels after deletion.
The last item on the list is the most common. After the children's pranks, the subscriber suddenly discovers that the channels have disappeared. Or the user himself clears the list by incorrect actions or accidentally pressing buttons on the remote control.
How to reset your receiver
The procedure for resetting the settings depends on the model of the receiver you are using. Today, the Telekarta provider offers several brands of receivers in equipment sets or recommends for use.
EVO and GLOBO
In receivers of the EVO and GLOBO brands, not only the order of moving through sections and menu items, but even the design of the interface is almost identical. The names of the required on-screen buttons vary slightly. For example, in EVO receivers the required item is called “Factory settings”. And for GLOBO models the same on-screen button is labeled “Reset to factory settings.” It is clear that both points, when activated, do the same thing.
Step-by-step instructions on how to reset the receiver settings to factory defaults yourself look like this:
- press the Menu button on the remote control;
- use arrows to go to the “Custom Settings” block;
- then find and activate the “Factory settings” menu item.
This action affects the global parameters of the receiver. Therefore, its operating system will ask you to enter a PIN code. If the user or technician installing the equipment has specified their own combination, it must be entered. The default code is 0000. If the PIN has not been changed in the receiver options, you need to enter this combination.
Next, the user is required to confirm his action. To do this, just press the red button on the remote control or the on-screen “Yes”, depending on the receiver model. A factory reset will occur automatically, after which the device will reboot.
Continent
Continent brand receivers are quite simple in terms of protecting the parameters of the operating environment from changes. They do not ask for a PIN when initiating a factory reset procedure. To do this, it is enough:
- press the Menu button on the remote control;
- go to the “On-screen menu installation” section using the cursor keys;
- select “Factory settings”;
- Click “Yes” in response to the system request.
This completes the reset procedure. The receiver will reboot automatically.
Ricor
Rikor is the only brand of receivers that do not require a preliminary reset to factory settings. They provide for setting up channels with a complete replacement of the old list with a new one. You can do this yourself as follows:
- press the Menu button on the remote control;
- enter the “OSD Menu Settings” section;
- go to the “Television” block;
- press the right arrow on the remote control;
- select and activate the “Orion Express” item;
- click “Replace” in response to the search engine request.
After this, automatic scanning of Telecard system channels will begin. Once the search is complete, a new list of relevant channels will be compiled. It can be updated at any time by repeating the list replacement algorithm.
A little about the need for such programs
Software for formatting data on flash media allows you to restore functionality.
You can also destroy data beyond recovery, change the file structure (for example, FAT32 to NTFS) to record files over 4GB, or remove malicious software.
Let's look at a few solutions and do a little review.
MiniTool Partition Wizard
The program is a disk manager with advanced functionality. Link.
The software can convert the file system without losing data, format disks, copy a logical partition, merge or split volumes.
Supports work with different types of hard drives.
There are several versions of the product, most of which are paid.
- Free. As the name suggests, the solution is completely free and contains a minimal set of functions.
- Professional. Allows you to convert the file system, restore partitions, create bootable media and other operations. The license cost is $39.
- Server. The version is designed specifically for server OS. Supports all available functionality. Price: $159 per piece.
- Enterprise. This type of license is purchased by legal entities for use on workstations. Full functionality available. The cost is $399.
- Technician. All software features are available without restrictions on the number of working machines and servers. Price: $699.
- Bootable CD. The function of creating bootable disks is included in a separate software product. The cost of a license for one PC is $39.
Most home users choose the first option, since it already has the option to format USB drives.
The program interface is simple and intuitive. By clicking on “FAQ”, the visitor will go to the section of the most frequently asked questions, where he can familiarize himself with typical operations.
How to search and tune channels
If you need to update the list of existing ones or connect additional channels in accordance with changes in the broadcast schedule or active subscriptions, you need to conduct a full search for broadcasts. The general step-by-step instructions look like this:
- press the Menu button on the remote control;
- select the “OSD Menu Settings” section;
- Transponder data is entered in the satellite or antenna parameter block.
For each line of receivers, the procedure may be slightly different. For EVO receivers the procedure is as follows:
- you need to enter the system settings;
- select a transponder list item;
- enter a PIN previously specified by the user or a default combination of four zeros;
- In the parameter lines, enter the values speed 44948, carrier frequency 10981 MHz, set the polarization option to “Upper”.
Data is saved by pressing the blue button on the remote control. The search is carried out after confirmation by the user in the dialog box that appears. Upon completion, a new list of channels will be generated in the receiver.
How to set up free channels
The Telekarta provider, in addition to the package that the user has activated, offers a number of free channels. They are broadcast within the used transponder frequencies. To detect them, it is enough to conduct an express search over the entire range. This is done as follows:
- select system or antenna settings;
- go to the list of satellites;
- select from the list (KU) Express;
- confirm the start of the search.
Setting methods for individual receivers may differ from each other. Therefore, owners of equipment sets are recommended to study the instructions supplied by the provider. This will help you choose the parameters correctly and set their values, which may vary depending on the subscriber’s region of residence.
Source
Stock
To attract new customers, as well as improve the quality of satellite TV for its subscribers, the Telekarta operator constantly launches promotions with which television becomes even more accessible:
- Free for a whole month. When purchasing a set of Telecard equipment, the first month of television is not paid for.
- Look beyond zero. Public channels can be watched even after the television supply has been suspended due to non-payment.
Also, as part of the promotion, a cheap “Pioneer” tariff is available for new subscribers to connect to. The user is provided with 95 paid channels for 75 rubles/month, and when paying for an annual period, the cost is even lower - 67 rubles/month.
Setting up “Telecards”
Satellite television operator Telekarta offers a large selection of entertainment, music, children's and adult TV channels with high image quality. You can purchase a set of equipment and fill out an application for connection at any of the 4 thousand retail outlets throughout the Russian Federation. The company employs more than 7 thousand installers who can quickly install satellite television equipment, but using the instructions, you can do the installation yourself.
Choosing the right place
For successful installation of equipment, you should not only purchase a set of company equipment, but also choose the right place for installation.
It is also important to choose the correct diameter of the plate. There is an unspoken rule here - the lower the signal level, the larger the antenna should be in diameter.
Before purchasing equipment, you should check the coverage area in your area of residence.
If the provider reports that the coverage area is good, then you can safely enter into an agreement, purchase equipment and install and configure the Telecard.
It is important to understand that the company broadcasts from the American satellite and in order to choose the right location for installing the antenna, it is important to find the highest quality location for receiving the signal.
Operating principles of the company
You can find out the most successful coordinates by calling the toll-free hotline listed on the company’s website, or by going to the Satellite Finder resource and viewing the necessary settings on Google maps.
Once the mounting location and directions have been chosen, you can begin installing the equipment and begin configuring the antenna as a whole.
- How to set up the Telekarta Vostok antenna without devices
Deciding on a place for the plate
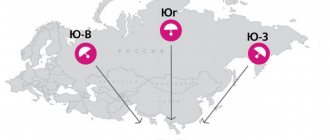
It is necessary to choose a place so that there are no obstacles in the direction of the satellite. Obstacles may include vegetation and buildings in the neighborhood. Depending on the region of residence, we give the approximate orientation to the Intelsat15 and Horizons2 satellites located in geostationary orbit at 85 degrees East:
Directing a dish to satellites for residents of Russia
- for residents of the Central region, send equipment to the southeast;
- residents of Siberia - to the south;
- residents of the Far Eastern region and Sakhalin - to the southwest, using only Intelsat
to contents ^
Determining the direction to the satellite
This procedure can be done using a compass or using a map. Let's consider both methods.
Using a compass
First, you need to check with the service department the azimuth of the village in which you live, taking into account the magnetic deviation. It is also necessary to find out the vertical tilt angles of the dish and the rotation angles of the receiving and amplifying external device. To clarify this information, you can call 8 (800) 1001047. For example, let’s take data for Moscow:
- azimuth with magnetic deviation = 137 degrees;
- the angle of inclination in the vertical plane is -11°, it is directed downwards;
- the rotation angle of the external receiving device is 27°.
Now you can take the compass and go outside. On the street, turn your back to the wall in the southeast of your house. Determine the north using the compass (the arrow points to 0°), and plot the azimuth on the device (137°). Fix the direction in which the arrow will point at azimuth 137. You can make a note for yourself for further orientation, for example, a tree or house standing in the distance. This is the direction towards satellites.
Using a card
To determine the direction to the satellites using a map, you must, in the same way as in the previous method, clarify the settings for your locality through the call center. For example, let's take data for Moscow, which was also taken into account in the previous method.
Determining guidelines for installing the plate
We take a map of your locality, you can simply print it from any search engine. Additional tools we will need are a protractor and a pencil. Use a pencil to mark the object on which the antenna is installed. When determining which direction north is, search engines usually mark the cardinal directions on their maps. From the north guide, use a protractor to mark 127° - this is the direction to the Intelsat15 and Horizons2 satellites. Using the map, you can make a note for yourself, for example, the edge of the roof of a house standing in the distance.
With a map on which the marks are marked, go out of the house and look for the landmark visually made earlier on the map, and then evaluate where on the building you can install the dish so that there is no obstacle to the signal in the direction of the satellite. If you have decided on the installation location, proceed to the next step.
HDD Low Level Format Tool
The software differs from other solutions in that it performs low-level formatting. This means that during the process, information is completely erased from the media and sectors are filled with zeros. After such an operation, the information cannot be restored.
Link.
The appearance is more minimal compared to the previous solution, but all options are available on the main screen.
The program is available in three versions.
- Free version for home or personal use. There is a slight limitation on formatting speed;
- Pro. Removes limitation from free version for $3.30;
- For commercial or professional purposes. Cost is $27;
All subsequent updates for any variant are free.
HP USB Disk Storage Format Tool
The third representative in the segment of working with HDD and flash media was developed by the large company Hewlett-Packard. The solution is a small utility that performs only two main functions - destroying data or creating a bootable USB flash drive.
Official site.
One of the features of the program is that it is completely free. Supports all the basic options when formatting disks: changing the file system, correcting errors, changing the volume name, and more.
SD Formatter
This utility is designed for one purpose - formatting SD cards. Its uniqueness is its small size and minimal functionality. Also, a special algorithm is used for each media.
Official site.
The utility is completely free and available for download. It allows you to recover bad sectors on SD cards during formatting. There are no other possibilities. Does not work with external media (eg hard drives).
Format USB Or Flash Drive Software
The fifth software product can erase information on several media simultaneously. The appearance is simple, the functionality is minimal.
Official site.
There is a trial period. The cost of the software is $23.59.
After launch, the utility scans the system for connected USB devices and displays the result on the screen. The user selects the required media, and then starts the process.
EzRecover
The software is designed to recover USB drives and memory cards. The option to erase data comes as one of the additional functions. The utility is capable of resuscitating devices in case of any failures.
Download site.
The interface consists of three lines and two buttons. After clicking “Recover”, the recovery procedure starts. The process of erasing data from the media is one of the algorithm procedures.
The program is no longer supported and therefore may not work correctly with the USB 3.0 standard. If possible, it is better to use the second version to connect media.
Securing the bracket
The holder is secured to the outside of the building so that the antenna subsequently installed on it faces the satellite, that is, the note defined in the previous paragraph is visible.
At this stage you may need the following tools:
- electric drill or hammer drill. They drill holes at the mounting points of the holder;
- fasteners for fixing the bracket on the wall;
- insulating tape and a knife that can be used to cut the cable;
- adjustable wrench and wrenches of different sizes;
- pen, felt-tip pen and marker for marking.
To ensure maximum strength in strong gusts of wind, it is best to secure the holder with through-type studs, screws or anchor fasteners, and the part of the pipe on which the antenna is attached should be located perpendicular to the ground.
The result for our example should be an antenna mount facing southeast.
Installation of equipment
Installation of equipment should be carried out in the recommended direction. Installation involves simply securing the antenna at the desired height in a suitable manner.
The antenna is installed on the outside of the building.
Usually the equipment has special fasteners for installation. The equipment can be secured with ordinary self-tapping screws, or using pre-dowels - the choice of fastening method depends solely on the material of the surface to which you plan to attach the equipment.
The antenna can be adjusted in two directions at once - in azimuth or in the angle of the signal reception location.
Principles for adjusting the location of an antenna dish on a building
A slight adjustment to the location of the equipment can either increase the signal level from the satellite or completely reduce it to zero.
Securing the converter
Before finally fixing the device, it is rotated to the desired angle; this is done by rotating the converter around the axis of the neck in the holder. When the angle is set, the clamps securing the converter are tightened tightly.
The direction of rotation depends on where you live:
- if you live west of 85°E, then turn the converter in the direction of the clock;
- If you live east of 85°E, then turn the converter counterclockwise.
If you have secured the converter correctly, the lower part of its housing will be directed to the south and away from the north side. This recommendation is suitable for any region of the Russian Federation, except for villages exactly at 85° East, for which you do not need to set an angle, the bottom of the converter is simply directed towards the ground.
After fixing the converter next to it to the rod using electrical tape or special clamps, a cable with a reserve length of about 1 m is secured. The reserve is needed for comfortable replacement of the connector in the event of its failure during use.
We mount, configure and connect the dish
The antenna itself is installed as follows:
- it is placed on the rod, while the adjusting nuts for moving it in the horizontal and vertical planes should be tightened with force, but with the possibility of further adjustment;
- If the equipment is installed on the roof of a building and is its peak point, it can become an object for lightning strikes, so you need to ground it and make a lightning rod to avoid failure of the entire structure or even injury from a lightning strike. If the structure is mounted on a wall, balcony or loggia of a building with grounding, then there is no need to take additional measures to remove lightning;
Fastening and installation of satellite TV antenna
After installing the plate, screw the F-connector of the cable brought out and fixed to the rod onto the converter.
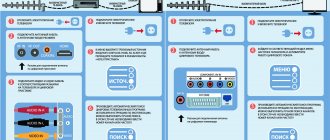
Connect and configure the receiver
The second edge of the cable with the F-connector is brought indoors; now it can be screwed tightly onto the F-connector of the receiver. During the entire installation, safety regulations must be strictly observed, therefore all manipulations are carried out with the receiver disconnected from the 220V network. The receiver connects to the TV via HDMI or RCA cable.
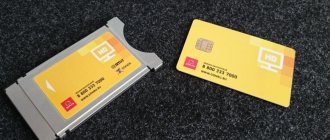
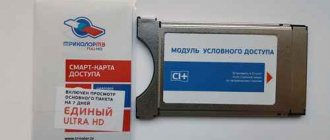
Now you can turn on the TV and set it to receive images from the video input to which the receiver is connected. A smart card is inserted into the receiver slot.
Setting up the Telecard receiver
The receiver is configured to capture channels from the Telekarta operator using its own remote control. This is done like this:
- turn on the receiver, the device identification process is shown on the TV screen;
- if the receiver has not been configured before, a request to select a profile will appear on the screen, select “Telecard HD” or “Telecard Vostok” and press “Ok” on the remote control;
- select the scanning mode and press “OK” on the remote control again. Waiting for the search process to complete. At this stage, the channels will not be found, when the message “No programs found” appears on the screen, press “Ok” on the remote control
- use the arrows on the remote control to select “DVB-S Settings”, click “Ok”;
- use the arrows to select “Antenna installation” and click “Ok”;
- set the antenna characteristics, they can be found in the subscriber's directory. This section will show the signal strength and quality scales. When setting the plate, it is necessary to achieve the highest value on the second scale; the first does not play a special role.
to contents ^
When should you contact a setup specialist?
In a situation where the user cannot configure and install the equipment himself, he should seek help from a company specialist or a third party.
The same applies to the situation when the setup was carried out correctly, but the equipment does not work.
Application for connection to satellite TV channels
If the coverage area is poor or the signal level is weak, you should contact a specialist for help before purchasing equipment.
A professional will select the required diameter of the antenna dish and install the equipment as correctly as possible to receive the signal from the satellite.
| Telecard Vkontakte | Telecard in Odnoklassniki |
| Telecard on Facebook |
Download the “Telecard” application on android Download the “Telecard” application on iPhone
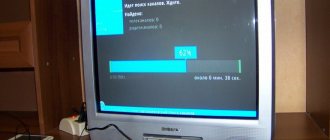
Searching for a signal and fixing the dish
Initially, you should look for a signal in the horizontal plane in the corresponding sector. To do this, loosen the screws that fix the plate horizontally so that you can turn it with force. Next, step by step, turn it by 1, maximum 3 cm in one direction or the other to find the satellite in the intended direction. The optimal search sector size is considered to be 10° (approximately 0.1 m) horizontally and 6° (approximately 0.06 m) vertically in the intended direction.
As you measure each step, pause for 3-5 seconds to allow time for the receiver to capture the signal, while also monitoring the power levels and signal quality on the TV.
If the signal is not captured when turning the plate horizontally, then proceed to vertical tuning. To do this, the plate needs to be moved up or down no more than 1 cm, fixed at this level and adjusted horizontally again.
When the signal quality scale reaches the maximum value, the antenna should be fixed by tightening the horizontal and vertical fixing screws. It is important to remember that when searching for a satellite, you need to focus on the Power value, and when tuning to an already found satellite, look at the level of Signal Quality. If, when turning the plate, the value on both scales is close to 0 and does not change, you should check the correct connection and installation of the cable.
JetFlash Recovery Tool
Another utility for recovering damaged sectors on flash drives from the manufacturer Transcend. The program supports two modes of operation: data recovery and removal of write protection.
Official site.
The program is no longer supported by the vendor. He replaced it with the online service JetFlash Online Recovery. The application is available at the link above.
The user connects the media, starts the service and tries to recover the data.
Final setup
When the antenna is fixed, make a final, more precise adjustment of the receiver; to do this, press the “Exit” button on the remote control twice; this action will return you to the main menu. Use the arrows to select “Factory settings” and click “Ok”. Enter the password “0000”, use the remote control arrows to move to “Yes” and press “Ok”. Select the “Telecard HD” profile and click “OK”. Wait for the search process to complete and click “OK”. The receiver automatically switches to watching television channels. That's it for setting up the receiver.