by adminPublished03/10/2020
Hello, friends! In this article we will figure out how to connect a monitor to a computer. By computer we will mean a desktop computer. It's the same with laptops, netbooks and ultrabooks.
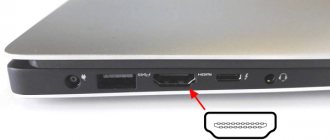
The first thing it is advisable to do is examine the connectors on the computer. Usually everything is located on the rear panel of the system unit. I have video built into the processor so the video outputs are on the motherboard.
You may have a discrete graphics card. In this case, the video outputs are placed a little to the side
In the pictures above you can see all the most common connectors for connecting monitors.
Now we’ll examine the latter for video inputs. For example, LED monitor Samsung S27C570H
There are not many connectors - digital HDMI and analog VGA, which is better not to use.
Connection cables
It is advisable to connect the monitor to the computer without adapters and that the ends of the cable have the same connectors. For example HDMI - HDMI
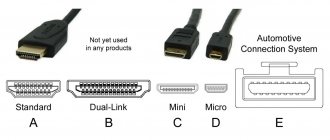
It is advisable to give preference to a digital connector: DisplayPort, HDMI, DVI. They are arranged in descending order of capacity. But this does not mean that the DVI connector cannot provide resolutions higher than 1920 x 1080 - without problems, but with one condition. If you are going to use a monitor with a resolution higher than Full HD (1920 x 1080), then it is advisable to use a Dual Link cable. The latter is distinguished by the presence of a large number of contacts.
The picture above shows the different versions of DVI connectors:
- DVI-I - can transmit both digital and analog signals
- DVI-D - transmits digital signal only
- DVI-A - analog signal only
I haven't seen any DVI-A cables, but they say there are some.
We find the same digital connectors on the monitor and computer. If it is not included, we buy the corresponding cable. If your computer and monitor do not have matching connectors, then it is advisable to buy special adapter cables. For example DisplayPort to DVI
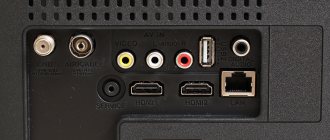
We study equipment for two monitors.
The following table provides more information about the components required to install an additional monitor.
Equipment Description More information
USB Type-C The most versatile video cable with audio, data and power transfer capabilities.
LCD (Liquid Crystal Display) Monitor LCD monitors are thin, lightweight, and have high resolution.
VGA (video graphics standard) port The most popular computer ports that use an analog system to transmit display data.
DVI (Digital Video Interface) port The DVI port provides high-quality picture transmission using digital technology.
HDMI Port (High-Definition Multimedia Interface): HDMI ports are an interface standard used for audiovisual equipment such as a high-definition television or home theater system.
S-Video port The S-Video port is one of the most popular ways to connect your computer to your TV.
Monitor Cable The monitor cable carries information from the computer to the monitor in graphical form. The connectors on the cables you use must match the connectors on your computer.
Video adapter cable or converter A converter may only be needed if you need to connect a computer with one type of graphics card, such as VGA, to a monitor using another technology, such as DVI.
Connection
The connection process is as follows:
- Turn off the computer
- Connect one end of the cable to the monitor connector
- The other is to the video output on the computer. If you have video outputs on the motherboard and on the video card, then connect to the video card.
- Turn on the computer
Usually nothing more is required. Windows itself will install the necessary drivers for the connected monitor and display the recommended resolution on it.
Thank you for sharing the article on social networks. All the best!
Choosing a converter
If you want to connect an old monitor directly to a new video card, a regular adapter will not be enough. You will need an active converter that will convert the analog signal transmitted from the monitor into a digital one that the video card can receive.
When choosing a converter, you need to consider three factors:
- Connection interface. See which port is used on your video card. If HDMI, then you need to look for an appropriate adapter. Well, if DVI-D, then a VGA to DVI-D adapter.
- The converter must have additional power. Yes, it’s far from a fact that you will need it, but it’s better to play it safe and take an adapter that can be powered from a regular USB connector. Visually, it looks like an adapter with two cables - one, for example, HDMI, and the second - USB-A.
This is a video card with a DVI-D port. You need to pay attention to the fact that visually it is similar to VGA, but it has a separate pad for a different type of contacts on the right
Here are the universal HDMI ports. Nowadays these are used in almost all TVs and monitors.
Mini-course for beginners - How to assemble a computer and save money on it
Update date: 09/03/2019, next update date: 09/03/2022
Hello friends! Let's take a break from setting up routers and Wi-Fi for a moment. Let's talk about a general technical topic, which, I am sure, will be of interest to many of our subscribers and guests. We will talk about how to connect a monitor to a computer via an HDMI interface.
If you have questions while reading or something doesn’t work out, be sure to write in the comments, which are always open to all our readers.
What is DVI for?
The standard is intended for broadcasting video on displays, TV equipment, projectors and other devices. This becomes clear from the decoding of the abbreviation DVI and its translation into Russian - digital video interface.
Features of DVI output
The highest resolution is 1920x1080 pixels, but a number of video cards work with picture quality at 2560x1600 pixels. Below is the relationship between the size of the DVI output cable and the appropriate resolution:
- 10.5 meters is the maximum length of the cord through which a resolution of 1920x1200 pixels is transmitted.
- By increasing the specified length by another 7.5 meters, the highest resolution is reduced to 1280x1024.
A low degree of shielding can lead to transmission
information.
Placing near devices
that produce electromagnetic waves often results in artifacts when sending video via the Digital Visual Interface.
DVI port that connects to the appropriate cable
, does not support audio transport.
So for these purposes other communication channels should be used. The cord is 10 times larger than the Mini Displayport
.
Possible problems
The following video explains how the connection connector affects picture quality:
Here I want to talk about problems with screen resolution and colors that you may encounter when connecting a monitor to a computer via an HDMI interface. The fact is that initially this standard was intended for connecting household appliances, not computers.
For example, on TVs that transmit analog images, there is an Overscan mode that masks distortions at the edges of frames - the picture is enlarged and the edges are cropped. When we connect the display to the computer, the video card drivers can turn on the overscan compensation mode, which will give us a smaller picture and black, unused areas at the edges. To avoid this, you need to disable this function in the video card driver.
Another problem is color distortion. Household appliances use a limited range of color values, while computer equipment uses a full range. Therefore, when connecting a monitor to a computer via HDMI, the following problems may occur:
- Narrowing of the image, gray dots instead of black, dull colors;
- Few color gradations;
- Sharp colors.
Only adjusting the RGB range will help here. A similar function is available in the driver for Nvidia and AMD video cards.
Now I want to reassure our reader. You are unlikely to encounter such problems if you have modern computer equipment.
If you have any questions, welcome to the comments! We will respond quickly and try to help! And I say goodbye, see you on our portal!
Every PC user should be able to connect a monitor to a computer. Because sooner or later there will be a need to buy a new monitor or simply move the computer to another location. In such a situation, you need to be able to disconnect and connect the monitor to the computer. In this article we will talk about how to do this.
Setting up dual monitor screens
You may want to adjust the image yourself. Here are the settings for Windows 7. If necessary, you can drag the monitor icons so that they are positioned the same way as the monitors on your desk. Click "Detect" to check which monitor is detected as "1" and which as "2". Numbers will appear on your monitors.
In the Multiple Displays section, you can also customize what is visible on the second monitor. The following options exist:
Extend Screens - Spreads your desktop across both monitors and allows you to drag and drop items between the two screens. This is how most people use dual monitors, and is the default setting for desktop computers. Once you've set up your monitor, you can use your mouse to grab the title bar (top) of the window and drag it to the new screen. If the window does not move when you drag it, first double-click the title bar and then drag it.
Duplicate screens - display the same desktop on both monitors. For a laptop, this is the default setting. This is useful if you are giving a presentation while your laptop is connected to a projector or large monitor.
Desktop sharing on only one monitor - most often used with a laptop if you want the laptop screen to remain blank after connecting to a large desktop computer monitor.
When you disconnect the secondary monitor, the original display settings are restored to your primary display. In addition, all open files and program windows are moved to the main display. The next time you connect the same monitor, Windows will automatically apply the display settings that were used the last time you connected that monitor.
Methods for connecting a monitor to a computer
The monitor can be connected using a DVI interface. This option is used most often. If your computer is equipped with several interfaces, then you should use DVI first, as it provides the highest quality picture.
Video output DVI interface:
The monitor can be connected using the VGA interface. The VGA interface is considered obsolete. It should be used only if there is no DVI or HDMI output, as well as in cases where the connected monitor does not support other interfaces.
What is DVI output
since the DVI port , however, despite this, this interface
continues to enjoy fame. Previously, the introduction of a similar development made it possible to raise the display of video content on the display to a new level.
The port operates by sending information using TMDS, an encryption protocol created by Silicon Image. The image is transmitted sequentially, which is facilitated by the mentioned protocol.
Similar to HDMI
The socket in question implements broadband content protection, allowing devices to encrypt data.
VGA
output is backwards compatible with the DVI port.
The process of connecting a monitor to a computer
So, if you don't know how to connect a monitor to your computer, then first look at the back panel of your computer. Most likely, at the bottom of the rear panel of the system unit you will find video outputs (DVI or VGA output, as well as HDMI).
If you find video outputs at the bottom of the system unit, then these are the video outputs of the video card, and they should be used first. If there are no video outputs at the bottom of the system unit, this means that the computer is not equipped with a separate video card and uses integrated graphics. In this case, you must use the video outputs on the top of the system unit (these are the video outputs on the motherboard).
After that, inspect the back of the monitor. Nowadays it is quite difficult to find a monitor without a DVI input. But some of the cheapest or oldest models may not have it. If your computer has a DVI output, but your monitor does not have a DVI input, then to connect the monitor you will have to use the VGA output on the computer and the VGA input on the monitor. If the computer has only a DVI output, and the monitor only has a VGA input, then you can use an adapter.
But, in most cases, such problems do not occur. As a rule, a monitor has both a DVI and a VGA input, and the choice of video interface for connecting the monitor depends only on what video outputs are available on your computer.
In order to connect a monitor to a computer using a DVI or VGA interface, you need to connect the video output on the computer and the video input on the monitor using a DVI or VGA cable (depending on which interface you are using). After connecting, you need to tighten the two screws that are located on the sides of the DVI and VGA cable.
These screws have plastic tips and are hand-tightened. If you do not secure the connection with screws, the cable may have poor contact, resulting in flickering on the monitor.
If you are using an HDMI interface, you do not need to tighten the screws, since this cable is not equipped with such a function. In this case, you just need to plug the HDMI cable into the HDMI output on your computer and the HDMI input on your monitor.
>
What to do if the monitor does not turn on
How to connect a laptop to a computer
If you encounter this situation, you need to identify the reason that led to the monitor turning off. To do this, you need to inspect the laptop and conduct a comprehensive diagnosis. But don’t rush to call a specialist. Here are the basic steps you can do yourself:
- Checking the connection to the network and power source: the socket, power supply and all wires are in good condition.
- Presence of external defects of the case.
- Image settings in the main menu.
- Normal functioning of all drivers and video cards.
In most cases, the malfunction can be easily resolved using normal settings, but there are situations that are more complicated.
Checking the display by connecting an external monitor
For accurate diagnostics, you can use an additional screen. Connect an external monitor to your laptop and evaluate its performance. To do this, connect a second monitor with the device turned off, and then turn everything on to the network. If after startup it displays a picture, but the first screen does not show anything, then the problem lies in its matrix or cable. Most likely, they were damaged during operation, resulting in a disruption in their operation.
Reset
Perhaps the easiest way that you can do yourself is to reset and reinstall system settings. To do this, follow the instructions:
- Disconnect the device from the network.
- Remove the power supply and battery, then press the power button for about 20–30 seconds.
- After all the main settings are reset, turn on the equipment again.
- From the proposed boot mode, select standard system startup and wait for the result.
If the problem is resolved, such a reboot will solve the problem, and the monitor will again display the picture in standard mode.
Resetting BIOS Settings
Resetting the BIOS will be more difficult. There is an option to change the configuration using the keyboard using hot keys. The main difficulty is choosing the right moment at which the mode changes from F9 to F10. It would be safer to remove the special battery responsible for the system, but this will require disassembling the laptop case.
Reinstalling the RAM module
If assembly is incorrect or liquid gets into the equipment case, you should inspect the installation location of the RAM unit. To perform the actions correctly, you must follow the operating instructions supplied with the laptop:
- Unplug the equipment and remove the battery.
- According to the instructions, open the mounting location of the RAM strip. Disconnect the cover, and if it is missing, disassemble the area on the computer case using a screwdriver.
- Remove the board by moving away the special fixing fasteners.
- Clean the unit from dust and blow through the contacts.
- Reinstall everything in reverse order.
After these manipulations, try turning on the laptop again and checking its operation. If unsuccessful, try seeking help from specialists.
Why connect
For ordinary users, connecting two devices simultaneously to display an image is not required.
The presence of two or more screens is necessary:
- while working in any professional environment - Photoshop, 3D Max;
- those engineers who develop complex software (for debugging);
- when carrying out any work with a virtual machine - when the software being developed is multi-platform.
Also, many users use such a function as a desktop extension. It allows you to play various types of simulators more comfortably.
Pros of connecting a TV via DVI
Due to the fact that DVI provides digital
format for transmitting information, it significantly improves the quality of the resulting image.
Therefore, the best solution would be to connect your TV via DVI as opposed to analog outputs. The outdated sockets include both VGA
and its clone, a type of DVI called DVI-A, which are not capable of producing such a clear picture.
The standard in question was released after the implementation of HDMI. A distinctive characteristic of a DVI cable is the hardware separation of one
general signal.
This means that the communication between a laptop
or computer and TV occurs in two stages.
First you need to connect
the cable to the output on the video card that only works with images. Then the free plug is plugged into a port on the sound card (built-in or separate) or amplifier.