In my free time, in addition to working part-time in a small workshop with a friend of an individual entrepreneur who repairs electronics, I sometimes buy electronic equipment for the purpose of repair and subsequent sale, so to speak, as additional income. There is essentially no budget for organizing a workplace in the workshop, as is often the case with those who are just starting to work, you have your own working PC, your own Internet, the only equipment you have is a soldering station and a laboratory power supply, so we have to get out as best we can.
Converting LCD monitor backlights to LED strips
They gave me a 17-inch LG L1753S LCD monitor, an old one, for spare parts. Since I really like 4:3 displays, I simply had to resurrect it. These old LCD monitors also have a second advantage - colors that are pleasing to the eye. I plug in the monitor, the backlight comes on for 1 second, and then goes off. Clearly, this means the inverter protection is triggered. I'm disassembling the monitor...
I see that everything seems to be in order with the inverter, but someone did a lot of digging in the monitor. On the back of the board I see a capacitor soldered in place of one of the lamps, and the wires from this lamp are cut off. I didn’t want to mess with the inverter, much less buy lamps, so I decided to disassemble the display module and replace the lamps with LED strips.
After I disassembled the display module and took out the lamps, it turned out that one of them had burnt leads, the other was cracked, and the remaining two lamps were intact. We take the lamps out of the “grooves” and throw them away, glue the LED strip into the grooves. It is also imperative to turn off the power to the inverter that previously powered the lamps. To do this, we look for a 12-volt circuit (there are usually a couple of electrolytic capacitors along this circuit), then we trace the path that goes in the direction of the inverter chip, and we cut this path. This action is a MUST DO!!!
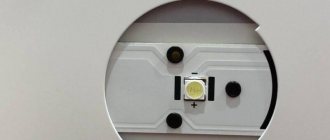
It is better to take a tape with a neutral white glow, and its width should also be minimally narrow (the width of the tape in the photo is 8 mm). The number of LEDs is also important - at least 120 LEDs per meter of strip.
After the tapes have been glued, we remove the wires and check the functionality of the device.
Next, the display module can be assembled. The tapes can be powered from a “12v” circuit; the pins are labeled on the board.
On the board you can find jumpers that contain 12 volt power, and solder the backlight wires to these jumpers.
After this modification, a problem appears - the backlight is always on, and even the brightness is not adjustable... Let's start looking for the circuit for adjusting the backlight brightness. We carefully look at the inscriptions near the connector. The “ON” pin turns the backlight on and off; when the backlight is on, there is a voltage of about 3 volts at the “ON” pin. When the backlight is off, there is no voltage at the “ON” pin. The “DIM” pin adjusts the backlight brightness by changing the duty cycle of the PWM signal.
When setting almost maximum brightness, the PWM duty cycle is 80...90%, the signal amplitude is 5 volts. When the backlight is turned off, there is also no signal at the “DIM” output, so there is no need to use the “ON” pin. To turn it on/off and adjust the brightness, it is enough to use the “DIM” pin. In order to adjust the brightness, you need to connect the LED strip through an N-channel field switch, and apply a signal from the “DIM” pin to the gate of the field switch through a small resistor (100...200 ohms).
I took the field switch from a burned out motherboard, N-channel AP9T18GH, with a maximum drain-source voltage of 20 volts and a current of 10 amperes. By the way, each of the tape segments consumes approximately 180 milliamps, so you can use almost any field device with a current of at least 0.5 amperes. Also, just for fun, I measured the supply voltage along the 12 volt circuit. The voltage was within normal limits.
After final assembly of the display module, I tested the uniformity of the LED backlight. The result pleased me very much, the uniformity turned out to be decent, only at the very top and at the very bottom, if you look closely, the uneven light from the tape is slightly noticeable. Here is a photo of the uniformity of the LED backlight after the alteration:
Overview and essence of the problem
The monitor is like a monitor, the most ordinary in terms of appearance, it is a little scratched, but it’s not critical for me, I didn’t buy it to edit images.
The backlight does not disappear immediately after turning it on, so I had to wait a while for it to go out; by the way, the camera does not fully convey the brightness of the monitor; here the brightness is higher than by eye.
Finally, after waiting for the backlight to start to “glitch,” I recorded a visual video of how this happens:
Everything inside the monitor looks like this:
Types of socles
A socket is a thread or other type of connector with which a light bulb is attached to a socket or lamp. The base contains contacts that, when interacting with the contacts of the lamp, conduct current.
The device of a classic light bulb
The following types of bases are found in everyday life:
- E27 is the most common type; it is screwed into almost all chandeliers and floor lamps. It has the form of a thread with a diameter of 27 mm.
- E14 is the second most common base, thread with a diameter of 14 mm. It is available in low-power models that are installed in floor lamps, bedside lamps, and wall decorative lamps.
- The picture below in the second row shows the bases of tubular fluorescent lamps found in long ceiling and wall lamps.
- In the third row you can see the bases of the light bulbs that are built into the ceiling lamp.
Common types of bases
Replacing the lamp step by step
The procedure for replacing a light bulb directly depends on the type of base. If we are talking about replacing devices with GU5.3, it happens as follows:
- The first stage is a power outage. This will protect the technician from electric shock, since the switch does not always disconnect the phase wire.
- If there is a decorative lampshade, it must be removed.
- Press the locking bracket with your fingers using the special “antennae”. At this stage you need to be careful, as the removed stopper sometimes slips out of your fingers.
- The lamp will now hang on the wire. Holding onto it, the light bulb must be removed from the base. It is important not to pull the wire too hard to avoid tearing it off.
- The last stage is to assemble the structure in reverse order.
Fig. 3 – cartridge GU5.3.
Sometimes the stopper does not go back into place. This can happen for two reasons. The first is that the lamp is not fully inserted. The second reason is that the ring does not fit the lamp. This happens if the master mixed them up by changing several lamps at the same time.
Replacing LG TV backlight LEDs
Using a Quick 857DW+ hot-air soldering station, we solder the LED at a temperature of 280 degrees and an air flow of 5. Then we solder a new LED 35*35, 6.8V at 350 milliamps. We repeat the procedure 31 more times. To prevent damage to LEDs from thermal overheating, special equipment is used. You can acquire the skill of installing SMD components in a course on repairing modern TVs.
Replacing diodes
How to unscrew a light bulb with your own hands
Each type of fixture and lamp has its own replacement instructions, but the first steps are the same for all cases.
- Completely de-energize your home at the panel or meter. In this case, there is no need to worry about electric shock.
- To access tall chandeliers and spot lights on a suspended ceiling, find a stable stepladder or stool. When working with such fragile parts, you need to be sure of where you stand.
- We carefully stand on a stool (or remain on the floor if the light bulb can be reached without effort), working only with the switch off with dry hands.
- Further steps to replace lamps depend on their type. If these are threaded sockets, then with one hand we grasp the light bulb itself (attention, it may still be hot), and with the other we hold on to the socket. Using gentle movements, we begin to unscrew it counterclockwise. Do not squeeze the glass too hard - remember, it is thin. When unscrewing a halogen lamp, remove it only with clean and soft gloves.
- If the light bulb cannot be unscrewed, you need to try to loosen it, then it will give in.
- If it burns out because it burst, then unscrewing it will be quite difficult. How to change a broken light bulb in this case? There is nothing to grab hold of - only sharp shards of glass stick out from the cartridge. A regular potato will help you. Cut it in half, carefully place the cut on the protruding fragments, and then unscrew the remaining light bulb with gentle counterclockwise movements.
Unscrewing a broken light bulb using a potato
- Even if the fragments do not stick out, but the base is firmly seated in the socket, it can be unscrewed using an ordinary plastic bottle. Using a match or lighter, melt the neck of the bottle a little, and while the plastic is hot, insert it into the empty base. Wait a minute for the plastic inside to harden, then unscrew the rest. The E14 base can be removed using a wine stopper. This method is not suitable for replacing light bulbs in a suspended ceiling lamp.
- Long tubular fluorescent lamps have their own fixation method. To remove, grasp the body of the lamp with both hands and carefully rotate it along its axis in any direction. During the process, several characteristic clicks will be heard along the edges of the lamp - this is how it should be, these are the fasteners clicking. After turning approximately 45 degrees, the lamp contacts will appear along the edges of the mount, and it can be easily pulled out of the grooves.
Mounting a tubular fluorescent lamp
- How to change a light bulb in a spotlight? With built-in lamps the situation is a little more complicated. The lamps are secured in them using special springs made of hardened metal. To interact with them, there are special levers on the body; by pressing them, you will release the light bulb from the mount, and it can be removed. The main thing is not to overdo it with pressing the levers - they are quite fragile, they are very easy to break. In addition, if you suddenly release the light bulb, it may slip out and fall to the floor, which will lead to the formation of a large number of dangerous fragments and damage to the floor covering - not the best way to replace a lamp in a suspended ceiling.
- If you can't find any levers, but you can grasp the device with your hands, try gently turning it 90 degrees counterclockwise. How to remove a spotlight? There are fasteners that, after turning the light bulb and making a quiet click, allow you to remove it. After removing the lamp, set it aside in a safe place.
Types of lamps with different mounts
LCD display device
Before you find out how to replace a faulty backlight, you need to understand why it is needed and how the LCD screen works.
Liquid crystals are substances that have the property of fluidity, but the arrangement of molecules in them is ordered. The molecules in these substances have an elongated or disk-shaped shape. The operating principle of an LCD display is based on the property of LCD molecules to change spatial orientation under the influence of an applied electric field. In this way, you can adjust the polarization of light passing through the LCD matrix and create an image based on the principle of mixing RGB colors.
Cold cathode lamp design.
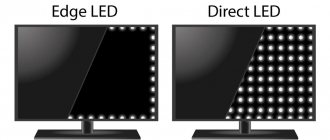
A lamp is needed to create transmitted light radiation. In most cases these are non-cathode filament fluorescent lamps (CCFL). This lamp is a sealed glass container filled with an inert gas with a small admixture of mercury. To operate, it needs a voltage source of 600..900 volts (depending on the modification), and for ignition a little more - 800..1500 volts. To create a uniform flow over the surface, a system of diffusers is used.
System for creating diffused light flux.
The lamp is the most short-lived link in the system, but replacing it with a working one yourself is not so difficult.
Replacing a lamp in a suspended ceiling
If you are planning to change LED lamps, then you should take into account that some lamps and the lamps inside them are a single whole.
In this case, you will have to change the lamp itself. The procedure is as follows.
First, remember that it is not held in the ceiling film itself, but in a special mounting platform.
Using your hands, carefully bend the lamp to see two expanding springs, due to which the fastening occurs.
These springs will need to be held during dismantling so as not to catch and tear the ceiling itself.
- press the springs inward and pull down to pull out the lamp
- disconnect the power connector and connect a new spot in its place
- now bend the springs inward with your fingers and insert them into the ring of the mounting platform
Sometimes it’s not very convenient to do this at the same time, so you start the right side first, and then, pressing the left spring, insert the entire lamp.
Please note - the lamp should not hang on the film. The springs must fit exactly into the ring, which is located behind the film.
Using your thumbs, you press the body up, finally sinking it inside the ceiling. The lamp is installed in its place. Turn on the switch and check the lighting.
Replacing the LED lamp
First, turn off the power supply to the apartment network. To perform the work you will need a chair or stepladder. When working with suspended ceilings, you must be careful not to damage the material.
Replacing the lamp is carried out as follows:
- Unlock the lamp from its mounts (the light bulb is secured with a special ring).
- Slowly unscrew the old light source. Then install a new lamp in its place.
- To insert a new light bulb, perform the above steps in reverse order. When the lamp is installed, the retaining ring must be returned to its original place.
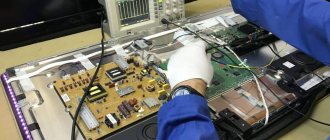
Disassembling the TV and removing the 43-inch matrix
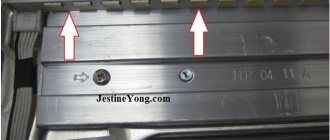
In order to disassemble the TV and get to the LEDs, you need to remove the front frame. The screws around the perimeter are unscrewed, the metal strip is carefully bent and lifted up. Repeat on all four sides of the monitor.
LG repair
Remove the matrix without damaging the cables. In this case, it is necessary to hold the matrix itself by the edge and secure the bar to prevent damage.
LG Matrix Connection Bar
Then remove the light-scattering filters. Typically filters are glued with double-sided tape. To peel them off, a dielectric thin plastic spatula is used. The next step is to disconnect the reflective filter.
Removing the reflector
Removing the diverging lenses from the bars, taking into account the mark on the lens body. This is necessary to put the lenses back into place with their exact orientation. To avoid glare on the TV screen.
diverging lens
Peeling off LED strips. For this procedure, isopropyl alcohol and a plastic spatula are used. It is important not to damage the integrity of the conductive tracks coated with white varnish. Pay attention to the integrity of the tracks under the LED. If there are burns, replace the strip.
Removing LED strips
Replacing a halogen lamp
Replacing halogen-type spotlights is practically no different from the same actions with any other light sources. Before replacing a halogen light bulb, turn off the power supply to the apartment. Then carefully remove the mount holding the lamp, remove the lamp from the socket and install a new one in the same place.
When replacing a halogen lamp, remember not to touch its glass surface. The fact is that halogen light sources operate at high temperatures, and if a little grease from your fingers gets on the surface of the bulb, the bulb will inevitably overheat and fail. If contact does occur, you need to thoroughly wipe the affected surfaces with alcohol.
Sources
- https://cxem.net/comp/comp134.php
- https://LampaGid.ru/osveshchenie/dom-i-uchastok/smena-lampochki
- https://svetilov.ru/lampochki/nakalivaniya/zamena-v-tochechnom-svetilnike
- https://svetosmotr.ru/kak-zamenit-lampochku-v-podvesnom-potolke/
- https://220.guru/osveshhenie/istochniki-sveta/zamena-lampochki.html
Signs of a backlight malfunction
The user may encounter the following phenomena:
- When you turn on the monitor, the power indicator lights up, but the screen remains dark;
- The display turns on, an image appears on it, but after a few seconds it goes out.
In the first case, there are serious reasons to assume that the monitor backlight needs to be repaired, although the fault may also be in the power supply of the lighting source. In the second, the probability of lamp failure is 90+ percent. Also, a high probability of malfunction of the light sources is indicated by the dim glow of the entire display or half, as well as the fading of half of the display.