The MKV format is universal and convenient for visualizing video content. One of its main advantages is the ability to store several audio or video tracks of the same type. At the time of playback, the user independently selects the subtitle file, voiceover language and some other multimedia components.
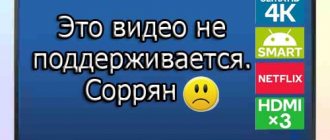
But not all modern TVs read this format. On some devices, the standard video player plays such files with errors: without sound, with the wrong frame rate, or refuses to play them at all. Let's find out how to watch MKV video on a TV and look at possible problems that may arise.
Why TV doesn't read MKV files
There are three main reasons here: a damaged file, outdated software, and some system restrictions set by the manufacturer. Let's look at each problem in more detail.
Damaged file
When the MKV format does not play on your TV, you should try running it on a personal computer . If the PC could not read it, then it is quite possible that the file is damaged. Movies downloaded from the Internet may not be packaged correctly.
The surest way to eliminate this problem is to find another, or better yet, several short videos in the MKV format and try to open them on TV. Unfortunately, nothing can be done with an incorrectly packed file - just delete it.
System limitations
It is possible that the MKV format is not readable on the TV due to restrictions set by the manufacturer. Typically this is the file size. For example, the standard Philips TV player cannot play files larger than 1.5 GB. Some older generation Samsung devices are also limited in capacity and do not play videos larger than 2.1 GB. The only way out is to re-encode the file into a smaller one with a loss of quality.
Outdated software
If the TV does not read the MKV format, then the culprit may be an outdated firmware version. The latter contains the codecs necessary to play various multimedia content. You can update the software yourself without involving third-party specialists. The TV must be connected to the network.
Firmware update via the Internet:
- Open “Smart TV Settings”.
- Go to the “Support” section.
- Find the line “Software update”.
- Select “Update via Wi-Fi”.
- We agree with the licensor and wait for the process to complete.
- Reboot the TV.
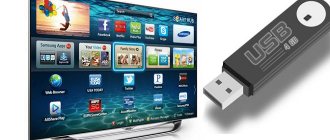
You can also update the software via a USB flash drive. This is a more labor-intensive procedure, but due to the lack of an Internet connection, it is the only possible one. To do this, you will need a flash drive with a capacity of more than 1 GB and a PC with network access.
Firmware update via USB drive:
- We go to the official website of the TV manufacturer on PC.
- Enter the TV model in the search bar.
- In the results, select the line containing the text “Software”, “Updates”, or the like.
- Download the latest firmware version and copy it to a flash drive.
- Insert the USB drive into the TV port.
- We repeat the steps indicated in the instructions above with the exception of point 4: “Update via USB”.
Important! Some models have menu items that differ from those shown. For example, on a good half of LG TVs, the “Software Update” item is called “Firmware” and is placed in the main menu.
SamyGO (installation options on TV of various series)
!!! You do everything below at your own peril and risk of “bricking” your TV!!! I strongly recommend that you connect the TV via UPS while replacing the firmware in case of electrical problems. !!! Important !!! Before you start, make sure that in the service menu: watchdog - off, rs232 - debug, OTN server - operating. This will help restore the TV using a special cable in case of serious problems, otherwise only replacing the board!!! All items are located in: Control-SubOption.
1. Set in the “Network” menu - “Network Settings” of the TV DNS Server 149.154.159.134 (for other TV models the address may be different, check on the SAMYGO website) 2. In the “Support” menu -> “Software Update” ->” “On the network” we connect to the server, it offers to download firmware version 001090. In fact, this is firmware 001015 with Jailbreak. We install it and never update it again (don’t forget to disable the “automatic firmware update” option in the TV settings. 3. After installing the firmware and rebooting the TV, return the old DNS server address and restart the TV. 4. Go to SMART HUB, in the IP address settings for synchronization widgets, set the same server address 149.154.159.134 and load the SAMYGO widget. 5. If the BrokenTV widget is installed, do not launch it under any circumstances, but immediately delete it, it means you have a temporary ban on the server and you need to wait. If SAMYGO is installed, then everything is in order, you can launch it, it will work and you can log into the TV via FTP using Total Commander.The ChannelInfo widget, which is installed with SAMYGO, is better not to launch, its launch leads to cluttering the screen with a huge information panel, which is difficult to get rid of. Here is a special widget for getting rid of: forum.samygo.tv/download/file.ph ... bcd829c056 6. In Total Commander, in the “FTP” tab, select “Connect to an FTP server” -> “Add” and enter “Connection name” - “Samsung TV” ", "Server" - IP TV, "Account" - "develop", "password" - do not enter, check the box "passive sharing mode", click "OK" and "Connect". 7. You have reached the internal disk of the TV. In the folder 0:/mtd_rwcommon/widgets/user/ there are custom widgets, immediately copy all the folders to your disk just in case (but I recommend not copying the SAMYGO widget copied from the TV to other TVs, since each model downloads its own version, which can “brick” another model; when downloading from the site, the TV model is checked and the required version of the widget is given), you can also copy the necessary widgets there, creating folders with the correct names and placing the unpacked widget files in them (not an archive). For example, the file “main.js” should be located in the folder 0:/mtd_rwcommon/widgets/user/TheDarkSmartTV/ and the path of the skin folder should look like this: 0:/mtd_rwcommon/widgets/user/TheDarkSmartTV/skins/ 8. To allow autoloading of the widget Now you only need to copy the “config.xml” file with the line y directly to the TV, the choice to autostart it will be available in SMARTHUB after the TV is restarted. 9. In the folder 0:/mtd_contents/ there are folders V0, V1 and V2, in which garbage accumulates from files launched from a flash drive in the form of a base of preview icons. If the files on the flash drive have Russian names, then the folders will contain files like ???????.??? and it is simply impossible to remove them. There is a special script for this. 10. Don’t delete or change anything else, otherwise you might end up with Malevich’s “Black Square.” 11. After turning on the TV, to log into the TV disk via FTP, you need to launch the SAMYGO widget once. After it has been processed, the virtual USB SamyGo will appear and the FTP login will open. After installing SAMYGO, it is advisable to copy the widget settings folders from the 0:/mtd_rwcommon/common/ folder, even if the widgets have been deleted from the TV. After this, you can return the original widget settings at any time simply by copying them back to the TV. The SAMYGO widget copied to your computer can later be used on the same TV for installation together with other widgets using WoodMiniWebServer, by zipping it and putting it in the folder with widgets and registering it in the widgetlist.xml file. TheDarkSmartTV server does not install SamyGO due to restrictions on the size of installed widgets - about 9.5 Gbt. To successfully launch the SamyGO widget, it is necessary that there are no other widgets in the TV autostart. If another widget is set to autorun, then before starting SamyGO you need to disable autorun, restart the TV and only then launch SamyGO.
Instructions for installing SAMYGO on 55D7000, suitable as written on the SAMYGO website (D6xxx and above) for everything starting from D6000 but not for ES!!! (tested only on D7000).
Added: 2014-01-15 21:40:54
If you run SAMYGO, copy all folders with widgets from 0:/mtd_rwcommon/widgets/user/, as well as folders with settings for these widgets from 0:/mtd_rwcommon/common/, access the folders with widgets, and then start updating, communication via FTP does not disappear, after updating the widgets, we update the panel in Totall Commander and get a freshly installed TheDarkSmartTV and TheDarkSmartTVSkins, copy them to the computer, copy back all the folders that were there, exit Smart Hub and restart the TV. Everything returns to its original state, except for the order of widgets, which must be restored manually by logging into Smart Hub. Tested on D7000, may differ on other models.
Added: 2014-01-15 21:41:09
Getting ROOT access on the E series without a develop account (IP synchronization): 1. Install the Skype widget and launch it: a) select “Login” b) select “Login when Skype starts” c) select “Login when you turn on the TV” d) sign out of Skype 2. Turn off the TV. 3. Remove all USB storage devices from the TV. 4. Using a PC, unzip the “InstallSamygo.rar” archive (yadi.sk/d/sEFNVKH74TOtm) to the root of the USB drive (FAT32 flash drive). 5. Turn on the TV. 6. Go to Smart Hub Apps. 7. Select the “Advanced” tab. Applications" at the bottom. 8. Now insert the USB device (flash drive) into the slot on the TV. a) close the “new device detected” window if it pops up. b) the SamyGO widget will automatically be added to the existing list. 9. Launch the SamyGO widget. a) press Enter, then again (wait for the procedure to complete on the screen). b) exit SamyGO. 10. Turn off the TV, remove the USB flash drive and turn on the TV. 11. Wait 2 minutes. 12. Check the FTP connection to the TV via port 21. After rebooting, SamyGO will not be in the list of applications, root access will still work. Uninstalling Skype will also remove SamyGO and root access.
Installing (updating) The Dark widget:
1. Press the button on a regular remote control Menu (or the Misc button on a touchscreen, use arrows to move to the Menu button on the screen remote control) 2. Select the menu item “Smart Functions” 3. Select “Account”. zap. Samsung", select "Login" 4. Enter "El.p.": develop (if develop is already entered - step 7) 5. Enter "Password" including the exclamation mark: sso1029dev! (if the password is entered automatically - step 7) 6. Check the “Remember password” checkbox. 7. Press “Login” 8. Exit the menu 9. Press the “Smart Hub” button 10. Select “Add. app." 11. Select “Params” 12. Select the “IP Settings” menu item and enter the server IP address (if necessary) 13. Select the “Start App Sync” menu item 14. Turn off and on the TV.
To update the widget, repeat steps 1-3, 7-11, 13-14
Getting ROOT access on the F-series without a develop account (without IP synchronization):
1. Install the Skype widget and launch it: a) select “Sign in” b) select “Sign in when Skype starts” c) select “Sign in when you turn on the TV” d) sign out of Skype 2. Turn off the TV. 3. Remove all USB storage devices from the TV. 4. Using a PC, unzip the “SamyGO_usb.zip” archive to the root of the USB drive (FAT32 flash drive). 5. Turn on the TV. 6. Go to Smart Hub Apps. 7. Select the “Advanced” tab. Applications" at the bottom. 8. Now insert the USB device (flash drive) into the slot on the TV. a) close the “new device detected” window if it pops up. b) the SamyGO widget will automatically be added to the existing list. 9. Launch the SamyGO widget. a) press Enter, then again (wait for the procedure to complete on the screen). b) exit SamyGO. 10. Turn off the TV, remove the USB flash drive and turn on the TV. 11. Wait 2 minutes. 12. Check the FTP connection to the TV via port 21.
After reboot, SamyGO will not be in the list of applications, root access will still work. Uninstalling Skype will also remove SamyGO and root access. Make a copy of the desired widget so that later, if necessary, you can install it from your PC.
Next, activate SamyGO Extensions on your TV. 13. Unpack the “SamyGO_stable.zip” archive. Rename SamyGO_stable.zip to SamyGO.zip and copy via FTP to the TV to the directory :/mtd_rwcommon/widgets/user/ 14. Using a PC, unzip the “data.zip” archive to the root of the USB drive (FAT32 flash drive) as is with the “data” folder " 15. Insert the USB flash drive into the TV. 16. Launch the SamyGO widget on the “Advanced” tab. applications" in Smart Hub. 17. Press “Enter”, if Step1 and Step2 = Ok, then the hack got into the TV. 18. Turn off the TV, remove the USB flash drive and turn on the TV. 19. Check the FTP connection to the TV via port 21 and putty telnet via port 23 or the presence of a virtual flash drive “USB disk sda: SamyGo Virt. USB" on the TV. 20. Now you can copy previously installed widgets and their settings folders to your computer.
Samsung UE55D7000/UE55H8000/UE55F9080/SEK-2500/SEK-3500
Thanks said: cadnegad1
Solving problems using third-party tools
If the methods described above do not help, then you should turn to third-party utilities and applications for help. There are two ways to go here. Install an application that allows you to watch the MKV format on your TV, or completely transcode the file.
SamyGO DCA
This is practically the only universal application that works without failures on a good half of modern TVs with Smart- TV . To install the program, you will need the SamyGO distribution kit (can be downloaded from the official website or from w3bsit3-dns.com) and a USB drive.
Important! The flash drive must be formatted under the FAT32 system. Otherwise, the application will start generating errors.
Installing SamyGO:
- Copy the application distribution kit to a flash drive. If necessary, unpack the archive.
- There should be a samygodca folder with the contents in the root directory of the USB drive.
- We connect the flash drive to the TV and install the program as a regular gaming application. In some cases, manual installation will be required: move the files to the “Game” folder of the Content Library section.
- Reboot the TV.
Playing videos using the program:
- We connect a removable disk with an MKV file to the device.
- Reboot the TV.
- Go to the library of downloaded applications.
- Find the SamyGO application and launch it.
- Close all windows and open the standard TV player.
- Playing MKV video.
Important! The program will have to be launched after each reboot (turn off) of the TV.
Format Factory
Among other PC utilities, this is one of the best converters. The program is simple, universal and has an intuitive interface. You can download it both from the official website of the developer and from specialized web resources.
Converting video to another format:
- We launch the program and on the left side of the panel click on the “-> AVI” or “-> MP4” shortcut (we’ll find out which file format the standard TV player plays in the operating instructions).
- In the window that appears, click on “Add file”.
- Select the MKV video format on your computer and click “Open”, then OK.
- Next, click on the “Start” button and wait for the process to complete.
The program also allows you to adjust the quality of the output video by reducing or increasing the size of the final file.
SamyGO is an international non-profit project created by independent enthusiasts, engineers and programmers, the main goal of which is to correct all the shortcomings and limitations of the factory software installed on Samsung TVs, as well as to connect additional TV functions that were not available before. For example, switching audio tracks while watching a movie, recording TV broadcasts from digital channels, connecting the NFS network protocol (allows you to fix the error with rewinding movies while watching them over a local network) and others. A list of these functions has already been given in the Introduction section. Almost all of them are implemented using the SamyGO application and its modules.
In order to enable any additional service, you just need to copy the required module of the SamyGO program into the TV’s memory and run it there. Moreover, on patched firmware, one (first) launch is enough, so that every time you turn on the TV, the installed function is activated automatically. User BlackByte (one of the curators of the Russian-language forum dedicated to this topic) went even further and wrote the SamyGO Auto configurator, which allows you to assemble and configure basic functions in one program window in just 2 clicks.
Important! It is assumed that you have already installed the patch firmware on your TV (where to get it and how to install it is described in the previous section). In addition, your TV must support the Content Library (CONTENT remote control button) and, in particular, one of its sections - GAME. Installation and launch of SamyGO modules will be carried out through this section.
Well, now let’s proceed directly to setting up, assembling and installing SamyGO program modules on TV:
- download the SamyGO-Auto-100701.exe (version 100701 is not the latest, but at least I didn’t have any problems with it; in later versions of the configurator, some users noted freezes and unexpected reboots of the TV);
- insert the flash drive into the USB port of the computer, since we will indicate in the program that all program modules are saved immediately to the flash drive;
- launch the program and make the necessary settings;
In this example:
f: – path to our flash drive;
Copy in TV automatically, Auto Start – automatic copying to the internal memory of the TV and autorun of SamyGO scripts every time you turn on the TV;
Telnet - just in case (if we want to manually edit files and perform other operations with the TV file system);
PVR – recording of TV programs from digital channels;
Switch – switching between audio tracks while watching movies in the TV media player (for now we deliberately do not highlight this option, since Switch “conflicts” with the current version of the PVR recording module;
ArFix2 – adds more image formats and allows you to view movies in full screen that were not “stretched” before. For TV with CI+, i.e. if you have a combination of letters CIP (for example, T-CHU CIP DEUC), you need to select the ArFix2ci+ option accordingly;
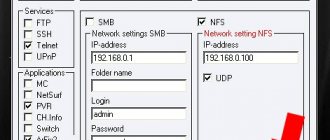
NFS - this option allows the TV to access the computer in order to watch movies over a local network without the old Samsung PC Share Manager, while eliminating the problem with rewinding movies that existed before (for NFS to work, you will also need to install an NFS server on the computer, about which will be discussed in the next section);
192.168.xxx.xxx – IP address of your computer connected to the TV (we will then install an NFS server on it and “share” folders from it);
UDP is a protocol that speeds up data transfer over the network;
NetSurf Internet browser or support for third-party Wi-Fi adapters for wireless communication, etc.).
- After you press the “GO” button, you need to wait a little while the program compiles the necessary modules and writes them to our flash drive. Also, upon completion of the program, the pvr.ini file will open (if you selected the PVR option) - this is a file for setting up the recording of digital channels, in which, by changing the line with the TARGET parameter, you can specify where to save the recorded channels (setting PVR parameters is discussed in a separate section) ;
- Upon completion of the SamyGO Auto configurator, remove the flash drive from the computer and insert it into the top USB port of the TV. The TV will automatically detect the portable device and offer you several actions to choose from - select and go to the Content Library;
- then in the section Content Management go to USB > our flash drive > A game, where we will see the SamyGO Auto program and other modules depending on what settings we chose in the previous steps. All that remains is to launch the program. Select SamyGO Auto and click Play;
- It will take a little time (20-30 seconds) to complete the SamyGO program (all this time you will observe iridescent colored waves on the screen). Returning the screen to normal mode means that the program has completed execution and has been copied to the internal memory of the TV - the next time you turn on the TV there is no need to run it again;
- in the last step we will check whether all modules have really been copied to the internal memory of the TV. To do this, let's go to the My Content > Game section, where we will see our applications (if something is not copied, you can go back to the USB > Game , select the desired application and select Copy Play ).
Note: You can similarly record to the TV memory and run other applications there. All you need to do is download the desired application from the Internet, copy the folder with the application to a flash drive, insert the flash drive into the USB port of the TV, and then proceed as in the instructions given (only other applications usually have to be copied to the TV memory manually).
After we have installed SamyGO on our TV, the next step is to install and configure the NFS server on the computer. After this, a computer connected to the TV via a local network will be perceived as if we had inserted a high-capacity flash drive into the USB port of the TV.
Source: https://samsungtvupgrade.blogspot.ru/2010/07/samygo.html
Tags
Samsung SamyGO Samsung TVs
Possible difficulties
If you have any serious problems updating your device, installing applications or utilities, you can use online services for converting multimedia files . One of the most popular is Cloud Convert. The resource interface is extremely simple: select files by clicking on Select Files, then in the drop-down context menu opposite the video, select the required format and click Start Conversion.
Important! It is worth clarifying that when using such services, traffic is spent on uploading the original and downloading the converted file.