Every subscriber connected to satellite television would like to receive the highest quality services. Therefore, the question of why the channels on Tricolor TV disappeared after the update seems quite natural.
Not a single client will agree to accept the lack of paid services and will try to solve the problem as soon as possible. Moreover, you can cope with most of the difficulties that arise on your own. To do this, it is enough to show a little patience and attention in order to understand in a calm atmosphere the reasons for what happened and try to restore communication with the satellite and the display of paid channels. And in the most difficult situations, TV viewers always have the opportunity to contact support operators who will tell you how to deal with the difficulties.
Tricolor TV channels have disappeared - how to set up
If a subscriber has paid for satellite television, not a single channel should disappear without reason for a long period of time. Therefore, the company’s clients who want to return broadcasts should first understand the reasons for what happened. In 2021, the following may lead to trouble:
- a simple settings failure;
- problems with the SMART card;
- simple failure of TV channels;
- a satellite dish turned during bad weather;
- incorrect software update;
- equipment problems;
- ice formed on the surface of the antenna.
There are other, less common reasons for the disappearance of TV channels. They can even be associated with damage to the antenna cable. But the options listed above are the most relevant and are encountered most often by subscribers.
Resetting the GI - S1025 receiver to factory settings
The way to reset the GI - S1025 receiver to factory settings is as follows. Go to the menu, select the fourth tab “System”, click “OK”. In the window that opens, select the third item “Factory settings” and confirm with “OK”.
In the new window, select “Default Settings”, then enter the requested password. As a rule, on all receivers the password is four zeros, if no one has changed anything. After entering your password, confirm your actions by clicking on “Yes”.
Having reset the receiver to factory settings, and knowing the name of the desired satellite, you can already select it in the list and scan channels. And everything will work, provided that the dish is configured and the signal arrives through the cable.
Ideally, it would be a good idea to learn how to use frequency tables. And then it will be possible to independently add new transponders, and therefore new channels, since not all satellite receivers have a blind search function.
Receiver Settings Options
Press MENU, then “Installation” and “OK”, and again “Installation” and “OK”. The required settings window will open.
- Satellite name
The first line is a list of satellites, select the one you need from it.
It is important to know! The selected satellite, i.e. its name, does not affect the tuner settings in any way.
You can select the Intelsat 15 at 85.2°E Telecard satellite in the first line of settings, and set the tuner to Tricolor Siberia using the following parameters. It’s clear, first of all, the satellite dish should be set to 56 degrees, not 85.
It is quite possible that your companion may not be in the drop-down list. It's okay, choose any one from the list and tune in to it.
LNB type
In the line - LNB Type - select the parameter of the converter used. How to find out which converter is used in your satellite system? What types of LNB are there?
The signal transmitted from the satellite can be in the C-band or Ku-band. We will not consider all possible options; we will touch only on the most common.
The C-band converter looks like this.
The Ku-band converter is like this.
To correctly determine what range the channels are in, focus primarily on the type of converter attached to your antenna.
All paid operators, without exception, broadcast in the Ku band.
In addition, the Ku-band signal can be transmitted in linear or circular polarization. Therefore, converters in this range come in two types: converters operating in linear polarization and circular polarization.
With a Ku-linear polarization range converter, set the “LNB Type” line to “Universal”. The set frequency range will be from 9750 to 10600.
In a circular polarized LNB, select the frequency 10750 MHz
For the C-band converter, the “Standard” option is selected in this line, i.e. the range of received frequencies starts from 5150 MHz
If anything else can be read on the converter you are using, the frequency parameters it uses are written on it.
TP number
Third line “TP number”. It contains a list of transponders and their parameters - transponder frequency, polarization and symbol rate.
In the GI - S 1025 receiver, the list of transponders and their parameters are edited as follows, I will explain step by step from scratch.
Press the MENU button. Select the “Install” tab, click “OK”, and again “Install” and “OK”. On the TV screen below you will see colored buttons with tips. In our case, we are interested in the yellow one, signed as TP ed. (edit transponders). Press the yellow button on the tuner remote control. In the transponder editing window that opens, perform the necessary actions using the colored buttons on the tuner remote control.
Clicking on blue deletes the entire list of transponders. The yellow button deletes the selected transponder. By clicking on green, you can add a new transponder by entering its parameters in the new window that opens. The red button is labeled “Transp.S”; when you press it, the transponder is scanned and all the channels on it are recorded.
After the operation is completed, click on EXIT and either save the changes made or not.
Where can I get the necessary data on the frequencies and their parameters of the satellite of interest? In satellite television frequency tables.
DISEqC
When there is only one LNB on the antenna, the disk in the satellite settings should be disabled - Disable (Off)
Disek or in other words disec switch between several convectors (guns). Used when you have several antennas or LNBs configured for different satellites. In the case when several satellites are used for viewing, in the tuner settings, select the DISEqC port to which the LNB configured for this satellite is connected.
- Positioner
If the antenna is not moved by a slider to another satellite by pressing a button on the remote control, then you do not have one. In the settings we leave it - Off.
- 22 k
When using a universal converter, this tab is not active. We don't need her.
- 0/12 V
By default, the setting is enabled. Leave it like that. This setting, like the previous one, is uninteresting and unnecessary.
- Polarization
The default is “Auto”, leave it that way. If you select horizontal (H) or vertical (V), only channels located on transponders with the selected polarization will be available for viewing.
- Tone signal
The default is “Off”, so leave it that way. I have no idea what this setting is responsible for in the GI-S 1025 receiver.
Power LNB
Must be included.
Let's sum it up
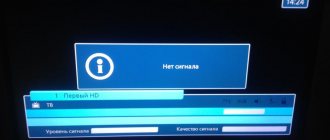
When the tuner settings are set correctly, the current one is selected from the transponder lists, the scales displaying the signal strength and quality will be filled with color. Which means the signal is present, the dish is tuned.
Otherwise, when the tuner settings are correct and the scales are not filled with color, switch your attention to the plate. Start setting up your satellite dish.
I’m not sure that the article turned out to be simple, understandable and accessible. Therefore, in case of any difficulties, when setting up the tuner yourself, ask questions in the comments. I'll try to help if I can.
And at the end of the article about setting up the tuner yourself, an entertaining video - The flight of an eagle with a camera on its back from the tallest building in the world - UAE, Dubai, Burj Khalifa (828 m). When an eagle swoops down, it's something. Impressive.
Settings failed
The easiest way is to understand how to restore channels on Tricolor TV after an update, if the cause of the incident was a simple settings failure. Sometimes even a banal reboot of the receiver (regardless of its brand, including the e212 model) allows you to return the broadcast. Additionally, you can try to reset the installed operating parameters to the factory level.
For this you will need:
- go to the main menu of the console;
- open the “settings” section (may have a different name);
- find an item mentioning factory or basic level;
- select the found inscription and click on it;
- confirm the actions taken;
- wait for the reset to complete and the start menu of the receiver to turn on;
- set the primary parameters, which include the connection region, languages, and several additional items.
After that, all that remains is to check the operation of the device and proceed to watch your favorite programs, if the described actions brought a suitable result.
Working with the remote control after basic settings
Depending on the tuner model, the control functionality may differ slightly. But with any tuner, the delivery set always includes a user manual, which consistently describes all control functions.
The result of successfully setting up a satellite TV tuner. Now the user has access to dozens of channels of various topics using the remote control
Digital tuners are quite functional devices. Therefore, in addition to the standard functions of switching from channel to channel, there are also a lot of various manipulations.
For example, all channels identified by the search can be formed in different ways, as convenient for the user:
- one column, two or three;
- quick sort;
- displaying a list of favorites, etc.
Using the remote control, you can display a list of available audio languages and set the desired language. It is also possible to choose between mono and stereo broadcasting or, if necessary, connect subtitles.
The remote control functionality, as a rule, supports the display of so-called “information banners”, which play a kind of role as a television program.
The info banner also shows the current date and time, the channel being shown, the TV program and other parameters of information broadcasting.
Information banner where the user is provided with an extensive set of data, including not only the television program, but also technical information on the equipment
The “TV Guide” functionality seems even more “advanced” in this regard, which, in addition to the current broadcast, indicates a number of other broadcasts scheduled for transmission during the short time range.
In a word, the control functions of a tuner, even the “cheapest” one by user standards, are a very rich set of manipulations that require separate study.
We also invite you to get acquainted with interesting ideas for building and setting up a TV antenna from scrap materials.
What to do if there are no Tricolor TV channels and it says “use search”
If a TV viewer has updated Tricolor TV and the channels have disappeared, and in their place an inscription appears prompting you to use the search, you should follow the advice received. In this case, clients can choose between automatic and manual search.
In the first case you will have to:
- open the main menu;
- select the section mentioning “applications”;
- click on “setup wizard”;
- start a search by specifying the desired time zone;
- wait for the running procedure to complete;
- check the results obtained.
If automatic signal acquisition does not lead to the desired result, you can try to use the manual mode.
To do this you need:
- enter the subsection of received signal sources and specify the antenna;
- switch to manual settings;
- specify the parameters (network search - on, frequency - 12226, desired satellite and speed - 27500);
- follow the instructions and prompts of the system;
- save the result.
If everything is done correctly, very soon TV viewers will be able to return to watching programs and films.
Purpose of the tuner and its location
For users, and there are many of them, who are completely ignorant of radio-television electronics, the word “tuner” is perceived as difficult to fully understand.
However, there is nothing complicated about this word, since in fact it hides the usual meaning of a signal receiver.
One of the many design variations of the receiver (tuner) of a television signal from a satellite, which traditionally represents the basis of the satellite system along with the “dish” - the satellite antenna
In this case, we are talking about a television signal receiver broadcast via satellite.
The signal received by the tuner is converted for consistent processing by the TV. As a result, the user visually perceives the television picture generated by the signal on the TV screen.
Before you start installing the tuner, we recommend reading our other articles, where we described in detail how to correctly install a satellite dish with your own hands and tune the “dish” to the satellite.
Correct installation of the tuner
After purchasing a television receiver, the user will need to configure it. That is, perform a series of sequential steps according to the instructions before the received signal is converted correctly and displayed on the TV screen.
Next, this process will be discussed in detail using the example of the tuner of the Tricolor TV system.
Even before you start setting up, the tuner should be installed on a flat, hard surface, preferably next to the TV, but no closer than 10-15 cm from the screen panel or back wall.
This is approximately how you should place the device next to the television receiver. Correct installation of the tuner - when a flat, hard surface is used and the technical distances between it and the TV are maintained
The receiver module must be installed with unobstructed air access to ventilation areas, usually the bottom and top covers or side covers. Violation of the ventilation mode can lead to overheating and malfunction of the device.
Typically the package includes:
- tuner module;
- control panel (RC);
- power adapter module;
- connecting cable type 3RCA.
The locally installed tuner must be connected to the TV using appropriate cables. This operation must be carried out with the network cable disconnected.
Interfaces and controls
The body of the standard tuner is rectangular, has a front and rear panel where operation control elements and system interfaces are located. The first ones, as a rule, occupy the front panel area. The second ones are located in the rear panel area.
The main control elements are the power on/off button, mode and channel change buttons, information display and user card slot.
The interface component of a modern tuner provides the end user with a variety of options for connecting an image output source and sound broadcast
Interfaces are usually located on the rear panel. The number of interfaces of a modern tuner is quite large and can reach more than 10:
- Under the RF cable (RF OUT) connection to TV.
- For over-the-air antenna cable (RF IN).
- Connection with another tuner (LNB OUT).
- Satellite antenna cable connection (LNB IN).
- Composite video (VIDEO).
- For connection to a computer (USB).
- TV connection (SCART).
- TV connection (HDMI).
- Connecting sound via “tulip” (AUDIO).
There, on the rear panel, there is traditionally a socket for the power adapter plug, sometimes mode switches and fuses.
Connection cable option (SCART/3RSA) that can be used when connecting the output of a satellite TV tuner to the input interface of a standard TV signal receiver
Connecting the tuner with a cable to a television receiver is usually done using a “SCART” cable (full wiring) through the appropriate connector.
However, other options are not excluded, including the RF OUT signal through the standard antenna input of the TV. But in these options, the quality of the image and sound is reduced.
After updating the Tricolor receiver, channels do not show - what to do
Those who are trying to figure out how to return channels to Tricolor TV after an update should think about whether the updated software is installed correctly. If the receiver was suddenly turned off while downloading the update, you will no longer be able to cope with the troubles on your own. The equipment will not work until a professional repairs the software and reinstalls the correct version of the program. In such situations, you only have to think about finding the nearest service center where you can take the equipment. Additionally, you can find out the phone number of the repair shop so you can call and find out under what conditions the specialists will agree to restore the equipment.
Conclusions and useful video on the topic
The author of the video demonstrates emergency tuner setup, which may be required in various cases of failure on a previously configured receiver. Such moments happen infrequently, but can be useful in user practice:
As the user instructions above demonstrate, it is quite possible to independently configure the reception of a TV signal from a satellite with a tuner. Moreover, the process is not at all complicated, as it may initially seem to an inexperienced user .
Each manufacturer completes the delivery with instructions and calls these instructions user instructions. Therefore, there is no need to order tuning from a specialist when you can really do it all yourself.
Perhaps you have had to configure the tuner yourself and you know some subtleties that we did not mention in this material? Please share information with visitors to our site - leave your comments in the block below. There you can ask questions about the topic of the article.
Other solutions
In addition to the indicated methods for restoring the Tricolor broadcast, users can take a closer look at the condition of the SMART card. It should not be bent or scratched. It is important for high-quality signal reception and display of channels and the condition of the dish. It is worth checking its position and the presence of water or ice.
Additionally, in order not to waste time on useless settings, you can call the contact center and ask for advice and support. Consultants will definitely help you understand what is happening and tell you how to restore television viewing.
Price issue
Digital terrestrial television is available to 98.4% of Russian residents. 20 TV channels can be received without a monthly fee using an over-the-air UHF antenna and a TV that supports the DVB-T2 standard. A digital set-top box is additionally required for televisions with a kinescope and plasma panels without support for the DVB-T2 standard (until 2013).
There are 253 models of television set-top boxes on the market. Of these, 63% of models are priced from 400 to 999 rubles , another 34% are from 1000 to 2791 , the remaining 3% are from 3500 to 5690 rubles .
The more expensive the model, the more additional features. Among them are YouTube viewing, an Ethernet interface, the Timeshift function - recording programs on a flash drive, rewinding videos and others.
In what cases may it be necessary to delete some channels on Tricolor
Users often encounter the problem of unnecessary TV channels appearing. These could be the following channels:
- Duplicated as a result of software updates;
- Changing the channel's broadcast frequency, which led to the absence of broadcasting;
- Family members are not interested in watching programs;
- Channels reproduced in poor quality due to equipment changes.
To enjoy watching your favorite channels and not encounter advertising information channels, you need to delete or encode them.
How to enter a new frequency, transponder and scan for new satellite channels
In most cases, we go to the menu - installations or satellite settings.
First of all, turn on the parameters, select the desired port for a specific satellite.
You can look at the disk itself, near the antenna, or select it experimentally - the signal and quality (usually two bars at the bottom) in this case should become colored.
How to enter a new frequency - transponder into a satellite receiver?
This is how we set up the disks - let's move on to setting the frequencies. This is usually done by colored buttons or by the headings of another menu. Most receiver software provides the ability to create a new transponder, frequencies, by pressing a certain button. If this is not the case, then you can safely edit an unnecessary or outdated frequency that does not accept, also by pressing the button described in the menu. Enter the required parameters, save and scan. If you look closely, scanning a certain frequency will not be difficult. Otherwise, you can scan the entire satellite, but that's okay; new channels will be available at the end of the general list of channels from all satellites.
In addition to the frequency itself, you will need to indicate the stream speed (in some receivers the stream itself is DVB-S or DVB-S2), polarity - V or H (vertical, horizontal) and sometimes FEC - 1/2, 2/3, 3/4, 5 /6, etc.
We look for frequencies or ask friends.
Afterwards we simply scan, sort (if necessary) and enjoy watching.
As already mentioned, new channels found will appear at the end of the general list of channels (usually all satellites).