Modern Smart TVs support a new technology for working with channels – OTTplayer. Some owners do not yet know about this, although this function is very useful, so we suggest considering its capabilities, as well as technical settings.
OTTplayer - what is it?
Simply put, OTTplayer (4pda) is an IPTV player. It could be called one of many and quite ordinary, if not for a number of features that distinguish it from its competitors.
Benefits include:
- lack of advertising, there is none at all;
- useful additions in the form of reminders, favorites list, etc.
- pre-installed player (no need to additionally connect VLC Player or analogue);
- decent optimization for smart TVs;
- integrated TV program guide;
- cross-platform, the player can be installed on almost all operating systems: Samsung, LG, Android and others;
- Can run on Android version 4 or later, which is useful for users of older TV boxes;
- support for the most popular standards HLS, RTSP, TS UDP, RTMP;
The only drawback is that it requires resources; 1 GB of RAM is required for comfortable operation, otherwise blockages may occur. However, it's hard to find less powerful devices these days, so we won't blame this as a significant drawback.
Features of OTTplayer for Samsung Smart TV
The application in question has not yet received the popularity it deserves, but we think that over time this problem will solve itself. Many are already trying to download OTTplayer for Samsung Smart TV to enjoy online TV, which has become quite popular lately as users have finally realized the benefits. Watching channels online is a much more cost-effective and cost-effective way to enjoy your favorite shows without paying too much. So, by connecting the widget to a Samsung TV, we get the following:
- The service will be available not only on Samsung Smart TV, but also on other devices that have the player installed and have Internet access. Of course, you will have to go through the registration procedure there too, but it won’t take much time, especially if this process has already been done on television;
- Low prices due to small infrastructure and lack of additional equipment.
- Requirements for guaranteed network throughput are reduced because information is transmitted in small, segmented streams. Obviously, despite this, the network must be persistent, otherwise the widget will not work, even if the configuration was done correctly;
- You can use your favorite playlists anywhere in the world, of course, not forgetting that this place must have the Internet and devices with the player installed. If any of these components are missing, the TV will have to wait;
- A huge number of manufacturers have predicted that users will like OTT technology and want to see the player in question on their devices. Therefore, there are so many subscriber devices on the market that work with various operating systems from Apple and Android to Microsoft;
In general, an OTT player is one of the best options for installation on a Smart TV, of course, if the TV is connected to the network and the owner knows how to manage channels or wants to learn.
Installing a channel list for IPTV on your computer
So, in order for interactive TV to be available on a computer or laptop, you need to download a player that supports the technology to the device. We will look at how to install a playlist using the example of popular applications - VLC Media Player and IP-TV Player (a VLC shell focused on watching IPTV). Downloading and installing the software is standard, as is the case with other programs on Windows, you just need to download the installer from the official website of the application, run it, and then the Installation Wizard will get involved. Installing a media player on a device is extremely simple and there is no point in describing the process in detail.
Installing a playlist in VLC Media Player
VLC is a multifunctional media player that supports all modern media formats, with a huge number of capabilities, including converting, video editing, creating web broadcasts, etc. You may already have it on your computer, but if not, we recommend installing the software. After installing the player, we find and download a suitable object in M3U format. Channel lists can be downloaded from an official source or open network resources; downloading is carried out as standard by clicking the corresponding button located next to the file.
Now let's look at how to connect a selection of TV channels:
- Launch VLC Media Player.
- In the “Media” menu, select “Open file” (or press Ctrl+O).
- We indicate the path to the object that should be opened, find it in the explorer that opens, select it, and click the “Open” button.
- VLC Media Player will start playing TV (provided that the links in the playlist are working). To view the list of channels, select “View” – Playlist from the menu (or press Ctrl + L), the desired option from the list can be selected by clicking on it.
An alternative way is to right-click on the playlist and select the “Open with” option from the context menu - VLC. You can also associate the program with this file type so that elements with this extension are always opened by it by checking the corresponding box.
Installing a playlist in IP-TV Player
Download the application installation file from the official website and install it in standard mode. When you launch IP-TV Player, you will be given the opportunity to choose to play TV broadcasts - using the provider or from a downloaded playlist.
To work with the built-in player lists, you need to click on the list to expand it and select the appropriate operator. On the right side of the media player you will see a list of available channels. Providers can block access to TV channels and also change the addresses of direct sources, but when you select the first option for working with IP-TV Player, the program will detect the changes that have occurred and download updates for this broadcast stream.
Adding new TV channels to the M3U playlist
To play an IPTV list in the player, perform the following steps:
- Click the settings icon on the bottom panel (in the form of a gear).
- ABOUT.
- In the “Channel list address” field, enter the current URL or, to insert an M3U playlist, look for it on the computer, to indicate the path, click the corresponding button on the right (“…”), and click the “Update” button in the form of a round arrow.
- Playback will start automatically, and a list of TV channels that you can navigate through will also be available in the player window.
Features of the service
This is the new era of television at its best. What does he offer? The list is impressive. Here are some features of the system in question.
- Favorite TV channels can be added to the favorites list or access to them is password protected;
- The television in question can work not only on TVs, but also on other smart devices, given that computers and smartphones have access to their data.
- The official website ottplayer.es contains a huge amount of information that allows you to work without the help of a specialist or another person. All settings can be done independently, using only virtual prompts consisting of video and text content;
Advantages of OTT player
- One of the main advantages of this player is the ability to deliver content to any playback device. More precisely, it could be a Sony TV, although the content can be played just as well on a Philips. But we had something a little different in mind, because the content can be played on a smartphone, computer or tablet, just connect the player and get stable access to the World Wide Web;
- The TV show is already built in and you don't have to worry about setting it up.
- Own integrated reader. Not all applications can boast of this.
- The required Android version is 4 or later. Currently older consoles (Android TV Box) have little choice and OTT would fit even on an older device if there was only 1GB of RAM.
- Advanced user features: reminders, favorites, etc.
- Optimized for Smart TV. Full optimization: screen aspect ratio, remote control (TV remote control) and many other sandwiches that the average user does not understand.
- Ability to record signals on various devices;
- Multiplatform. If OTT suits you, you can easily install it on all your devices running different OS (Android, Windows, IOS, MacOS, WebOS (LG Smart TV), Samsung Smart TV).
- With OTTPlayer, you can watch TV both live and recorded, allowing you to fast forward or rewind the image, just like watching a movie on your computer. Have you seen this in any free app?
- Support HLS, RTSP, TS UDP, RTMP. This means that any link to the stream will be read and all playlists will work for you.
- The ability to encrypt video content in different formats for viewing on different end devices;
Please note that these are clear advantages over other programs, and not just the listed functions, as is usually the case. I am more than sure that if you install this IPTV player now, it will become your favorite application on your device.
Disadvantages of OttPlayer
- The author's website is not always accessible, which makes registration impossible.
- There is no automatic playback of channels in full screen mode.
- It is not possible to change channels using the arrows (left/right) on the remote control.
Setting up OTTPlayer on Samsung Smart TV
The setup of the player in question on different devices is not so different, although it would be unfair to say that there are no differences at all. They exist and are fundamentally important, of course, if the user is interested in watching his playlist normally. Setting up this application takes little time, so users can simply follow the instructions and within a few minutes download a playlist to check if the system is working.
Launch OttPlayer; When you first start the system, you will be prompted to enter your registration data. Remember, you entered them when downloading the player and registering on its official website?; When the widget starts, you need to go to the “Settings” section and fill in the “Username” and “Password” fields
It is important that the registration data completely matches those indicated on the website, otherwise you will not be able to connect television of the format in question to your TV; In the same section, you can configure additional functions, and then simply click confirm the procedure, otherwise the changes will not be saved and you will have to repeat the procedure; Having successfully completed the first authorization, the new user will be asked to attach a new device or select a device that has already been registered. If you choose the second option, you need to carefully review the list that will be displayed in front of the user on the site; Using the site, download and link the playlist to your new device
In this case, we are talking about a TV, so you can choose a playlist with the largest number of channels, use paid or free resources - it all depends on the preferences and financial status of the user.
There is no need to restart the widget, the binding occurs automatically, so the user only needs to correctly carry out all the above procedures and within half an hour enjoy the unlimited capabilities of the player in question. The main thing is that the program is working and the installation is completed correctly.
Download the application
Number of downloads: 7189
Checked! No viruses or other threats were detected.
How to install an OTT player on a Samsung TV
As with any application, you first need to download the player. But there are two instructions on the Internet that say this is how you can make the application work. But users claim that they have many problems and sometimes the widget does not work at all. There could be many reasons, but if you go back and remember that there are two instructions for installing the application in question, then maybe that's it? What if one of them doesn't work? Let's start with the shortest and simplest:
- Open the website ottplayer.es - this is the main page of the application;
- Find OTTplayer among various programs and click “Download.
- Find the app store and go there;
- Open the Samsung TV menu;
- Make sure you have an Internet connection;
- Do a short registration;
As a rule, after this the program will already be on your TV, and after installation is completed it will work in the desired mode. Below is another instruction, which actually receives a lot of complaints, so it is not recommended to use it:
- Open the website ottplayer.es - this is the main page of the application and register there;
- A message appears indicating that a new device is connected.
- Insert the drive with the file into the USB port of the TV;
- Download and unpack the webOS_OTTPlayer.zip archive to the root of the flash drive;
- Go to the TV and log in from your registered account to the page;
The further procedure is as simple as cleaning the pears and consists of activating the file. But as already mentioned, this method is very unreliable and almost always does not give the desired result. That's why it's best to download the widget using the first method to ensure that it will work and that the player can be used to watch TV over an Internet connection.
Advantages of an OTT player
This player has a number of advantages:
- This is a free app, but there are no annoying recruiting ads.
- For correct operation, 1 GB of RAM is sufficient.
- Suitable for different devices: tablets, smartphones, TVs. The interface is adapted for each platform, you can easily control it using the remote control.
- Works with HLS, RTSP, TS, RTMP technologies, which allows you to process information from any of these encodings (incompatibility is practically eliminated).
- Automatically adjusts the broadcast network.
- Can group content into categories: liked, recently viewed, etc.
- You can watch both live broadcasts of channels and recordings, stop and rewind videos.
How to install OTTplayer on Philips Smart TV
- Go to the website ottplayer.es before setting up the player directly on the TV, and create an account there. Remember your username and password.
- Turn on your TV and go to the app store - there you will find OTTPlayer. Wait for the installation to complete.
- Enter the program and click “Settings” at the top right. Log in to the system using the credentials from the site mentioned above. Click Return and Apply Settings. From now on, you can create your own playlist based on the tips.
How to set up OTTplayer on Sony TVs
We think you already know how to use the application catalog. Like last time, you need to find the player there and install it, and then do the following:
- Open the section “All applications” - “Opera TV” - “For developers”.
- Click the “URL Loader” icon and enter there a link to the resource that we have already talked about.
- Click “Go” and in the window that opens on the right there is a gear wheel.
- Enter your login and password.
- Add a playlist. The video will appear and you will see if it is scaled to fit your screen. If not, then it is regulated by the yellow remote control button.
How to install an OTT player on a Samsung TV
After the OTTplayer widget is installed, you can proceed to configuration:
- Launch the application. An input line and a virtual keyboard will appear - come up with a name for your TV and enter it here.
- Open "Samsung TV Settings".
- Enter your login and password from the site.
- Click the red button to save everything. If you do not do this, you will have to fill out the fields again. If you make a mistake, click “Back” and return to the previous state.
How to set up IPTV on Samsung Smart TV?
The easiest and cheapest way to watch IPTV on TV is to download the player from the official application store.
The problem with this method is that Samsung can remove such programs at any time for copyright infringement.
At the time of publication of the article, everything is working stably.
- Open search and find the Peers TV app.
- Go to Pierce TV and download the add-on.
Now you have access to a small part of the TV channels; to watch the rest you need to download your IPTV playlist.
- To do this, go to the settings and click on the “Add playlist” section.
- Enter the address of the site where the playlist is located. You can get links on our website https://iptvmaster.ru/m3u-playlist/, I recommend using a playlist that updates automatically.
- If you specified the link correctly and the server is working with the file, the list of channels will contain tens or hundreds of sources. You can add your favorite channels to favorites for easier viewing.
- Don't forget to update your playlist on time!
Where can I get high-quality IPTV playlists for OttPlayer?
If your cable TV and Internet provider provides ]IPTV television[/anchor], and, accordingly, playlists, then everything is clear, but what about others? Of course, you can constantly surf the Internet in search of free playlists, which, as a rule, stop working after a couple of days, or are no longer working, so it is better to use relatively free services.
just $1 you will get over 1200 channels on your screens:
- ILook (flexible and customizable IPTV playlist + media library)
How to add IPTV playlists to an OTT player
Now let's talk about where to find, where and how to download playlists for the OTT player. These are text files with the .m3u extension that store links to videos. There are sites that offer their collections - you can download and use, but be careful - do not trust dubious sources.
You can also create them yourself in Notepad using the following formula:
- # EXTM3U (written without modifications);
- https://nazvanie.com/online/play/145 (link to resource).
- #EXTINF: 0, Comedy (channel name);
The document should contain the entire collection formatted this way, so click "File" - "Save As...", select "All formats" and save as "name.m3u".
You can also download someone's document with a playlist and simply fix some links, replacing uninteresting ones with something useful. So you don't have to constantly refer to the sample provided and worry that a mistake was made somewhere.
How to add a ready-made playlist to the player:
- go to the website ottplayer.es under your name;
- you'll see a playlist ready to play - you can play it and watch.
- click "Submit";
- call it something, but so that later you understand what it contains;
- now open the player widget, log in again;
- insert a link to the source or attach the same file that you created (downloaded) earlier;
- open “Playlist” - “New playlist”;
- indicates what devices you play it on (in addition to TV, it can be a smartphone, tablet or computer);
Of course, this scheme is relevant not only for video content - music collections are created in the same way. You can create several short or long thematic playlists that will play for several hours - it all depends on your desire.
OttPlayer Registration
Of course, you can immediately throw the playlist into the player and start watching TV, but without registration you will not experience all the delights of the service! The whole process won't even take you a couple of minutes!
Go to https://ottplayer.es/account/registration and register, I advise you to use not telegram, but traditionally - email and password!
Registration on the service: create and enter your username and password and enter your email
Afterwards, go to your email and confirm your registration on the service!
Why doesn't OTTplayer work?
Occasionally, problems arise with the functioning of OTTplayer, but even the developers themselves have not provided any specific advice on how to resolve them.
Now the best:
- Check the playlist first. It is recommended to add another one that is clearly working.
- We check the correctness of the information provided to enter your personal account. Most likely, one or more characters are incorrect and the player simply cannot recover the playlist data.
- Try reinstalling the player in an alternative way: if you did it via IP, try through the archive or store and vice versa.
OTTplayer is a worthy representative of IPTV players with all the necessary functions, but it does not have a very convenient approach to adding playlists. Working with collections through the site requires the use of a computer, which allows you to get the job done quickly, but using an additional device creates unnecessary inconvenience. But we can control channels from almost anywhere on Earth.
Sources
- https://tvoykomputer.ru/kak-zagruzit-plejlist-v-ottplayer/
- https://nastroyvse.ru/tv/kak-ustanovit-ottplayer-na-televizore.html
- https://smtvplay.ru/ott-player-smart-tv.html
- https://ProSmartTV.ru/iptv/ott-pleer.html
- https://IPTVMaster.ru/nastroyka-iptv-televizorah-samsung/
- https://planshet-info.ru/kompjutery/kak-nastroit-ottplayer-na-smart-tv-samsung
- https://ProSmartTV.ru/iptv/ottplayer-dlya-samsung.html
- https://dtv.plus/ottplayer/
How to download an IPTV playlist in Android applications and Smart TV set-top boxes
There is nothing easier than organizing IPTV viewing on Android. If you have a mobile device running on Android OS or a Smart TV box using this operating system, all that remains is to install the appropriate software that allows you to play content of this format, import a suitable playlist into the program and enjoy watching numerous TV channels.
The Android software can be downloaded from the Google Play Market app store. You can download for free any of the players that support the playlist format; the best options today are IPTV, Kodi, OttPlayer, Lazy IPTV, Perfect Player IPTV. Downloading and installing is no different from installing any other Android applications. In the case of a set-top box, one of the applications may already be preinstalled.
There are two main ways to add a playlist to the player:
- Indication of the URL of the list of TV channels (the link may also be provided by your provider).
- Loading from the device memory (you first need to download the working playlist in a suitable format, usually M3U, but other file extensions may be supported).
https://youtube.com/watch?v=JPWHLOAZSiA
How can I download a playlist to IPTV Player?
Let's look at how to perform the task using a simple application called IPTV as an example:
- Download and install the software on the device, launch it.
- Click “Add playlist” and select the adding method. You can add a URL or select an M3U file from your device.
The first option, which involves entering the address from the remote control, if we are talking about a set-top box, is an exciting activity. But it is good because it is possible to update the file online from the server (this is provided that the links are kept up to date). The second option is easier to perform on a set-top box if a suitable playlist has previously been downloaded to the device’s memory.
- When the file is downloaded, a list will appear, sorted by category.
- We select a TV channel, after which a player will be offered to play it (MX Player), and we allow the software access to the content on the device.
Setting up Kodi to watch IPTV
If the software was already pre-installed on your device, it is better to remove it and install it again from the Play Market. This will avoid possible errors in the application.
Set up Kodi as follows:
- Open Kodi.
- If the interface is in English, enable Russian manually: System – Settings – Addons – OK – Install from repository – Look and feel – Languages – Russian – Install – Yes.
- To turn on the TV, go to the menu System – Settings – General – Enable. Click “OK” after the message and PVR IPTV Simple Client – Enable.
Alternative method: System – Settings – Add-ons – My Add-ons – PVR Clients – PVR IPTV Simple Client – Enable.
Load the playlist into Perfect Player on the Android console:
- Open the player, click “OK” on the control panel.
- Go to Settings by clicking the gear icon.
- Go to the “Basic” section, then select “Playlist”.
- In the window that opens, indicate the path to the object or click the folder icon at the top right to select a file from the device, click the “Ok” button.
- Ready. A selection of channels is now available.
Selecting a language in an IPTV program
As you can see, adding sheet-IPTV on Android is not difficult. There should be no problems with other software either, since all actions are performed according to the same principle. The source from which TV is broadcast is either a URL address or an M3U file downloaded to the Android device.
Installing Simple Smart IPTV
Many “newly” happy owners of Samsung smart TVs are faced with a problem after connecting them to the Internet.
An expensive gadget does not live up to the user’s expectations and broadcasts regular channels that were available to him to watch from a regular TV.
note
The fact is that in addition to the contract with the provider for Internet communication services and IPTV, you also need a program for viewing “TV Player”.
Some utilities are available for installation for free, including Simple Smart IPTV. Since 2013, this application has been actively used not only in the Russian Federation and neighboring countries, but also in the countries of South America and Europe.
Where to download and how to install?
- The Simple Smart IPTV application works perfectly with any Samsung Smart TV model, the main thing is that the model series is not lower than “D”.
- Although the settings interface is different for different models, the essence of the actions when installing the program is the same, except for the “J” models.
- The sequence of actions to install the “SS-IPTV” TV player on a TV consists of the following steps:
- Go to the TV menu and open the “Smart Functions” tab;
- Next, go to the “Samsung Account” tab;
- Log in to your account by typing your login and access code. If there are none, you will need to register. To this end, click “Create” and comply with the requirements of the messages that appear. It is recommended to indicate “develop” in the login column. If the TV model is “E”, then a six-digit password should be entered in the access code field, and in models “H” and “F” a password is not needed;
- Re-enter the “Smart Functions” section;
- Click “Open Smart Hub”;
- Next, click “Additional applications”;
- Then go to the “Options” tab;
- Click “IP setting”;
- After this, a menu will be displayed where you can type “91.122.100.196”;
- Open the “Settings” tab;
- Click “Start App Sync”;
- Wait for the process to complete;
- The “SS-IPTV” icon will be displayed in the “Additional Applications” tab;
- Ready. Installation completed successfully.
Owners of J series models will need to do the following:
- On your computer, through any Internet browser, enter the “Samsung Smart Hub” store;
- Register and download the “SS-IPTV” application;
- Next, insert a flash drive into the USB port and create a folder in it called “userwidget”;
- Move the downloaded program to the created folder on removable media;
- Insert the external drive into the USB port of the Smart TV;
- Wait for the automatic installation of the program from the flash drive to the TV to complete;
- Ready.
The application is now ready to use. After launching it, you can download playlists and enjoy watching high-quality interactive television broadcasts.
Loading playlists
All user playlists are located in the “Settings” tab. Clicking on any of the playlists will display a specific list of television channels.
- Enter the “Content” tab;
- Select a playlist and click “Add”;
- Come up with and print a name;
- Click “Save”.
- Enter “Settings”;
- Go to the “General” tab;
- Click “Get code”;
- Wait for the process of automatically generating a one-time code to complete (it will be valid for one day);
- Then open the “SS IPTV” page and enter the “Playlist Editor” column;
- Print the generated password;
- Click “Add device”;
- Open the sheet and then click save;
- Ready. The settings menu will display an icon for the new, freshly downloaded playlist.
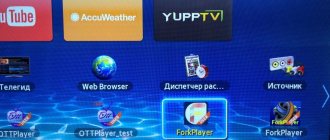
ForkPlayer
ForkPlayer is another very popular program installed on Smart TV, which provides convenient search and online viewing of movies and channels.
How to download and install?
You can download it from the official source of the widget developer, as well as through the Play Market from Google. Of course, it is also available on many third-party resources, but it is not recommended to use them if you are not completely sure of the security of the content in them.
- If the Samsung smart TV was manufactured before 2014, then installation is carried out using a widget sheet. You should follow the user instructions supplied by the developers for the specific TV model;
- In some production models, starting from 2010, the synchronization function with IP “46.36.222.114” is available, after which the program is installed automatically;
- If the TV is of the “J” series (manufactured no earlier than 2015), then installation is possible only via an external USB drive (you should study the instructions for the specific TV model).
After launching the widget, the user immediately has access to the current video and audio quality parameters, as well as its brief description.
Playlists are located in the “Store Portal's” section. If the user registers on the official Samsung resource, then numerous additional options will become available through ForkPlayer, for example, saving links, external playlists, importing bookmarks from other user devices.
Other useful programs are available in the Fork Store App Market, for example, for displaying video content and photos from social networks on the large screen of a Samsung Smart TV.
Source: https://nastrojkin.ru/television/smarttv/tv-pleer-dlya-smart-tv-samsung.html
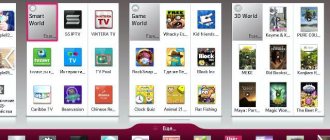
Installing third-party widgets on Smart TV (using the example of Samsung, LG and Philips)
Smart TV is good because the TV's capabilities can be expanded with widgets. Usually they are installed from built-in stores, but sometimes you want to add applications from third-party developers.
To make Smart TV even smarter, install third-party widgets using a flash drive, ForkPlayer or application IP addresses.
Samsung
Standard widgets are installed through the built-in Samsung Apps store. With third-party applications the situation is a little more complicated. Samsung has limited the ability to install them, but this ban can be circumvented. To install third-party widgets, you will need a flash drive. Format it to FAT32. For this:
- Connect the flash drive to your computer.
- Open Computer and right-click on the drive.
- Select Format .
- Select FAT32 .
- Click Get Started .
Formatting will delete all data on the drive. All that remains is to prepare it for installing widgets on Samsung Smart TV.
- Open the flash drive.
- Create a folder "userwidget".
- Download archives with widgets and drop them into a folder without unpacking.
- Connect the drive to your TV.
The installation of widgets from the flash drive will begin automatically and end with the message “Package is done.” After this, a new widget will appear in the Smart TV menu.
In addition, widgets on Samsung can be downloaded by IP address. To do this, press the “Smart Hub” and “A” buttons. Enter the username “develop”. The password will be entered automatically on all series except F - on TVs of this series you need to use the “sso1029dev!” key.
Next, you need to click the “Tools” button to get into the settings, go to the “Development” section, and enter the address of the application that you want to install.
What is OTT
The technology under consideration is something new and unusual, since thanks to it it is possible to deliver TV content with only the Internet, without using satellite television services. This is very convenient and certainly better than in the case of buying a bunch of equipment and other accessories, and also having to pay a monthly payment for the services provided. As a result, the user receives several dozen channels, which, frankly speaking, are not of very high quality.
- One of the main advantages of this player is the ability to deliver content to any playback device. More precisely, it could be a Sony TV, although the content could just as easily be played on Philips. But that’s not what we meant, because the content can be played on a smartphone, computer or tablet, you just need to install the player and have stable access to the World Wide Web;
- The ability to encrypt video content in different formats in order to watch it on different end devices;
- Ability to record signals on various devices;
- Thanks to OTTPlayer, you can watch TV both in real time and in recording, which allows you to rewind the picture forward or backward, just like when watching a movie on a computer.
These are not all the advantages of the technology in question over other, more familiar analogues, but they are what people ask about when they think about connecting content. Although we should not forget about the simple connection diagram, which is also quite interesting for the user.
How to add a playlist to OTTplayer?
Due to its low prevalence, it is a little difficult to figure out how to use OTTplayer, and there are practically no full-fledged materials on the Internet. Well, let's be the first.
How to install OTTplayer on LG TV and add a playlist:
- Unpack the contents of the archive into the root directory of the USB drive.
- We log in to our own profile on the TV.
- We connect the media, click on the image of the house and scroll to the right until you find the widget among the launcher list.
- We indicate your personal information and complete the procedure with a confirmation that will be sent to your mailbox.
- On the website, go to the “Playlists” tab and provide a link to a selection of channels or download a file.
- Open the application on the TV, enter your login information and enjoy watching.
By the way, OTTplayer for Samsung Smart TV is installed according to a slightly different principle. You should go to the “Developer” section, preferably from a new account, and enter 88.150.252.53 in the “Server IP” line. All that remains is to start synchronization with the “Synchronize” button. On Android it's even easier, just use the app store.
How to install OTT Player on Philips Smart TV
The following steps are suitable if you want to connect this technology to Philips, Sony, Samsung TVs and devices of other brands. For all this to work, as you already understand, you need to not only find, but download and install OTTPlayer. This can be done on the application market, which is available to every smart device. For example, for Samsung it is Samsung Apps, and so on. Further instructions look like this:
- Launch the OTTPlayer widget on your Sony TV or any other one;
- After launch, the program window will appear, where in the upper right corner there will be a button labeled “Settings” or “Options”, depending on which version of the player was downloaded;
- The support service has sent the data, and you need to enter it in the “Login” and “Password” fields. After this, on the Sony TV remote control you need to press the “Return” key to save the settings;
- Give the device a name, and it doesn’t matter what it is;
- The support service will add a playlist, but it cannot be used yet. You need to click “Updates to apply the settings.” Having done everything correctly, this playlist will be added to you and given access to it.
As for the display of the list in the TV menu, this can also be adjusted depending on personal preferences, desire and the TV menu. The player in question opens up many possibilities for TVs of various brands.
Setting up Ace Stream for ForkPlayer
Acestream uses magnet links through content identifiers. These content IDs are unique and assigned to streaming channels and once you get these content IDs, you can stream your desired content instantly.
In general, Acestream runs on BitTorrent technology. Torrent laws differ from country to country. However, many people are unaware that streaming copyrighted content is illegal, regardless of whether you do it through Kodi, extratorrents or Acestream
Therefore, it is imperative that you use some kind of protection to avoid trouble with the law
To avoid legal problems when streaming on Acestream channels, you should use a VPN. Most ISPs monitor torrent activity, and if you don't use a VPN service, you risk being exposed to streaming copyrighted content and your ISP may throttle your connections, meaning you can no longer access service. Hence, a VPN is essential for your online security as well as to access geo-restricted content. We recommend FastestVPN, which have high-speed servers optimized for streaming.
How to download Acestream on different devices?
Acestream is only available for Android and Windows, so to install Ace Player HD and watch the required content, you must have a Windows PC or any other Android device. To get Acestream for Windows and Android, follow the simple instructions below:
How to install Acestream on Windows
- in Chrome, Firefox or any other browser.
- Download the Ace Player HD app.
- Install the player on your Windows device by accepting the license agreement.
- Uncheck the "Visit the Ace Stream website and test installed software" option if you do not want to test the application and continue using the application.
- Launch Ace Player and select "Media".
- Select "Open Ace Stream Content ID" and enter the desired channel's Content ID in the field.
- Click Play.
How to install Acestream on Android
- Visit acestream.org from your Android device
- Download Ace Player from the website or search directly from the Play Store.
- Install the player on your Android device
- Launch Ace Player
- Click on the menu in the top right corner and select Enter Content ID and enter the Content ID of your desired channel in the field.
- Click Open
Casting Ace Stream from your Android phone or tablet to your TV is actually as easy as watching it on the phone itself. Let's look at the algorithms.
Complete setup of ForkPlayer
I recommend that you carefully go through the instructions and configure ForkPlayer in a way that is convenient for you. I will show you how to set up the main, in my opinion, moments in the player.
1. Press the red button on the remote control to open Menu - Application Settings.
2. Make sure the Live Search feature is enabled. She is responsible for hints during the search, so that you can type 3 letters, and the name of the movie will already appear.
3. If you wish, you can disable adult content. Also at number 17 there is a parental control function.
Changing data in the settings is easy: use the left-right arrows or the OK button.
4. Adjust the maximum video quality depending on the Internet speed. This clause applies only to some movie portals; others will continue to show 4K films even with a 1080p limit.
5. Important point. Points 8 and 9 are responsible for players. They come in four types: Media Player, VIMU, JW Player and HTML Player.
6. RemoteFork is needed to download files and playlists from a PC/phone to TV, and watch torrents. Ace Stream is also needed to play torrent trackers.
7. Points 21 and 22 are responsible for where all settings, start screen, etc. will be stored. If you use an Android console or Mag Auro, then store the data on the server, and if you access ForkPlayer through a browser, then save the information locally.
I don’t recommend changing your preferred server, let it remain Auto.
Setting up the start menu (screen) in ForkPlayer
I'll show you how to customize the start menu in ForkPlayer: hide standard sites, add to favorites, etc.
1. Click on the Favorites section.
2. Here you can enable or disable the search bar.
3. To move a site/widget from the best to favorites, hold down the red button and call up the menu. In this way you can add to favorites, bookmarks or customize the site.
4. For example, I transferred YouTube. To hide the section with the “best” sites, click on the “Best” inscription.
5. Reduce the "Best" tab to 0 rows.
6. Now you can save the necessary portals in your favorites and remove unnecessary ones!
How to add a new playlist or site to the launch pad?
1. Enter the playlist address in the search bar.
2. Click on the star icon and select where you want to save the IPTV playlist.
3. For example, I saved it to the start menu.
4. There is a second way: open Add a shortcut.
5. Specify the title and URL of the link. The resource will be added in the same way as in the previous method.
How to add a new portal?
1. The algorithm of actions is no different from adding a playlist. Enter the portal address in the search.
2. Add to the start menu or bookmarks bar by clicking on the star icon.
How to rename a shortcut?
To rename a site, hover over it and click the red button. Go to Edit - Rename.
Also in this menu you can delete a shortcut, move and change the icon.
How to open a new tab?
ForkPlayer's design is a bit old, so many users get confused and can't open a new tab to launch a second site without closing the first one.
This is done easily: move the cursor to the name of the portal and move to the right to the plus icon. Click on it and the start menu will open.
Internal and external bookmarks in ForkPlayer
Bookmarks are especially useful when creating playlists, be it IPTV or regular movies. You can sort them by category and create your own sections.
How to add a channel/movie to an internal bookmark?
1. Open any playlist. Hover over a channel and click the red button and select Add to bookmarks. Bookmark self-updating and IPTV.
Repeat the steps with the desired TV channels or films.
2. Return to the start menu, hover over any shortcut and press the red button. Open internal bookmarks.
3. Go to the section you need.
By the way, by clicking on Add folder, you can add another one. For example, "Bookmarks / Music".
4. This is what a custom playlist looks like in internal bookmarks.
External bookmarks
External bookmarks in ForkPlayer are needed to synchronize folders and playlists between your devices. To do this, use an account on forkplayer.tv
1. In the start menu, click on the icon with three horizontal stripes, as shown in the screenshot. Open the My Account tab - Login.
2. Enter your username and password or register.
3. After successful authorization, your account will be displayed in that line. (Test12 is my username).
4. Click on the yellow button or the red one, and then go to external bookmarks.
5. All playlists, files and folders from the account are displayed here. Right now there is only a test folder.