Channels on the domestically produced TV “Horizon” can be tuned in without any special effort, like models from other companies. Consequently, there should not be any difficulties in resolving this issue. For those who are encountering Horizon for the first time, these recommendations will be suitable. You will need
- – TV “Horizon”;
- - remote control;
- - TV antenna.
Instructions
1. Tuning channels on a TV is not difficult. But to do this, you first need to connect an antenna to it and plug it into the network. Set your Horizon to the operating mode by clicking the “Network” button and start setting it up. 2. Pick up the remote control that came with your TV. Include the channel sequence number you require. After this, press the “menu” button on the remote control, which will take you to the process of setting up channels. A multi-level menu is called up by repeatedly pressing the SL key. TV channel settings will appear if you hold this button for more than 2 seconds. 3. At the same time, you can indicate what type of adjustment you will use: manual or mechanical. Method 2 is much more comfortable. In this case, you don’t have to do anything, because the TV itself will search for the channels it receives. You will only need to assign it to the selected button. 4. Also during settings, you can search for television stations by frequency or by broadcast channel number. 5. Take your time while setting up, look through all the options. It is possible that reception on a different range will be better. Pay attention to the quality of the picture and sound. If there are TV interference, ripples, third-party noise results, look for another option. If you are satisfied with the detected channel, save it to the selected button. To secure the result, just click “OK” or “Save”. 6. Settings for the entire channel are made individually. When you have saved all the selected stations, check their quality again. Scroll through the channels using either the number buttons or the P+ (to go forward) and P- (to go back) channel cycling buttons. If everything is typical, the channels are detected, sit back comfortably and enjoy watching TV programs.
Currently, cable (satellite) television has become widespread, in which a large number of television programs can be transmitted via one cable. You can watch them both on a regular TV and on a computer to which a TV tuner is connected. In such cases, you can set up a television channel using several methods.
You will need
- TV, tuner
Instructions
1. To manually configure the TV for all programs transmitted via cable, enter the main menu of the TV. Select “channel settings”. In this menu window, select “auto-tuning”. The TV will step through all frequencies, remembering those at which a signal is present. 2. For manual setup, select “manual setup”. In this menu, select the channel number, the desired range and click the “search” button. After the system captures the settings of any channel, click “save” to save or “search” to search for a further channel. Sort the channels in the desired order by first switching the TV to this channel, then changing the channel number, and then saving the new settings. 3. To configure the tuner installed in the system unit, install the driver and software from the CD that came with the tuner. Connect the antenna cable to the tuner input. When you first start the program, you will be offered to configure the tuner mechanically. Agree for auto-configuration or skip this step for further manual configuration. 4. To manually configure the tuner, click the “setup” button on the program panel. In the window that opens, select the “channel” tab. In this tab, select the input from which the signal should come (cable or antenna). After that, select the country and region in which you live. Below, select the color signal format. Click the "auto scan" button. After completing the search, select from the list in the table (by checking or unchecking the corresponding lines in the “remember” column of the table) the channels . After this (if necessary), sign the selected channels in the “channel name” column. To restrict access to some channels, assign a password by clicking on the “password” button. Later, check these channels in the “lock with password” column. Arrange the channels in the order you want using the channel sort feature. Click the "save" and "ok" button. Video on the topic Please note! In fact, if your system has several signal sources, then you don’t have to configure your TV or projector for all of them. More precisely, you will need to correctly configure the video device once, and after that only slightly adjust the parameters for different sources. Helpful advice Unfortunately, modern TV manufacturers set up their products in a truly shoddy manner, since they are not interested in ensuring that their displays correspond to the existing color standards, but in increasing sales of these same displays. How to set the contrast parameter to positive?
A large number of TV channels is no longer a dream, but a reality. In fact, the entire average family has access to more than 20 channels. And yet, the desires are growing, and over time, many TV viewers feel that channels freely received by their antenna.
You will need
- operating instructions for the TV, satellite receiver, knowledge of the frequencies of reception of digital channels, multifeed.
Instructions
1. In order to expand the likelihood of your TV, do not strictly call an expert. Setting up additional channels depends on what type of television you have at home. If you are the owner of cable TV, then you can try to increase the number of signals by setting up digital channels . The algorithm for setting them is determined by the manufacturer model of your TV receiver. 2. In this regard, make settings in accordance with the instructions for use of your TV. In the manual for using the TV receiver, find a list of received signals (in the “technical parameters/characteristics” section). 3. Find “Cable” in the list of received signals and select as the signal source. In the settings, set one of the receiving countries: Finland, Germany, the Netherlands. If the country data is not in the options of your TV, then check the “other” box. 4. Look at the reception parameters of digital channels and their placement by frequency. In accordance with this plan (shown in table form), configure additional digital channels . 5. If you have already connected satellite TV, then the algorithm for setting up additional channels is slightly different. If you have a “Mainland TV” satellite dish, install the multifeed according to the instructions. Later, connect the additional converter directly to the receiver and select the desired satellite in it (say, ABS1). 6. Set the LNB type to “universal1” (09750/10600) and select any working transponder (you will find lists of transponders for ABS1 satellites on the Internet). During setup, monitor the quality and level of the signal until you achieve the desired result. 7. Setting up additional channels on other types of satellite antennas usually has a similar algorithm of actions. The main thing is to strictly follow the instructions for the supplied television equipment. 8. If you have an ordinary TV antenna, it will be able to broadcast more channels only if you, traveling with it around the apartment (as far as the cable allows), suddenly pick up reception of other signals. Compared to cable and satellite television, the likelihood of such an antenna is minimal.
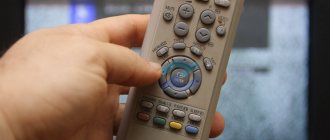
To change channels, the TV remote control has a special numeric keypad. Data input for switched channels is carried out in various modes.
You will need
- - remote control.
Instructions
1. Observe the channel switching mode in your TV model in the user manual. Make sure that it can switch between single-character and multi-character keyboard input. 2. If changing the mode is available, but the required button is not available on the remote control, you can replace the remote control device with another remote control, one that would fit your TV model and would have a special button with the function of switching the mode for entering broadcast channel numbers. This is quite comfortable for those who can watch a large number of channels. 3. Carefully examine the remote control buttons and find a button on it marked -/–, this will be the mode switch. In single-character input mode, you simply need to press the button corresponding to the channel number, the one you want to turn on. This is convenient for those who have no more than 9 channels configured and do not have to enter two-digit numbers. 4. If you have configured more positions of received channels, use this button to switch the mode. Let's say, if you need to go to channel number 18, then in normal mode you can switch it only by sequentially pressing the arrow button after channel 9, and in a two-character mode you can simply press stepwise the numbers 1 and 8. 5. In case If your remote control does not support one of the input modes, use your usual channel switching method. Please note that some TVs support both modes of entering channel numbers at the same time; for this, if you need to switch to one of the channels in the top ten, simply enter its number and wait until it switches. If you need to switch to two-character mode, immediately press the second digit. Video on the topic Helpful advice About switching modes, ask the seller in advance.
A regular control does not require configuration. If you bought a multifunctional remote control , it will only work with your TV after advance preparation. Some of them require learning commands from a genuine remote control , others require programming the unit model number.
Instructions
1. the so-called learning remote control only if you still have the original one. Press the button on it prepared for starting training (its name depends on the type of device). 2. Select one of several devices that you are going to control, and then, pointing the remote controls at each other, step by step press the buttons on the learning remote . In some devices, you first need to press the button on the learning remote control , and then the corresponding her key is on the genuine one, and in others - on the contrary. 3. When you have finished learning, press the key provided to exit this mode. Do not throw away the original remote control - after replacing the batteries in the learner, you will need it again. 4. If the remote control is programmable, first find the digital codes in the instructions that correspond to the manufacturers of the equipment you have and scratch them on the inside of the battery compartment cover. 5. Save the instructions in case you change one of the units, and the original remote control , too, in case the programmable one breaks. Press the “PROG” button and at the same time press the device type button (there are six of each). The indicator LED (visible color) will light up. 6. Now enter the digital code and the LED will go out. Program the numbers of other devices in the same way. 7. To use either a teachable or a programmable remote , select the device you want to control and the unit will switch to command mode for that device. After this, use the universal remote control in the same way as a regular one. 8. If the universal remote control freezes, remove the batteries from it, short-circuit the compartment contacts for a moment (but in no case the batteries themselves), then remove the jumper and install the batteries in place, observing the polarity. 9. Later, repeat the training or programming. If the cells are discharged, proceed in the same way, but with new batteries. Note! You can change the settings and order of channels at any time. The rule of action is as described above.
- How to set up a Samsung Smart TV - step by step instructions
Content:
Before you can enjoy watching your favorite movies or TV shows, you need to configure the channels on your device. Setting up a TV is a rather complex and responsible procedure, which, firstly, includes searching for channels, and secondly, it will allow you to remove unnecessary things and rank the list by frequency of views.
This procedure is especially relevant in our time, when the list of channels is regularly updated, which leads to failure of all previously specified settings. When working with cable and satellite television, the task of setting up a TV becomes more complicated.
Problems during setup and their solutions
The correct setup algorithm does not cause problems when searching and viewing digital television channels on Samsung TV. However, users sometimes encounter some glitches.
The channel list is missing
Samsung TVs equipped with Smart TV periodically update their software. After this process, which by default occurs without user intervention, the settings are reset. You need to re-search for available broadcasts and sort the list if necessary. Automatic updates can be disabled in settings .
Advice! It is recommended to manually check for new versions quarterly. When updating, the list of programs will also be reset, but the user will be able to take time to search and restore other settings.
TV or set-top box does not see channels
Most often, the problem when a Samsung TV does not find broadcasts lies in the antenna unit. Probably the wrong model was selected, or it was installed and configured incorrectly. You can check the serviceability of the amplifier and purchase another, more powerful antenna.
If certain broadcasts suddenly stop showing, it is recommended to check your cable network. The wire is inspected for kinks, breaks, or abrasions in the insulation. If necessary, damaged areas are replaced. F-connectors are inspected and serviced if they are used in a cable network. Contact pads are cleaned of oxides and dirt. Then the connectors are screwed tightly.
Why doesn't automatic tuning of TV channels work?
Modern models of television receivers support both manual and automatic channel tuning. Most TV viewers use automatic search, which copes with the assigned tasks perfectly; the user can only remove unnecessary channels from the presented list.
However, for various reasons, sensitive equipment may not be able to recognize the scan range or signal source. In this case, the procedure must be carried out manually.
As practice shows, there are no particular advantages in choosing one or another method of setting up channels. And if the automatic mode can save the user’s time and is suitable even for inexperienced TV viewers, then the second option will require more time and special knowledge, but at the same time provides more detailed channel settings even with poor reception quality.
In particularly difficult cases, you should use the services of a professional teleworker. The cost of his services will depend on the region of residence, distance from the workshop and the company’s pricing policy. In addition, today there are a number of volunteer organizations that help everyone switch to the new broadcast format free of charge.
Standard manual control
To understand how to set up a TV without a remote control, you need to understand the standard values and keys. They are available in all types of TVs. And these include:
- Turn on or POWER. It is located separately and is usually larger in size than other keys.
- Go to the menu section - . There are TV models where the same key is used to turn it on, only in this case it must be held for 10-15 seconds.
- The confirmation key for the selected actions is OK. There are options where you need to double-click on it to go to the menu.
- Switching channels - signs. Located next to each other. They are also used for menu navigation.
- Volume control - indicated by + and -. Also needed for navigation.
Separately, older versions of TVs have a button for switching the signal source. It is designated "AV". In new versions, the broadcast source is selected through the menu.
In new TVs from Panasonic, Philips, Samsung, the control keys resemble a game joystick, next to which there is an on/off button.
How to set up a new TV
In order to set up a new TV and connect it to a regular antenna, you need to select your native language on the device. To do this, you need to connect the antenna cable to the successor, then by long pressing the “OK” button on the remote control, go to the Menu, where you select the LANGUAGE item. We mark the language RUSSIAN, after which all settings will be automatically translated into Russian.
Features of automatic channel tuning
How to set up your TV automatically? To complete the procedure, you will need to perform the following algorithm of actions:
- We turn on the receiver, after which a message will appear on the screen stating that “Channels are not configured”;
- Using the remote control, go to the Menu, where we select “Channel settings” - “Automatic tuning”;
- Don't forget to indicate the type of broadcast - digital or analogue.
- Press ENTER/OK.
After completing all the steps, the TV will begin tuning channels, scanning the frequency range available to it. On average, Auto Tuning takes no more than a few minutes, after which all saved TV channels are displayed on the screen. If nothing works out, don’t panic. We carefully study the instructions for the device. It must provide detailed descriptions of the settings for this model.
- FAQ
If the operator adds new channels, the setup will have to be done again using the editing option. In this case, the previously created list of TV channels is saved, new items are simply added to it. You can delete the old list using the appropriate command, after which you will have to search again.
Manual channel tuning
If the automatic tuning of TV channels does not work correctly, then you need to use the manual search option. With its help, the viewer decides which channels he wants to add to the saved list.
The algorithm for manual configuration is as follows:
- Turn on the receiver;
- In the Menu, select “Channel settings” - “Manual tuning”;
- Select the “Programs” command and assign numbers to them;
- Additionally, you need to select a color system: PAL or SECAM, sound: 2.0 (stereo), 5.1, etc.;
- We perform a “Search” for channels and save the required TV channels.
The resulting list can be updated or deleted if necessary.
Answers to questions on Horizont TV
The image of the Horizont 51CTV-510 TV on all channels has become flattened on the sides, like a pillow.
Please tell me why the screen is like this and what needs to be done to fix it to normal
Indeed, there is such a term as “pincushion distortion” of CRT televisions. To compensate for them, the TV 51CTV-510 uses special circuit elements; they are the ones that failed. You cannot do anything yourself; you need to contact a repair shop.
- Author: Maria Sukhorukikh
Rate this article:
- 5
- 4
- 3
- 2
- 1
(0 votes, average: 0 out of 5)
Share with your friends!
Setting up satellite channels
In general, setting up satellite channels is not difficult:
- We connect the TV and receiver using a special cable. We switch the TV to monitor mode.
- Using the remote control we set the satellite settings.
- In the menu we start scanning the satellite. The best option would be to use an automatic search, which will carry out all the necessary actions without user intervention.
- We edit the list of saved channels, remove from it TV channels that most likely will not be viewed by viewers;
When using satellite television, remember that deteriorating picture or sound may be caused by rain, wind or thunderstorms, which negatively affect reception conditions.
Horizon TV remote control
Horizon TV remote control:
Power button
turning on and off the standby mode of the Horizont TV
Mute button
instantly muting the sound
Button 0. 9
selecting a channel number by direct dialing
F1 button
turning on the freeze frame function
Button
turning on the channel list
SMART S button
selecting fixed sound presets
SMART P button
selecting fixed picture presets
OK button
confirming a selection in the Menu
Cursor button
moves through the Menu Right and Left
Cursor button
moves up and down through the Menu
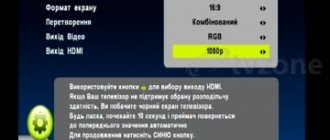
Setting up digital channels
High-definition digital television is a modern television broadcasting standard that provides the highest picture quality under any reception conditions. To set up digital TV channels on your TV, it must be equipped with an HD viewing function. In recent years, an increasing number of TV equipment models equipped with this technology have been produced.
To configure channels on such television receivers, it will be enough to carefully study the manufacturer’s instructions. For most devices, the algorithm of actions is as follows:
- Menu - Options - Automatic settings - Start;
- Select the Digital Channels section and press start again;
- In Search Mode, select “Full”;
- You will need to enter the following numbers in the fields that appear on the screen: frequency (kHz) - 314,000 (314 MHz), modulation - 256 QAM, speed - 6875 kS/s.
All modern TVs are equipped with a network search option. For those viewers who do not want to waste time manually setting up channels, just turn on network and search and wait a few minutes, which the receiver will need to scan and create a list of saved TV channels.
- How to set up digital channels on a Samsung TV?
Horizont CTV-66O/661
To enter the service mode, the following operations must be performed: close the contacts of the XN10 control point on the monochassis and turn on the TV in operating mode. After this, press the MENU button, and the service menu appears on the screen displaying option bytes (op.byte 1, op.byte 2) . The selection of positions is carried out using the “P+”, “P-” buttons, and the content adjustment is carried out using the “+” or “-” buttons on the remote control. To exit the service mode, press the TV button on the remote control and turn off the TV. Then remove the jumper from the XN10 test point on the mono chassis.
Setting up Smart TV on modern TVs
We live in the era of “smart” technology. Today, refrigerators, washing machines, dishwashers, and televisions have their own intelligence. The Smart TV feature is an innovative technology that is completely dependent on the Internet. It allows you to convert an ordinary TV into a full-fledged computer, with which you can make purchases in online stores, view news on information resources and enjoy your favorite programs in high quality.
Leading home appliance manufacturers create full-fledged operating shells for their smart TVs, while many other brands use Android, Linux and Windows for these purposes. You can configure TV channels on Smart TV using special applications.
Remote setup without remote control via smartphone
Smart TVs work via the Internet. They are equipped with more functions than classic plasma or LCD panels. And they can be controlled via smartphones, after installing the appropriate application on the mobile phone.
There are quite a lot of “remote control replacement” programs, but TV Remote is considered the most effective. It is suitable for all models of modern TVs. And you can easily download it for free through the AppStore or Google Play, depending on your smartphone OS.
After installing the application, you need to synchronize with Smart TV. This can be done in three ways:
All options are wireless. And their choice depends on the model of TV and mobile phone.
Important! The application allows you to bypass the Child Lock button lock. This option disables manual control of equipment. And thanks to remote synchronization, a virtual remote control appears, with which you can enter the unlock password.
TV Remote App Features
The Smart TW Remote application allows you to set up a Samsung TV without a remote control. It is also suitable for all Smart TV manufacturers. And with its help it is easy to change channels, play movies from a DVD player, install new applications and even access social networks through the technology screen.
Among the options and advantages are a convenient keyboard for text entry, voice data entry, and Multi-touch for simultaneous solving of different tasks. In fact, the application becomes a full-fledged and even more functional analogue of the remote control.
Installation takes less than a minute. To synchronize you need:
- Launch the application.
- Connect your phone to the TV - go to settings and select a TV brand from the list as an access point;
- Wait for automatic synchronization.
After these simple steps, your smartphone will turn into a multifunctional remote control.
Features of searching and tuning channels without a remote control
Don't panic or get upset if your TV remote control gets lost or stops working. You can cope with the situation and configure the equipment using control buttons, the functions of which are described in detail in the instructions for the equipment.
When setting up a TV without a remote control, consider the following nuances:
- The MENU key is not available on all devices. Sometimes, in order to get into the settings, you need to simultaneously press the buttons that control the volume;
- To confirm the actions taken, you can use the “OK”, “MENU” or “Vol+” buttons;
- On Sony brand TVs, you can start automatic search and tuning of channels by long pressing the “MENU” button;
- Philips TVs cannot be set up without a remote control.
In recent years, Russians have almost completely abandoned conventional antennas, giving preference to more modern and high-tech receivers - special digital set-top boxes that receive signals from a satellite or via the Internet. Such devices operate similarly to smartphones or tablets: they have an operating shell (Android) installed, in which settings and work with channels were carried out using mobile applications. Users can download the necessary software from the PlayMarket store.
TV instructions Horizon 32LE3181
TV Horizon instructions
for the Horizon model, the following controls are described on the body of the 32LE3181 TV: 1) Photoreceiver of the remote control and the TV on indicator (standby mode, blue, operating mode, no light) 2) SOURCE button selecting an input signal 3) CH button increasing the channel number 4) Button CH - decrease the channel number 5) Vol button to increase the sound volume 6) Vol button to decrease the sound volume 7) Button TV settings menu Button to turn on and off the Horizont TV
Setting up channels on older TV models
If desired, you can watch digital channels on an old TV; all you need to do is manually configure the TV receiver and connect a DVB-T2 set-top box to it. Perhaps the only drawback of outdated TV models is the small amount of memory for saving frequently watched channels; most often, you can add no more than six positions to this list.
To search for and configure older TV models, you can use not only remote controls, but also physical control buttons on the TV itself.
TV Horizon
sold on Avito in Kemerovo. link to it: . VOL button
change the volume
MENU button
enable Menu mode
CH button
switching channels
OK button
turns on the selected mode
MENU button
turns on menu mode
SOURCE button
selects the TV input source Horizon
CH button
changes the channel number down or up
INFO button
displaying system information
Button
setting the turn-off time in timer mode
Button
switching to the previous channel being watched
16:9 button
selecting the image format
COLOR button
selecting the color tone of the image
P/N button
select picture mode
AUDIO button
select playback language
PLAY button
enable playback in USB mode
PAUSE button
pause playback in USB mode
STOP button
stop playback in USB mode
The final stage of setup is working with image quality
Quite often there are situations when, after completing the search and settings of the program, they are broadcast in poor quality. In order to improve picture clarity and eliminate other defects, you can perform the following steps:
- enable the HD option in the settings;
- select the picture broadcast mode, for example, for Samsung and LG TVs, the “Cinema” mode is considered the best option;
- manually set the contrast, brightness and colors of the image.
As practice shows, you only need to spend time and effort once to understand the TV settings and compile a list of saved TV channels, in order to subsequently comfortably watch any films and programs, without being distracted by annoying little things and problems that can ruin anyone’s mood.
Found a mistake? Select it and press ctrl+enter
Sokol 37/51/54/TC6155
To switch to the service mode, press the “DISP”, “EXPAND”, “TIME” buttons on the remote control.
The following table should appear on the TV screen:
| SERVICE (03) |
| Presets White Balance Geometry Options RGB Test Auto Adjust |
| Time=… Hour |
| Select Shch Login |
The number after the inscription “Service” means the version number of the processor program.
The number indicated after the inscription “Time” indicates the number of hours the TV has been operating (this parameter is read from the memory chip).
Exiting the selected line and service mode is done using the “MENU” button on the remote control.
Share on social networks
How to find out your TV's resolutionHow to set up your TV for the best picture
You will need
- — TV “Horizon”;
- - remote control;
- - TV antenna.
Instructions 1 Tuning channels on your TV is not difficult. But to do this, you first need to connect an antenna to it and plug it into the network. Set your Horizon to the operating mode by pressing the “Network” button and start setting it up.2Pick up the remote control that came with the TV. Include the channel number you want. Then press the “menu” button on the remote control, which will take you to the process of setting up channels. A multi-level menu is called up by repeatedly pressing the SL key. TV channel settings will appear if you hold this button for more than two seconds.3At the same time, you can specify what type of tuning you will use: manual or automatic. The second method is much more convenient. In this case, you don’t have to do anything, since the TV itself will search for the channels it receives. You will only need to assign it to the selected button.4 Also, during settings, you can search for television stations by frequency or by broadcast channel number.5 During settings, take your time, look through all the options. It is possible that reception on another band will be better. Pay attention to the quality of the picture and sound. If there is television interference, ripples, or extraneous noise effects, look for another option. If you are satisfied with the channel you found, save it to the selected button. To consolidate the result, just click “OK” or “Save.”6Settings for each channel are made individually. Once you have saved all the selected stations, check their quality again. Scroll through the channels using either the number buttons or the P+ (to go forward) and P- (to go back) channel cycling buttons. If everything is fine, the channels are found, sit back and enjoy watching TV programs. Sources used:
- https://jprosto.ru/kak-nastroit-kanalyi-na-televizore-quotgorizontquot/
- https://tv-vybor.ru/stati/118-kak-nastroit-televizor.html
- https://faqstorage.ru/topic/22572-kak-nastroit-kanaly-na-televizore-gorizont/
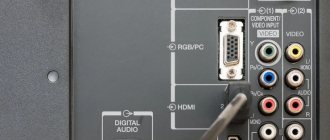
What is AV mode for?
First of all, you should understand the functional purpose of the AV connector. Any modern TV has image and sound output functions. To implement these functions, different modes can be used:
- standard television for watching TV programs, films, series, etc.;
- AV.
The standard mode does not have any complex features and involves normal viewing of terrestrial television. AV is a more complex mode. This connector is designed for high-speed signal transmission from a transmitting device, and its output in the form of image and sound on a TV.