In 2021, all residents of Russia are slowly switching to a new TV format - digital. Its advantage is that the picture quality is higher than that of the usual analogue. 20 federal channels are provided to everyone free of charge. For digital TV to work for you, you need a TV with a digital receiver - most modern models have them. If you already have an outdated model, you need to buy an additional digital TV set-top box. How to connect and configure it after purchase?
A little about digital set-top boxes
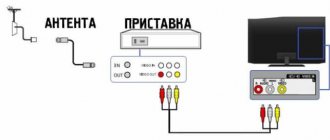
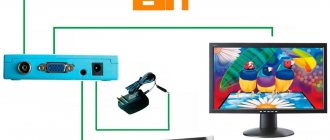
A digital TV set-top box is a rectangular or square device to which an antenna is connected. The set-top box, in turn, is connected to the TV using a cable. Thus, the set-top box (tuner, decoder) acts as an intermediary on the signal path from the antenna to the TV. It converts the digital signal into a regular one, which the TV can already recognize.
A set-top box is a small device that converts a digital signal from an antenna so that the TV can recognize it
The price of the device is low - you can buy a high-quality model for 1000 rubles. When purchasing, pay attention to the characteristics of the device - it should be marked DVB-T2.
How to connect a digital set-top box to your TV
Before connecting any devices via wires, unplug all equipment. After this, connect the cable that comes from the antenna to the RF IN connector on the set-top box.
Insert the cable from the antenna into the RF IN connector
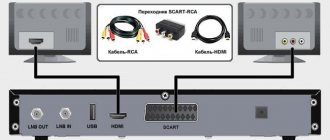
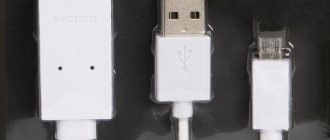
Now connect the set-top box to the TV. For communication you can use one of three cables:
- HDMI. Suitable for more modern TVs with the same output. This wire will provide the maximum picture quality that digital TV is capable of.
- Cable “tulip” with three plugs. Used most often in the case of outdated TVs. The quality here is not the same as with HDMI, but if you have a small display on your TV, the difference will not be too noticeable. Connecting the cable is easy: the color of the plug matches the color of the round slot. Yellow is used for video signal, white is for audio input signal, and red is for audio output signal.
The set-top box can be connected to the TV using a “tulip” (RCA) or HDMI
After connecting the devices, connect the TV and set-top box to the mains and turn them on. Now you can proceed to the channel search itself.
How to choose and where to buy
I chose based on price/quality ratio and after reading a large number of reviews, comments and posts on forums, Yandex Market, and social networks. I also watched quite a few unboxing videos on YouTube.
The choice fell on a set-top box for digital television of the Supra brand, SDT brand. I especially liked that you can order on Aliexpress in the Tmall section, which guarantees fast delivery from a warehouse in the Russian Federation and a local guarantee, instructions in Russian, all documents.
Also, these models are also produced under the Lumax brand in slightly different cases, but the filling is the same.
I bought it here, it cost about 650 rubles then. If something is wrong, then type the phrase “DVB-T/T2” in the Aliexpress search. Average prices are 10-15$.
How to set up a digital set-top box to receive 20 digital television channels
Let's consider the entire process of debugging and checking the quality of the signal from the set-top box and antenna.
Instructions for setting up TV channels on a DVB-T2 set-top box
You can find free channels automatically or manually. The first one is simpler and faster. Manual is used when automatic does not cope with the task.
Let's look at an easier way first:
- On your TV, switch to video mode. The menu of the connected set-top box should load. In the setup wizard (should appear if you turned on the set-top box for the first time and have not configured it before).
Select country and language
Start channel search
Wait a while until the set-top box finds all channels
If this method of searching for channels does not work, use manual mode:
- Go to the search section in the console menu. Select "Manual Search".
- Click on OK to start the process.
Start a manual search
How to set up local channels on a digital set-top box
Many people complain that with the transition to digital TV they have lost local channels. In order for them to appear in the list again, when setting up (before starting the automatic search), you need to select to search for both analogue and digital channels at once, that is, set the value to DTV-T/DTV-T2.
Federal channels, which are already available in digital, may later be excluded from analogue TV, but local regional ones will not be removed from analogue.
Digital TV set-top box SUPRA SDT-99 (DVB-T/T2)
Euro Euro
- February 24, 2015 5/5
Regarding the sound, movies where the sound is in AC-3 format (most MKVs - On high-quality rips (5-50 GB file) so that there is sound everywhere (AC-3) - in the sound settings of the set-top box you need to select OPTIONS ( GLOBUS) - Digital audio - RAW HDMI ON! I spent 2 nights choosing. We really had a “gold rush” on Terrestrial TV))) the main qualification criterion was the ability to be able to read all audio/video codecs from a flash drive and hard drive. The price itself turned out to be good. This set-top box is in 3rd place in demand in the Yandex market. I neglected the CI slot, I don’t see the point in overpaying by 1 thousand rubles, I minimized the risk of not reading films. Also nominated: 1) BBK SMP245HDT2С has a CI+ slot, power supply for HDD via USB Up to 20 MB/sec - loss, normal Input stream 45.52 2) BBK SMP246HDT2С has a video output antenna loss no MPEG-4 /AVC SD/HS DIVX 4X- 5X 3) RDB-507NR (DVB-T2) Rolsen RDB-507N (DVB-T2) red or black models, respectively, the loss is slightly worse sensitivity -78~82 dBm not all modulation capabilities QPSK 16QAM 64QAM 4) SUPRA SDT-99 has a video output antennas - the BEST modulation in terms of characteristics 256QAM is possible in the case of HD channels, not everyone has it either! video MPEG-2SD/HD( [email protected] / [email protected] ), MPEG-4 H.264/AVC SD/HS DIVX 4X-5X audio Dolby Digital AC-3, L-PCNstereo MPEG Layer I&II, 22.1 /32/44.1/48 kHz sensitivity from -75~82 dBm modulation QPSK 16QAM 64QAM 256QAM 5) SUPRA SDT-98CI (DVB-T2) has CI slot PLAY NO MPEG-4 H.264/AVC SD/HS DIVX 4X-5X Dolby Digital AC-3, L-PCNstereo WORSE SENSITIVITY -78~82 dBm AND INCOMPLETE MODULATION QPSK 16QAM 64QAM 6) TELEFUNKEN TF-DVBT206 207 (without antenna output) complaints from reviews that the MANUFACTURER deceived - does not read the sound of films in AC-3 and the DIVX format is indicated as follows: MPEG-1, MPEG-2, MPEG-4 HD, H.264 MPEG-1, MPEG-2 (Layer I/II), MP3, AC-3, AAC-LC, HE-AAC MPEG Layer I&II, 32/44.1/48 kHz -25~82 dBm up to 45.5 Mbps
Advantages:
SUPRA-SDT99 - understands most modern formats, even read some AVIs that the LG TV could not, it also has the option of powering the antenna amplifier, which simplifies the system. Understands the hard drive in NTFS, All sorts of old 3gp, mp4 that were written from old Nokia))) Television - channels that broadcast in 4:3, it perfectly pulls out if there are stubs at the top/bottom, adapts, sometimes cuts off more than necessary, well, this option is identical to how a modern TV does it, but it is proportionally almost 16:9. Still, there is hope that someday all channels will switch to 16:9. This is the IMAGE-SCREEN PROPORTIONS-16:9 Pan&Scan mode
Flaws:
The output sound is a little quieter than analog TV, but this doesn’t really interfere, you just make the TV louder and that’s it.
Period of use:
a few months
38 3
Checking signal quality and solving setup problems
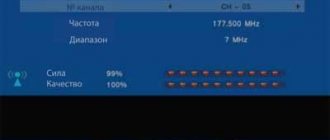
If you see obvious noise in the picture, check the quality of the signal coming from the antenna. To do this, press the Info key on the remote control several times. Look at the strength and intensity indicators: if their value is below 60 - 70%, then there is a problem with the signal. You need to change the position of the antenna and its direction. To do this, you will need help: someone must move the antenna slowly, and someone must monitor the picture quality (is it improving or deteriorating). When the interference disappears, fix the antenna position.
For a stable signal, the antenna must be pointed clearly at the tower
If you cannot find the desired antenna position, most likely the tower is located far from you - hence the weak signal. Usually this situation occurs outside the city. In the homes of urban residents, the signal is usually received well. In this case, you need to purchase an additional amplifier for the antenna or buy a new, more powerful antenna. It is also worth placing the antenna as high as possible - if possible, on the roof itself.
If possible, look up information on the Internet regarding the location of towers in your area so you know where to point the antenna.
If everything is in order with the indicators in the Info section (70% and above), but interference is still present, then the problem is with the set-top box. It may not be configured correctly. If you changed any of its parameters, return the factory settings back or reset the settings to factory settings, and then start the automatic or manual channel search again.
Reset the set-top box settings and search for channels again
There could be a different situation: the set-top box initially found less than 20 channels or began to show fewer of them some time after successful setup. The solutions in this case are the same as for interference: look at the signal level, restart the channel search, change the position of the antenna. If the problem persists, you need to buy a new antenna or amplifier for the old one and place it as high as possible.
It is also possible that the problem is a hardware malfunction, if everything was fine before, but now some of the channels have suddenly disappeared. Only a specialist can say for sure that the set-top box or antenna is faulty, so it would be advisable to call a specialist to your home to determine and eliminate the causes of the malfunction.
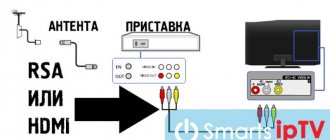
The antenna cable is connected to the TV tuner, and from the set-top box there is a cable to the TV (HDMI, “tulip” or coaxial cable). Next, the setup is carried out - first automatic, and then manual, if the first does not produce results. If you do not receive all channels or they show poorly, change the position of the antenna. If necessary, purchase an amplifier for it.
In 2021, all residents of Russia are slowly switching to a new TV format - digital. Its advantage is that the picture quality is higher than that of the usual analogue. 20 federal channels are provided to everyone free of charge. For digital TV to work for you, you need a TV with a digital receiver - most modern models have them. If you already have an outdated model, you need to buy an additional digital TV set-top box. How to connect and configure it after purchase?
Manual
Page 2
- Image
- Text
Manual
2
content
Operating and safety rules ………………………………………………………………………………………….3 Equipment ………………… ……………………………………………………………………………………………………………………………………3 Tuner controls ………………………………………………………………………………………………………………4 Remote control … ……………………………………………………………………………………………………………5 Preparing the tuner for operation ………… ……………………………………………………………………………………………………………..7 Initial installation ………… ……………………………………………………………………………………………………………….7 Tuner settings… …………………………………………………………………………………………………………………………………… 7 Video recording…………………………………………………………………………………………………………………………… ………………..13 Safe decommissioning………………………………………………………………………………………… …………….13 Troubleshooting …………………………………………………………………………………………………………… …………..14 Technical characteristics…………………………………………………………………………………………………………… ………….15
DEAR BUYER!
Thank you for choosing products manufactured under the SUPRA brand. We are pleased to offer you products developed and manufactured in accordance with high requirements for quality, functionality and design. We are confident that you will be pleased with the purchase of a product from our company.
Electricity can perform many useful functions, but it can also cause harm and property damage if used incorrectly. While safety has been a priority in the design and manufacture of this product, incorrect use may result in electric shock. For your safety and to prolong the life of the product, please read this manual carefully before using, installing, operating and cleaning the player.
Take care to keep this manual safe and use it as a reference material for further use of the device.
NOTE:
All images in this manual are examples only, actual product may vary
from the image.
A little about digital set-top boxes
A digital TV set-top box is a rectangular or square device to which an antenna is connected. The set-top box, in turn, is connected to the TV using a cable. Thus, the set-top box (tuner, decoder) acts as an intermediary on the signal path from the antenna to the TV. It converts the digital signal into a regular one, which the TV can already recognize.
A set-top box is a small device that converts a digital signal from an antenna so that the TV can recognize it
The price of the device is low - you can buy a high-quality model for 1000 rubles. When purchasing, pay attention to the characteristics of the device - it should be marked DVB-T2.
How to connect a digital set-top box to your TV
Before connecting any devices via wires, unplug all equipment. After this, connect the cable that comes from the antenna to the RF IN connector on the set-top box.
Insert the cable from the antenna into the RF IN connector
Now connect the set-top box to the TV. For communication you can use one of three cables:
- HDMI. Suitable for more modern TVs with the same output. This wire will provide the maximum picture quality that digital TV is capable of.
- Cable “tulip” with three plugs. Used most often in the case of outdated TVs. The quality here is not the same as with HDMI, but if you have a small display on your TV, the difference will not be too noticeable. Connecting the cable is easy: the color of the plug matches the color of the round slot. Yellow is used for video signal, white is for audio input signal, and red is for audio output signal.
The set-top box can be connected to the TV using a “tulip” (RCA) or HDMI
After connecting the devices, connect the TV and set-top box to the mains and turn them on. Now you can proceed to the channel search itself.
Functional
The second reason for choosing the Supra SDT is the enormous capabilities it offers. In addition to standard viewing of digital channels, you can also watch from a flash drive, and also record broadcasts on this flash drive.
- How to set up a Supra TV - My articles - Articles catalog - telev-sat.ru
Record and pause
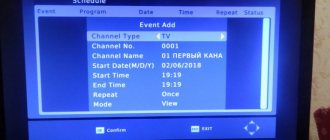
There is a delayed viewing function. Simply indicate the time for which you need to record a specific broadcast on a specific channel and the set-top box will turn on and record. For example, want to watch the Eurovision festival but don't want to wait until midnight? Just record the recording time and you don't even need to keep the TV on!
It’s also fun to pause during live broadcasts. You just press pause and go about your business for a while, and then come back and start watching from the right moment. It’s just that at this time the Supra SDT set-top box records into memory, and then starts showing from memory, while simultaneously continuing to record the live broadcast. Then you can skip the ads.
Everything recorded can be sped up at two or three times, etc. once. Maximum - 16 times.
List of programs
The list of favorite programs is also very convenient. You can switch between them simply by using a cross, rather than choosing a number.
Connection
A regular TV with a handset can be connected via tulips, and more modern LCD and plasma TVs can be connected via HDMI or the same tulips. You can also connect a monitor from a computer, but if it does not have a built-in speaker, then you will need to connect an external audio system (speakers) or headphones.
A small life hack
Do you have an unnecessary PC monitor at home? Just connect it to such a set-top box, then buy any cheapest USB-powered speakers at any computer or electronics store. Connect the speakers to the USB connector of the Supra set-top box and then they will turn on/off automatically with it.
You will get a TV with digital channels and stereo sound from a regular monitor!))
How to set up a digital set-top box to receive 20 digital television channels
Let's consider the entire process of debugging and checking the quality of the signal from the set-top box and antenna.
Instructions for setting up TV channels on a DVB-T2 set-top box
You can find free channels automatically or manually. The first one is simpler and faster. Manual is used when automatic does not cope with the task.
Let's look at an easier way first:
- On your TV, switch to video mode. The menu of the connected set-top box should load. In the setup wizard (should appear if you turned on the set-top box for the first time and have not configured it before).
Select country and language
Start channel search
Wait a while until the set-top box finds all channels
If this method of searching for channels does not work, use manual mode:
- Go to the search section in the console menu. Select "Manual Search".
- Click on OK to start the process.
Start a manual search
How to set up local channels on a digital set-top box
Many people complain that with the transition to digital TV they have lost local channels. In order for them to appear in the list again, when setting up (before starting the automatic search), you need to select to search for both analogue and digital channels at once, that is, set the value to DTV-T/DTV-T2.
Federal channels, which are already available in digital, may later be excluded from analogue TV, but local regional ones will not be removed from analogue.
Television receiver DVB-T2 Supra SDT-99
Euro Euro
- February 24, 2015 5/5
Regarding the sound, movies where the sound is in AC-3 format (most MKVs - On high-quality rips (5-50 GB file) so that there is sound everywhere (AC-3) - in the sound settings of the set-top box you need to select OPTIONS ( GLOBUS) - Digital audio - RAW HDMI ON! I spent 2 nights choosing. We really had a “gold rush” on Terrestrial TV))) the main qualification criterion was the ability to be able to read all audio/video codecs from a flash drive and hard drive. The price itself turned out to be good. This set-top box is in 3rd place in demand in the Yandex market. I neglected the CI slot, I don’t see the point in overpaying by 1 thousand rubles, I minimized the risk of not reading films. Also nominated: 1) BBK SMP245HDT2С has a CI+ slot, power supply for HDD via USB Up to 20 MB/sec - loss, normal Input stream 45.52 2) BBK SMP246HDT2С has a video output antenna loss no MPEG-4 /AVC SD/HS DIVX 4X- 5X 3) RDB-507NR (DVB-T2) Rolsen RDB-507N (DVB-T2) red or black models, respectively, the loss is slightly worse sensitivity -78~82 dBm not all modulation capabilities QPSK 16QAM 64QAM 4) SUPRA SDT-99 has a video output antennas - the BEST modulation in terms of characteristics 256QAM is possible in the case of HD channels, not everyone has it either! video MPEG-2SD/HD( [email protected] / [email protected] ), MPEG-4 H.264/AVC SD/HS DIVX 4X-5X audio Dolby Digital AC-3, L-PCNstereo MPEG Layer I&II, 22.1 /32/44.1/48 kHz sensitivity from -75~82 dBm modulation QPSK 16QAM 64QAM 256QAM 5) SUPRA SDT-98CI (DVB-T2) has CI slot PLAY NO MPEG-4 H.264/AVC SD/HS DIVX 4X-5X Dolby Digital AC-3, L-PCNstereo WORSE SENSITIVITY -78~82 dBm AND INCOMPLETE MODULATION QPSK 16QAM 64QAM 6) TELEFUNKEN TF-DVBT206 207 (without antenna output) complaints from reviews that the MANUFACTURER deceived - does not read the sound of films in AC-3 and the DIVX format is indicated as follows: MPEG-1, MPEG-2, MPEG-4 HD, H.264 MPEG-1, MPEG-2 (Layer I/II), MP3, AC-3, AAC-LC, HE-AAC MPEG Layer I&II, 32/44.1/48 kHz -25~82 dBm up to 45.5 Mbps
Advantages:
SUPRA-SDT99 - understands most modern formats, even read some AVIs that the LG TV could not, it also has the option of powering the antenna amplifier, which simplifies the system. Understands the hard drive in NTFS, All sorts of old 3gp, mp4 that were written from old Nokia))) Television - channels that broadcast in 4:3, it perfectly pulls out if there are stubs at the top/bottom, adapts, sometimes cuts off more than necessary, well, this option is identical to how a modern TV does it, but it is proportionally almost 16:9. Still, there is hope that someday all channels will switch to 16:9. This is the IMAGE-SCREEN PROPORTIONS-16:9 Pan&Scan mode
Flaws:
The output sound is a little quieter than analog TV, but this doesn’t really interfere, you just make the TV louder and that’s it.
Period of use:
a few months
38 3
Checking signal quality and solving setup problems
If you see obvious noise in the picture, check the quality of the signal coming from the antenna. To do this, press the Info key on the remote control several times. Look at the strength and intensity indicators: if their value is below 60 - 70%, then there is a problem with the signal. You need to change the position of the antenna and its direction. To do this, you will need help: someone must move the antenna slowly, and someone must monitor the picture quality (is it improving or deteriorating). When the interference disappears, fix the antenna position.
For a stable signal, the antenna must be pointed clearly at the tower
If you cannot find the desired antenna position, most likely the tower is located far from you - hence the weak signal. Usually this situation occurs outside the city. In the homes of urban residents, the signal is usually received well. In this case, you need to purchase an additional amplifier for the antenna or buy a new, more powerful antenna. It is also worth placing the antenna as high as possible - if possible, on the roof itself.
If possible, look up information on the Internet regarding the location of towers in your area so you know where to point the antenna.
If everything is in order with the indicators in the Info section (70% and above), but interference is still present, then the problem is with the set-top box. It may not be configured correctly. If you changed any of its parameters, return the factory settings back or reset the settings to factory settings, and then start the automatic or manual channel search again.
Reset the set-top box settings and search for channels again
There could be a different situation: the set-top box initially found less than 20 channels or began to show fewer of them some time after successful setup. The solutions in this case are the same as for interference: look at the signal level, restart the channel search, change the position of the antenna. If the problem persists, you need to buy a new antenna or amplifier for the old one and place it as high as possible.
It is also possible that the problem is a hardware malfunction, if everything was fine before, but now some of the channels have suddenly disappeared. Only a specialist can say for sure that the set-top box or antenna is faulty, so it would be advisable to call a specialist to your home to determine and eliminate the causes of the malfunction.
The antenna cable is connected to the TV tuner, and from the set-top box there is a cable to the TV (HDMI, “tulip” or coaxial cable). Next, the setup is carried out - first automatic, and then manual, if the first does not produce results. If you do not receive all channels or they show poorly, change the position of the antenna. If necessary, purchase an amplifier for it.
The Supra line includes more than 10,000 items of various household appliances. Even if we take TVs alone, there are at least hundreds of them, including models that have been discontinued but are still on sale. Often, even the owners of modern receivers do not know how to correctly catch all available transmissions. Let's figure out how to set up digital channels on the Supra TV.
Functional
The second reason for choosing the Supra SDT is the enormous capabilities it offers. In addition to standard viewing of digital channels, you can also watch from a flash drive, and also record broadcasts on this flash drive.
Record and pause
There is a delayed viewing function. Simply indicate the time for which you need to record a specific broadcast on a specific channel and the set-top box will turn on and record. For example, want to watch the Eurovision festival but don't want to wait until midnight? Just record the recording time and you don't even need to keep the TV on!
It’s also fun to pause during live broadcasts. You just press pause and go about your business for a while, and then come back and start watching from the right moment. It’s just that at this time the Supra SDT set-top box records into memory, and then starts showing from memory, while simultaneously continuing to record the live broadcast. Then you can skip the ads.
Everything recorded can be sped up at two or three times, etc. once. Maximum - 16 times.
List of programs
The list of favorite programs is also very convenient. You can switch between them simply by using a cross, rather than choosing a number.
Connection
A regular TV with a handset can be connected via tulips, and more modern LCD and plasma TVs can be connected via HDMI or the same tulips. You can also connect a monitor from a computer, but if it does not have a built-in speaker, then you will need to connect an external audio system (speakers) or headphones.
A small life hack
Do you have an unnecessary PC monitor at home? Just connect it to such a set-top box, then buy any cheapest USB-powered speakers at any computer or electronics store. Connect the speakers to the USB connector of the Supra set-top box and then they will turn on/off automatically with it.
You will get a TV with digital channels and stereo sound from a regular monitor!))
Let's check if your Supra TV supports digital TV
First, let's make sure that your model has the right tuner. Not everyone can receive digital television, and among those who have this opportunity, not everyone supports the second-generation European standard DVB-T2, used in Russia.
There are two ways to check a specific brand:
- Search for information online on the websites of official dealers. Not the most reliable option: sellers, even those who cooperate directly with Supra, often confuse the models.
- Insert the model number of your TV into the “search” line. If it is found, the ethereal “digit” is almost in your hands.
| Model | Diagonal | DVB-T2 support |
| STV-LC19T410WL | 19 | + |
| STV-LC19T860WL | 19 | + |
| STV-LC22T400FL | 22 | + |
| STV-LC22T410WL | 22 | + |
| STV-LC24T400FL | 24 | + |
| STV-LC24T400WL | 24 | + |
| STV-LC24T410FL | 24 | + |
| STV-LC24T410WL | 24 | + |
| STV-LC24T850WL | 24 | + |
| STV-LC28T400WL | 28 | + |
| STV-LC28T850WL | 28 | + |
| STV-LC32T250WL | 32 | + |
| STV-LC32T400WL | 32 | + |
| STV-LC32T410WL | 32 | + |
| STV-LC32T420WL | 32 | + |
| STV-LC32T500WL | 32 | + |
| STV-LC32T850WL | 32 | + |
| STV-LC32T860WL | 32 | + |
| STV-LC32T871WL | 32 | + |
| STV-LC32T900WL | 32 | + |
| STV-LC32ST880WL | 32 | + |
| STV-LC40ST900FL | 40 | + |
| STV-LC40T420FL | 40 | + |
| STV-LC40T850FL | 40 | + |
| STV-LC40T860FL | 40 | + |
| STV-LC40T871FL | 40 | + |
| STV-LC40T900FL | 40 | + |
| STV-LC42T410FL | 42 | + |
| STV-LC42T900FL | 42 | + |
| STV-LC48T400FL | 48 | + |
| STV-LC50T400FL | 48 | + |
If the TV does not support digital
What should I do if, based on the results of the test, it turns out that a particular Supra TV cannot receive DVB-T2 itself?
There are two options here:
- Buy a new TV. This is a radical, but preferable method, since even relatively new TV receivers that are not designed for digital broadcasting often do not support all the capabilities of DTTV (high definition, teletext, etc.);
- Install a digital set-top box (aka receiver, decoder or external tuner). This will be enough to watch 2 federal multiplexes with 20 channels.
SUPRA SDT-99
Euro Euro, 10/14/2015
Advantages: SUPRA-SDT99 - understands most modern formats, even read some AVIs that the LG TV could not, it also has the option of powering the antenna amplifier, which simplifies the system. Understands the hard drive in NTFS, All sorts of old 3gp, mp4 that were written from old Nokia))) Television - channels that broadcast in 4:3, it perfectly pulls out if there are stubs at the top/bottom, adapts, sometimes cuts off more than necessary, well, this option is identical to how a modern TV does it, but it is proportionally almost 16:9. Still, there is hope that someday all channels will switch to 16:9. This is the IMAGE-SCREEN PROPORTIONS-16:9 Pan&Scan mode
Disadvantages: the output sound is a little quieter than analog TV, but this doesn’t really interfere, you just make the TV louder and that’s it.
Comment: Regarding the sound, movies where the sound is in AC-3 format (most MKVs - On high-quality rips (5-50 GB file) so that there is sound everywhere (AC-3) - in the sound settings of the set-top box you need to select OPTIONS (GLOBE) - Digital audio - RAW HDMI ON! It took me 2 nights to choose. We really had a “gold rush” on Terrestrial TV))) the main qualification criterion was the ability to be able to read all audio/video codecs from a flash drive and hard drive. The price itself turned out to be good. This set-top box is in 3rd place in demand in the Yandex market. I neglected the CI slot, I don’t see the point in overpaying by 1 thousand rubles, I minimized the risk of not reading films. Also nominated: 1) BBK SMP245HDT2С has a CI+ slot, power supply for HDD via USB Up to 20 MB/sec - loss, normal Input stream 45.52 2) BBK SMP246HDT2С has a video output antenna loss no MPEG-4 /AVC SD/HS DIVX 4X- 5X 3) RDB-507NR (DVB-T2) Rolsen RDB-507N (DVB-T2) red or black models, respectively, the loss is slightly worse sensitivity -78~82 dBm not all modulation capabilities QPSK 16QAM 64QAM 4) SUPRA SDT-99 has a video output antennas - the BEST modulation in terms of characteristics 256QAM is possible in the case of HD channels, not everyone has it either! video MPEG-2SD/HD( [email protected] / [email protected] ), MPEG-4 H.264/AVC SD/HS DIVX 4X-5X audio Dolby Digital AC-3, L-PCNstereo MPEG Layer I&II, 22.1 /32/44.1/48 kHz sensitivity from -75~82 dBm modulation QPSK 16QAM 64QAM 256QAM 5) SUPRA SDT-98CI (DVB-T2) has CI slot PLAY NO MPEG-4 H.264/AVC SD/HS DIVX 4X-5X Dolby Digital AC-3, L-PCN stereo WORSE SENSITIVITY -78~82 dBm AND INCOMPLETE MODULATION QPSK 16QAM 64QAM 6) TELEFUNKEN TF-DVBT206 207 (without antenna output) complaints from reviews that the MANUFACTURER deceived - does not read the sound of films in AC-3 and the DIVX format is indicated as follows: MPEG-1, MPEG-2, MPEG-4 HD, H.264 MPEG-1, MPEG-2 (Layer I/II), MP3, AC-3, AAC-LC, HE-AAC MPEG Layer I&II, 32/44.1/48 kHz -25~82 dBm up to 45.5 Mbps
Automatic search for digital channels on Supra
The easiest way to set up your Supra TV is in automatic mode. To do this, connect the antenna, check the signal level and follow the instructions:
- Press the “TV Setup” button on the remote control. The setup menu will open.
- Select the "Preset" item and activate it.
- Several lines will appear, from which you need to select “Auto search”.
- Auto-tuning will begin. It will start from the lowest frequencies available to the model and gradually increase. The search takes about 5–10 minutes.
- At the end of the process, all channels will be saved. You can start watching.
Setting up a Supra TV with a different interface will look like this:
- Press the "Menu" button on the remote control.
- In the menu that opens, select “Settings”.
- Indicate the country (Russia) and the source of the signal (for terrestrial TV - “antenna”; for cable TV - the adjacent line). When setting up cable or satellite TV reception, you will need to specify the technical parameters of the broadcast. You can find them on your provider’s website or by calling their support phone number.
- After the choice is made, you need to find the “Auto search” position and indicate which channels will be searched. ABOUT.
- At the end of the list, select “Search” and activate it. The TV will begin the setup procedure.
Important: If you select “Digital and Analogue”, you will not have to additionally search for local broadcast channels later. However, if the antenna only receives UHF, which broadcasts digital TV, you should select the “Digital” item.
SUPRA SDT-98CI
A full-size multifunctional digital receiver from the well-known manufacturer SUPRA SDT-98CI is produced for receiving free and encrypted terrestrial television/radio signals. Radio signal reception is carried out in the ranges (UHF) 470-860 MHz, (VHF) 177-230 MHz. The main difference between the SUPRA SDT-98CI and related models is its “classic” appearance, the presence of a CI slot for a conditional access card, and the ability to supply voltage when connecting an active antenna to the set-top box.
A large selection of communication connectors responsible for transmitting the processed output signal allows you to use different brands of TV with any input connectors for watching. The best option is to connect a digital TV to a set-top box via the HDMI interface, which provides images with a resolution of 720p, 1080i, 1080p, reaching a value of 1920x1080p. Additionally, the design provides connectors for component, composite, and SKART outputs. It is convenient to have a CI slot in the design for installing CAM modules, which allows you to receive encoded programs.
The device supports external media up to 1.4 TB, connected to the set-top box via a USB 2.0 port. Using additional memory allows you to:
- Promptly replace old software with more modern software.
- Record live programs in current time, or in delayed mode using the built-in timer (PVR option).
- Play recorded information, use pause mode, fast forward in any direction to find the desired fragment (Time Shift).
- When activating the “Built-in media player” function, play media file formats declared by the manufacturer.
The modest package includes a SUPRA SDT-98CI receiver, a remote control with two AAA batteries, an instruction manual, and a warranty card. The appearance is memorable due to its classic design. The combination of the dark color scheme of the iron case with a plastic front panel and the absence of “overload” in the filling of the front panel create an image that will successfully complement any set of audio/video household appliances. The average quality of materials contributes to a decrease in the integrity of perception, which is obviously inherent in the price niche of the device.
On the left side of the front panel there are built-in buttons for power, volume control, channel navigation, and menu entry. In the center there is a 4-character display, an indicator of operating modes. There is a CI slot on the right side behind the hinged door. Rear panel communications are represented by antenna input/output (RF IN, RF OUT), composite RCA output, 3 RCA component output, HDMI interface, coaxial digital audio output SP DIF, USB 2.0 port.
Characteristics of SUPRA SDT-98CI
- File formats adapted for playback: MKV, TS, H264, MPEG1/2, MPEG4, AVI, MPG, VOB, MP4, AAC, MP3, AC3, DTS, ADPCM, MP1/2, PCM, JPEG, PNG, BMP.
- Electronic TV program guide EPG, teletext, subtitles, parental controls.
- Dimensions: 190 x 42 x 40 mm.
During operation, I liked the presence of control buttons on the set-top box, the “omnivorous” nature of reading media files, the solid build quality, and good picture quality. Negative points are the independent installation of software when turning on the device, poor locking of the remote control buttons for operation, and an unergonomic remote control.
Manual setting
If for some reason you are not satisfied with the results of the auto search, you can conduct a manual search.
The procedure looks like this:
- Click the TV Setup button and select Preset.
- Select the manual method (“Search”).
- Using the “3” and “4” buttons (or volume up and down, depending on the model), the digital tuner “chases” up and down the range.
- Opened channels must be saved manually by pressing the “Enter” button.
- After this, using the buttons to increase and decrease the number, you need to go to the next one and repeat the setting.
- After completing the setup, you need to exit the menu. The channels will be saved in the TV memory.
In the second version of the interface, the procedure will be slightly different:
- After going to the menu and activating the “Settings” item, you will need to select not “Auto search”, but “Manual DTV search”;
- Here you will need to specify frequencies and other broadcast parameters. For cable and satellite, information is taken from the provider, for terrestrial - according to the instructions for searching for CETV frequencies. The received data must be entered.
- Use the cursor buttons to change the search range. The found channels are saved using the selection confirmation button.
Adding local analogue TV channels
Analogue channels, which may be on air from local TV stations, are added at the auto-search stage if the “Digital and analogue” item was selected. If this has not been done, they can be added manually later.
To do this you need to do the following:
- Activate the menu.
- Select settings mode.
- Specify the antenna as the signal source.
- Select analog channels (ATV).
- Perform manual configuration and save the found ones. The procedure is similar to that for digital channels.
Deleting and sorting channels
If duplication occurs (for example, the antenna accidentally picked up a signal from two repeaters broadcasting at different frequencies at once) or some of the channels turned out to be unnecessary, they can be deleted.
The algorithm of actions here will be as follows:
- Use the remote control to activate the menu.
- Select setting mode.
- Specify the item “Channels”, “Manage Channels” or similar (the exact name depends on the interface).
- Select "Editing". Here each specific one can be erased or renamed.
- Select the unnecessary TV channel and the “Delete” option.
- Confirm the action.
In addition to editing, most models also have the ability to sort channels, assigning an arbitrary number to each individual program. This is done in a similar way through the “Editing” tab, only you need to select the “Sorting” item. After that, moving from one to another, you can assign them new numbers under which they will be displayed on the screen.