I recently bought myself a TV and somehow before there was no need to use an HDMI cable at all. But then the relatives came home. And I decided to show video and photos. I plug in the cable, but there is no picture or sound. In general, I struggled with this problem, but still managed to solve it. Today I will tell you why HDMI does not work on a laptop and how to solve this problem.
And so, first of all, look at the integrity of the cable. A friend of mine has a cat that chewed through the wire from his XBox and for a long time he could not understand why there was no image. They rarely burn, but it’s still worth checking. Now let's go to the settings. The configuration will be the same for all versions of Windows: 10, 8, 7, etc.
No signal via HDMI
HDMI says no signal
If this is your first time connecting your TV to your computer and you see a floating message on the hdmi screen there is no signal, you need to make some settings both on the computer and on the TV itself.
No signal via HDMI to TV
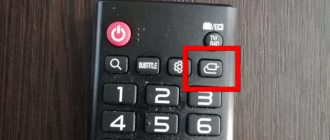
In order for the HDMI signal to appear on the TV, take the remote control and press the button with the image or name SOURCE.
After the connection options appear on the screen, select the appropriate HDMI port. If there is more than one such port, you will be offered multiple ports. Select the one you need and wait for the picture to appear.
Why is there no HDMI signal?
If after this the signal still does not appear on the TV, as indicated by the floating message, open the screen settings on the computer. To do this, right-click on the Desktop and select Screen Resolution.
In the window that opens, in the Screen line, select your device, for example, Digital TV.
Next, in a line of several screens, select the desired item at your discretion.
→ Duplicate these screens. In this case, the image from the computer monitor screen will be duplicated on the TV, that is, both the TV and the computer will show the picture.
→ Expand these screens. Don't choose.
→ Display desktop only on 1. The image will be shown on the device that is first in the list of screens.
→ Display the desktop only on 2. Accordingly, the image will be shown on the device that is second in the list of screens.
Solution 1: Check your display output settings
1. Click Start and click the Settings icon in the lower left corner.
2. Next go to the System section.
3. Select Screen from the menu on the left and check if your TV is installed as a second monitor.
If the TV is not detected, follow these steps:
1. Press Win + P (Windows logo key and P key) at the same time.
2. Select Recurring from the pop-up menu on the right side.
3. If "Recurring" doesn't work, try switching to "Expand".
After this, you will see the TV in the display output settings.
The system is not configured
To transfer an image to a TV, you will need not only to select a source, but also to configure the screen on the laptop itself:
- Right click on the desktop. Open the "Screen Resolution" section.
- In the Display field, select Multiple Monitors. The resolution will be selected automatically, but you can change it yourself.
- In the “Multiple screens” field, select desktop duplication or another image display mode that suits you.
On some laptop models, you can turn on the second screen using the Fn+F8 key combination (instead of F8 there may be another button from the F1-F12 row). After this setup, the laptop desktop should appear on the TV screen. If the sound continues to play through the laptop's speakers, make additional adjustments:
- Click on the volume icon in the tray and open "Playback Devices".
- On the Playback tab, select your HDMI connected TV.
If after selecting the signal source and configuring the system there is still no image, check the drivers and settings of the video card.
How to turn it on correctly?
The best way to fix the problem and figure out what's wrong is to do it all over again.
- Carefully insert one end of the cable into the connector of your laptop or computer, and the second into the HDMI port on your TV or other device.
Driver installation and verification
And so, let me remind you that the HDMI output comes directly from the video card. It doesn't matter whether it's built-in or separate. Our task is to install newer drivers.
I recently bought myself a TV and somehow before there was no need to use an HDMI cable at all. But then the relatives came home. And I decided to show video and photos. I plug in the cable, but there is no picture or sound. In general, I struggled with this problem, but still managed to solve it. Today I will tell you why HDMI does not work on a laptop and how to solve this problem.
And so, first of all, look at the integrity of the cable. A friend of mine has a cat that chewed through the wire from his XBox and for a long time he could not understand why there was no image. They rarely burn, but it’s still worth checking. Now let's go to the settings. The configuration will be the same for all versions of Windows: 10, 8, 7, etc.
Signal check
If all manipulations do not bring the desired result, it is recommended to check the signal using other connection options.
The check is performed as follows:
- Disconnect equipment from the network.
- Connect the HDMI cable to the computer and screen.
- Turn on the TV and press the “Source” key.
- In the column that appears, select the HDMI operating mode and click “OK”.
- Turn on the computer: when the OS boots, if everything is done, the TV screen and monitor will broadcast identical information.
- If the signal does not appear, then you need to go to the “Device Manager” to see if there are still available connectors for connection.
7. For example, if VGA is available, then you need to perform the same algorithm of actions, only set the appropriate mode in the settings.
If even after these steps the equipment does not start working, then most likely the problem is an internal failure.
Thus, the computer may not see the TV via an HDMI cable for various reasons, which can be diagnosed and fixed at home without special knowledge in the field of modern technology.
Finding the cause of the malfunction
The search for the reason for the inability to synchronize the TV with the computer should begin by checking the cable used for the connection.
To perform diagnostics, you will need to connect the HDMI cable to another external monitor or laptop, and then try to display the image in the usual way: if the attempt to start broadcasting media content is successful, then the cause of the problem lies in the malfunction of the devices.
It is worth adding that when purchasing an HDMI cable, it would not be superfluous to ask the seller to demonstrate the functionality of the purchased peripherals.
The next step in diagnosing a connection error is checking the signal source on the TV.
The user will need:
- click on the button for selecting the input signal source (“Source”) - on most models of Samsung and Sony TV devices, this button is located in the upper right corner of the remote control;
- view the list of available input resources and select exactly the HDMI connector through which the computer is connected to the TV;
- save the correct TV settings.
Such a check of the connector is necessary, since sometimes the TV device gets confused about the signal sources and incorrectly determines the HDMI port involved in synchronization. If a personal computer is connected to several external monitors at once, it will be necessary to check the correctness of the image and sound output parameters.
The setup algorithm looks like this:
- The user must right-click on an empty area of the desktop.
- If Windows 7-10 is installed on your computer, you will need to select “Screen Resolution” from the context menu that appears. When using older versions of the operating system, the required tab will be called “Graphics characteristics”.
- The choice of the proposed image streaming options is the one that involves the screen of the desired TV.
It is worth noting that you can also open the image output settings menu using the “Fn + F4” key combination. If manipulations with signal sources do not bring the desired results and the laptop still does not see the TV, then you will need to check the system parameters of the computer.
To do this, you will need to launch “Device Manager” and find the version of the drivers installed on the video card, and then compare the build number of the software used with the index of the most “recent” version of the software.
You can download new drivers from the official website of the developer. Outdated software is also the cause of a system error in which the laptop does not see the TV device via the WiFi interface. The last step in diagnosing the problem is to check the sync port. From the list of possible causes of the problem, you should not exclude mechanical damage to the TV or computer connector or wire plug.
Also, with prolonged and intensive use, the HDMI cable may fray in places where it is frequently bent. It should be added that experts recommend connecting the TV to the computer when turning off the external power sources of the devices.
What to do?
The first step is to check the reliability of the cable connection from the computer to the monitor at both ends. Move it and completely tighten the fixing screws on both ends of the cable, both from the system unit side and from the monitor side, if any.
Also visually inspect the entire cable around the perimeter for mechanical damage and fractures.
If none of the above helps, then you need to try changing the cable from the monitor to the system unit, borrowing it, for example, from friends or neighbors.
Debugg
The algorithm for independently solving the problem of synchronizing a TV device with a computer is as follows:
- Select connectors compatible with your existing HDMI cable. Since there are several generations of this interface, each of which has unique throughput characteristics, the user must be careful when choosing an input port on a television set. You can find out the properties of the connectors located on the monitor from the instructions supplied with the device.
- Disconnect the TV from the network and switch the laptop to battery mode. By following these steps, the user will protect the cable from internal damage.
- Connecting a laptop to an external monitor.
- Activation of the TV and manual selection of the external signal source. It is necessary to switch the device from digital TV display mode to media content streaming mode.
- Starting the computer. When the signal passes, the operating system loading icon should appear on the TV screen and a special connection sound should be heard. If any error occurs during data transfer, you need to disconnect other peripherals from the laptop and try to update the image streaming settings. If there are no positive results, you will need to move to the next stage of this algorithm.
- Connect devices using a VGA or DVI cable or wirelessly via WiFi. When connecting, you will need to use HDMI adapters from the specified TV connectors.
Perhaps the cause of the malfunction lies in the incompatibility of the TV device with the version of the HDMI interface installed in the laptop.
The user can also synchronize devices without special adapters - for this, both the TV and the laptop must have a connector corresponding to the selected interface. If, after following the steps specified in the instructions above, the user does not receive the required result, he will need to seek help from a specialist in setting up telecommunications equipment.
Attempts to independently repair device connectors can only aggravate the situation and cause new malfunctions.
Conclusion
Now the user knows why the TV may not be visible to a laptop connected via HDMI. It is worth adding that sometimes to fix the problem it is enough to simply restart the computer.
The HDMI port may burn out. Why and how to prevent?
Many of our panel and brick houses have “problems” with grounding (not to mention small rural houses, where there are no projects at all.). For some reason, in our country few people give due attention to grounding.
So, if you (let’s say) have a plasma TV connected to such an outlet without grounding, then under a certain set of circumstances, it can induce phase on the HDMI cable. Because of this, if you do not carefully insert the connector when connecting, for example, you touch the outer contour of the plug while trying to get into the socket, then the device can “burn” (sometimes a small spark may “appear”).
I will also note that if the computer and TV are connected to different outlets, then even if they are both grounded, there may be such a thing as different “ground levels”. You may have even noticed how sometimes you were “beaten” by static (precisely, most often, because of this.).
HDMI burned out (such a case is still rare. Usually, after burning, HDMI looks the same as before, without external signs)
How to prevent this: in order to reduce the risk of burning something to a minimum, you need to follow a simple sequence.
- Before connecting/disconnecting via HDMI, completely turn off the computer (laptop) and TV (monitor);
- Next, disconnect the plugs from the sockets. If you are dealing with TV, then disconnect the antenna cable (if you have cable TV);
- connect the device's HDMI cable;
- reconnect the television cable to the TV;
- connect the devices to the power supply;
- turn it on.
However, I will add that if your sockets are not grounded, then even this method does not provide a 100% guarantee. A grounded outlet, a good surge protector, a high-quality HDMI cable, and a “cold” connection are perhaps the most reliable things that can prevent such a problem.
The HDMI cable has melted.
Important!
Please note that the HDMI cable may cause a fire! In some cases, the temperature at the ports (where the cable connects to the device) can reach temperatures that cause sparks and melt plastic. A few photos above are proof of this.
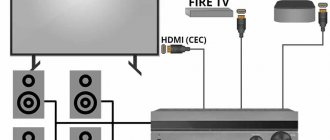
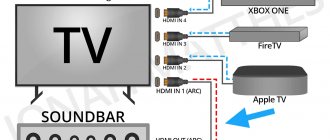
Correctly connecting the TV using HDMI
Home theater owners should know the truth - a digital media device has a playback source menu. The easiest way to illustrate the fact is with old stereo systems. Traditionally, devices had three blocks:
- Cassette decks: recording, playback.
- Radio broadcast reception.
- Laser discs.
Moreover, the blocks refused to play melodies simultaneously. It was necessary to switch sections using a special lever. Even a modern telephone is often equipped with an FM button... Can’t guess why the TV doesn’t see HDMI? Go ahead. The back of a TV typically contains half a dozen output jacks. Among the troops we will find a “tulip” formed by three petals, sometimes VGA puffs up, and certainly HDMI. Traditionally, the list is not limited to a meager list; see the instructions for more details. From the remote control, with the elusive press of a button (with only one HDMI port), you can select a source from the menu. The selection tool can be the Source key. You need to find a menu listing sources, select the cable connection port. There can be more than two HDMI connectors; it is important to track the correct number.
The computer usually avoids such tricks. There is no direct option to select the direction of signal transmission. However:
Fn+F3 or F4
- On laptops, the function keys Fn+F3 (F4) will open a pop-up system menu listing interesting options:
- Computer only. The image will not be sent to the external monitor (TV). Most people choose the named option. Don't be surprised that the TV can't see the laptop.
- Duplicate. The laptop screen will be duplicated by the TV. This is what most people need.
- Expand. Some people like to drag player and browser windows onto the TV, making it more convenient to watch movies. Let's be afraid to judge (tastes are individual), select the Expand option, lengthening the desktop.
- Projector only. The laptop screen turns off. The image will be displayed individually on the TV.
- Desktop personal computers detect TV independently. Otherwise, take the trouble to visit the driver menu and select the required broadcast port.
It is easier to control a connected TV using the desktop context menu. First, right-click on the free space, select the Screen Resolution option. Successful TV detection makes the “Multiple Monitors” button available. You will see four options that are exactly the same as the laptop options. Read the values above. It happens that the computer does not see the TV via HDMI: it makes sense to look here and look at the context menu. The monitors will be numbered; you can swap ports by simply clicking and selecting the object for changing system parameters.
There is no “Multiple Monitors” button in case of inconsistency: the system does not see the TV. Both devices must be turned on (230 volt power supply).
Sound. Connecting a TV to a Computer HDMI
Since its creation by the committee (2002), the HDMI interface has been conceived as a combined solution for transmitting image and sound. See the available audio formats individually (Wikipedia page), we only note that in Windows you need to select the sound source. Now the TV is considered a system device, so these responsibilities can be assigned to it. To do this, it’s easier to right-click the lower right corner of the desktop (speaker icon) and select Playback devices in the context menu. If there is no icon in the lower right corner, you need to click the arrow to the right of the language selection symbol RU (EN), to the left of the clock. There will be a symbol there.
Audio volume mixer
After clicking, a window will open: playback devices will be listed. You will need to turn off everything except the TV, and, on the contrary, turn on the TV. In 90% of cases, after a couple of seconds the native speakers of the plasma panel will sound. Do we want Sound Around? A similar speaker system comes with a home theater. Look through the device description. There are a number of ways to transfer sound from a TV to a home theater; any will do, taking into account the need to purchase the required cable. Similarly, using the Source button on the home theater control panel, select the desired sound source.
On the TV side, the procedure is often transparent, and the device’s own speakers are turned off. Then don't worry if the movie soundtrack is recorded in mono. Every self-respecting home theater has a splitter inside that easily splits the sound into channels of the Sound Around format.