- Publication date April 19 09:00
- Share on social networks
Special offer
ViP package
Movie premieres and new TV series at your home.
Dear subscribers!
Install new firmware right now!
Current software: current version is 1.2 (when updating via satellite) or 1.1 (when updating via USB).
ATTENTION! During the software update process, do not turn off the receiver from the power supply. Do not disconnect the antenna cable. Otherwise, it may cause the receiver to malfunction.
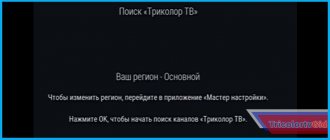
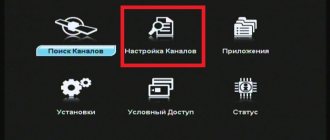
Update from satellite
| Set parameters: Transponder – 12160 H 28800, Load PID – 8005 |
| After the update, the receiver will reboot and return to the package selection page. Select the appropriate package and search for channels. |
Update via USB
Software file for EVO 09 receiver (Conax).
| Step 1. | Download the software file. Unzip the file from the archive to a USB drive. If there are previous versions of the software on the USB drive, it is recommended to delete them. |
| Insert the USB disk into the receiver port. Wait until the USB drive is detected by the receiver, then go to the receiver menu “Settings” - “Update via USB”. |
Enjoy watching!
Special offer
ViP package
Movie premieres and new TV series at your home.
Telekarta is one of the most popular satellite television providers in the Russian Federation. Sometimes, even if the package is paid on time, TV channels disappear. This means you need to update your settings. You can invite a specialist, but if you wish, it’s easy to do it yourself.
Reasons for updating
Satellite television operator Telekarta positions itself as a provider with a dense coverage map in most regions of the Russian Federation. In the central part and middle zone of the country there are practically no complaints about the work of the service provider. The only problem that arises in rural areas is signal deterioration in bad weather.
What to do if the channels are lost forever and how to update the channels on the Telecard on your own - users often search for the answer to this question in the public domain.
If everything is in order with the payment (the availability of money in the account can be checked in your personal account),
then the channel update problem may occur for the following reasons:
- Technical failure in signal transmission from the satellite.
- Missed update via Telekart satellite.
- Change of broadcast network operator. For example, if additional channels were included in the package.
It is also necessary to exclude physical causes of signal loss. For example, in winter snow often sticks to the convector; a poorly secured plate can turn around under the influence of strong winds or break when hit by a branch. If there is no external damage, then the equipment needs to be updated.
There are two ways to find channels on the Telecard - for recommended and non-recommended receivers. There is nothing criminal in using the latter; it’s just that such tuners were not included in the Telecard broadcasting equipment list. After broadcasting of TV channels has been restored, the user can use the TV menu to sort the list. For example, by moving unnecessary channels to the end of the list.
About company
Today, Telekart has many tariff plans that are designed specifically for different categories of clients. After concluding an agreement on the provision of satellite TV access services, the user receives access to his personal account. You can make all the necessary settings there.
The equipment necessary to connect satellite TV is provided by the provider. The delivery set includes a satellite dish, receiver, provider access card, universal converter and connection cables. The first launch and preliminary setup will be performed by a specialist who comes to the subscriber’s home.
Attention! You should not carry out the installation and first launch of satellite equipment yourself. Otherwise, the provider may refuse to provide its services to the client and deactivate the guarantee.
Is it possible to independently update the Telecard on non-recommended equipment?
Sometimes a situation arises when it is necessary to update equipment that the provider has not included in the recommended list. Recently, the Gione receiver from the manufacturer Galaxy Innovations has been selling well. This is a budget, stylish, small size and decent performance brand.
Sellers recommend inexpensive equipment for use in dachas as a set-top box for watching free channels. But such a tuner must be updated periodically.
What can you find out on the website telekarta.tv?
The website always has up-to-date information available both for satellite TV users and for those who are still considering Telekarta as a permanent television provider at home. By following the link with the site address, you can always find out:
- Operating TV channels broadcast by satellite TV;
- Current packages offered by the company to its subscribers;
- How to make a subscription fee;
- Latest news and new promotions carried out
Review all current packages and find out what each package is. For convenience, the information is presented in a visual form. In order to find out information about channels and packages, you need to click on the “TV Channels” tab on the website.
“TV Channels” tab on the website All information is available at any time on the “Tariffs” tab. It can be viewed by both a registered user on the site and those who do not yet have registration.
Registered users can apply directly on the website to connect to a specific package of channels by simply clicking on the appropriate button and entering the data requested by the system.
“Tariffs” tab on the website
The amount of payment directly depends on the selected channel package. The company provides the opportunity to pay in any way convenient for the user, a full list of which can be found on the website by clicking on the “Subscribers” tab.
“Subscribers” tab
Attention: in order for the site to provide the most accurate information, you need to indicate the region of location of the user of the Telekarta satellite TV. This action is performed in the upper left corner of the site.
We indicate the exact region on the website
Ingredients
1. Review
1.1 How to find a satellite1.2 Globo and Tricolor1.3 Master code
2. The receiver does not turn on
2.1 It turns on only after disconnecting from the network 2.2 Overheating of the board 2.3 Shutting down every half hour 2.4 Fuses 2.5 Capacitors 2.6 Four lines, no image 2.7 Off Boot2.8 Boot on, but still won’t turn on
3. Firmware update via satellite 4. Firmware via cable
4.1 Step-by-step instructions4.2 Download the firmware4.3 Solve the “Connection Failed” problem
Tariffs and channel lists
The satellite TV operator offers subscribers many tariffs. Everyone can choose a package of services based on personal needs and wallet. Telecard has three basic tariffs; see the table below for prices and conditions.
| Package of services | Regular rate (cost per month) | Bonus tariff (cost per month) |
| Master | 149 rub. | 100 rub. when replenishing the balance from 1200 rubles. |
| Leader | 249 rub. | 166 rub. after replenishment from 1990 rub. in one payment |
| Premier | 399 rub. | 333 rub. after depositing from 3990 rubles into the account. and 250 rub. after replenishment for 5990 rub. |
The provider has additional tariffs. Each package includes a certain number of channels, including thematic ones (children's, sports, etc.). You can view the tariffs here.
Rates
Review of the Telekarta Globo x90 receiver
Globo X90 is a digital receiver, which is a fusion of a satellite simplex (one-way - reception only) modem and a specialized computer. The operating system of such “set-top boxes” is stored in integrated circuits of non-volatile memory with electrical reprogramming (flash memory). Specifically, Globo X90 is a satellite receiver of the DVB-S standard with the MPEG2 codec. The Globo X90 is no longer in the official list of Telecard equipment. The advantage is that it has two video outputs - SCART and RCA. Many people still have the previous series - Globo X80. Structurally, they are almost identical, so many tips and problems will be valid for both models.
View instruction manual
Download electrical diagram (1.72 MB, JPEG)
Characteristics of the globo x90 receiver:
- Used for satellite television "Telecard"
- Resolution: SD (PAL 576, NTSC 480)
- Card reader - CAM module
- Has a Russian-language interface
- EPG (Electronic Program Guide) present
- Polarization: Linear, Circular, Unicable
- Data exchange via Diseqc protocol: 1.0, 1.1, 1.2 and USALS
- Video interfaces: SCART and RCA (“tulips”)
- Audio interfaces: SCART (mono, stereo), RCA (left/right)
- Additional outputs: 12V, RS232, coaxial SPDIF
- Dimensions 180x40x100 mm (Metal body)
Satellites for Telecard. Coverage area
The Telecard coverage area can be viewed on the official website. In total, three satellites are used in the Russian Federation: Intelsat-15 (85°E), Horizons 2 (84.8°E) and Express AM5 (140°E)
How to catch a satellite?
To correctly align your satellite dish, you need to go to https://www.dishpointer.com/. In the Enter Location line, enter the name of your locality, or click on the sight icon. Then the site will automatically determine your position...
...and insert the coordinates of where you are:
On the right, select the desired satellite. In our case it is Intelsat-15. After clicking the Search button, a map will open with a straight line along which you need to set the satellite dish. The service determined our location. Now you see which way to point:
The plate needs to be mounted as high as possible, because... There should be no obstacles for it - trees, pillars, other houses.
Here is a view towards the satellite. No interference.
Is it possible to use Globo X90 under Tricolor?
Unfortunately, there is no firmware for Tricolor for this receiver. Even if you insert a Tricolor card into the CAM module and configure the satellite, nothing will work. You should not try to flash your Globo X90 with custom firmware, which is recommended on various forums - you will ruin the receiver. Logging into the emulator will not help here.
What is the master code for the set-top box?
Check Disk
The software is designed to check hard drive sectors and correct errors if they are detected. Data overwriting is an additional option.
Official site.
The appearance of the program is simple and does not cause problems in use. Once launched, it scans the system for connected hard drives and external devices.
The utility is supplied free of charge.
Globo X90 does not turn on
Turns on only after disconnecting from the network
One of the most common problems. The fact is that the receiver does not turn on from the remote control when it has been left in stand by mode for a long time. Those. When you turn on the TV you will see an error
Board overheating
Since the receiver is assembled in the Middle Kingdom, there is no need to talk about the quality of assembly and soldering. Controller failure due to overheating. The standard situation, given the size of the board and the case itself, is that it heats up very well. Prevention here is simple - do not put the receiver in drawers and cabinets, and also be sure to keep the ventilation holes open (they are on top)
Switches off every half hour
Fuse burns out
Another subtle, literally, point in the Globo X80/90 receivers is the fuse, which likes to blow out from power surges in the electrical networks of our apartments. It can also burn out if the antenna cable is shorted - do not allow water to get on the coaxial interface (S/PDIF)
Capacitors are drying up
Electrolytic capacitors also suffer from voltage surges. One or several at once. capacitors, diode bridges and resistors
A common problem with receivers is poor-quality electrolytes in the power supply. When the capacitor capacity is lost, the voltage at the output of the power supply drops (can be checked with a multimeter). The normal value is 3.3-3.4 volts. Solved by replacing the capacitor on the power supply (33uF 400V)
The capacitor in the power circuit often dries out and swells. If this happens, the receiver will no longer turn on (the indicators will not light either). There is only one treatment - to re-solder the capacitor, preferably to a higher quality one with a high degree + with a voltage reserve
4 lines are lit on the display - no picture or sound
Four horizontal lines on the receiver's display indicate the absence of a channel list, and not the absence of a signal, as one might think (the absence of a signal is indicated by a red LED). To solve this problem, you need to re-upload the firmware to the receiver (see section “Firmware via cable”)
Doesn't turn on, boot doesn't light up when turned on
When you turn on the receiver, the word boot appears on the display - this means that the set-top box is loading and will turn on soon. But this doesn't always happen. Often the problem is the power supply (you can check by connecting an external power supply to the 3.3 V line) - the culprit is the 22.0x50v capacitor (dries out). SMD electrolytes also often dry out - for prevention it is worth checking them too.
A failed flash memory firmware of the receiver is also the reason why boot is not lit on the display when turned on. This can be solved by flashing firmware via the receiver's JTAG interface.
If the tuner does not have a JTAG connector, then you can flash the flash memory using a programmer (“flasher”). Step by step:
1. Download firmware for SPI Flash
2. Flash the flash memory using a programmer. To consider this chip as a programmer you need to know the code or master code.
They write online that flash memory needs to be desoldered for firmware. This is true, but firmware through the programmer is possible without dismantling the microcircuit. Video of how to flash with a programmer:
3. After flashing the SPI Flash firmware, we update the firmware of the receiver itself using a regular cable. Download the bootloader, firmware dump and update the software (more details in the “Firmware via cable” section)
If, after all, there is no programmer, then you will still have to unsolder the microcircuit, solder the receiver where there is a JTAG interface, flash it and solder it back into your receiver.
How to flash via the JTAG interface, read this material
Doesn't turn on, but now boot is lit on the screen
Personal account features
Most Telekart TV subscribers have already appreciated the convenience and ease of using remote service without having to call the support service. Telekarta’s personal account is accessible around the clock and from any device, and there are special applications for mobile devices that can be downloaded from the main page of the site. After registration, the following services are available here:
- Obtaining information about your cash balance and payment history.
- View data on current services and their expiration dates, as well as manage them (connect or disconnect, expand and renew).
- Top up your account online and without commission.
- View current promotions and current offers.
- Online communication with support service.
Firmware via cable
The main problem with the Globo X80 is related to the firmware. It often happens when the receiver freezes and does not respond to anything, it does not turn on from the remote control, and juggling the power socket does not help. In most cases, firmware helps. To connect to a PC you will need an RS-232 to USB cable. You can buy it in stores that sell phones, digital equipment, etc.
The RS-232 interface (aka 9-pin COM) is located on the rear panel of the set-top box
Step-by-step firmware process
1) Download the bootloader - Upgrade Tool
2) Unpack the archive, run the file upgrade.exe
3) Select the desired port to which the receiver will be connected. By default it is already there. Those. Leave all the settings in the window as they are (Operation mode - UPGRADE)
4) Connect the receiver to the PC, but do not turn it on(!).
5) Press the Connect button and only now plug the receiver into the outlet
6) In the next window, select All Chunk and select the firmware file (a check mark will appear next).
7) Next comes the firmware process. Click Finish at the end
 Reboot the receiver using power (from the outlet)
Download firmware
It is better to use a dump to flash the receiver firmware. A dump is a complete copy taken from a working receiver, which contains all the necessary software, as well as channels, BISS keys, settings, etc. Those. This is a full-fledged “firmware”, after which your receiver will work immediately. There is an option to install “bare” firmware, but then the list of channels and keys will have to be configured separately
Download original Globo X90 firmware
Download Globo X90 dump from 02/17/2017 (for satellites - Amos 2/3 4.0°W, Astra 4A 4.8°E, Hot Bird 13 B/C/E, 13.0°E, ABS 2, 75.0°E)
Download Globo X90 dump (2015) (for satellites 4W-5E-13E-75E)
Download Globo X90 dump for Telecard (2018) (Software version 1.3.70C, for satellites 4-4,8-13)
Download Globo X90 firmware for Telecard v1.1.61
Clarification: The name of the satellite in the firmware is not critical at all. You can rename any one or add a new one that you specifically need in your location (see section Manually searching for a satellite). But this is provided that the dish is aimed at the satellite you need.
“Connect failed” during the firmware process
If such an error occurs at the beginning, check whether the firmware file is in the same folder as the bootloader - it probably cannot find the firmware. Also check whether the COM port is specified correctly in the Upgrade Tool window:
If such an error appears during the process, it may be due to swollen 5V electrolytes in the power supply (check the voltage from the power supply to the board - it should be 3.3-3.4V)
Black screen after flashing with cable
It can only be treated by flashing it using a programmer with a firmware dump uploaded to it, or via JTAG. Read how to do this here.
Often, even after making a subscription payment, some of the TV channels that are included in the selected satellite television package do not work. Most likely, this is due to channel recoding; to restore broadcasting, you need to update the Telecard channels yourself.
The actions taken depend on the model of the signal receiver - receiver.
Telecard recommends the following models for good signal broadcasting:
- Continent CSD-01/IR;
- Continent CHD-02/IR, 04/IR, 04/CX;
- Continent CSD-03/IR;
- GLOBO HD X8;
- GLOBO X80/90;
- EVO-01;
- EVO-02;
- EVO-05;
- EVO-07;
- Ricor;
Your home receiver may be from a different manufacturer.
Pivot table
| Name | Price | Version | Peculiarities | Advantages | Flaws |
| MiniTool Partition Wizard | Professional – $39 Server – $159 Enterprise – $399 Technician – $699 Bootable CD – $39 | v10.3 Year 2018 | Complete solution with many built-in options | All-in-one product | Advanced functionality is available only in paid versions |
| HDD Low Level Format Tool | Pro – $3.30 Enterprise – $27 | v4.40 Year 2014 | A utility for deleting data without subsequent recovery. | Minimalism. Low-level formatting | No advanced features. No longer in development. |
| HP USB Disk Storage Format Tool | Free | v2.2.3 Year 2016 | An alternative to the system utility. | Formats flash drives | There are no additional options. No longer supported by the vendor. |
| SD Formatter | Free | v5.0 | Can restore the functionality of SD cards | Minimalism. Each type of card has its own algorithm | Only for SD cards. English interface. |
| Format USB Or Flash Drive Software | Trial period available $ 23.59 | v7.0 Year 2018 | Ability to format multiple media. | Minimalism. Working with multiple flash drives. | Does not support Russian language. |
| EzRecover | Free | v7.1 Year 2015 | Recovering media in case of failures | Supports the ability to revive a flash drive or memory card | Not compatible with some SD card models. Doesn't work correctly with USB 3.0 |
| JetFlash Recovery Tool | Free | v1.0 Year 2015 | Restoring flash drives. There is an online version | Removes write protection and revives media. | No longer updated by the manufacturer. Calculated only for Transcend products |
| Check Disk | Free | v1.3 Year 2015 | Repairs damaged sectors | Minimalism. Error recovery | English interface. No longer supported by the manufacturer. |
| Telecard Vkontakte | Telecard in Odnoklassniki |
| Telecard on Facebook | |
Download the “Telecard” application on android Download the “Telecard” application on iPhone
Algorithm of actions for updating channels depending on the model
Continent CSD-01/IR:
- Open the Menu on the receiver's remote control to search for channels.
- In the menu that opens, select the “Custom Settings” section.
- Select the "Factory settings" option.
- Confirm the action by pressing the “OK” button.
- Enter the password using the numeric keypad on the receiver's remote control. If the password has not been changed, then the standard password corresponds to the numbers “0000”.
- Select the “Yes” option to confirm the action.
- Click the “OK” button.
- Wait for the time during which the search for TV channel encodings will be carried out.
- At the end of the process, click the “OK” button.
- Exit the menu by pressing the “Exit” button.
Continent CHD-02/IR, 04/IR, 04/CX
- Open the Menu using the button on the receiver remote control.
- Select the “Settings” section from the menu.
- To continue working, click the “OK” button.
- Select the “Configuration” option.
- Confirm the action with the “OK” button.
- Enter the password that the receiver asks for. The standard password, as in the previous case, is “0000”.
- Select the "Restore Default" option.
- Confirm the action with the “OK” button.
- Next, windows will pop up, in each of which you should select “OK”.
- From the service packages presented to choose from, select the one you need.
- Confirm the action with the “OK” button.
- In the newly popped up window, confirm your choice of actions with the “OK” button.
- The search for broadcast channels will begin. After completing the search, press the “OK” button. Exit the menu with the “Exit” button.
Continent CSD-03/IR
- Open the Menu with the corresponding button on the remote control.
- Open the “Installation” section.
- Confirm the action with the “OK” button on the remote control.
- Select one of the suggested “Factory settings” options.
- Click the “OK” button.
- A window will pop up in which you need to click the “Yes” button and confirm the action with the “OK” button on the remote control.
- Use the “OK” button to select the “Search for channels” option.
- Make sure that the “Network Search” column is turned on.
- Click the option on the “Start Search” screen and confirm the action with the “OK” button.
- The receiver will begin searching for channel signals.
- When the search process is complete, click “OK”.
- Exit the menu by clicking “Exit”.
GLOBO HD X8
- Enter the Menu using the remote control.
- Select the “Settings” section using the arrows on the remote control.
- Click the “OK” button.
- Select an option in the "Factory settings" section.
- Click the “OK” button.
- When a confirmation request appears on the screen, click the “Yes” button, followed by the “OK” button.
- Select your channel package by pressing the “OK” button.
- The search for channel signals will begin, after which you should press the “OK” button.
- Exit menu.
GLOBO X80/90
- Enter the Menu using the remote control.
- Open the “Custom Settings” section using the “OK” button.
- Reset factory settings by selecting the desired option.
- Confirm the action with the “OK” button.
- Enter your password. If it has not been changed, then enter .
- A window will pop up in which you need to click the “Yes” button, then the “OK” button.
- After finding all the necessary signals, complete the process with the “OK” button.
- Exit the menu using the “Exit” button.
EVO-01
- Enter Menu.
- Open the “User Settings” menu section.
- Confirm the selection of the “Factory settings” option with the “OK” button.
- You will be prompted to enter a password. Password from .
- The receiver will prompt you to reset to factory settings on the screen. To do this, press the red button on the receiver's remote control.
- Press the “OK” button to search for satellite television signals.
- After the process is completed, you do not need to do anything, since the receiver will open the TV channels on its own.
EVO-02
- Enter the Menu using the remote control.
- Open the “Settings” section.
- Confirm the action with the “OK” button.
- Scroll down options. Select the “Configuration” option.
- Use the "OK" button.
- Open the “Factory settings” option with the “OK” button.
- Reply to the password request, .
- In the pop-up window, click the “Yes” button and the “OK” button.
- An automatic search for broadcast channels will begin.
- Finish the job with the “OK” button.
- Exit the receiver menu using the corresponding button.
EVO-05
- Open the menu using the remote control from the receiver.
- Open the “Settings” section with the “OK” button.
- Open the “Configuration” option with the “OK” button.
- Enter your password. If it has not been changed previously, you must enter the password “0000”.
- Open the "Factory settings" option with the OK button.
- Answer all confirmation requests using the "OK" button.
- Find your service package in the options offered.
- Click the “OK” button.
- In the pop-up window, confirm the action using the “OK” button.
- After automatically searching for channels, fix the action of the receiver with the “OK” button.
- Exit the menu using the appropriate button.
EVO-07
- Open the receiver menu using the remote control.
- Select the “Settings” section using the right or left arrow buttons.
- Open the “Factory settings” option with the “OK” button.
- Enter a 4-digit password. Password from .
- Confirm the actions with the “Yes” and “OK” buttons.
- Find your service package in the proposed options.
- Make a selection with the “OK” button.
- Wait until the automatic search for TV channels broadcast by satellite is completed.
- Exit the menu when all actions are completed.
Ricor
- Enter the System Menu.
- Click the “OK” button after selecting the “Settings” section.
- Find the “Television” item.
- Press the “OK” button.
- Find the “Orion Express” item using the buttons that move the arrow on the screen to the right and left.
- Click the “OK” button.
- Select the “Search” item and confirm the action with the “OK” button.
- A window will pop up in which you need to select the “Replace” option by clicking the “OK” button.
- The search for TV signals will begin.
- At the end of the process, log out of the system.
Why is satellite TV so popular?
Satellite television is slightly more expensive than standard TV, but differs markedly from it in image quality and the number of channels.
In addition, when connecting to satellite TV, you can choose any of the numerous channel packages, focusing on personal preferences. Here are a few advantages that distinguish satellite TV from the usual standard television:
- High image quality: the picture on the TV screen is now brighter and clearer. There is no annoying interference, noise and white “ripples” that always occur when the antenna is not configured correctly.
- Variety of channels. Satellite TV providers offer packages that include a specific set of channels. This is very convenient: some people like to watch movies and TV series, some adore programs about nature and the animal world, while others want to watch culinary talk shows and news channels. The selected package, if desired, can be replaced with any other.
- Broadcast in any region. If configured correctly, satellite TV will broadcast channels regardless of proximity to the central district of the country (the capital), delighting users with excellent picture and sound quality.
- Affordable price. The purchase and installation of satellite equipment is accessible to any average resident of our country. The subscription fee for a package of channels is paid once a year and its size depends on which package is chosen by the user.
JetFlash Recovery Tool
Another utility for recovering damaged sectors on flash drives from the manufacturer Transcend. The program supports two modes of operation: data recovery and removal of write protection.
The program is no longer supported by the vendor. He replaced it with the online service JetFlash Online Recovery. The application is available at the link above.
The user connects the media, starts the service and tries to recover the data.