Smart TVs from Philips are equipped with a significant amount of functionality, but using them sometimes causes difficulties for new owners.
The following guide will help the user not only to correctly connect and configure the operation of modern equipment, but also to provide access to a huge number of Internet resources.
Feature overview
This model combines the functions of television and Internet technologies.
Philips televisions operate on the WebOS and Android platforms, which allows them to effectively interact not only with World Wide Web resources and traditional analogue broadcast sources, but also with local media servers.
As a result, the TV owner receives at his disposal:
- Ability to surf the Internet on a TV screen;
- Install and use numerous programs that significantly expand the capabilities of the device;
- Watch video content online without using a computer;
- Use widgets;
- Get access to Google services;
- Communicate with loved ones and acquaintances via the Internet using communication applications;
- The presence of USB and HDMI connectors greatly expand the possibilities of using the TV;
- Ease of use thanks to an intuitive interface and proprietary recommendation system.
Next, let's look at the main functionality of TV from this company.
SimplyShare
Thanks to this function, TV and PC (laptop), tablet, smartphone are synchronized. To connect devices to match with TV, a wireless connection using Wi-Fi technology is used.
Smart TVs from Philips can show video and play audio using the same files that the user is used to opening on a PC.
This became possible due to the use of special technology in their Smart TV, which was called “SongBird”.
It itself identifies files and installs missing codecs.
Control
After the appearance of such a function, the TV owner was able to control and manage television through a mobile device (using a laptop, tablet or smartphone).
For this purpose, it is enough to install the “My Remote” application into the gadget.
Now, to adjust all the parameters of the TV, it is not necessary to reach for the remote control, since if the user has, for example, a smartphone with the My Remote program installed, it turns into a full-fledged TV remote control.
Net TV
To quickly access the global network, the developers have provided a separate “Net TV” function.
Thanks to it, you can quickly start broadcasting, for example, from Zoomby, Vimeo, YouTube, Tunin, Picasa and other similar services.
In addition, gaming enthusiasts respond well to access to "FunSpot", which has a variety of flash games.
It should be noted that there is no need to separately configure this function, since it is performed automatically immediately after connecting to the World Wide Web.
The Net TV information tab displays not only world news and exchange rates, but also the weather, traffic jams, etc.
USB recording
This is a simple function, but it is most often used by owners of modern TVs.
For example, if a person does not have time to finish watching an interesting game, show or movie, he can watch it later, when he has free time.
To do this, using this function you only need to record to an external USB drive.
How to set up IPTV on Philips TV
Setting up IPTV on a Philips TV is done through the ForkSmart smart TV widget. The sequence of actions is as follows:
- Go to Philips setup.
- Click view parameters.
- Write down the numbers and letters that appear on the screen.
- Return to menu.
- Select network settings.
- Set the IP address.
- Return to the menu and start setting up a static IP address.
- All necessary specified parameters must be taken from the entries in paragraph 3.
- Turn off the TV and turn it on again.
- Press on the TV remote control on Smart TV.
- Launch the “Megogo” widget, as a result of which foorksmart should start working.
When fork player is launched, the installation is considered successfully completed. The variety of widgets that the upgraded Philips can access will give your smart TV endless possibilities in the world of Internet technology. And the user will receive a bonus in the form of a most interesting pastime in front of the Smart TV screen.
Connection procedure
You can connect your TV to the Internet via Wi-Fi. This option is the most popular at present, since you do not have to run an Internet cable to the TV.
Access to Internet resources will be provided via a wireless network.
For this purpose, it is necessary to perform the following sequential actions:
- Make sure that the router broadcasting Wi-Fi is turned on;
- If the TV does not have a built-in Wi-Fi receiver, then insert an external adapter into the USB port of the TV;
- Next, to connect to the router, you can press the button on it, which is specially designed for quickly connecting home devices to Wi-Fi. The key on the router is labeled "WPS";
- In the TV menu, click “Easy Access” and then click “Ok”;
- Alternatively, you can connect by entering your wireless network password using your remote control.
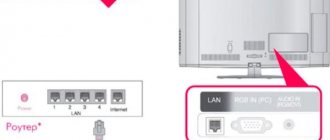
In the case where the user has chosen a wired connection, since it is not subject to external interference, unlike a wireless connection, the following steps will be required:
Using a cable, connect the TV to the LAN port of the router.
For example, on the Philips 43PUS7150/12 TV model, the socket into which you need to insert the cable is marked “Network”.
The main thing is that the wire is long enough to connect two devices.
On a LAN router, the connectors are usually highlighted in yellow:
- Press “House” on the remote control;
- Enter the “Settings” section, where click on the “Wired and Wireless Networks” tab;
- Click “Wired or Wi-Fi”;
- Click “Connect to a network”;
- Click “Wired”;
- Click “Finish”;
- Ready. The connection to the global network has been established.
At the end of the connection procedure, an agreement will be displayed that you must agree to. Then register for the Philips Club:
Click "Create Now".
In the menu that appears, type your personal information using the remote control and click “Create an account.”
After that, click “Login to My Philips”. Enter your personal name and access code to the club. Click “Register product”.
Find the TV model through the search.
In the next menu that appears, indicate the day, month and year of purchase of the Smart TV and click “Registration”.
Ready. These steps allow you to establish a connection with the Philips server and provide access to all the features of your Philips Smart TV.
But simply connecting your TV to the network is not enough. Next, we should move on to solving the question of how to properly configure smart television.
A little about SMART TV from Philips
These days, no one is surprised by smart TVs. Personally, I'm an avid fan of LG, or at least Samsung. However, I have noticed that our readers are looking forward to switching to Sony Bravia and Philips TVs. I don’t understand what’s so special about them, apparently it’s a matter of habit, but the price and functionality are about the same.
Philips TVs are based on the WebOS or Android operating systems.
Lately, it has become fashionable to switch to Android - it's cool, trendy, familiar and has a lot of features. But WebOS as a transitional form between dead firmware and a full-fledged “axis” is also not bad. In both cases, there are no problems connecting the TV to Wi-Fi, setting up channels and installing third-party applications. We would like to devote the rest of the story to these questions.
Setup procedure
The manufacturer has tried to simplify this process as much as possible, so setting up a Philips TV will not cause significant difficulties even for novice users.
Before proceeding directly with the configuration, it is recommended to update the smart TV software. To do this, press the “Home” key on the remote control.
Next, in the menu displayed on the TV screen, enter the “Configuration” column and start the upgrade process.
Wait for it to complete.
Ready. Now the old software has been replaced with the new one and you can start setting configuration parameters.
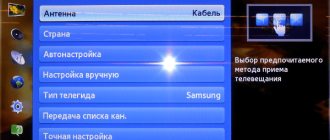
Setting up channels
To set up television reception you must perform the following steps:
- Press “House” on the remote control;
- Go to the “Configuration” section;
- Click “Search for channels”;
- Next, click “Reinstall channels”;
- Mark the state where the user lives;
- If your country is not on the list, then you can indicate another one, for example, “Finland”;
- Further, for example, if the connection is made via a digital wired network, then o;
- In the next menu that appears called “Start channel search”, click “Settings”;
- Then click “Automatic”;
- After that, open the “Quick Scan” tab;
- In order to be able to broadcast television by receiving an analog signal, you should set “On” in the “Analog channels” column. (make sure that the cable from the antenna is inserted into the corresponding plug on the back panel of the TV);
- Click “Done”.
Note: The channel search process usually takes about ten minutes.
To set up Smart-TV after connecting to the Internet, you just need to click “Browse Net TV”. The user can then view videos and websites directly from the TV screen.
Where to begin
Before you start setting up Smart TV technology on your Philips TV, you must first determine whether it supports it or not. You can find this out either in the User Manual on the page with the characteristics of your device, or on the manufacturer’s website, or even visually: check for the presence of an input for connecting an Internet cable, a built-in Wi-Fi function, or simply look for a button on the remote control with that name.
After we have made sure that our Philips TV works with Smart TV, we can move on to the next step: install the latest current firmware update. This procedure must be done due to the fact that sometimes a bug or incompatibility with some equipment may be discovered in the operation of any device. In this case, the manufacturer corrects the error and releases a new update.
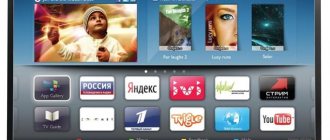
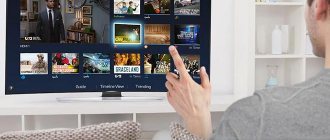
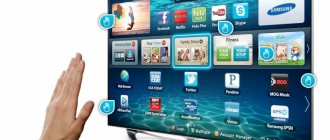
Online applications
Thanks to the flexible ability to select and install applications according to the user’s personal taste, a smart TV from Philips is maximally adaptable to any requirements and preferences.
The programs make available a huge number of movies, music videos, special programs for communication and communications, and also provide quick access to news from around the world.
To install applications you will need to take the following sequential steps:
- Open the “App Store” section;
- Select the application you like;
- Install it on the main TV menu screen;
- Then launch the application at any time and use it.
For example, to watch movies and shows, experienced users often install “Stream Interactive”. And for quick access to Yandex services, they use the utility of the same name directly from the screen of their TV.
The “VideoMore” and “Ivi.ru” programs are very popular, where not only clips and movies are concentrated, but also many cartoons for children.
Malfunctions and their elimination
Users often have problems installing widgets. To troubleshoot the problem, you can use the ForckPlayer program. To do this you will need:
- Open the menu and go to the network connection settings section;
- Instead of the base DNS, we enter our own - 046.036.218.194;
- We are waiting for the TV to reconnect to the home network and open the Megago application. If everything is done correctly, Fork Player will launch instead;
- In older TV models, the year of manufacture of which was in 2009, we launch Tvigle instead of Megago.
Other faults are not so critical and in most cases can be easily fixed. To do this, just use the TV's instruction manual. The attached instructions describe the main causes of malfunctions and steps to eliminate them. All you have to do is follow the specified algorithm of actions and enjoy watching.
Application for mobile devices
The lucky owner of a Philips smart TV should first install the “Philips TV Remote” application on his mobile device.
This alone will provide access to a significant amount of interactive entertainment for Philips Smart TV.
Plus, there is no need to use a bundled remote device, since the TV will respond adequately to control via a smartphone or tablet.
It should be noted that the procedure for typing text from a mobile gadget is more convenient than from a standard push-button remote control, and this is often done on Smart TV.
The application implements a function for exchanging files, and also contains all the standard features of a simple remote control, for example, setting the sound, switching programs, etc.
Searching for channels and TV shows that the user is interested in through this application is much faster than with a remote control.
If you are too lazy to press buttons, you can use voice search, since the application adequately perceives the Russian language.
You can verify the program’s compatibility with your mobile device on the “philips.ru/support” page.
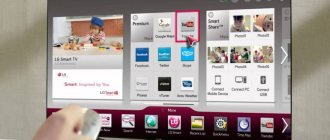
Installing widgets
If the TV model is not the most modern, then installing widgets is only possible through the built-in “App Gallery”, and new Philips models already support working with third-party developments.
To install the widget, follow just a few steps:
- Open the application store and indicate your location;
- Enter the name of the desired widget in the search bar or select from the list;
- Set the widget icon to the home page.
If the required application needs to be installed from an external USB drive, you must perform the following steps:
- Format the flash drive to FAT32;
- Next, open it in Explorer and call the context menu on an empty field (a blank formatted flash drive);
- Hover the cursor over the “Create” column and click “Folder”;
- Name the new directory “userwidget”;
- Save archives with widget distributions in it;
- Install a flash drive into the TV;
- Then, in automatic mode, the smart television will recognize the media and installation of programs will begin;
- Wait for the process to complete;
- Ready. Icons will appear in the TV menu through which you can launch widgets.