When using Toshiba equipment, problems with the software are possible. In this case, the “Do Not Power Off” warning appears on the screen. In this case, you need to reflash the TV to restore its functionality. It is important to remember that the Toshiba 40HL933RK requires unique firmware, like any other TV model, so you should figure out where to find the installation file and how to properly flash the Toshiba firmware yourself.
As with other TVs, problems can occur with Toshiba TVs. One day when you turn it on, you may see such a warning.
Why do you need firmware?
For the normal functioning of the device, a set of programs is required that is responsible for its functionality. During operation, software failures occur and defects occur in memory chips. As a result, the software stops working and the TV does not turn on. In this case, you need to download the firmware file and start the installation process.
Where can I download
Installation archives are downloaded from the official website. The file name corresponds to the device model. Character-letter combinations can be found in technical documents or on the back panel of the TV. For example, for Toshiba 40L7356RK the firmware is named similarly and a file with different letters will not work.
You should also note that not all devices in the list have a firmware file.
For example, there is no firmware for Toshiba 40L3453R. In this case, you will need to search for the file on third-party resources. Download links are available in thematic blogs, but it is possible to download a low-quality file with errors, which will lead to big problems.
For certain models of Toshiba equipment there is no updated version on the website, since direct automatic flashing is available for them. For more accurate information, please read the user manual.
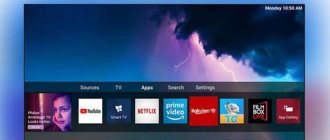
How to update firmware via the Internet
If the user has the ability to connect to the Internet, you can reflash the device directly from the TV. But even when technology needs updating, it cannot always load programs. The reason is a rather severe failure, so there is no other choice but to switch to working with additional devices.
If not everything is so tragic yet, there are just some glitches, make sure that the Internet connection is of high quality and will not be interrupted at the most inopportune moment.
The TV itself will find the firmware, the user just has to confirm its installation and follow the instructions in time. But we do not recommend using automatic updates, since they are often the cause of failures.
Installation options
You can install updated software on Toshiba directly via the Internet or by downloading from a flash drive. The option with removable media is more labor-intensive, but reliable. If you need to update the software for Toshiba 40L7363RK, firmware via USB will be the best option.
Firmware via USB
To install a file from removable media, you must have a flash drive of at least 500 MB. Typically, installation archives are no more than 200 MB. The media format does not matter. In any case, you will need to prepare a flash drive before downloading the firmware file.
Preparing a flash drive
The preparatory measures are intended to delete files existing on the drive and convert the file system format to FAT 32, since on most models, including the Toshiba 40D7363RK, the firmware will be installed only if this format is supported. To do this you will need:
- Download a special formatting program to your computer or laptop: HP USB Disk Storage FormatTool, HDD Low Level Format Tool or analogues.
- Remove o, since only in this case will it be possible to clear all files and copy the software to the media.
- Start formatting the flash drive so that the file system is formatted as FAT 32.
- Once formatting is complete, transfer the installation file to the USB flash drive.
If the formatting is done correctly, then the success of flashing the Toshiba is guaranteed if the software installation algorithm is strictly followed.
How to flash a Toshiba TV
Modern televisions contain several types of memory chips that store information for various devices. Accordingly, different firmware and methods are used. User software update (located in NAND-Flash memory) occurs via a USB interface (via a flash drive) or directly in the TV menu via the Internet. System memory (SPI-Flash and EEPROM) is updated by specialists using programmers.
Attention !
The files located here are intended for telemasters who understand what memory and why to update. If you are a TV user, we advise you to leave this site. In order to completely kill your device, you can use a bunch of other Internet sites designed for users. This site is for masters, not for users!
Information for masters
The archives contain firmware dumps for Toshiba TVs. The files are designed for programming using universal programmers via the SPI interface (FLASH), or via the I2C bus (EEPROM). Files are in BIN format, compressed with the RAR archiver.
Keep in mind that despite the general similarity, each brand has its own firmware features. Inside many archives there is a detailed description of a specific model. If you have additional questions, ask them in our forum, where the main visitors are repair specialists.
If the required file is missing, you can request it in the forum in the Search for firmware section or look at the more recent catalog Firmware for LCD TVs
Pay attention to the firmware of the Monitor website:
Installation algorithm
If the Toshiba 40HL933RK firmware is downloaded from the official website, installation instructions are usually included with the installation file. This also applies to updates for other TV models downloaded from an official source. The general instructions are as follows:
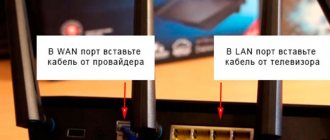
- Connect the storage device to the disconnected TV.
- Turn on the device.
- If the flash drive is prepared correctly, then the TV will automatically request to start the installation. You must confirm the update.
- Wait for the allotted time for installation.
- Wait until the TV automatically reboots.
When flashing, it is strictly forbidden to disconnect the flash drive. This will stop the installation and lose all files, so the update procedure must be carried out carefully. After the update is complete, you should check the functionality of the device.
Internet download
If you have a stable high-speed Internet, you can start a direct installation without downloading the file to the media. If there is an Internet connection, the device can independently find a new firmware version. Next, the update will start, which is easy to do if you follow the instructions. You should not completely rely on automatic installation, since if there are glitches in the Toshiba TV software, incorrect installation may occur. In this regard, experts recommend using firmware from USB to update Toshiba software.
Important! When choosing this option for updating the firmware for Toshiba, you should save the previous version on a flash drive, since if it fails, you will not be able to restore the data.
How to return old firmware
If the firmware is installed correctly, when you turn on the Toshiba device it will work correctly, you can start searching for programs and make settings. If the software update is unsuccessful, roll back the settings to the old version if there is a saved copy of it. To do this you will need to perform the following steps:
- Turn off the device into technical mode.
- Open settings.
- Connect a flash drive with the old firmware version.
- Wait for automatic data recovery.
- After rebooting the TV, check its functionality.
Returning to the previous firmware version will return the functionality of the Toshiba TV for a short time. It is important to find updated firmware in order to fully restore the functionality of the device.
Firmware for Toshiba is freely available on the Internet. In this case, it is important not only to download the appropriate file, but also to strictly follow the installation recommendations so as not to aggravate the situation, since serious failures may result in complete loss of functionality. In this case, it will be almost impossible to restore Toshiba's operation. In view of this, if you do not have flashing skills, it is better to entrust the work to professionals.
Installing firmware from a flash drive
Reflashing the TV using a prepared flash drive is quite simple - insert it into a special slot and confirm the boot installation. Of course, not all devices will immediately launch updates, but if this does not happen, you can launch them manually by going to the settings section and selecting the desired path, that is, through a USB device.
- Disconnect the TV from the network and insert the USB flash drive;
- Connect the device and press the power key on the remote control or panel;
- Confirm your desire to update the system;
- Please wait while the update process takes place;
- This will be followed by an automatic reboot.
Reflash it carefully, and under no circumstances touch the flash drive. As soon as it is pulled out or loses connection with the TV, the flashing process will stop, and this will have tragic consequences for the TV, since the device will practically not be able to work in the usual mode, if at all it will turn on.
Wireless connection (WiFi)
If your access point supports WPS, you can use this method.
WPS is an industry standard designed to make it easier to connect wireless network devices and configure security.
When using WPS, all wireless settings are configured automatically. Please note that WEP encryption may not be configurable via Simple Setup.
There are several wireless setup methods:
- Easy setup using PBC (setting by pressing a button).
- In the Preferences menu; go to Network installation; → Wireless setup; → Easy setup;.
- Select the RVS item; and press Start Scan; and then OK;.
- Follow the onscreen instructions to press the appropriate button on the access point.
- When a window appears notifying you that the setup is complete, click OK;.
- Easy setup with PIN code (personal identification number).
- In the Preferences menu; go to Network installation; → Wireless setup; → Easy setup;.
- Select the PIN item; and press Start Scan; and then OK;.
- Use the arrow buttons to select the desired access point and press OK;.
- When the PIN code window appears, enter the displayed PIN code into the access point settings, and then press NEXT; to continue setting up using the PIN code. When a message appears notifying you that the setup is complete, click OK;.
- Auxiliary setting
- In the Preferences menu; go to Network installation; → Wireless setup; → Auxiliary setting;.
- Use the arrow buttons to select the desired access point and press OK;.
- Highlight Security Key; and click OK;. A window with a software keyboard will appear.
- Enter the security key using the software keyboard. To save the settings, press the BLUE button. The security key value must satisfy the following conditions - 8-63 ASCII code characters or 64 hexadecimal numbers for TKIP / AES or 5 or 13 ASCII code characters or 10 or 26 hexadecimal numbers for WEP . Only one key ID can be set for WEP encryption.
- Highlight the Done option; and click OK.
- Manual setting (manual setting of all parameters)
- In the Preferences menu; go to Network installation; → Wireless setup; → Manual setting;.
- Use the arrow buttons to select Network Name; and click OK. A window with a software keyboard will appear.
- Enter the network name using the software keyboard. To save the settings, press the BLUE button.
- Select Authentication;, and then scroll to Open System;, Shared Key;, WPA-PSK; or WPA2-PSK;.
- Use the arrows to select the Encryption option; and then select None;, WEP;, TKIP; or AES;. Some encryption types are only available for certain authentication types. When set to Open system; Only WEP encryption types are available; and None;, with the value General key; — only WEP encryption type;, with the value WPA-PSK; or WPA2-PSK; — TKIP encryption types only; and AES;. If an incompatible Authentication/Encryption pair is detected, a warning message will be displayed and the connection will not be established until the incompatibility is resolved.
- Select the Security Key value; and click OK;.
- Enter the security key using the software keyboard. To save the settings, press the BLUE button. If for the Encryption parameter; set to Low;, this element will be inactive and grayed out.
- Highlight Done;, then press OK;.
If you set the menu to Preferences; → Network installation; → Wireless setup; item Support 11n; to the On position;, the Dual Channel function will be available; (40 MHz). NOTE: In addition, some other additional 11n features will be enabled. To cancel the setting during any setting method, press BACK; and then when the message appears, click OK;.
Model: 39L4353
Additional image features: True Cinema (24 frames)
.
Case color: black
.
It is possible to mount the TV to the wall.
.
Main technical characteristics: | |
| LCD TV LED Smart | Model year: 2013 |
| Diagonal screen size: | 39″ (99 cm) |
| Screen format: | 16:9 |
| Maximum resolution: | 1920×1080 |
| Update frequency: | 100 Hz |
| Matrix: | T390HVN01.0 XL |
| LED backlight: | There is |
| Smart: | There is. Wi-Fi support - yes |
| HD support: | 1080p Full HD |
| Brightness: | 300 cd/m2 |
| Viewing Angle: | 178° |
| Pixel response time: | 6.5 ms |
| Progressive Scan: | There is |
| TV standards: | PAL, SECAM, NTSC |
| Digital tuner: | DVB-T, DVB-T2, DVB-C |
| Teletext: | with memory for 500 pages. |
| DTV formats: | 480i, 480p, 576i, 576p, 720p, 1080i, 1080p |
| Multimedia: | MP3, WMA, MPEG4, Xvid, DivX, MKV, JPEG |
| Stereo sound: | There is. NICAM STEREO |
| Sound power: | 14 W (2×7 W) |
| Acoustics: | two speakers |
| Headphone jack: | There is |
| Interface: | AV, component, SCART, RGB, VGA, HDMI x4, MHL, USB x2, Ethernet (RJ-45), Wi-Fi, WiDi, Miracast |
| TV weight: | with stand: 8 kg without stand: 7 kg |
| Dimensions with stand: | 891x590x200 mm |
| Dimensions without stand: | 891x525x85 mm |
| Network consumption: | 138 W |
AMR 100
Modern TOSHIBA LED TVs, currently sold in the Russian Federation, can be manufactured in Russia at modular assembly plants in Kaliningrad.
Technical description
LED TV TOSHIBA 39L4353
with LCD display
T390HVN01.0
, diagonal size 39″ (99 cm)
16:9
.
The required screen brightness of 300 cd/m² is provided by LED backlighting. The display manufacturing technology of this model uses LED backlighting. T390HVN01.0
matrix and the software of the MainBoard
32L4300
implement images in high HD quality with a resolution of
1920×1080
pixels in graphics format according to the
1080p
(
Full HD
).
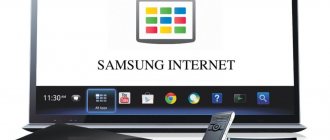
The 39L4353 TV is equipped with SMART software, built-in applications and the ability to work on the Internet. Connection to the Internet can be achieved via Wi-Fi wireless connection. The input high-frequency or video signal can be processed in analog systems PAL, SECAM, NTSC. Graphic processing and digital signal generation occurs in 480i, 480p, 576i, 576p, 720p, 1080i, 1080p standards. Supported media file formats: MP3, WMA, MPEG4, Xvid, DivX, MKV, JPEG. The power of the acoustic sound system is 14 W (2×7 W)
provided by two speakers.
NICAM STEREO
audio processing system is used .
The external interface (communication with other devices) is supported by standard input and output connectors: antenna input (RF), AV, component, SCART, RGB, VGA, HDMI x4, MHL, USB x2, Ethernet (RJ-45), Wi-Fi, WiDi, Miracast. There is an output for connecting headphones. To connect a computer or laptop to this TV model, use the VGA connector (D-Sub 15) on the TV body; this interface supports resolutions: 640×480, 800×600, 1024×768, 1280×1024, 1360×768, 1920×1080 . The digital tuner is capable of receiving television channels in the DVB-T, DVB-T2, DVB-C
.
The power consumed by the TV when operating in mains mode is 138 W
.
Power supply B191-101
.
Overall dimensions: with stand 891x590x200 mm, without stand 891x525x85 mm.
TV weight: with stand: 8 kg, without stand: 7 kg
.
Attention! Panel T390HVN01.0 XL
The TOSHIBA 39L4353 LED TV is an expensive and unreliable element. Avoid any impacts on the glass or pressure on the surface of the screen to avoid damage to the LED panel! It is also dangerous if liquid gets on the screen. Sometimes one drop is enough if it flows down the glass onto the cables to make the TV beyond repair.
Recommendations for TOSHIBA 39L4353 users
If the TV malfunctions, it is advisable to inquire about the presence or absence of warranty obligations from the manufacturer (seller) in the accompanying documents (warranty card).
If the TOSHIBA 39L4353 does not turn on or periodically turns off, you should check the sockets and extension cords where the network TV is connected.
If the TOSHIBA 39L4353 does not respond to the remote control, but the control buttons on the panel work, there is a certain possibility that the remote control is faulty (the remote control does not work). It is advisable to check or replace the batteries in it.
If, when watching on-air programs, a no-signal alert (no signal) appears, you should check your antenna or cable equipment. You can verify that the TV is working from other external devices.
If there is no sound only when watching analog television programs, you should check the sound system in the settings. For Russia D/K (6.5 MHz), for European countries B/G (5.5 MHz). In modern TVs, a region is usually selected to set color and sound standards - for Russia “East Europe” (Eastern Europe).
If the TOSHIBA 39L4353 freezes during operation and does not respond to either the remote control or the control panel buttons, sometimes a reboot helps. To do this, you need to completely disconnect the TV from the network by unplugging the cord from the socket, and turn it on again after 10-15 seconds.
If the screen is broken or cracked
The TOSHIBA 39L4353 LED TV screen requires careful handling on the part of users. Glass can crack even if struck lightly by a child's plastic toy. No less dangerous is excessive pressure on the surface of the screen over any part of the area.
If the screen is damaged, the LED panel T390HVN01.0 XL
. In such cases, the price must be clarified at the TOSHIBA Authorized Service Center by phone numbers listed on the official website or in the accompanying documents. In most cases, such repairs are not economically feasible.
For advanced users and craftsmen
In cases where the TOSHIBA 39L4353 does not have a picture, but there is sound, the display backlight often does not work. In LED TVs, the LEDs inside the T390HVN01.0 XL
, and less often the LED driver, are usually faulty. Without backlighting, sometimes you can see a barely noticeable image when certain ambient light hits the screen.
Replacing LEDs requires disassembling the T390HVN01.0
. We do not recommend such work to be done independently by TV owners and craftsmen who do not have experience in repairing LCD panels, especially at home.
If there is no image, but the backlight works, the screen becomes a little brighter when turned on, and with an open TV, the light can be seen through the holes in the panel body. In this case, the T-CON (Timing Controller) board may be faulty, but often the MainBoard 32L4300
.
A software glitch is also possible. The panel may also be faulty - damage to the strips, cables, for example, after moisture gets in. In such cases, first of all, it is necessary to check the panel supply voltage on the LVDS connector, the fuses on the T-CON board or panel strips, as well as the supply and reference voltages for column and row drivers - VGH, VGL, Vcom. If they are within normal limits, then with an oscilloscope you need to track the passage of LVDS signals from MainBoard 32L4300
, as well as synchronizing signals to the loops with drivers.
Flooded LED TV screens can sometimes be restored if significant damage has not occurred in the cables and panel strips.
Instructions and updates
Update file (firmware) and installation instructions:
| File name and description | file size | date |
| Loading order | 586 KB | 2011/9/15 |
| Installation instructions | 448 KB | 2013/9/18 |
| Firmware (T7_1_92_43_01_1.exe) | 148,582 KB | 2015/1/23 |
The file can be downloaded from the manufacturer's website for model 39L4353DB.
We remind users and TV owners once again. Attempts at self-repair can have serious negative consequences, including complete irreparability.