Setting up a Rostelecom set-top box seems to many users to be a very complicated process. In fact, the algorithm of actions is simple and quite within the capabilities of any person, even those far from the world of technology. In this article, we will tell you how to set up the Rostelecom set-top box for your TV, and we will provide detailed instructions with which you will definitely cope with the task.
Rostelecom digital TV is a very convenient thing with a bunch of cool features. For example, the broadcast can be paused, recorded, and viewed on several devices at once. To ensure that using the receiver does not cause you inconvenience in the future, we recommend that you immediately learn to understand its settings. Therefore, put the technician’s phone away for now and take out your set-top box - we’ll connect it ourselves!
Standard connection setup diagrams and equipment
We will tell you how to set up a Rostelecom TV set-top box via a router, because data is received and transmitted via the Internet. First, let's find out what is included in the basic package of the console:
- The device itself;
- Power unit;
- AV cable and tulip wire;
- Rostelecom remote control;
- Cables: network and composite;
- Connection instructions and warranty document.
If you want to watch videos in the best quality, you can request an additional item - an HDMI cable. By the way, this cable can be purchased separately at any time at any hardware store.
To set up a TV via the Rostelecom set-top box, you will first need to connect it to the router:
- The most basic option is an Ethernet cable. Just plug it into both devices and you will be happy;
- You can set up communication via WiFi, but then make sure that Rostelecom offers you an IPTV receiver that supports this feature. By the way, you will also have to buy a suitable router;
- A more expensive option is to buy a special adapter for the socket - PLC.
Additional functions of the set-top box
The most favorite feature that subscribers use most often is Shift support. It makes it possible to stop television broadcasting and continue it at any convenient time.
Rostelecom offers its subscribers about 180 different TV channels. The set-top box analyzes the interests of users and suggests programs that may be useful to them.
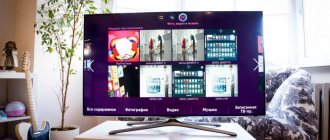
Subscribers are also offered video rental of the most interesting films. You can select them at the top of the screen and purchase them without leaving your couch, using only the DPU. Like this.
How to configure the receiver?
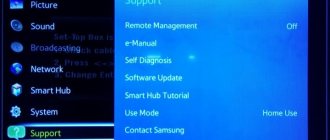
So, you unpacked the IPTV device, turned on the TV, router, and connected everything with cables. Now connect the power supply to the network and wait until the LED lights on the set-top box light up. Now let's try to configure the Rostelecom set-top box on a TV, for example, Samsung:
- Select the connection type on the screen: HDMI or AV Video Input;
- Find a sticker with your username and password on the receiver box. They need to be entered into the form that appears on the screen;
- You may be required to enter a PIN code (if parental controls are enabled) - try four zeros or four ones. If this does not work, contact Rostelecom technical service.
- Done, then the system itself will receive all the settings via the Internet and successfully integrate them into the set-top box.
If you use a third-party router, you will have to do additional configuration:
- Open any browser and enter the IP address of the router in the address bar. It can be found on the box of the device or through the “Control Panel” of the computer in the “Network and Internet” section. Go to “Connection Properties” and click on the “Internet Protocol 4” line. By the way, this IP is most often suitable: 192.168.0.1.
- Next, you need to enter your username/password (also found on the sticker on the box of the router, or try the universal admin/admin pair);
- When the interface expands, find the “Network” section and select “IPTV”;
- In the “IGMP Proxy” form, select the “Enable” line;
- Set the mode to “Bridge”;
- Find Lan 4 port;
- Click "Save".
STB Settings
general information
To connect / "Interactive TV" OJSC "Rostelecom" provides the following STB:
1) Zyxel STB-1001S rev 1
Has the following interfaces: SCART, S/PDIF, Ethernet
2) Zyxel STB-1001S rev 2
Has the following interfaces: RCA (composite), S/PDIF, Ethernet, USB (for connecting a special keyboard, not included in the package)
3) Yuxing YX-6916A
It has the following interfaces: HDMI, RCA (composite), YPbPr (component), S-Video, Ethernet, Audio (optical) Jack, USB.
4) Motorola VIP 1003G
(RCA)
5) Mag 250 Micro
Has the following interfaces: RCA (composite), HDMI, S/PDIF, Ethernet, Audio (optical) Jack, USB
6) SML 282 HD
(Base)
It has the following interfaces: HDMI, RCA (composite), YPbPr (component), Ethernet, Audio (optical) Jack, USB.
Frequently asked questions:
1. Question: What should I do if I always need to enter a PIN code to watch a program?
Solution: It is necessary to increase the current profile access level. The current level is configured in Settings – My Settings – Access Level and can be changed under each profile individually. To upgrade your access level, you must enter your profile PIN.
2. Question: How to quickly delete incorrectly entered characters when using search, password, etc.?
Solution: Use the LEFT button to delete. Solution: Through the menu. In the client application menu Settings - System Settings, select Factory settings and click OK. The set-top box will use the default system settings.
4. Question: How can I change the displayed image (stretch, shrink, etc.)?
Solution: Through the menu. In the client application menu Settings - System Settings, select Video Aspect Ratio. Then go to Screen Proportions and select the required proportions.
More complete information can be obtained from this document (12 MB)
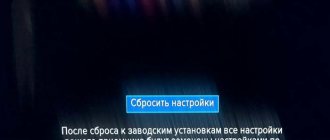
Factory reset
If something goes wrong, read how to reset the Rostelecom TV set-top box to factory settings. Sometimes this simple but effective solution turns out to be very useful.
- Turn on the receiver and click the “Menu” button on the remote control;
- In the window that opens, scroll down the list to the “Def.Settings” item;
- Having highlighted the desired line, click the “Right” key on the remote control;
- Click "OK", then scroll to the line "Save&Quite" and click the "Right" key again;
- Click OK again and wait for the reboot process to complete.
On some devices, rebooting can be done faster - just hold down the ON key on the remote control for 15-20 seconds. After the reboot, you need to enter code 977 and wait until the lights on the case blink 4 times.
If you need to reset to factory settings not the Rostelecom TV set-top box, but the router, just click on the Reset button on the back wall of the router. Hold the key pressed for 15-20 seconds until the lights on the case blink. On some models, the reset key is recessed into the box, so you will have to use a needle to press it.
All reboot methods
There are several options for rebooting a TV device. Usually it is not enough to simply press a button on the remote control. Additional steps are required.
Method 1: from the remote control
This option depends on the specific model you are using and should be described in the device documentation. Here are some cases of how to reboot a set-top box in this way:
- for Rostelecom TV box - press the power button on the remote control for 10 seconds;
- on Apple TV devices - simultaneously press “Menu” and “Down” or “Menu” and “Home” until the light on the device starts blinking;
- for other set-top boxes, see the instructions - this can be by pressing several buttons at the same time or by long pressing a key on the remote control.
Method 2: through the menu
Use the TV menu of the device. Using the remote control, you need to find the “Restart” item. It's usually found in the "main" settings or device options. This action should not cause complications. When you find the desired item, press the select or OK button on the remote control.
Method 3: Disable and Enable
This method of rebooting a digital television set-top box to a TV is also called “hard”. It should be used if the previous two do not work, for example, everything is completely frozen. There is a small chance that such a reset itself will damage something, for example, reduce the resource of the hard drive, if this device has one, or disrupt the settings, so use it only if necessary. Simpler models of consoles tolerate such a reboot more easily and this does not entail any complications.
- If there is a shutdown button on the case and it works, then press it. For example, Rostelecom does not have such a button, so immediately move on to the next point.
- Remove the wire from the outlet and disconnect it from the power supply.
- If you are using any other devices besides the device, then turn them off as well.
- Leave them without power for 10-30 seconds. This is necessary to discharge the capacitors that can maintain power to the memory chips after being disconnected from the network. Only in this case will the console reboot be complete.
- Now perform all the steps in reverse order: connect the other devices that you turned off, then press the device button, if there is such a button. Turn on your TV gadgets using the remote control and see how they work now.
Method 4: Hard reset
If the previous methods did not help, then you need to figure out what causes the problems in the operation of the set-top box. I will tell you about another way to reboot a digital TV set-top box with 20 channels, although this does not mean “reboot” in the usual sense, but resetting the device. Where it leads:
- all data that was in memory will be erased;
- all the settings you made have been reset;
- The device will return to the same condition as after purchase.
Therefore, this action should be performed as a last resort. There are often other ways to fix the problem. But if you need to quickly reload channels on your TV set-top box, and you don’t have valuable data and settings on your device, you can perform a reset:
- Go to the menu or device settings.
- Find the item “Restore and reset” - “Reset settings” or “Restore factory settings”.
- Confirm the action.
- Wait for the operation to complete. Never turn off the TV set-top box while it is resetting.
As you can see, restarting the TV set-top box is a fairly simple action. But even for this, several implementation options are possible; there are important nuances. I am confident that you will complete all the steps described without complications. If the TV set-top box does not return to normal operation, then you need to study the problem deeper, and perhaps contact service.
How to set up display on multiple devices?
If everything suits you, check out how you can set up a Rostelecom set-top box for two devices:
- As we said above, there are 2 types of connection, via HDMI and AV Input cable;
- Connect the main TV using HDMI, and the secondary TV via AV;
- For the third TV, you can use a tulip wire - it also comes with the set-top box.
Make sure your TVs support the required connection types and have the required connectors. Check if the wires are long enough. Then feel free to connect and make settings using the methods described in the previous sections.
If you want to watch different channels on two devices, you will have to buy a second receiver. To set up a second Rostelecom set-top box, use instructions similar to the first. As for routers, they are also usually equipped with at least 2 LAN connectors, so you only need to buy a second Ethernet cable.
Common configuration errors and ways to solve them
In conclusion, let's look at what problems users most often encounter when setting up a Rostelecom receiver.
So, now you know how to set up the Rostelecom IPTV interactive TV set-top box and are familiar with all the possible difficulties. In conclusion, we will give some tips. First, carefully check the integrity of the device’s contents while still in the office. Secondly, carefully study the user manual for connecting, setting up and using the receiver. Thirdly, do not be afraid to contact the support service - there are responsive people who work there and are always ready to help you. Not for free, of course.
Press and hold the "Menu" button on the console's remote control, then go to Settings.
Reset the console. Changing the active slot > Screenshot_20200806-115147.jpg" src="https://ct-itv01.svc.iptv.rt.ru/images/bv8f2rtoldaq8p1ovdog.jpg" width="1000″ border="0″ data-linked-resource -default-alias=»Screenshot_20200806-115147.jpg» data-linked-resource-container-version=»2″ data-location=»ITV Wiki > Reset the set-top box. Changing the active slot > Screenshot_20200806-115147.jpg» data-linked-resource-id=»48170692″ data-linked-resource-version=»1″ data-linked-resource-type=»attachment» data-unresolved-comment-count =»0″ data-linked-resource-content-type=»image/png» data-base-url=»https://wiki.svc.iptv.rt.ru» data-image-width=»1920″ data -image-src=»https://wink.rt.ru/download/attachments/48170691/Screenshot_20200806-115147.jpg?version=1&modificationDate=1596705856597&api=v2″ data-image-height=»1080″ />
Select “Storage and reset” and press “OK” on the remote control
Reset the console. Changing the active slot > Screenshot_20200806-115405.jpg" src="https://ct-itv01.svc.iptv.rt.ru/images/bv8f2utoldaq8p1ovdp0.jpg" width="1000″ border="0″ data-linked-resource -default-alias=»Screenshot_20200806-115405.jpg» data-linked-resource-container-version=»2″ data-location=»ITV Wiki > Reset the set-top box. Changing the active slot > Screenshot_20200806-115405.jpg» data-linked-resource-id=»48170694″ data-linked-resource-version=»2″ data-linked-resource-type=»attachment» data-unresolved-comment-count =»0″ data-linked-resource-content-type=»image/png» data-base-url=»https://wiki.svc.iptv.rt.ru» data-image-width=»1920″ data -image-src=»https://wink.rt.ru/download/attachments/48170691/Screenshot_20200806-115405.jpg?version=2&modificationDate=1596705987889&api=v2″ data-image-height=»1080″ />
Then click “OK” on the item “src=”https://ct-itv01.svc.iptv.rt.ru/images/bv8f31loldaq8p1ovdpg.jpg” width=”1000″ border=”0″ data-linked-resource-default -alias=”Screenshot_20200806-115413.jpg” data-linked-resource-container-version=”2″ data-location=”ITV Wiki > Reset the set-top box. Changing the active slot > Screenshot_20200806-115413.jpg» data-linked-resource-id=»48170696″ data-linked-resource-version=»1″ data-linked-resource-type=»attachment» data-unresolved-comment-count =»0″ data-linked-resource-content-type=»image/png» data-base-url=»https://wiki.svc.iptv.rt.ru» data-image-width=»1920″ data -image-src=»https://wink.rt.ru/download/attachments/48170691/Screenshot_20200806-115413.jpg?version=1&modificationDate=1596706071247&api=v2″ data-image-height=»1080″ />
Follow the screenshots
Reset the console. Changing the active slot > Screenshot_20200806-115419.jpg" src="https://ct-itv01.svc.iptv.rt.ru/images/bv8f34loldaq8p1ovdq0.jpg" width="1000″ border="0″ data-linked-resource -default-alias=»Screenshot_20200806-115419.jpg» data-linked-resource-container-version=»2″ data-location=»ITV Wiki > Reset the set-top box. Changing the active slot > Screenshot_20200806-115419.jpg» data-linked-resource-id=»48170697″ data-linked-resource-version=»2″ data-linked-resource-type=»attachment» data-unresolved-comment-count =»0″ data-linked-resource-content-type=»image/png» data-base-url=»https://wiki.svc.iptv.rt.ru» data-image-width=»1920″ data -image-src=»https://wink.rt.ru/download/attachments/48170691/Screenshot_20200806-115419.jpg?version=2&modificationDate=1596706143040&api=v2″ data-image-height=»1080″ />
Reset the console. Changing the active slot > Screenshot_20200806-115428.jpg" src="https://ct-itv01.svc.iptv.rt.ru/images/bv8f375oldaq8p1ovdqg.jpg" width="1000″ border="0″ data-linked-resource -default-alias=»Screenshot_20200806-115428.jpg» data-linked-resource-container-version=»2″ data-location=»ITV Wiki > Reset the set-top box. Changing the active slot > Screenshot_20200806-115428.jpg» data-linked-resource-id=»48170698″ data-linked-resource-version=»1″ data-linked-resource-type=»attachment» data-unresolved-comment-count =»0″ data-linked-resource-content-type=»image/png» data-base-url=»https://wiki.svc.iptv.rt.ru» data-image-width=»1920″ data -image-src=»https://wink.rt.ru/download/attachments/48170691/Screenshot_20200806-115428.jpg?version=1&modificationDate=1596706123981&api=v2″ data-image-height=»1080″ />
After this, all settings will be reset. The console will reboot and you will need to go through the initial setup.
Rostelecom digital television is a convenient service that provides many additional functions. You can watch videos not only on TV, but also on your computer. The equipment allows you to stop playback, record TV shows, etc. However, proper operation is impossible without setting up the Rostelecom TV set-top box.
Contents and connection diagram of the set-top box
The equipment set includes:
- TV set-top box;
- power unit;
- AV wire and tulip cable for connection;
- Rostelecom remote control for set-top box;
- network and composite cables;
- setup instructions;
- warranty card.
Depending on the client's wishes, the set may include an HDMI cable. It allows you to get high quality images. An additional feature is connection via a computer's HDMI connector. If the cable is not included in the package, it can be purchased separately.
How to connect the set-top box to the router? There are 3 connection options.
- Ethernet. The most reliable connection type. Involves the use of cables, which is not always convenient.
- Wi-Fi. If you plan to choose this option, you should notify the supplier. Not all Rostelecom IPTV set-top boxes provide this feature.
- PLC. The connection type allows you to get rid of unnecessary wires using adapters that are inserted into sockets. The best option if there are several devices in the house, but not the most budget-friendly one.
If you plan to connect a WiFi router to your TV via a set-top box, you will have to buy the receiver along with an adapter. Such equipment is not available for rent.
There are labels under all the connectors on the set-top box, which makes it easier to find the right socket during installation. Standard cables are connected through the AV jack and audio channels, an HDMI cable is connected through the HDMI jack.
Which console to choose
For 2021, Rostelecom offers only one option - “Standard” costing 3,590 rubles, which supports viewing HD video. Previously, you could purchase a “Premium” option, which had a built-in 500 GB hard drive. You can buy an IPTV RT HD Standart device not only in Rostelecom offices, but also in large equipment stores - M-Video, Media Markt, Yulmart, Eldorado, DNS, Online Trade.
You can connect the device to the Internet without wires or additional devices; it is sold with a WiFi module. But the wireless connection is not as reliable due to the high risk of interference.
- weight 0.5 kg;
- black color;
- controlled by a remote control on two AAA batteries, batteries are sold included;
- 1 LAN, 1 HDMI output, 1 USB 2.0 port, 1 3.5 mm audio/video output;
- the on-screen menu is Russified;
- maximum resolution 1920 x 1080 pixels (Full HD).
Is it possible to do without equipment?
The digital television service from Rostelecom implies the presence of appropriate equipment in the user’s home. Some TV models do not require any additional devices, but you will not be able to connect to the service of the Rostelecom provider without a set-top box, purchased or rented.
In addition, using digital television from Rostelecom requires high-speed Internet. If you have not used the Internet, when connecting to digital television, you will still have to pay for it and purchase a TP-Link router from Rostelecom.
How to set up a Rostelecom set-top box
After connecting the cables and the power supply, the LEDs should light up. When loading, the TV will ask you to select an image source. Depending on the connection type, click "AV Video Input" or "HDMI". If there are several HDMI connectors, you must select the one to which the set-top box is connected.
The device receives all settings via the Internet, so all you have to do is enter the password and login from the contract. The information is duplicated on a sticker on the console. After confirmation, the receiver may prompt you to enter a PIN code. This happens when parental controls are enabled. Most often, the combination 0000 or 1111 is suitable. If the set-top box produces an error, you will have to contact technical support.
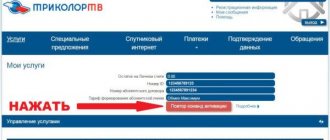
To disable the PIN code request after activation, go to settings, select “Parental Controls” and click on the “18+” line.
Pre-configuring the router
If you are using old or third-party equipment, you will need to configure the Rostelecom TV set-top box through a router. The interface of models from different manufacturers may differ slightly, but in any case you should follow the same algorithm.
- Enter the router's IP address in your browser. The most common combination is 192.168.0.1. Otherwise, you can find the address on a sticker on the router, in the contract, or in the “Network and Internet” section in the control panel. The required combination is located in the connection properties in the “Internet Protocol 4” line.
- Enter login and password. If you have forgotten the details, try the "Admin" combination for both fields.
- Select the “Network” section, and then the “IPTV” tab.
- Change the value in the "IGMP Proxy" field to "Enable".
- In the line below, set the mode to “Bridge”.
- Select the “LAN-4” port.
- Save your changes.
Now you can proceed to connecting the receiver.
View on multiple devices
When connected to one set-top box, all TVs and computers will broadcast one program. You will need multiple devices to watch different channels. How to connect a Rostelecom set-top box to a router if there are two receivers? Routers have multiple LAN connectors, so there won't be any problems.
How to watch Rostelecom IPTV channels without a set-top box for free
It is possible to set up IPTV on an LG Smart TV without a set-top box. This can be done with a built-in operating system and application store. The main condition is that the device must have Internet access.
- Click on the "Home" or "Smart" button.
- Launch Smart World.
- Through the search bar or the popular applications section, find the SS IPTV utility.
- Complete the registration procedure or enter your ID and password.
- Allow the program to access additional features.
- Launch the utility through the applications menu.
- To download a playlist, select Settings and go to the General tab.
- Click on the "Get code" button. It must be entered on the official application page. The code is valid for 24 hours.
- After adding the device to the resource, select the playlist on your computer and save it.
If you did everything correctly, a “My Playlist” button will appear on the main screen of the application. After the transition, you will see a list of available channels.
More on the topic
Tariff “Social” Payment by bank card How to read a message on a TV Smolensk Internet in rural areas Programming the remote control: what do you need to know?
Performed if the android does not boot and there is no way to reset it through the settings. To do this, you need to press the reset button with a blunt end (not a needle or a pin), you should hear a characteristic click. While holding the button down, turn on the android's power and release the button.
After a few seconds, one of two system recovery menus will appear on the screen:
or second option:
- Methods for setting up IPTV Rostelecom
In the first option (dark gray background), the reset can be done using the mouse by selecting “wipe data/factory reset” and then, in the next menu, select “Yes—delete all user data”. After a few seconds, the main menu will appear again, in which you need to select “Reboot system now”. The first boot after the reset lasts longer than usual, the first few minutes of operation after the reset the Android may slow down. Instructions for setting up the Android after flashing the firmware or after resetting the settings.
If you have the second option of the recovery menu (black background), then to reset you will most likely need to connect a USB keyboard, since mice are usually not supported in it. In this case, you need to turn on Android with an already connected keyboard. Moving through the menu is carried out with the up/down arrows, selection or return - with the right/left arrows or “Enter”. To reset, you need to select “wipe data/factory reset” and then, in the next menu, “Yes”. After a few seconds, the main menu will appear again, in which you need to select “Reboot system now”. The first boot after the reset lasts longer than usual, the first few minutes of operation after the reset the Android may slow down. Instructions for setting up the Android after flashing the firmware or after resetting the settings.
- home
- News
- Recommendations for users
- Setting up hardware and software
- "Multiscreen" from Rostelecom
- Router settings for FTTB
- FTTC (VDSL) technology
- ADSL modem settings
- Setting up universal routers
- Automatic configuration utilities
- Domolink TV/Interactive TV
- TV on computer
- Open TV
- FTTB technology
- ADSL technology
- Setting up security software
- Dynamic DNS service
- Setting up dial-up in different OS
- Setting up PPPoE in different OS
- VPN technology
- Zone /local. Subscriber instructions (archival information)
- Domolink.Mobi
- Personal antivirus
- Answers on questions
- Online Security
- Internet resources
- Services and tariffs
- Search
- Mailing list
- Write a letter to the technical support service of the Kaluga Branch
Contact numbers:
Attention, dear registered users! Before contacting, be prepared to name your personal account and account
Troubleshooting
During the process of setting up and using the set-top box, the user may encounter a number of errors. In most cases, problems can be resolved on your own. First, check that the connection is correct and try rebooting the receiver. Press and hold the "Power" button on the remote for 10 seconds. If this does not help, move on to the next steps.
Control conflict between set-top box and TV
If the remote control simultaneously sends a signal to both the TV and the receiver, you need to change the control code for the TV set-top box. This is done as follows.
- Press the "Power" and "OK" buttons simultaneously. Hold for 2-3 seconds.
- Dial any of the combinations: 3220, 3221, 3222, 3223 or 3224.
- If the problem persists, try entering a different code.
After loading a cartoon appears
The error indicates a connection to a different connector. Most often, socket 4 is used for correct operation of the receiver. Try connecting your device to it. If the problem cannot be resolved, check your router settings. The port is indicated in the “IPTV” tab.
IP Address Error Message
An error with a black screen background occurs either due to problems on the part of the provider, or due to incorrect configuration. First, make sure the cables are intact. Try connecting them again. If all else fails, contact a technical support representative. If configured correctly and there is a connection to the Internet, most often the problem lies in damaged wires.
Server communication error message: "Loading error"
The message “Server not found” indicates a problem on the provider’s side. If a problem occurs, you should call technical support.
Wired interface not available
The error occurs due to problems with the Internet. Reboot the router and make sure the wires are intact. Most often, after these actions, the connection is restored.
Reset
To return the remote control to factory settings, hold down the “Power” and “OK” buttons simultaneously for 2-3 seconds. After turning on the programming mode, enter the service combination - 977. If you did everything correctly, the LED of the “Power” button will blink 4 times.
Many users of Rostelecom digital interactive television who use Rostelecom IPTV STB RT-HD Standart set-top boxes know that this set-top box is a copy of the MAG-250 micro set-top box from Informir. And MAG-250 is already a full-fledged home media center, with a bunch of goodies,
Do I need to reset the settings after a reboot?
If the user saved the settings correctly after making changes, there is no need to re-enter the data. If failures occur during the reboot and the entered information is deleted, this may indicate problems with the Rostelecom router. To solve the problem you can take the following steps:
- try entering the settings from another browser (the problem may disappear);
- reset your router to factory settings;
- update the firmware via the official website.
As a rule, these actions are sufficient to restore normal operation of the device.
How to flash the Rostelecom IPTV STB RT HD set-top box in Infomir MAG-250.
The procedure for flashing the Rostelecom IPTV STB RT HD set-top box into Infomir MAG-250 is not complicated, but there are several pitfalls, which I think should be mentioned right away:
1. Before flashing the STB RT HD set-top box, you will need to find a playlist of Rostelecom channels for your Rostelecom branch. For example, here are Rostelecom playlists. Otherwise, you will not be able to watch Rostelecom digital television.
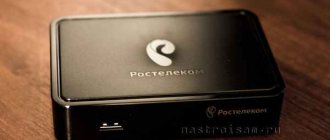
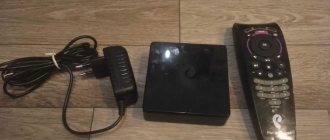
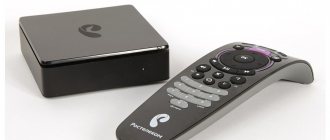
2. If you have a Rostelecom remote control, like this:
Then you need to flash the Rostelecom IPTV STB RT HD set-top box with modified firmware, since this remote control will not be able to work with standard firmware from Infomir, since it does not have some of the necessary buttons.
3. If you want the Internet and digital television on the Rostelecom IPTV STB RT-HD set-top box at the same time, then in most cases you will not be able to do this due to the technical implementation of the connection. This feature is available on routers that support UDP-to-HTTP Proxy.
4. You will not be able to use Rostelecom interactive digital television services, because they are only available on Rostelecom firmware.
Firmware for TV set-top box Rostelecom IPTV STB RT HD
Standard firmware for MAG-250 (regular remote control) - link. Modified firmware for MAG-250 (Rostelecom remote control) - link.
Resetting the Rostelecom IPTV STB RT HD set-top box to factory settings.
Before changing the firmware of the STB RT HD set-top box from Rostelecom to Infomir, it is advisable to reset the set-top box settings to the factory settings. To do this, turn on the set-top box and press the Menu button on the remote control. The BIOS of the STB RT HD set-top box will open:
Select Def. Settings and press the button to the right (>). The following message should appear:
Click OK. Next, select Exit & Save:
Press the right button (>). The following message should appear:
Press the OK button and wait for the Rostelecom STB RT HD set-top box to reboot.
Firmware for Rostelecom IPTV STB RT HD TV set-top box:
1. Download the MAG250 firmware files - Bootstrap and imageupdate and put them in one folder - let it be the mag250 folder on the C:\ drive. You should also put the mcast.exe and DualServer files there.
1. Turn on the IPTV STB RT-HD Standart set-top box, press and hold down the Menu button on the control panel.
2. We get into the BIOS of the STB RT-HD set-top box:
Select the Upgrade Tools section.
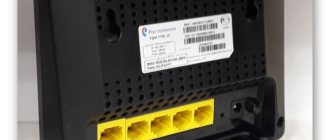
3. Connect the computer to the set-top box using a LAN cable. Cable crimping is normal, straight.
4. On the network card of your computer, write the IP address 192.168.1.1 and the mask 255.255.255.0.
5. Run dualserver.exe. To do this, you need to launch the command line (Win + R and in the Open line, enter cmd, click OK).
6. In the Windows command line, write the command C:\mag250\dualserver -v . The server should be up and running. Minimize (not close) the command line window.
7. Launch the mcast.exe program by double clicking the mouse. She will ask you to select the network interface through which we will flash the IPTV STB RT-HD:
Select 192.168.1.1, Local Area Connection. Press the Select button. The following window will open:
Here you need to change the broadcast address of the first stream (Stream 1) to the one that listens to STB RT-HD - 224.50.0.70:9000. We do not change the address of the second stream (Stream 2). Press both Start buttons.
7. On the MAG-250 set-top box, select the MC Upgrade item and press the > button (right):
After this, the STB RT-HD set-top box will start catching Bootstrap at the address of the multicast stream:
If everything is normal, the IPTV STB RT-HD set-top box will first display the message Reception of an image is started. If the firmware downloads successfully, you will see the message Writing the image to flash:
If the firmware is successfully written to the STB RT-HD memory, the set-top box will display the message Writing image to flash successfull:
After this, the Rostelecom STB RT-HD set-top box should reboot with the new firmware.
Attention! It will most likely not be possible to reflash the Rostelecom STB RT-HD to the MAG-250 via USB - you will constantly receive the error File mag250/imageupdate not present, even though the file is in the folder, the flash drive is formatted in FAT32 and its size is no more than 8GB. Therefore, flash Rostelecom STB RT-HD via Multicast.
Most TVs connected to the Interactive TV service from Rostelecom use a special set-top box. It has special software installed for watching and controlling television.
As with any other device, no one is immune from errors and performance problems. In such cases, resetting the receiver or remote control to factory settings may help.
We propose to consider this procedure, as well as all its features.
What is the new Wink TV service interface?
Wink is constantly evolving, and any changes in his appearance are immediately noticeable. These updates are provided to improve the performance of the application. But there is also misunderstanding on the part of the company’s clients. Nobody was ready for such radical changes.
The Wink interface was developed by Restream, which is a structural division of RTK. This is a more advanced application that allows you to watch not only TV programs from one account, but also have access to an online cinema. Moreover, you can watch all this both on TV and on a laptop or phone. If your existing set-top box supports Wink functionality, it will be updated automatically.
Resetting the Rostelecom set-top box
The set-top box is returned to its original form through the menu of the set-top box operating system. To do this you need to have a working remote control. The procedure is quite simple, so every user can handle it in a few seconds.
It is recommended to adhere to the following algorithm:
- Go to the main menu of the console with sections.
- Open the "System Settings" section. and find the corresponding “Factory settings” item in it. Click on it.
- A separate window will appear where the system will warn you about the consequences of the reset. If everything suits you, then click on “Agree”.
Resetting the Rostelecom remote control to factory settings
Much more often, users feel the need to reset the remote control itself, rather than the set-top box. This is true if the receiver has stopped responding to the device, and the remote control itself continues to work (the light blinks when pressed). You need to do the following:
- Turn on the TV and set-top box.
- Hold together the “POWER” (turn on the device) and “OK” buttons on the remote control.
- A special mode is activated for advanced users who want to program the remote control. It includes many commands, one of which is factory reset. Enter the code “977“ on the remote control numbers.
- If everything is done correctly, the “POWER” button will automatically blink 4 times. This indicates a successful procedure.
This should save you from all problems associated with the operation of the remote control. If this does not help, then it is likely that the problem lies in the technical part and not the software part. In this case, you can contact the specialists of PJSC Rostelecom or purchase a new device.
How to restore the remote control
After resetting the settings, you need to pair these devices again. This is again done through the programming mode. Use the following instructions:
- Turn on the TV and set-top box.
- Press the “OK” and “TV” buttons on the remote control.
- If the LED blinks 2 times, then the programming mode has been successfully launched. Enter code “991“.
- Now you need to press the channel switch button one by one until the set-top box responds, namely, turns off the TV. If this happens, then press the “OK” button to save the settings.
The automatic mode of reprogramming the remote control is described above. The system itself selects all the codes from the database until it finds one suitable for the job. You can carry out this procedure yourself, but you need to know the code suitable for your TV model. Full table of combinations:
The manual procedure is as follows:
- Turn on the TV and set-top box.
- Hold the “TV” and “OK” buttons on the remote control together until the LED blinks 2 times.
- Enter the code found in the table on the official website.
- Try changing the channel or turning off the TV. If everything works, save the settings by pressing “OK” for a couple of seconds.
Rostelecom set-top box does not respond to the remote control: reset and re-binding
Hi all!
Today I encountered a problem when the Rostelecom remote control does not change channels on the TV, and the volume also does not work. On the Internet, many people complain about other buttons not working. In 99% of cases, the problem occurs due to incorrect binding - the remote control has a large number of programs that work with thousands of TVs, and some programs are similar, but work differently. As a result, with automatic setup, you could link, for example, your LG TV with a program for Samsung - these software may be similar, but some buttons will work and some will not. We need to do the following:
- Reset the remote control configuration.
- Rebind it with automatic configuration.
- If the problem persists, then reset it again and do the binding manually or using codes for the TV manufacturers.
Next I will tell you how to do this. If it breaks down and stops responding to some buttons, then you need to disassemble it and clean it - see the last chapter. This also applies to “Remote blocking”, which appears simply due to the displacement of the rubber band or buttons.
SPECIALIST HELP! If you have any questions or encounter any difficulties, write in the comments - I will try to help you.
- STEP 1: Reset
- STEP 2: Linking
- The set-top box does not respond or the channels are switching simultaneously
- How to disassemble the remote control from Rostelecom
STEP 1: Reset
If the Rostelecom remote control does not work, and you have already linked it before, then first of all, let’s reset the settings, to do this you need to hold down two buttons on the remote control: “TV” and the round “OK” button.
You need to press until the light on the remote control blinks exactly 2 times. After this, you need to enter three numbers one by one:
Then the light will blink four more times - this will mean that you have reset the configuration to factory settings. Now you need to configure it again, see the next chapter.
STEP 2: Linking
If the set-top box or TV does not respond to the remote control, then after resetting you can re-pair the devices. This can be done in 3 ways:
ATTENTION! If one of the methods does not work, try the next one.
ATTENTION! As I said earlier, if after this binding you have problems when some buttons refuse to work, then reset again, but use manual settings.
- Be sure to turn on the TV or set-top box you will be working with.
- Press “OK” and “TV” for 3 seconds.
- As soon as the light blinks 2 times, enter the code:
- Watch the indicator, it should blink 2 times.
- Click on “TV”.
- The light will blink two more times.
- Find the “up arrow” (CH) and click on it.
- This time, the remote should blink exactly once and your device should turn off. If it turns off, then click “OK”; if not, then wait about 2 seconds and again click on the up arrow. The idea is simple - you switch between different binding modes until you find the right program.
If this method does not work, try the next one.
- Turn on the set-top box or TV.
- Press and hold “TV” for three seconds.
- The indicator should blink 2 times.
- Release your finger from the “TV” button.
- Hold down the key and do not release - depending on the manufacturer of your TV (look at the table below).
- At the very end, the device should turn off - this will mean that the binding has occurred.
If nothing happens or you did not find your manufacturer in the table, perform manual configuration.
- Turn on the playback device.
- Just like with automatic binding, hold down “TV” for 3 seconds, as soon as the indicator blinks twice, release it.
- Enter 4 numbers from the table. As you can see, there are several of them, so you need to enter the code one by one until your TV turns off. As soon as it turns off, click on “TV”.
- If you cannot find the company you need, take a look at the table below.
The set-top box does not respond or the channels are switching simultaneously
By the way, sometimes the problem can manifest itself like this: after binding, the set-top box does not respond to the remote control. The problem is due to the fact that the TV and the set-top box for the remote control have the same program code.
- We turn on the set-top box and TV.
- Now we simultaneously click on the “OK” button and on the one with which the set-top box is turned on.
- As soon as the diode blinks twice, enter one of the codes:
3220 3221 3222 3223 3224
- After that, we check whether this problem has disappeared or not. If it has not disappeared, then we carry out the same steps, but now enter the next 4 digits.
How to disassemble the remote control from Rostelecom
The remote control is held solely by latches. The main lock is located on the bottom of the device - to remove the top cover, you need to pry or push the top cover itself towards the buttons. You can also try to pry lightly in this place with a knife or screwdriver. But be careful, as the plastic is quite fragile.
To eliminate common malfunctions, clean it from dust and wipe it with a dry cloth. If a button does not work, try cleaning the contact on the main board - use an eraser to do this. You can also lightly scrape the contact with something sharp and metallic, such as a needle or pin, but be careful. At the very end, we put the remote control back together and check it.